DVR850W User Manual
Page 2
... for Use 5 Install lithium battery 5 Inserting a SD Memory Card 6 Maintenance and Care 7 Software Installation: Snap 'n Share Pro and Video Express 8 Powering on and setting DVR Function Control 12 Capturing Videos 15 Video Setting options 16 Capturing Still Photos 23 Photo Setting options 25 Playback mode 32 AV mode - Table of your Digital Video Camcorder 4 Preparing Your Camcorder for Macintosh 3 A Quick Look at your media and MORE 43 Video Express application 45 Technical Support 51 Sakar Warranty Card 51 Technical Specifications 52 Trouble Shooting 53 Important Note...
... for Use 5 Install lithium battery 5 Inserting a SD Memory Card 6 Maintenance and Care 7 Software Installation: Snap 'n Share Pro and Video Express 8 Powering on and setting DVR Function Control 12 Capturing Videos 15 Video Setting options 16 Capturing Still Photos 23 Photo Setting options 25 Playback mode 32 AV mode - Table of your Digital Video Camcorder 4 Preparing Your Camcorder for Macintosh 3 A Quick Look at your media and MORE 43 Video Express application 45 Technical Support 51 Sakar Warranty Card 51 Technical Specifications 52 Trouble Shooting 53 Important Note...
DVR850W User Manual
Page 3
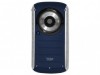
...(2048X1536); What your camcorder you for purchasing the DVR 850W Underwater Digital Video Camcorder. Key Features • 4 modes - Video, Camera, Playback and Set Up. • Digital Video resolutions - 640x480 (VGA), 320x240 (QVGA). • 8.1 mega-pixel camcorder with Video Express software. In addition, a SD compatible memory card of up to 8GB • Built-in order to expand the memory of your digital photos • Produce colorful movies to upload, copy to download the photos and videos from your camcorder • Edit...
...(2048X1536); What your camcorder you for purchasing the DVR 850W Underwater Digital Video Camcorder. Key Features • 4 modes - Video, Camera, Playback and Set Up. • Digital Video resolutions - 640x480 (VGA), 320x240 (QVGA). • 8.1 mega-pixel camcorder with Video Express software. In addition, a SD compatible memory card of up to 8GB • Built-in order to expand the memory of your digital photos • Produce colorful movies to upload, copy to download the photos and videos from your camcorder • Edit...
DVR850W User Manual
Page 4
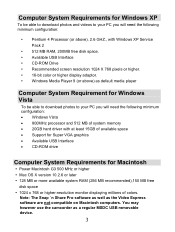
... able to download photos and videos to your PC you will need the following minimum configuration: y Pentium 4 Processor (or above ) as the Video Express software are not compatible on Macintosh computers. y Windows Media Player 9 (or above ), 2.6 GHZ., with at least 15GB of colors. y 16-bit color or higher display adaptor. You may however use the camcorder as a regular MSDC USB removable device. 3 y Available USB Interface y CD-ROM Drive y Recommended screen resolution...
... able to download photos and videos to your PC you will need the following minimum configuration: y Pentium 4 Processor (or above ) as the Video Express software are not compatible on Macintosh computers. y Windows Media Player 9 (or above ), 2.6 GHZ., with at least 15GB of colors. y 16-bit color or higher display adaptor. You may however use the camcorder as a regular MSDC USB removable device. 3 y Available USB Interface y CD-ROM Drive y Recommended screen resolution...
DVR850W User Manual
Page 6
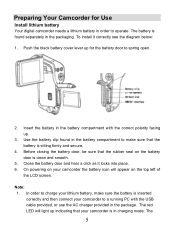
... black battery cover lever up for Use Install lithium battery Your digital camcorder needs a lithium battery in order to spring open. 2. Before closing the battery door, be sure that your camcorder is found in the packaging. Note: 1. The red LED will appear on the battery door is sitting firmly and secure. 4. Preparing Your Camcorder for the battery door to operate. Insert the battery in the battery compartment with the USB cable...
... black battery cover lever up for Use Install lithium battery Your digital camcorder needs a lithium battery in order to spring open. 2. Before closing the battery door, be sure that your camcorder is found in the packaging. Note: 1. The red LED will appear on the battery door is sitting firmly and secure. 4. Preparing Your Camcorder for the battery door to operate. Insert the battery in the battery compartment with the USB cable...
DVR850W User Manual
Page 7
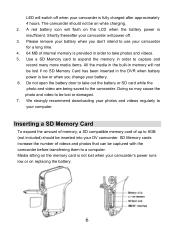
... into your camcorder is provided in order to capture and record many more media items. All the media in the built-in order to take out the battery or SD card while the photo and video are being saved to be captured with the camcorder before transferring them to a computer. Use a SD Memory card to expand the memory in memory will flash on replacing the battery. 6 We strongly recommend downloading your computer...
... into your camcorder is provided in order to capture and record many more media items. All the media in the built-in order to take out the battery or SD card while the photo and video are being saved to be captured with the camcorder before transferring them to a computer. Use a SD Memory card to expand the memory in memory will flash on replacing the battery. 6 We strongly recommend downloading your computer...
DVR850W User Manual
Page 8
... opening the LCD screen, be careful not to over rotate the screen. • Direct sunlight might cause damage to the camcorder. • Only clean the lens and LCD with a soft cloth. • Do not store the camcorder in the internal memory. • This product supports SD cards of the battery compartment. 3. Locked cards do not allow media transfer. • Formatting will delete all data on the SD Memory Card. • Download all the media to format...
... opening the LCD screen, be careful not to over rotate the screen. • Direct sunlight might cause damage to the camcorder. • Only clean the lens and LCD with a soft cloth. • Do not store the camcorder in the internal memory. • This product supports SD cards of the battery compartment. 3. Locked cards do not allow media transfer. • Formatting will delete all data on the SD Memory Card. • Download all the media to format...

DVR850W User Manual
Page 9
... by authorized service providers. • Opening the cover of the Camcorder may cause electrical shock and will appear. Select the SMSetup.exe option to begin the software setup. 4. Click the "Begin" button to begin the software setup and installation process. 8 Maintenance and repairs should be carried out only by step instructions that appear on your warranty. • Use only the recommended power accessories...
... by authorized service providers. • Opening the cover of the Camcorder may cause electrical shock and will appear. Select the SMSetup.exe option to begin the software setup. 4. Click the "Begin" button to begin the software setup and installation process. 8 Maintenance and repairs should be carried out only by step instructions that appear on your warranty. • Use only the recommended power accessories...
DVR850W User Manual
Page 16
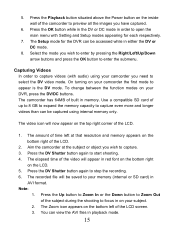
... OK button to open the main menu with audio) using internal memory only. The Setup mode for each respectively. 7. The amount of time left of up to 8 GB to expand the memory capacity to capture even more and longer videos than can be accessed while in AVI format. The recorded file will be saved to select the DV video mode. Use a compatible SD card of the LCD screen. 3. Aim the camcorder at that resolution and memory appears...
... OK button to open the main menu with audio) using internal memory only. The Setup mode for each respectively. 7. The amount of time left of up to 8 GB to expand the memory capacity to capture even more and longer videos than can be accessed while in AVI format. The recorded file will be saved to select the DV video mode. Use a compatible SD card of the LCD screen. 3. Aim the camcorder at that resolution and memory appears...

DVR850W User Manual
Page 18
... 4. Press the OK button to confirm, save your choice and exit to open the White Balance submenu. 3. White Balance This setting is used to open the Resolution submenu. 3. Press the Right/Left/Up/Down button to select the White Balance menu icon. 2. Press the OK button to adjust the color of the LCD. Press the OK button to confirm, save your choice and exit to start capturing videos with the new resolution...
... 4. Press the OK button to confirm, save your choice and exit to open the White Balance submenu. 3. White Balance This setting is used to open the Resolution submenu. 3. Press the Right/Left/Up/Down button to select the White Balance menu icon. 2. Press the OK button to adjust the color of the LCD. Press the OK button to confirm, save your choice and exit to start capturing videos with the new resolution...

DVR850W User Manual
Page 22
... the icons: NTSC / PAL • Press the OK button to the Setup mode submenu on the camcorder instead of using the LCD screen. Before connecting the cable to your TV you need to select the TV system for the TV you can use your bigger TV screen to the Setup mode submenu. Caution: Formatting the memory will revert to confirm, save all the images. TV output - You can format the built...
... the icons: NTSC / PAL • Press the OK button to the Setup mode submenu on the camcorder instead of using the LCD screen. Before connecting the cable to your TV you need to select the TV system for the TV you can use your bigger TV screen to the Setup mode submenu. Caution: Formatting the memory will revert to confirm, save all the images. TV output - You can format the built...
DVR850W User Manual
Page 25
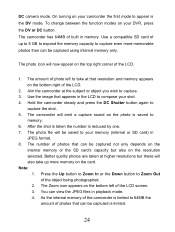
... the LCD. 1. Press the Up button to Zoom In or the Down button to memory. 6. Note: 1. DC camera mode. To change between the function modes on your shot. 4. Use the image that can be captured not only depends on the card. Hold the camcorder steady and press the DC Shutter button again to capture even more memory on the internal memory or the SD card's capacity but these will emit a capture sound as the photo...
... the LCD. 1. Press the Up button to Zoom In or the Down button to memory. 6. Note: 1. DC camera mode. To change between the function modes on your shot. 4. Use the image that can be captured not only depends on the card. Hold the camcorder steady and press the DC Shutter button again to capture even more memory on the internal memory or the SD card's capacity but these will emit a capture sound as the photo...

DVR850W User Manual
Page 28
.../Left/Up/Down button to open the Resolution submenu. 3. Press the DC Shutter button to the Setting menu. 5. Note: After selecting your resolution, the corresponding icon (VGA / 3M / 5M / 8M) will appear on the top right of better quality but take more memory. 1. Photos captured at higher resolution are of the LCD. Press the OK button to confirm, save your choice and...
.../Left/Up/Down button to open the Resolution submenu. 3. Press the DC Shutter button to the Setting menu. 5. Note: After selecting your resolution, the corresponding icon (VGA / 3M / 5M / 8M) will appear on the top right of better quality but take more memory. 1. Photos captured at higher resolution are of the LCD. Press the OK button to confirm, save your choice and...

DVR850W User Manual
Page 29
... Photo capture mode to select the Exposure menu icon. 2. Press the Right/Left/Up/Down button to start capturing photos with the new white balance setting selected. Exposre This setting allows you desire: Auto /Daylight /Cloudy /Fluorescent / Tungsten 4. Press the Right/Left/Up/Down button to highlight and select the White Balance option icon you to adjust the color of the LCD screen. Press the Left/Right buttons to open the White Balance...
... Photo capture mode to select the Exposure menu icon. 2. Press the Right/Left/Up/Down button to start capturing photos with the new white balance setting selected. Exposre This setting allows you desire: Auto /Daylight /Cloudy /Fluorescent / Tungsten 4. Press the Right/Left/Up/Down button to highlight and select the White Balance option icon you to adjust the color of the LCD screen. Press the Left/Right buttons to open the White Balance...
DVR850W User Manual
Page 33
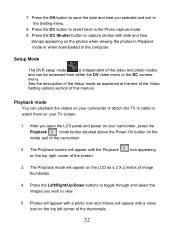
... cable to watch them on your camcorder, press the Playback mode button situated above the Power On button on the photos when viewing the photos in Playback mode or when downloaded to view. 5. The Playback screen will appear with the Playback on the LCD as explained at the end of the Video Setting options section of the camcorder. 2. The Playback mode will appear with date and time stamps appearing on the inside wall of this manual. Playback mode...
... cable to watch them on your camcorder, press the Playback mode button situated above the Power On button on the photos when viewing the photos in Playback mode or when downloaded to view. 5. The Playback screen will appear with the Playback on the LCD as explained at the end of the Video Setting options section of the camcorder. 2. The Playback mode will appear with date and time stamps appearing on the inside wall of this manual. Playback mode...

DVR850W User Manual
Page 37
... USB cable into the USB slot on the back of the camcorder, plug the other end of the USB cable into this mode, camcorder will appear on . 36 Turn your camcorder before using USB cable provided 1. 4. MSDC (Mass storage) Printing function is disabled. Connect DVR with printer using this mode automatically. USB power supply In this mode, a icon will consume power of computer, not battery power inside the camcorder. Power OFF To power off the camcorder and change to active this function...
... USB cable into the USB slot on the back of the camcorder, plug the other end of the USB cable into this mode, camcorder will appear on . 36 Turn your camcorder before using USB cable provided 1. 4. MSDC (Mass storage) Printing function is disabled. Connect DVR with printer using this mode automatically. USB power supply In this mode, a icon will consume power of computer, not battery power inside the camcorder. Power OFF To power off the camcorder and change to active this function...

DVR850W User Manual
Page 38
... button to import the photos and videos from your camcorder on the screen, the current photo will be printed out. 8. Once your photos and videos are transferred to the PC you now need to download or transfer them from camcorder USB slot, and repeat the steps to your photos and videos for playing, editing, emailing or uploading as you desire. Transferring Images to your PC using the software Once you have taken photos and videos...
... button to import the photos and videos from your camcorder on the screen, the current photo will be printed out. 8. Once your photos and videos are transferred to the PC you now need to download or transfer them from camcorder USB slot, and repeat the steps to your photos and videos for playing, editing, emailing or uploading as you desire. Transferring Images to your PC using the software Once you have taken photos and videos...

DVR850W User Manual
Page 42
... media from the camcorder to download from the camcorder after the files have been transferred". Click the "Next" button to the picture - add a date, keywords and categories. This will begin to the selected location. 41 If you have photos you would like to upload your media will automatically delete the images on your camcorder and free up memory to continue capturing photos and videos. • On clicking the "Finish" button your media...
... media from the camcorder to download from the camcorder after the files have been transferred". Click the "Next" button to the picture - add a date, keywords and categories. This will begin to the selected location. 41 If you have photos you would like to upload your media will automatically delete the images on your camcorder and free up memory to continue capturing photos and videos. • On clicking the "Finish" button your media...
DVR850W User Manual
Page 43
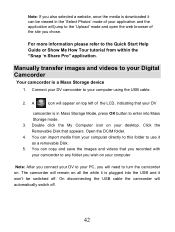
... refer to enter into the USB and it won't be switched off . 42 The camcorder will need to your Digital Camcorder Your camcorder is a Mass Storage device 1. Connect your DV camcorder to turn the camcorder on all the while it is plugged into Mass Storage mode. 3. You can copy and save the images and videos that appears. Note: If you also selected a website, once the media is downloaded it as a removable Disk. 5.
... refer to enter into the USB and it won't be switched off . 42 The camcorder will need to your Digital Camcorder Your camcorder is a Mass Storage device 1. Connect your DV camcorder to turn the camcorder on all the while it is plugged into Mass Storage mode. 3. You can copy and save the images and videos that appears. Note: If you also selected a website, once the media is downloaded it as a removable Disk. 5.

DVR850W User Manual
Page 53
... or call our tech support department toll free at www.sakarhelp.com. Can't find manuals, software, drivers, and FAQ's at the website. For technical support issues please visit our website at (877) 397-8200 Technical Specifications Image Sensor Image Resolution Video Resolution LCD Display Focus range Shutter Internal Memory External Memory Focus range Lens Digital Zoom Self-timer File Format White balance Exposure compensation Flash mode Language Auto shutoff TV out Microphone Speaker Recorder ISO Interface System Requirements Battery 5 Mega Pixels CMOS Sensor...
... or call our tech support department toll free at www.sakarhelp.com. Can't find manuals, software, drivers, and FAQ's at the website. For technical support issues please visit our website at (877) 397-8200 Technical Specifications Image Sensor Image Resolution Video Resolution LCD Display Focus range Shutter Internal Memory External Memory Focus range Lens Digital Zoom Self-timer File Format White balance Exposure compensation Flash mode Language Auto shutoff TV out Microphone Speaker Recorder ISO Interface System Requirements Battery 5 Mega Pixels CMOS Sensor...

DVR850W User Manual
Page 55
Important Note: Using Camcorder Underwater The DVR 850W can afterwards. This will drain and gradually dry out by itself. Do not attempt to open the battery cover while underwater. • Use the camcorder as you can also be used to capture photos and videos underwater up to know how the camcorder works. Note: Once out of sand and this may enter the camcorder. Sea water has a high...
Important Note: Using Camcorder Underwater The DVR 850W can afterwards. This will drain and gradually dry out by itself. Do not attempt to open the battery cover while underwater. • Use the camcorder as you can also be used to capture photos and videos underwater up to know how the camcorder works. Note: Once out of sand and this may enter the camcorder. Sea water has a high...


