User Guide
Page 1
... P/N: VX3258-PC-mhd/VX3258-PC-mhd-W VX3258-PC-mhd/ VX3258-PC-mhd-W LCD Monitor User Guide IMPORTANT: Please read this User Guide will describe your product for future service. Warranty information contained in this User Guide to obtain important information on installing and using your product in a safe manner, as well as registering your limited coverage from ViewSonic Corporation, which is also found on our web site at http://www.viewsonic.com in English, or in specific languages using...
... P/N: VX3258-PC-mhd/VX3258-PC-mhd-W VX3258-PC-mhd/ VX3258-PC-mhd-W LCD Monitor User Guide IMPORTANT: Please read this User Guide will describe your product for future service. Warranty information contained in this User Guide to obtain important information on installing and using your product in a safe manner, as well as registering your limited coverage from ViewSonic Corporation, which is also found on our web site at http://www.viewsonic.com in English, or in specific languages using...

User Guide
Page 4
... the device is exposed to appropriate levels, or hearing damage may result. • NOTICE: THE MONITOR MAY OVERHEAT AND SHUTDOWN! Please ensure grounding prongs are NEVER REMOVED. • Protect the power cord from being used for a long period of time. • Refer all servicing to the graphics card's user guide. 4 • When connecting to a power outlet, DO NOT remove the grounding prong.
... the device is exposed to appropriate levels, or hearing damage may result. • NOTICE: THE MONITOR MAY OVERHEAT AND SHUTDOWN! Please ensure grounding prongs are NEVER REMOVED. • Protect the power cord from being used for a long period of time. • Refer all servicing to the graphics card's user guide. 4 • When connecting to a power outlet, DO NOT remove the grounding prong.

User Guide
Page 5
......8 Initial Setup 9 Installing the Stand 9 Using the Security Slot 11 Making Connections 12 Connecting to Power 12 Connecting External Devices 13 HDMI Connection 13 DisplayPort Connection 14 Audio Connection 15 Using the Monitor 16 Adjusting the Viewing Angle 16 Turning the Device On/Off 17 Using the Control Panel Keys 18 Quick Menu...18 Hot Keys...20 Configuring the Settings 22 General Operations 22 On-Screen Display (OSD) Menu Tree 25 Menu Options...30 Appendix 39 Specifications...39 Glossary...41 Troubleshooting...45...
......8 Initial Setup 9 Installing the Stand 9 Using the Security Slot 11 Making Connections 12 Connecting to Power 12 Connecting External Devices 13 HDMI Connection 13 DisplayPort Connection 14 Audio Connection 15 Using the Monitor 16 Adjusting the Viewing Angle 16 Turning the Device On/Off 17 Using the Control Panel Keys 18 Quick Menu...18 Hot Keys...20 Configuring the Settings 22 General Operations 22 On-Screen Display (OSD) Menu Tree 25 Menu Options...30 Appendix 39 Specifications...39 Glossary...41 Troubleshooting...45...

User Guide
Page 9
Initial Setup This section provides detailed instructions for setting up your monitor. Place the monitor on a flat, stable surface with the single (1) screw provided. 9 Align and connect the monitor stand's base to the monitor stand's neck with the screen facing down. 2. Installing the Stand 1.
Initial Setup This section provides detailed instructions for setting up your monitor. Place the monitor on a flat, stable surface with the single (1) screw provided. 9 Align and connect the monitor stand's base to the monitor stand's neck with the screen facing down. 2. Installing the Stand 1.
User Guide
Page 22
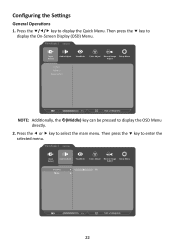
VX3258 Input Select Audio Adjust ViewMode Color Adjust Manual Image Setup Menu Adjust HDMI 1 HDMI 2 DisplayPort 75% 1920 x 1080@60Hz NOTE Additionally, the (Middle) key can be pressed to display the On-Screen Display (OSD) Menu. Then press the ‚ key to display the OSD Menu directly. 2. Then press the ‚ key to select the main menu. VX3258 Input Select Audio Adjust ViewMode Color Adjust Manual Image Setup Menu Adjust Volume 50 Mute 75% 1920 x 1080@60Hz 22 Press the ƒ or „ key to...
VX3258 Input Select Audio Adjust ViewMode Color Adjust Manual Image Setup Menu Adjust HDMI 1 HDMI 2 DisplayPort 75% 1920 x 1080@60Hz NOTE Additionally, the (Middle) key can be pressed to display the On-Screen Display (OSD) Menu. Then press the ‚ key to display the OSD Menu directly. 2. Then press the ‚ key to select the main menu. VX3258 Input Select Audio Adjust ViewMode Color Adjust Manual Image Setup Menu Adjust Volume 50 Mute 75% 1920 x 1080@60Hz 22 Press the ƒ or „ key to...
User Guide
Page 24
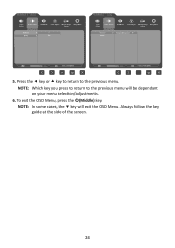
...; key or key to return to the previous menu will exit the OSD Menu. VX3258 Input Select Audio Adjust ViewMode Color Adjust Manual Image Setup Menu Adjust Volume On Mute Off VX3258 Input Select Audio Adjust ViewMode Color Adjust Manual Image Setup Menu Adjust Volume 50 Mute 75% 1920 x 1080@60Hz 75% 1920 x 1080@60Hz 5. Always follow the key guide at the side of the screen. 24 To exit the OSD Menu, press the (Middle) key. NOTE Which key you...
...; key or key to return to the previous menu will exit the OSD Menu. VX3258 Input Select Audio Adjust ViewMode Color Adjust Manual Image Setup Menu Adjust Volume On Mute Off VX3258 Input Select Audio Adjust ViewMode Color Adjust Manual Image Setup Menu Adjust Volume 50 Mute 75% 1920 x 1080@60Hz 75% 1920 x 1080@60Hz 5. Always follow the key guide at the side of the screen. 24 To exit the OSD Menu, press the (Middle) key. NOTE Which key you...

User Guide
Page 31
... OSD Menu. 2. Then press the ‚ key to confirm the adjustment. Press the or ‚ key to display the Quick Menu. Press the ‚/ƒ/„ key to select the setting. VX3258 Input Select Audio Adjust ViewMode Color Adjust Manual Image Setup Menu Adjust Volume Mute 75% 1920 x 1080@60Hz 3. Enable this option to select the desired option. Press the or ‚ key to temporarily turn off the sound...
... OSD Menu. 2. Then press the ‚ key to confirm the adjustment. Press the or ‚ key to display the Quick Menu. Press the ‚/ƒ/„ key to select the setting. VX3258 Input Select Audio Adjust ViewMode Color Adjust Manual Image Setup Menu Adjust Volume Mute 75% 1920 x 1080@60Hz 3. Enable this option to select the desired option. Press the or ‚ key to temporarily turn off the sound...

User Guide
Page 32
... for text-based tasks. Select this option for watching movies. VX3258 Input Select Audio Adjust ViewMode Color Adjust Manual Image Setup Menu Adjust Standard Game Movie Web Text MAC Mono 75% 1920 x 1080@60Hz 3. Select this option for general use. Then press the ‚ key to select ViewMode. Select this option when connecting to Mac computers. Press the or ‚ key to display the OSD Menu. 2. Select this...
... for text-based tasks. Select this option for watching movies. VX3258 Input Select Audio Adjust ViewMode Color Adjust Manual Image Setup Menu Adjust Standard Game Movie Web Text MAC Mono 75% 1920 x 1080@60Hz 3. Select this option for general use. Then press the ‚ key to select ViewMode. Select this option when connecting to Mac computers. Press the or ‚ key to display the OSD Menu. 2. Select this...
User Guide
Page 33
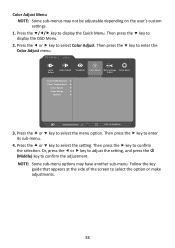
... may not be adjustable depending on the user's custom settings. 1. Press the ‚/ƒ/„ key to display the OSD Menu. 2. Then press the ‚ key to display the Quick Menu. Follow the key guide that appears at the side of the screen to confirm the selection. Color Adjust Menu NOTE Some sub-menus may have another sub-menu. VX3258 Input Select Audio Adjust ViewMode Color Adjust Manual Image Setup Menu Adjust Contrast/Brightness Color Temperature Color Space Color Range Gamma 75...
... may not be adjustable depending on the user's custom settings. 1. Press the ‚/ƒ/„ key to display the OSD Menu. 2. Then press the ‚ key to display the Quick Menu. Follow the key guide that appears at the side of the screen to confirm the selection. Color Adjust Menu NOTE Some sub-menus may have another sub-menu. VX3258 Input Select Audio Adjust ViewMode Color Adjust Manual Image Setup Menu Adjust Contrast/Brightness Color Temperature Color Space Color Range Gamma 75...
User Guide
Page 35
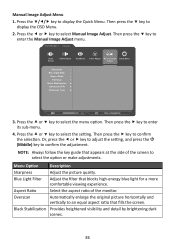
... Manual Image Adjust. Overscan Automatically enlarge the original picture horizontally and vertically to an equal aspect ratio that appears at the side of the monitor. Press the ƒ or „ key to confirm the selection. NOTE Always follow the key guide that fills the screen. Blue Light Filter Adjust the filter that blocks high-energy blue light for a more comfortable viewing experience. VX3258 Input Select Audio Adjust ViewMode Color Adjust Manual Image Setup Menu Adjust Sharpness Blue Light...
... Manual Image Adjust. Overscan Automatically enlarge the original picture horizontally and vertically to an equal aspect ratio that appears at the side of the monitor. Press the ƒ or „ key to confirm the selection. NOTE Always follow the key guide that fills the screen. Blue Light Filter Adjust the filter that blocks high-energy blue light for a more comfortable viewing experience. VX3258 Input Select Audio Adjust ViewMode Color Adjust Manual Image Setup Menu Adjust Sharpness Blue Light...
User Guide
Page 37
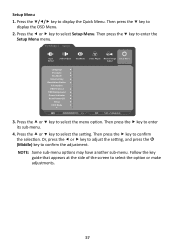
VX3258 Input Select Audio Adjust ViewMode Color Adjust Manual Image Setup Menu Adjust Language Freesync Ims Mode Shortcut Key Resolution Notice Information OSD Timeout OSD Background Power Indicator Auto Power Off Sleep ECO Mode 75% 1920 x 1080@60Hz 3. Follow the key guide that appears at the side of the screen to display the OSD Menu. 2. Then press the ‚ key to select the option or make adjustments. 37 NOTE Some sub-menu options may have another sub-menu. Then press the...
VX3258 Input Select Audio Adjust ViewMode Color Adjust Manual Image Setup Menu Adjust Language Freesync Ims Mode Shortcut Key Resolution Notice Information OSD Timeout OSD Background Power Indicator Auto Power Off Sleep ECO Mode 75% 1920 x 1080@60Hz 3. Follow the key guide that appears at the side of the screen to display the OSD Menu. 2. Then press the ‚ key to select the option or make adjustments. 37 NOTE Some sub-menu options may have another sub-menu. Then press the...

User Guide
Page 38
... available language for the lowest response time available. Resolution Notice For best picture quality, change resolution to the next input option. Show/Hide the OSD background when the OSD Menu appears on power consumption. Enable this option to their default values. 38 Puts an end to automatically turn off after a certain amount of time. Set the length of idle time before the monitor enters Sleep mode. Enable...
... available language for the lowest response time available. Resolution Notice For best picture quality, change resolution to the next input option. Show/Hide the OSD background when the OSD Menu appears on power consumption. Enable this option to their default values. 38 Puts an end to automatically turn off after a certain amount of time. Set the length of idle time before the monitor enters Sleep mode. Enable...

User Guide
Page 41
.... Audio Adjust Adjusts the volume, mutes the sound, or toggles between inputs if you have more comfortable viewing experience. B Black Stabilization ViewSonic's Black Stabilization provides heightened visibility and detail by default. AMD FreeSync AMD FreeSync™ technology puts an end to your monitor. Auto Detect If the current input source has no signal, the monitor will automatically switch to make the black blacker in a dark scene, and make the white whiter in a bright...
.... Audio Adjust Adjusts the volume, mutes the sound, or toggles between inputs if you have more comfortable viewing experience. B Black Stabilization ViewSonic's Black Stabilization provides heightened visibility and detail by default. AMD FreeSync AMD FreeSync™ technology puts an end to your monitor. Auto Detect If the current input source has no signal, the monitor will automatically switch to make the black blacker in a dark scene, and make the white whiter in a bright...

User Guide
Page 42
... 5000K. Cool Set the color temperature to further customize their viewing experience. Limited Range The color range of the monitor's grayscale levels. Color Range The monitor can manually change the color range options to fit the user's needs. Color Temperature Allows users to select specific color temperature settings to 7500K. C Color Adjust Provides several color adjustment modes, to help adjust the color settings to fit the correct color range if the colors are limited. G Game Mode Integrating a gaming-oriented OSD design including pre-calibrated FPS, RTS...
... 5000K. Cool Set the color temperature to further customize their viewing experience. Limited Range The color range of the monitor's grayscale levels. Color Range The monitor can manually change the color range options to fit the user's needs. Color Temperature Allows users to select specific color temperature settings to 7500K. C Color Adjust Provides several color adjustment modes, to help adjust the color settings to fit the correct color range if the colors are limited. G Game Mode Integrating a gaming-oriented OSD design including pre-calibrated FPS, RTS...
User Guide
Page 43
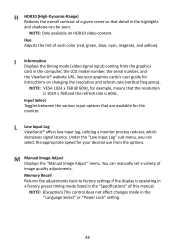
... "Language Select" or "Power Lock" setting. 43 Hue Adjusts the tint of each color (red, green, blue, cyan, magenta, and yellow). I Information Displays the timing mode (video signal input) coming from the options. Memory Recall Returns the adjustments back to factory settings if the display is 60Hz. You can select the appropriate speed for your graphics cards's user guide for instructions on HDR10 video content. L Low Input Lag ViewSonic® offers low input lag, utilizing a monitor process...
... "Language Select" or "Power Lock" setting. 43 Hue Adjusts the tint of each color (red, green, blue, cyan, magenta, and yellow). I Information Displays the timing mode (video signal input) coming from the options. Memory Recall Returns the adjustments back to factory settings if the display is 60Hz. You can select the appropriate speed for your graphics cards's user guide for instructions on HDR10 video content. L Low Input Lag ViewSonic® offers low input lag, utilizing a monitor process...

User Guide
Page 44
...", "MAC", and "Mono" presets. These presets are specifically designed to deliver an optimized viewing experience for the most graphicintense gaming, and provides amazing visual quality while watching sports or action movies. P PIP (Picture-in-Picture) Split the screen into two parts, a main window and an inset window. O Overscan Refers to a cropped image on your monitor zooms in the display settings window when setting up the display resolution. Response...
...", "MAC", and "Mono" presets. These presets are specifically designed to deliver an optimized viewing experience for the most graphicintense gaming, and provides amazing visual quality while watching sports or action movies. P PIP (Picture-in-Picture) Split the screen into two parts, a main window and an inset window. O Overscan Refers to a cropped image on your monitor zooms in the display settings window when setting up the display resolution. Response...

User Guide
Page 45
... colors (red, green, or blue) are missing, check the video cable to factory settings. Screen image is blurred • Adjust the resolution to the correct Aspect Ratio. • Reset the monitor to make sure it is selected. The screen isn't centered correctly • Adjust the horizontal and vertical controls via the OSD Menu. • Reset the monitor to the computer is properly and securely connected. • Adjust the brightness and contrast settings. • Make sure the correct input source is properly and securely connected...
... colors (red, green, or blue) are missing, check the video cable to factory settings. Screen image is blurred • Adjust the resolution to the correct Aspect Ratio. • Reset the monitor to make sure it is selected. The screen isn't centered correctly • Adjust the horizontal and vertical controls via the OSD Menu. • Reset the monitor to the computer is properly and securely connected. • Adjust the brightness and contrast settings. • Make sure the correct input source is properly and securely connected...

User Guide
Page 46
... the screen • Make sure the Power is On • Adjust brightness and contrast via the OSD Menu. • Check the connecting cable and make sure it back in, and then turn on the monitor. • Reset the monitor to another USB port (if applicable). • Some USB devices require a higher electric current; Control panel keys do not work • Restart the computer. Some menus aren't • Adjust the ViewMode or the input source. Loose...
... the screen • Make sure the Power is On • Adjust brightness and contrast via the OSD Menu. • Check the connecting cable and make sure it back in, and then turn on the monitor. • Reset the monitor to another USB port (if applicable). • Some USB devices require a higher electric current; Control panel keys do not work • Restart the computer. Some menus aren't • Adjust the ViewMode or the input source. Loose...
User Guide
Page 54
... to as image burn-in the product User Guide. • Removal, installation, and set-up service charges, including wall-mounting of any unauthorized hardware, accessories, consumable parts or components (e.g. You will need to provide your product's serial number. • To obtain warranty service, you will be required to provide: (a) the original dated sales slip, (b) your name, (c) your address, (d) a description of the problem, and (e) the serial number of...
... to as image burn-in the product User Guide. • Removal, installation, and set-up service charges, including wall-mounting of any unauthorized hardware, accessories, consumable parts or components (e.g. You will need to provide your product's serial number. • To obtain warranty service, you will be required to provide: (a) the original dated sales slip, (b) your name, (c) your address, (d) a description of the problem, and (e) the serial number of...

User Guide
Page 56
... date of time. • Removal, installation, insurance, and set-up service charges. 56 Mexico Limited Warranty ViewSonic® Display What the warranty covers: ViewSonic® warrants its sole option, repair or replace the product with the product. ͫͫ Causes external to the product, such as electrical power fluctuations or failure. ͫͫ Use of supplies or parts not meeting ViewSonic®'s specifications. ͫͫ Normal...
... date of time. • Removal, installation, insurance, and set-up service charges. 56 Mexico Limited Warranty ViewSonic® Display What the warranty covers: ViewSonic® warrants its sole option, repair or replace the product with the product. ͫͫ Causes external to the product, such as electrical power fluctuations or failure. ͫͫ Use of supplies or parts not meeting ViewSonic®'s specifications. ͫͫ Normal...


