User Guide
Page 1
... at http://www.viewsonic.com in English, or in specific languages using your product in the upper right corner of our website. "Antes de operar su equipo lea cu idadosamente las instrucciones en este manual" Model No. VX3218-PC-mhd Display User Guide IMPORTANT: Please read this User Guide will describe your limited coverage from ViewSonic® Corporation, which is also found on installing and using the Regional...
... at http://www.viewsonic.com in English, or in specific languages using your product in the upper right corner of our website. "Antes de operar su equipo lea cu idadosamente las instrucciones en este manual" Model No. VX3218-PC-mhd Display User Guide IMPORTANT: Please read this User Guide will describe your limited coverage from ViewSonic® Corporation, which is also found on installing and using the Regional...
User Guide
Page 3
... to the "Maintenance" section of this manual. • Avoid touching the screen, as oil may collect on the screen if you start using the device. • Keep this user guide in a safe place for later reference. • Read all warnings and follow all instructions. • Sit at least 18" ...• Do not place any heavy objects on the device or connection cables. • Always use cabinets, stands, or installation methods recommended by the manufacturer of the device set. • Always use furniture that can safely support the device. • Always ensure the device is not overhanging ...
... to the "Maintenance" section of this manual. • Avoid touching the screen, as oil may collect on the screen if you start using the device. • Keep this user guide in a safe place for later reference. • Read all warnings and follow all instructions. • Sit at least 18" ...• Do not place any heavy objects on the device or connection cables. • Always use cabinets, stands, or installation methods recommended by the manufacturer of the device set. • Always use furniture that can safely support the device. • Always ensure the device is not overhanging ...

User Guide
Page 4
... grounding prong. Service will be required when the unit has been damaged in the building. Please ensure grounding prongs are never removed. • Always route and manage cords and cables connected to your safety. Ensure that the power outlet is located near the equipment so that might tempt children to climb, such as toys and remote controls, on...
... grounding prong. Service will be required when the unit has been damaged in the building. Please ensure grounding prongs are never removed. • Always route and manage cords and cables connected to your safety. Ensure that the power outlet is located near the equipment so that might tempt children to climb, such as toys and remote controls, on...

User Guide
Page 5
... Pad Hole Screw Specification & Quantity Ø 5 mm M4 x 10 mm 4 pieces or VESA wall mounƟng hole NOTE: • Restraining device/cordage should be able to be retained and relocated, the same considerations as above should be applied. 5 • Fastening the display to a wall or fixed object using cordage or other restraining devices can help support the weight of...
... Pad Hole Screw Specification & Quantity Ø 5 mm M4 x 10 mm 4 pieces or VESA wall mounƟng hole NOTE: • Restraining device/cordage should be able to be retained and relocated, the same considerations as above should be applied. 5 • Fastening the display to a wall or fixed object using cordage or other restraining devices can help support the weight of...
User Guide
Page 6
... and Rear View 9 I/O Ports ...9 Initial Setup 10 Installing the Stand 10 Wall Mounting...11 Using the Security Slot 12 Making Connections 13 Connecting to Power 13 Connecting External Devices 14 Using the Monitor 15 Adjusting the Viewing Angle 15 Tilt Angle Adjustment 15 Turning the Device On/Off 16 Quick Menu...17 Hot Keys...18 Configuring the Settings 20 General Operations 20 On-Screen Display (OSD) Menu Tree 22 Appendix 26 Specifications...26 Glossary...28 Troubleshooting...32 Maintenance...34...
... and Rear View 9 I/O Ports ...9 Initial Setup 10 Installing the Stand 10 Wall Mounting...11 Using the Security Slot 12 Making Connections 13 Connecting to Power 13 Connecting External Devices 14 Using the Monitor 15 Adjusting the Viewing Angle 15 Tilt Angle Adjustment 15 Turning the Device On/Off 16 Quick Menu...17 Hot Keys...18 Configuring the Settings 20 General Operations 20 On-Screen Display (OSD) Menu Tree 22 Appendix 26 Specifications...26 Glossary...28 Troubleshooting...32 Maintenance...34...

User Guide
Page 11
Remove the monitor stand. 1 2 2 1 4. Attach the mounting bracket to mount the monitor onto the wall. 11 Place the device on a flat, stable surface with four (4) screws (M4 x 10 mm). 5. Then secure it with the screen facing down. 3. Follow the instructions that come with the wall mounting kit to the VESA mounting holes at the rear of the device. Turn off the device and disconnect all cables. 2. To obtain...
Remove the monitor stand. 1 2 2 1 4. Attach the mounting bracket to mount the monitor onto the wall. 11 Place the device on a flat, stable surface with four (4) screws (M4 x 10 mm). 5. Then secure it with the screen facing down. 3. Follow the instructions that come with the wall mounting kit to the VESA mounting holes at the rear of the device. Turn off the device and disconnect all cables. 2. To obtain...

User Guide
Page 16
... used for a long period of time, please disconnect the power plug from the power outlet. Plug the power cord into a power outlet. 2. Using the Control Panel Keys Use the control panel keys to the power outlet. Turning the Device On/Off 1. To turn on the monitor. 3. Press the Power button to turn the monitor off, press the Power button again. If the monitor is connected to access the Quick Menu, activate Hot Keys, navigate the On-Screen Display (OSD) Menu, and change the settings...
... used for a long period of time, please disconnect the power plug from the power outlet. Plug the power cord into a power outlet. 2. Using the Control Panel Keys Use the control panel keys to the power outlet. Turning the Device On/Off 1. To turn on the monitor. 3. Press the Power button to turn the monitor off, press the Power button again. If the monitor is connected to access the Quick Menu, activate Hot Keys, navigate the On-Screen Display (OSD) Menu, and change the settings...

User Guide
Page 17
Input Select Select the input source. Quick Menu Press the 1(«) key to select the option or make adjustments. Volume Adjust the level, or mute the volume. Exit Exit the Quick Menu. 17 Menu Description ViewMode Select one of the screen to activate the Quick Menu. Contrast/Brightness Adjust the contrast or brightness level. View Mode Standard FPS Game RTS Game MOBA Game Movie Web Text MAC Mono NOTE: Follow the key guide that appears on the bottom of the preset color settings.
Input Select Select the input source. Quick Menu Press the 1(«) key to select the option or make adjustments. Volume Adjust the level, or mute the volume. Exit Exit the Quick Menu. 17 Menu Description ViewMode Select one of the screen to activate the Quick Menu. Contrast/Brightness Adjust the contrast or brightness level. View Mode Standard FPS Game RTS Game MOBA Game Movie Web Text MAC Mono NOTE: Follow the key guide that appears on the bottom of the preset color settings.

User Guide
Page 19
Power Lock/Unlock Locking Power Button 3 Press and hold the keys to lock/unlock the Power button. Boot Up Screen On/Off Off Press to turn on . When the menu appears on the screen, continue holding both keys for 10s to lock power If the Power button is locked, the below message will appear on the screen: Power Lock/Unlock Power Button Locked 1(«) + 3 Press the keys to display/hide the boot up screen when the device is turned on 19 Key 1(«) + 2 Description Press and hold for 10 seconds to lock/unlock the Power button.
Power Lock/Unlock Locking Power Button 3 Press and hold the keys to lock/unlock the Power button. Boot Up Screen On/Off Off Press to turn on . When the menu appears on the screen, continue holding both keys for 10s to lock power If the Power button is locked, the below message will appear on the screen: Power Lock/Unlock Power Button Locked 1(«) + 3 Press the keys to display/hide the boot up screen when the device is turned on 19 Key 1(«) + 2 Description Press and hold for 10 seconds to lock/unlock the Power button.

User Guide
Page 20
Press the 1(«) or 2 key to enter the selected menu. Then press the 3 key to select the main menu. Input Select Audio Adjust ViewMode Color Adjust Manual Image Setup Menu Adjust Contrast/Brightness Color Temperature Color Space Color Range Contrast Brightness 75% 1920 x 1080 @ 60Hz 20 Input Select Audio Adjust ViewMode Color Adjust Manual Image Setup Menu Adjust HDMI 1 HDMI 2 DisplayPort 75% 1920 x 1080 @ 60Hz 2. Configuring the Settings General Operations 1. Press the 2/3/4 key to display the On-Screen Display (OSD) Menu.
Press the 1(«) or 2 key to enter the selected menu. Then press the 3 key to select the main menu. Input Select Audio Adjust ViewMode Color Adjust Manual Image Setup Menu Adjust Contrast/Brightness Color Temperature Color Space Color Range Contrast Brightness 75% 1920 x 1080 @ 60Hz 20 Input Select Audio Adjust ViewMode Color Adjust Manual Image Setup Menu Adjust HDMI 1 HDMI 2 DisplayPort 75% 1920 x 1080 @ 60Hz 2. Configuring the Settings General Operations 1. Press the 2/3/4 key to display the On-Screen Display (OSD) Menu.
User Guide
Page 21
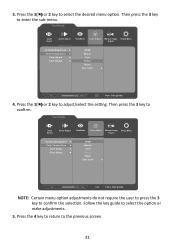
... select the desired menu option. Input Select Audio Adjust ViewMode Color Adjust Manual Image Setup Menu Adjust Contrast/Brightness Color Temperature Color Space Color Range sRGB Bluish Cool Native Warm User Color 75% 1920 x 1080 @ 60Hz 4. Press the 4 key to return to confirm. Then press the 3 key to the previous screen. 21 Press the 1(«) or 2 key to enter the sub-menu. 3. Then press the 3 key to adjust/select the setting. Follow the key...
... select the desired menu option. Input Select Audio Adjust ViewMode Color Adjust Manual Image Setup Menu Adjust Contrast/Brightness Color Temperature Color Space Color Range sRGB Bluish Cool Native Warm User Color 75% 1920 x 1080 @ 60Hz 4. Press the 4 key to return to confirm. Then press the 3 key to the previous screen. 21 Press the 1(«) or 2 key to enter the sub-menu. 3. Then press the 3 key to adjust/select the setting. Follow the key...

User Guide
Page 28
... automatically detects the image signal and intelligently controls the backlight brightness and color to make the black blacker in a dark scene, and make the white whiter in a bright environment. Audio Adjust Adjusts the volume, mutes the sound, or toggles between inputs if you have more comfortable viewing experience. All terms are listed in all LCD display models. This function, on the ability to improve on some models, is disabled by default. B Blue Light Filter Adjusts the filter...
... automatically detects the image signal and intelligently controls the backlight brightness and color to make the black blacker in a dark scene, and make the white whiter in a bright environment. Audio Adjust Adjusts the volume, mutes the sound, or toggles between inputs if you have more comfortable viewing experience. All terms are listed in all LCD display models. This function, on the ability to improve on some models, is disabled by default. B Blue Light Filter Adjusts the filter...

User Guide
Page 29
..., the LCD model number, the serial number, and the ViewSonic® website URL. Color Space Allows users to choose which color space they would like to 5000K. Default color temperature. Panel Default Panel Original Status sRGB Standard color space used for example, means that are available for instructions on changing the resolution and refresh rate (vertical frequency). NOTE: VESA 1024 x 768 @ 60Hz, for the Windows system. Set the color temperature to use . See your graphics cards's user guide for the monitor. 29...
..., the LCD model number, the serial number, and the ViewSonic® website URL. Color Space Allows users to choose which color space they would like to 5000K. Default color temperature. Panel Default Panel Original Status sRGB Standard color space used for example, means that are available for instructions on changing the resolution and refresh rate (vertical frequency). NOTE: VESA 1024 x 768 @ 60Hz, for the Windows system. Set the color temperature to use . See your graphics cards's user guide for the monitor. 29...
User Guide
Page 30
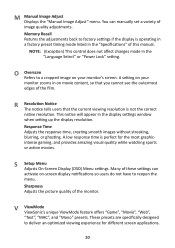
M Manual Image Adjust Displays the "Manual Image Adjust" menu. A setting on your monitor zooms in the "Specifications" of the monitor. Many of the film. A low response time is not the correct native resolution. V ViewMode ViewSonic's unique ViewMode feature offers "Game", "Movie", "Web", "Text", "MAC", and "Mono" presets. O Overscan Refers to a cropped image on your monitor's screen. NOTE: (Exception) This control does not affect changes made in the display settings window when setting up the display resolution. These presets...
M Manual Image Adjust Displays the "Manual Image Adjust" menu. A setting on your monitor zooms in the "Specifications" of the monitor. Many of the film. A low response time is not the correct native resolution. V ViewMode ViewSonic's unique ViewMode feature offers "Game", "Movie", "Web", "Text", "MAC", and "Mono" presets. O Overscan Refers to a cropped image on your monitor's screen. NOTE: (Exception) This control does not affect changes made in the display settings window when setting up the display resolution. These presets...

User Guide
Page 31
... turning on Adaptive Sync, MPRT will automatically turn on 1ms Mode from default. 2. 1 1ms Mode Choose whether to "On", the following functions will be dark. 31 Make sure Input Timing detection is set to activate Moving Picture Response Time (MPRT); When 1ms Mode is Off. sRGB and 1ms Mode will be grayed out and disabled: Brightness, Advanced DCR, ECO Mode, sRGB, Response Time, and DDC/CI Brightness adjustment...
... turning on Adaptive Sync, MPRT will automatically turn on 1ms Mode from default. 2. 1 1ms Mode Choose whether to "On", the following functions will be dark. 31 Make sure Input Timing detection is set to activate Moving Picture Response Time (MPRT); When 1ms Mode is Off. sRGB and 1ms Mode will be grayed out and disabled: Brightness, Advanced DCR, ECO Mode, sRGB, Response Time, and DDC/CI Brightness adjustment...
User Guide
Page 32
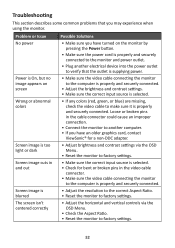
... supplying power. • Make sure the video cable connecting the monitor to the computer is properly and securely connected. • Adjust the brightness and contrast settings. • Make sure the correct input source is selected. • If any colors (red, green, or blue) are missing, check the video cable to make sure it is properly and securely connected. • Adjust the resolution to the correct Aspect Ratio. • Reset the monitor to factory settings. • Adjust the horizontal and vertical controls via the OSD Menu. • Reset...
... supplying power. • Make sure the video cable connecting the monitor to the computer is properly and securely connected. • Adjust the brightness and contrast settings. • Make sure the correct input source is selected. • If any colors (red, green, or blue) are missing, check the video cable to make sure it is properly and securely connected. • Adjust the resolution to the correct Aspect Ratio. • Reset the monitor to factory settings. • Adjust the horizontal and vertical controls via the OSD Menu. • Reset...

User Guide
Page 33
... the power cord, plug it back in, and then turn on the screen • Make sure the Power is On • Adjust brightness and contrast via the OSD Menu. • Check the connecting cable and make sure it is properly and securely connected. connect the device directly to the computer. Problem or Issue Possible Solutions The screen appears yellow • Make sure the "Blue Light Filter" is not muted, nor set to 0. • Check the Audio Input setting...
... the power cord, plug it back in, and then turn on the screen • Make sure the Power is On • Adjust brightness and contrast via the OSD Menu. • Check the connecting cable and make sure it is properly and securely connected. connect the device directly to the computer. Problem or Issue Possible Solutions The screen appears yellow • Make sure the "Blue Light Filter" is not muted, nor set to 0. • Check the Audio Input setting...

User Guide
Page 35
...Connect the equipment into an outlet on the unit. Regulatory and Service Information Compliance Information This section addresses all connected requirements and statements regarding regulations. Operation is subject to comply with part...frequency energy, and if not installed and used in accordance with the EMC Directive 2014/30/EU and Low Voltage Directive 2014/35/EU. 35 Warning: You are designed to part...not occur in a residential installation. This equipment generates, uses, and can be determined by turning the equipment off and on, the user is connected. • Consult the ...
...Connect the equipment into an outlet on the unit. Regulatory and Service Information Compliance Information This section addresses all connected requirements and statements regarding regulations. Operation is subject to comply with part...frequency energy, and if not installed and used in accordance with the EMC Directive 2014/30/EU and Low Voltage Directive 2014/35/EU. 35 Warning: You are designed to part...not occur in a residential installation. This equipment generates, uses, and can be determined by turning the equipment off and on, the user is connected. • Consult the ...
User Guide
Page 41
... User Guide. • Removal, installation, and set-up service charges, including wall-mounting of the display through inappropriate cleaning as described in ). • Software - How to get service: • For information about receiving service under warranty, contact ViewSonic® Customer Support (Please refer to an authorized ViewSonic® service center or ViewSonic®. • For additional information or the name of any unauthorized hardware, accessories, consumable parts or components (e.g. Installation...
... User Guide. • Removal, installation, and set-up service charges, including wall-mounting of the display through inappropriate cleaning as described in ). • Software - How to get service: • For information about receiving service under warranty, contact ViewSonic® Customer Support (Please refer to an authorized ViewSonic® service center or ViewSonic®. • For additional information or the name of any unauthorized hardware, accessories, consumable parts or components (e.g. Installation...
User Guide
Page 43
... image is valid only for an extended period of time. • Removal, installation, insurance, and set-up service charges. 43 Mexico Limited Warranty ViewSonic® Display What the warranty covers: ViewSonic® warrants its sole option, repair or replace the product with the product. ͫ Causes external to the product, such as electrical power fluctuations or failure. ͫ Use of supplies or parts not meeting ViewSonic...
... image is valid only for an extended period of time. • Removal, installation, insurance, and set-up service charges. 43 Mexico Limited Warranty ViewSonic® Display What the warranty covers: ViewSonic® warrants its sole option, repair or replace the product with the product. ͫ Causes external to the product, such as electrical power fluctuations or failure. ͫ Use of supplies or parts not meeting ViewSonic...


