User Guide
Page 3
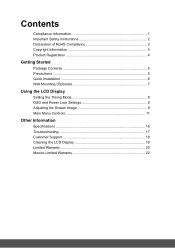
Contents Compliance Information 1 Important Safety Instructions 2 Declaration of RoHS Compliance 3 Copyright Information 4 Product Registration 4 Getting Started Package Contents 5 Precautions 5 Quick Installation 6 Wall Mounting (Optional 7 Using the LCD Display Setting the Timing Mode 8 OSD and Power Lock Settings 8 Adjusting the Screen Image 9 Main Menu Controls 11 Other Information Specifications 16 Troubleshooting 17 Customer Support 18 Cleaning the LCD Display 19 Limited Warranty 20 Mexico Limited Warranty 22
Contents Compliance Information 1 Important Safety Instructions 2 Declaration of RoHS Compliance 3 Copyright Information 4 Product Registration 4 Getting Started Package Contents 5 Precautions 5 Quick Installation 6 Wall Mounting (Optional 7 Using the LCD Display Setting the Timing Mode 8 OSD and Power Lock Settings 8 Adjusting the Screen Image 9 Main Menu Controls 11 Other Information Specifications 16 Troubleshooting 17 Customer Support 18 Cleaning the LCD Display 19 Limited Warranty 20 Mexico Limited Warranty 22

User Guide
Page 9
...to the computer and plug the video cable into the computer's CD drive. Attach the adapter to install the INF file. Insert the ViewSonic Wizard CD into the adapter. Installation is important. For instructions on -screen instructions. NOTE: Windows users may mail or fax to auto...See back of LCD display.) You can register your region. Windows users: Set the timing mode (resolution and refresh rate) Example: 1920 x 1080 @ 60 Hz. To be best prepared for your product online at the ViewSonic website for any future customer service needs: print this guide. See the ...
...to the computer and plug the video cable into the computer's CD drive. Attach the adapter to install the INF file. Insert the ViewSonic Wizard CD into the adapter. Installation is important. For instructions on -screen instructions. NOTE: Windows users may mail or fax to auto...See back of LCD display.) You can register your region. Windows users: Set the timing mode (resolution and refresh rate) Example: 1920 x 1080 @ 60 Hz. To be best prepared for your product online at the ViewSonic website for any future customer service needs: print this guide. See the ...

User Guide
Page 10
...power will automatically turn ON when power is restored. • Power Button Unlock: Press and hold [1] and the down arrow T for 3 seconds. After setting the timing mode, use the OSD (On-screen Display) controls to : VESA 1920 x 1080 @ 60Hz. If the power button is pressed the message ...• OSD Unlock: Press and hold [1] and the down arrow T again for instructions. With or without this setting, after a power failure, your LCD display. For the best picture quality set the Timing Mode: 1. If any buttons are pressed the message OSD Locked will display for 10 seconds. The timing ...
...power will automatically turn ON when power is restored. • Power Button Unlock: Press and hold [1] and the down arrow T for 3 seconds. After setting the timing mode, use the OSD (On-screen Display) controls to : VESA 1920 x 1080 @ 60Hz. If the power button is pressed the message ...• OSD Unlock: Press and hold [1] and the down arrow T again for instructions. With or without this setting, after a power failure, your LCD display. For the best picture quality set the Timing Mode: 1. If any buttons are pressed the message OSD Locked will display for 10 seconds. The timing ...

User Guide
Page 12
...A control screen like the one shown below appears. To save the adjustments and exit the menu, press button [1] twice. The following to adjust the display setting: 1. To adjust the control, press the up or down T buttons. 5. To select a control to adjust, pressSorTto scroll up S or down in ... NOTE: All OSD menus and adjustment screens disappear automatically after about 15 seconds. After the desired control is adjustable through the OSD timeout setting in the setup menu. 2. POSITION until the screen image is completely visible. (The black border around the edge of the screen should...
...A control screen like the one shown below appears. To save the adjustments and exit the menu, press button [1] twice. The following to adjust the display setting: 1. To adjust the control, press the up or down T buttons. 5. To select a control to adjust, pressSorTto scroll up S or down in ... NOTE: All OSD menus and adjustment screens disappear automatically after about 15 seconds. After the desired control is adjustable through the OSD timeout setting in the setup menu. 2. POSITION until the screen image is completely visible. (The black border around the edge of the screen should...

User Guide
Page 13
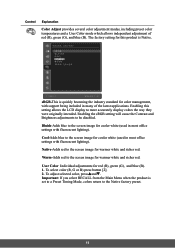
... than one computer connected to the LCD Display. Control Explanation Auto Image Adjust automatically sizes, centers, and fine tunes the video signal to its pre-set value. If this function does not work on your LCD display, then lower the video refresh rate to 60 Hz and... set the resolution to eliminate waviness and distortion. Mute temporarily silences audio output. Main Menu Controls Adjust the menu items shown below by using the up S ...
... than one computer connected to the LCD Display. Control Explanation Auto Image Adjust automatically sizes, centers, and fine tunes the video signal to its pre-set value. If this function does not work on your LCD display, then lower the video refresh rate to 60 Hz and... set the resolution to eliminate waviness and distortion. Mute temporarily silences audio output. Main Menu Controls Adjust the menu items shown below by using the up S ...
User Guide
Page 14
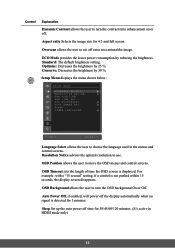
...to the screen image for warmer white and richer red. Warm-Adds red to the screen image for cooler white (used in most office settings with fluorescent lighting). Bluish-Adds blue to the screen image for warmer white and richer red. Enabling this product is Native. Cool-Adds... the LCD display to the screen image for color management, with support being included in most office settings with fluorescent lighting). Enabling the sRGB setting will cause the Contrast and Brightness adjustments to the Native factory preset. 11 Important: If you select RECALL from the Main Menu...
...to the screen image for warmer white and richer red. Warm-Adds red to the screen image for cooler white (used in most office settings with fluorescent lighting). Bluish-Adds blue to the screen image for warmer white and richer red. Enabling this product is Native. Cool-Adds... the LCD display to the screen image for color management, with support being included in most office settings with fluorescent lighting). Enabling the sRGB setting will cause the Contrast and Brightness adjustments to the Native factory preset. 11 Important: If you select RECALL from the Main Menu...
User Guide
Page 16
... 15 seconds, the display screen disappears. Auto Power Off, if enabled, will power off extra area around the image. Standard: The default brightness setting. Setup Menu displays the menu shown below: Language Select allows the user to cut off the display automatically when no signal is detected for 30.../45/60/120 minutes. (It's active in the menus and control screens. Sleep Set up the auto power off . Overscan allows the user to choose the language used in HDMI mode only) 13 Optimize: Decreases the brightness by...
... 15 seconds, the display screen disappears. Auto Power Off, if enabled, will power off extra area around the image. Standard: The default brightness setting. Setup Menu displays the menu shown below: Language Select allows the user to cut off the display automatically when no signal is detected for 30.../45/60/120 minutes. (It's active in the menus and control screens. Sleep Set up the auto power off . Overscan allows the user to choose the language used in HDMI mode only) 13 Optimize: Decreases the brightness by...
User Guide
Page 17
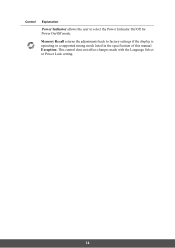
Exception: This control does not affect changes made with the Language Select or Power Lock setting. 14 Memory Recall returns the adjustments back to select the Power Indicator On/Off for Power On/Off mode. Control Explanation Power Indicator allows the user to factory settings if the display is operating in a supported timing mode listed in the specification of this manual.
Exception: This control does not affect changes made with the Language Select or Power Lock setting. 14 Memory Recall returns the adjustments back to select the Power Indicator On/Off for Power On/Off mode. Control Explanation Power Indicator allows the user to factory settings if the display is operating in a supported timing mode listed in the specification of this manual.
User Guide
Page 18
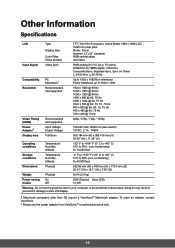
... Dimensions Physical 532.58 mm (W) x 409 mm (H) x 179.5 mm (D) 20.91" (W) x 16.1" (H) x 7.06" (D) Weight Physical 8.6 lb (3.9 kg) Power saving On modes Off 30W (Typical) (blue LED)
... Dimensions Physical 532.58 mm (W) x 409 mm (H) x 179.5 mm (D) 20.91" (W) x 16.1" (H) x 7.06" (D) Weight Physical 8.6 lb (3.9 kg) Power saving On modes Off 30W (Typical) (blue LED)

User Guide
Page 22
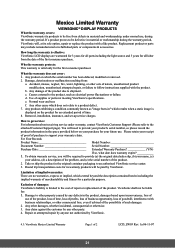
...Removal, installation, one way transportation, insurance, and set-up service charges. For additional information or the name of nature, unauthorized product modification, or failure to be required to an authorized ViewSonic service center or ViewSonic. 4. c. d. Damage, deterioration or malfunction resulting...commonly known as electrical power fluctuations or failure. For information about receiving service under normal use, during the warranty period, ViewSonic will need to provide your address, (d) a description of the problem, and (e) the serial number of the product ...
...Removal, installation, one way transportation, insurance, and set-up service charges. For additional information or the name of nature, unauthorized product modification, or failure to be required to an authorized ViewSonic service center or ViewSonic. 4. c. d. Damage, deterioration or malfunction resulting...commonly known as electrical power fluctuations or failure. For information about receiving service under normal use, during the warranty period, ViewSonic will need to provide your address, (d) a description of the problem, and (e) the serial number of the product ...
User Guide
Page 24
... including the light source and 3 years for your warranty claim. Any claim against the customer by ViewSonic. 4.3: ViewSonic Mexico Limited Warranty Page 1 of purchase to follow instructions supplied with a like product. Repair or attempted...when a static image is limited to shipment. If a product proves to be required to other property caused by ViewSonic. Any product on the product for : 1. Damage, deterioration or malfunction resulting from the date of the first consumer...7. What the warranty does not cover: 1. Removal, installation, insurance, and set-up service charges.
... including the light source and 3 years for your warranty claim. Any claim against the customer by ViewSonic. 4.3: ViewSonic Mexico Limited Warranty Page 1 of purchase to follow instructions supplied with a like product. Repair or attempted...when a static image is limited to shipment. If a product proves to be required to other property caused by ViewSonic. Any product on the product for : 1. Damage, deterioration or malfunction resulting from the date of the first consumer...7. What the warranty does not cover: 1. Removal, installation, insurance, and set-up service charges.


