User Guide
Page 2
Contents Product Registration...2 For Your Records ...2 Getting Started Package Contents ...3 Precautions ...3 Quick Installation ...4 Installation of Wall Mount (Optional) ...5 Using the LCD Display Setting the Timing Mode ...6 OSD and Power Lock Settings...6 Adjusting the Screen Image ...7 Main Menu Controls ...9 Other Information Specifications ...14 Troubleshooting...15 Customer Support ...16 Cleaning the LCD Display ...17 Limited Warranty ...18 Appendix Safety Guidelines ...19 Compliance Information for U.S.A...20 CE Conformity for Europe ...20 10/29/02 A ViewSonic VT550 1
Contents Product Registration...2 For Your Records ...2 Getting Started Package Contents ...3 Precautions ...3 Quick Installation ...4 Installation of Wall Mount (Optional) ...5 Using the LCD Display Setting the Timing Mode ...6 OSD and Power Lock Settings...6 Adjusting the Screen Image ...7 Main Menu Controls ...9 Other Information Specifications ...14 Troubleshooting...15 Customer Support ...16 Cleaning the LCD Display ...17 Limited Warranty ...18 Appendix Safety Guidelines ...19 Compliance Information for U.S.A...20 CE Conformity for Europe ...20 10/29/02 A ViewSonic VT550 1
User Guide
Page 3
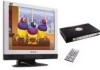
.... Environmental Protection Agency (EPA). No part of its useful life. For Your Records Product Name: Model Number: Document Number: Serial Number: Purchase Date: ViewSonic VT550 VLCDS23897-3W A-CD-VT550-1 _____ _____ Product disposal at the end of this product properly at end of product life ViewSonic is a registered trademark of our environment. Please dispose of this document may change product specifications without notice.
.... Environmental Protection Agency (EPA). No part of its useful life. For Your Records Product Name: Model Number: Document Number: Serial Number: Purchase Date: ViewSonic VT550 VLCDS23897-3W A-CD-VT550-1 _____ _____ Product disposal at the end of this product properly at end of product life ViewSonic is a registered trademark of our environment. Please dispose of this document may change product specifications without notice.
User Guide
Page 4
... LCD display with Windows operating systems, and the ICM file (Image Color Matching) ensures accurate on-screen colors. ViewSonic recommends that prevents heat dissipation. • Ensure the area around the LCD display is clean and free of a ViewSonic® LCD display. You may be seriously injured if you install both files. Important! Package Contents Your LCD display package includes: • LCD display • Power cords • Video cables (VGA and DVI) • Audio cable...
... LCD display with Windows operating systems, and the ICM file (Image Color Matching) ensures accurate on-screen colors. ViewSonic recommends that prevents heat dissipation. • Ensure the area around the LCD display is clean and free of a ViewSonic® LCD display. You may be seriously injured if you install both files. Important! Package Contents Your LCD display package includes: • LCD display • Power cords • Video cables (VGA and DVI) • Audio cable...
User Guide
Page 5
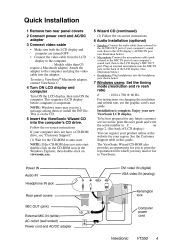
... rate, see illustration below . 4 Turn ON LCD display and computer Turn ON the LCD display, then turn ON the computer. For instructions on -screen instructions. 6 Audio Installation (optional) • Speakers Connect the audio cable (lime-colored) to the LCD display's AUDIO IN port (see the graphic card's user guide. Power IN Audio IN Headphone IN jack DVI video IN (digital) VGA video IN (analog) Rear panel covers MIC OUT (pink) External MIC IN (white) AC outlet (wall socket) Power cord and AC/DC adapter Kensington lock Computer power cord ViewSonic VT550 4
... rate, see illustration below . 4 Turn ON LCD display and computer Turn ON the LCD display, then turn ON the computer. For instructions on -screen instructions. 6 Audio Installation (optional) • Speakers Connect the audio cable (lime-colored) to the LCD display's AUDIO IN port (see the graphic card's user guide. Power IN Audio IN Headphone IN jack DVI video IN (digital) VGA video IN (analog) Rear panel covers MIC OUT (pink) External MIC IN (white) AC outlet (wall socket) Power cord and AC/DC adapter Kensington lock Computer power cord ViewSonic VT550 4

User Guide
Page 6
... the wall, following : Four screw holes with rubber filler 1 2 Disconnect Power. But, you remove the base for the wall mount on the back as shown on a towel or blanket. Attach the mounting bracket from each screw hole. Notice the four screw holes for a wall mount, the microphone in the wall-mounting kit. 3 4 ViewSonic VT550 5 Attach the LCD display to the LCD display with the base mounting kit. Remove the rubber filler from the VESA compatible wallmounting...
... the wall, following : Four screw holes with rubber filler 1 2 Disconnect Power. But, you remove the base for the wall mount on the back as shown on a towel or blanket. Attach the mounting bracket from each screw hole. Notice the four screw holes for a wall mount, the microphone in the wall-mounting kit. 3 4 ViewSonic VT550 5 Attach the LCD display to the LCD display with the base mounting kit. Remove the rubber filler from the VESA compatible wallmounting...

User Guide
Page 7
... the resolution (example 1024 x 768) and refresh rate (or vertical frequency; VT550 6 ViewSonic The timing mode consists of the screen image and minimizing eye strain. Using the LCD Display Setting the Timing Mode Setting the timing mode is pressed the message Power Button Locked will display for 10 seconds. After setting the timing mode, use the OnView ® controls to : VESA 1024 x 768 @ 60Hz. For the best picture quality set the resolution. 2 Set the refresh rate: See your LCD display timing mode to adjust the screen...
... the resolution (example 1024 x 768) and refresh rate (or vertical frequency; VT550 6 ViewSonic The timing mode consists of the screen image and minimizing eye strain. Using the LCD Display Setting the Timing Mode Setting the timing mode is pressed the message Power Button Locked will display for 10 seconds. After setting the timing mode, use the OnView ® controls to : VESA 1024 x 768 @ 60Hz. For the best picture quality set the resolution. 2 Set the refresh rate: See your LCD display timing mode to adjust the screen...

User Guide
Page 8
... "Main Menu Controls" on some screens: i.e. Microphone Displays the Main Menu or exits the control screen and saves adjustments Displays the control screen for viewing PC data or video. Power light Green = ON Orange = Power Saving Power On/Off Temporarily silences audio output Shortcut key: Toggles between standard and high brightness mode for the highlighted control. Adjusting the Screen Image Use the buttons on the front control panel to display the Contrast adjustment control screen. Shortcut key: toggles between analog (VGA) and digital (DVI) video connections...
... "Main Menu Controls" on some screens: i.e. Microphone Displays the Main Menu or exits the control screen and saves adjustments Displays the control screen for viewing PC data or video. Power light Green = ON Orange = Power Saving Power On/Off Temporarily silences audio output Shortcut key: Toggles between standard and high brightness mode for the highlighted control. Adjusting the Screen Image Use the buttons on the front control panel to display the Contrast adjustment control screen. Shortcut key: toggles between analog (VGA) and digital (DVI) video connections...
User Guide
Page 9
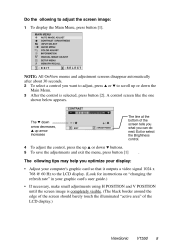
... display: • Adjust your graphic card's user guide.) • If necessary, make small adjustments using H POSITION and V POSITION until the screen image is selected, press button [2]. A control screen like the one shown below appears. To save the adjustments and exit the menu, press button [1] twice. The following to the LCD display. (Look for instructions on "changing the refresh rate" in your computer's graphic card so that it outputs a video signal...
... display: • Adjust your graphic card's user guide.) • If necessary, make small adjustments using H POSITION and V POSITION until the screen image is selected, press button [2]. A control screen like the one shown below appears. To save the adjustments and exit the menu, press button [1] twice. The following to the LCD display. (Look for instructions on "changing the refresh rate" in your computer's graphic card so that it outputs a video signal...
User Guide
Page 10
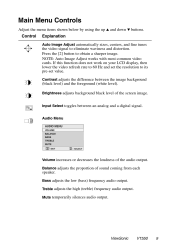
Control Explanation Auto Image Adjust automatically sizes, centers, and fine tunes the video signal to its pre-set value. Bass adjusts the low (bass) frequency audio output. ViewSonic VT550 9 If this function does not work on your LCD display, then lower the video refresh rate to 60 Hz and set the resolution to eliminate waviness and distortion. Audio Menu Volume increases or decreases the loudness of sound coming from each speaker. Balance adjusts the proportion...
Control Explanation Auto Image Adjust automatically sizes, centers, and fine tunes the video signal to its pre-set value. Bass adjusts the low (bass) frequency audio output. ViewSonic VT550 9 If this function does not work on your LCD display, then lower the video refresh rate to 60 Hz and set the resolution to eliminate waviness and distortion. Audio Menu Volume increases or decreases the loudness of sound coming from each speaker. Balance adjusts the proportion...

User Guide
Page 11
The factory setting for this product is set to a Preset Timing Mode, colors return to adjust red (R), green (G), and blue (B) separately. Adds blue and green to the screen image for a darker color. Adjusts red (R), green (G), and blue (B) individually. 1 2 To select color (R, G or B) press button [2]. Adds red to the screen image for warmer white and richer red. 5400K - Control Explanation Color Adjust provides several color adjustment modes: preset color temperatures and RGB which allows you select RECALL from the Main Menu when...
The factory setting for this product is set to a Preset Timing Mode, colors return to adjust red (R), green (G), and blue (B) separately. Adds blue and green to the screen image for a darker color. Adjusts red (R), green (G), and blue (B) individually. 1 2 To select color (R, G or B) press button [2]. Adds red to the screen image for warmer white and richer red. 5400K - Control Explanation Color Adjust provides several color adjustment modes: preset color temperatures and RGB which allows you select RECALL from the Main Menu when...

User Guide
Page 12
Manual Image Adjust displays the Manual Image Adjust menu. The Manual Image Adjust controls are explained below: th theht(y)/F1 1 Tf12.6997 0 0 12.6997 143.3317 492.0 Horizontal Size adjusts tht Information displays the timing mode (video signal input) coming from the graphics card in your graphic card's user guide for instructions on changing the resolution and refresh rate (vertical frequency). See your computer. NOTE: VESA 1024 x 768 @ 60 Hz (recommended) means that the resolution is 1024 x 768 and the refresh rate is 60 Hertz.
Manual Image Adjust displays the Manual Image Adjust menu. The Manual Image Adjust controls are explained below: th theht(y)/F1 1 Tf12.6997 0 0 12.6997 143.3317 492.0 Horizontal Size adjusts tht Information displays the timing mode (video signal input) coming from the graphics card in your graphic card's user guide for instructions on changing the resolution and refresh rate (vertical frequency). See your computer. NOTE: VESA 1024 x 768 @ 60 Hz (recommended) means that the resolution is 1024 x 768 and the refresh rate is 60 Hertz.

User Guide
Page 13
Fill all adjusts the video signal to use. Setup Menu displays the menu shown below . Fill Aspect Ratio maintains the correct video signal proportions for different resolutions. Resolution Notice displays the Resolution Notice menu shown below . OSD Timeout sets the length of the picture are explained below: Language allows you to choose the language used in the menus and control screens. ViewSonic VT550 12 2 Resolution Notice advises the optimal resolution to fill the screen. OSD Position...
Fill all adjusts the video signal to use. Setup Menu displays the menu shown below . Fill Aspect Ratio maintains the correct video signal proportions for different resolutions. Resolution Notice displays the Resolution Notice menu shown below . OSD Timeout sets the length of the picture are explained below: Language allows you to choose the language used in the menus and control screens. ViewSonic VT550 12 2 Resolution Notice advises the optimal resolution to fill the screen. OSD Position...
User Guide
Page 14
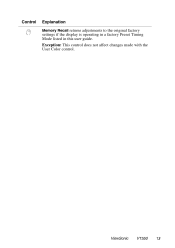
Exception: This control does not affect changes made with the User Color control. Control Explanation Memory Recall returns adjustments to the original factory settings if the display is operating in a factory Preset Timing Mode listed in this user guide. ViewSonic VT550 13 3
Exception: This control does not affect changes made with the User Color control. Control Explanation Memory Recall returns adjustments to the original factory settings if the display is operating in a factory Preset Timing Mode listed in this user guide. ViewSonic VT550 13 3
User Guide
Page 15
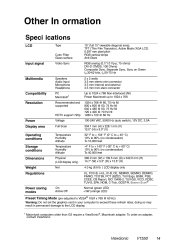
...Specifications LCD Type Color Filter Glass surface 15" (full 15" viewable diagonal area), TFT (Thin Film Transistor), Active Matrix XGA LCD, 0.297 mm pixel pitch RGB vertical stripe Anti-Glare RGB analog (0.7/1.0 Vp-p, 75 ohms) DVI-D (TMDS, 100 Ohms) Composite Sync, Separate Sync, Sync on Green...external 3.5 mm mini stero connector Up to 1024 x 768 Non-interlaced (NI) Power Macintosh up to 1024 x 768 1024 x 768 @ 60, 75 Hz NI 800 x 600 @ 60, 75 Hz NI 640 x 480 @ 60, 75 Hz NI 720 x 400 @ 70 Hz NI 1280 x 720 @ 60 Hz 100-240 VAC, 50/60 Hz (auto switch... 4.0 kg (8.8 lbs) LCD display only UL, FCC-B, c-...
...Specifications LCD Type Color Filter Glass surface 15" (full 15" viewable diagonal area), TFT (Thin Film Transistor), Active Matrix XGA LCD, 0.297 mm pixel pitch RGB vertical stripe Anti-Glare RGB analog (0.7/1.0 Vp-p, 75 ohms) DVI-D (TMDS, 100 Ohms) Composite Sync, Separate Sync, Sync on Green...external 3.5 mm mini stero connector Up to 1024 x 768 Non-interlaced (NI) Power Macintosh up to 1024 x 768 1024 x 768 @ 60, 75 Hz NI 800 x 600 @ 60, 75 Hz NI 640 x 480 @ 60, 75 Hz NI 720 x 400 @ 70 Hz NI 1280 x 720 @ 60 Hz 100-240 VAC, 50/60 Hz (auto switch... 4.0 kg (8.8 lbs) LCD display only UL, FCC-B, c-...

User Guide
Page 16
Troubleshooting No power • Make sure power button (or switch) is ON. • Make sure A/C power cord is securely connected to the DC power supply and the power supply is firmly connected to the LCD display. • Plug another computer. • If you need a Macintosh adapter. Wrong or abnormal colors • If any colors (red, green, or blue) are missing, check the video cable to make sure it to the LCD display. • Adjust brightness and contrast. •...
Troubleshooting No power • Make sure power button (or switch) is ON. • Make sure A/C power cord is securely connected to the DC power supply and the power supply is firmly connected to the LCD display. • Plug another computer. • If you need a Macintosh adapter. Wrong or abnormal colors • If any colors (red, green, or blue) are missing, check the video cable to make sure it to the LCD display. • Adjust brightness and contrast. •...

User Guide
Page 17
NOTE: You will need the product serial number. Customer Support For technical support or product service, see the table below or contact your reseller viewsonic.com.au viewsonic.com.sg T: +61 2 9929 3955 service.au@ F: +61 2 9929 8393 viewsonic.com T: 65 273 4018 F: 65 273 1566 service.sg@ viewsonic.com viewsonic.com.tw viewsonic.com/asia T: 886 2 2246 3456 service.ap@ F: 886 2 8242 3668 viewsonic.com T: 886 2 2246...
NOTE: You will need the product serial number. Customer Support For technical support or product service, see the table below or contact your reseller viewsonic.com.au viewsonic.com.sg T: +61 2 9929 3955 service.au@ F: +61 2 9929 8393 viewsonic.com T: 65 273 4018 F: 65 273 1566 service.sg@ viewsonic.com viewsonic.com.tw viewsonic.com/asia T: 886 2 2246 3456 service.ap@ F: 886 2 8242 3668 viewsonic.com T: 886 2 2246...
User Guide
Page 18
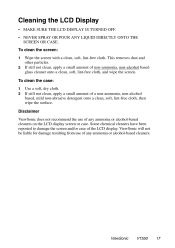
... amount of the LCD display. Some chemical cleaners have been reported to damage the screen and/or case of non-ammonia, non-alcohol based glass cleaner onto a clean, soft, lint-free cloth, and wipe the screen. ViewSonic VT550 17 7 To clean the screen: 1 2 Wipe the screen with a clean, soft, lint-free cloth. To clean the case: 1 2 Use a soft, dry cloth. ViewSonic will not...
... amount of the LCD display. Some chemical cleaners have been reported to damage the screen and/or case of non-ammonia, non-alcohol based glass cleaner onto a clean, soft, lint-free cloth, and wipe the screen. ViewSonic VT550 17 7 To clean the screen: 1 2 Wipe the screen with a clean, soft, lint-free cloth. To clean the case: 1 2 Use a soft, dry cloth. ViewSonic will not...
User Guide
Page 19
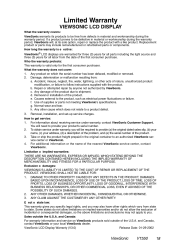
... SUCH DAMAGES. 2. ViewSonic LCD Display Warranty (V3.0) Release Date: 01-29-2002 ViewSonic VT550 18 8 Limited Warranty VIEWSONIC LCD DISPLAY What the warranty covers: ViewSonic warrants its sole option, repair or replace the product with the product. Accident, misuse, neglect, fire, water, lightning, or other cause which does not relate to provide your product's serial number. 2. b. h. Removal, installation, and set-up service charges. To obtain service under warranty, contact ViewSonic Customer Support. ANY CLAIM...
... SUCH DAMAGES. 2. ViewSonic LCD Display Warranty (V3.0) Release Date: 01-29-2002 ViewSonic VT550 18 8 Limited Warranty VIEWSONIC LCD DISPLAY What the warranty covers: ViewSonic warrants its sole option, repair or replace the product with the product. Accident, misuse, neglect, fire, water, lightning, or other cause which does not relate to provide your product's serial number. 2. b. h. Removal, installation, and set-up service charges. To obtain service under warranty, contact ViewSonic Customer Support. ANY CLAIM...
User Guide
Page 20
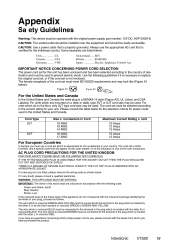
... SAFELY. ViewSonic VT550 19 9 CAUTION: Use a power cable that is coloured BROWN must be operated with the dealer from whom you must be connected to the terminal in the plug which is marked by the letter E or by the Earth symbol or coloured GREEN or GREEN-AND-YELLOW. The cord set must be connected to the terminal in the plug which proper power cord to use, please...
... SAFELY. ViewSonic VT550 19 9 CAUTION: Use a power cable that is coloured BROWN must be operated with the dealer from whom you must be connected to the terminal in the plug which is marked by the letter E or by the Earth symbol or coloured GREEN or GREEN-AND-YELLOW. The cord set must be connected to the terminal in the plug which proper power cord to use, please...
User Guide
Page 21
... assure continued FCC compliance, the user must use only a shielded BNC(5) cable. Compliance Information for compliance could void the user's authority to operate this equipment does cause harmful interference to radio or television reception, which the receiver is connected. • Consult the dealer or an experienced radio/TV technician for a Class B digital device, pursuant to part 15 of the FCC Rules. If...
... assure continued FCC compliance, the user must use only a shielded BNC(5) cable. Compliance Information for compliance could void the user's authority to operate this equipment does cause harmful interference to radio or television reception, which the receiver is connected. • Consult the dealer or an experienced radio/TV technician for a Class B digital device, pursuant to part 15 of the FCC Rules. If...


