
User Guide
Page 4
... the power plug from the equipment. When using ear-/headphones, adjust the volume to the graphics card's user guide. 4 After rebooting, change your monitor again. For details, please refer to appropriate levels, or hearing damage may result. • NOTICE: THE... MONITOR MAY OVERHEAT AND SHUTDOWN! If the device shuts down automatically, please turn on your monitor's resolution and refresh rate. Ensure that the power outlet is located near the equipment so that it emerges...
... the power plug from the equipment. When using ear-/headphones, adjust the volume to the graphics card's user guide. 4 After rebooting, change your monitor again. For details, please refer to appropriate levels, or hearing damage may result. • NOTICE: THE... MONITOR MAY OVERHEAT AND SHUTDOWN! If the device shuts down automatically, please turn on your monitor's resolution and refresh rate. Ensure that the power outlet is located near the equipment so that it emerges...

User Guide
Page 5
...-2K / VG2755-2K 31 Menu Options...35 5 VG2455-2K / VG2755-2K 8 Initial Setup 9 Installing the Stand 9 Wall Mounting...12 Using the Security Slot 14 Making Connections 15 Connecting to Power 15 Connecting External Devices 16 HDMI Connection 16 DisplayPort Connection 17 USB Connection...18 Using the Monitor 19... Adjusting the Viewing Angle 19 Height Adjustment 19 Tilt Angle Adjustment 20 Screen Orientation Adjustment (Monitor Pivot 20 Swivel Angle Adjustment 22 Turning the Device On/Off ...
...-2K / VG2755-2K 31 Menu Options...35 5 VG2455-2K / VG2755-2K 8 Initial Setup 9 Installing the Stand 9 Wall Mounting...12 Using the Security Slot 14 Making Connections 15 Connecting to Power 15 Connecting External Devices 16 HDMI Connection 16 DisplayPort Connection 17 USB Connection...18 Using the Monitor 19... Adjusting the Viewing Angle 19 Height Adjustment 19 Tilt Angle Adjustment 20 Screen Orientation Adjustment (Monitor Pivot 20 Swivel Angle Adjustment 22 Turning the Device On/Off ...

User Guide
Page 9
Remove the monitor stand's base and neck. Align and connect the three (3) points on a flat, stable surface and open the front flap of the box to the monitor stand's neck. 1 2 9 Initial Setup This section provides detailed instructions for setting up your monitor. Installing the Stand 1. Place the box on the monitor stand's base with the monitor stand's neck. 3. Use the captured screw in a user-friendly box to make installation easy. Remove the top tray. 2. NOTE: The monitor comes packaged in the monitor stand's base and secure it to reveal the contents.
Remove the monitor stand's base and neck. Align and connect the three (3) points on a flat, stable surface and open the front flap of the box to the monitor stand's neck. 1 2 9 Initial Setup This section provides detailed instructions for setting up your monitor. Installing the Stand 1. Place the box on the monitor stand's base with the monitor stand's neck. 3. Use the captured screw in a user-friendly box to make installation easy. Remove the top tray. 2. NOTE: The monitor comes packaged in the monitor stand's base and secure it to reveal the contents.

User Guide
Page 10
4. Align and slide the upper hooks of the monitor stand into the stand mounting slots as shown in the illustration below: NOTE: Ensure the stand is secure and the quick release tab positively clicks into place. 10
4. Align and slide the upper hooks of the monitor stand into the stand mounting slots as shown in the illustration below: NOTE: Ensure the stand is secure and the quick release tab positively clicks into place. 10

User Guide
Page 13
Follow the instructions that come with four (4) screws (M4 x 10 mm). 100 mm 6. Then secure it with the wall mounting kit to the VESA mounting holes at the rear of the device. 100 mm 5. Attach the mounting bracket to mount the monitor onto the wall. 13
Follow the instructions that come with four (4) screws (M4 x 10 mm). 100 mm 6. Then secure it with the wall mounting kit to the VESA mounting holes at the rear of the device. 100 mm 5. Attach the mounting bracket to mount the monitor onto the wall. 13

User Guide
Page 15
Connecting to the AC IN jack at the rear of the device. 2. Connect the power cord to Power 1. Connect the power cord plug to connect the monitor with other equipment. Making Connections This section guides you on how to a power outlet. 1 2 15
Connecting to the AC IN jack at the rear of the device. 2. Connect the power cord to Power 1. Connect the power cord plug to connect the monitor with other equipment. Making Connections This section guides you on how to a power outlet. 1 2 15

User Guide
Page 16
NOTE: The monitor is equipped with one end of an HDMI cable to the HDMI port of your computer. Then connect the other end of the cable to the HDMI port of your monitor. Connecting External Devices HDMI Connection Connect one HDMI 1.4 port. 16
NOTE: The monitor is equipped with one end of an HDMI cable to the HDMI port of your computer. Then connect the other end of the cable to the HDMI port of your monitor. Connecting External Devices HDMI Connection Connect one HDMI 1.4 port. 16

User Guide
Page 17
NOTE: To connect the monitor to the Thunderbolt port (v. 1&2) on your Mac, connect the mini DP end of the "mini DP to DisplayPort cable" to the Thunderbolt output of the monitor. 17 Then connect the other end of the cable to the DisplayPort port. DisplayPort Connection Connect one end of your Mac. Then connect the other end of the cable to the DisplayPort or mini DP port of a DisplayPort cable to the DisplayPort of your computer.
NOTE: To connect the monitor to the Thunderbolt port (v. 1&2) on your Mac, connect the mini DP end of the "mini DP to DisplayPort cable" to the Thunderbolt output of the monitor. 17 Then connect the other end of the cable to the DisplayPort port. DisplayPort Connection Connect one end of your Mac. Then connect the other end of the cable to the DisplayPort or mini DP port of a DisplayPort cable to the DisplayPort of your computer.

User Guide
Page 18
... guidelines: • Three (3) USB Type A ports: Connection for your Type C output device and cable support video signal transmission. Type-C Type-C 18 NOTE: The monitor supports three (3) types of USB ports. storage device). ͫ NOTE: To activate the USB Type A port, ensure your computer is also connected to the... the other end of the cable to a USB port of your computer. Then connect the other end of the cable to a USB port of the monitor. USB Connection Connect one end of a USB cable to the USB downstream port of your computer. • One (1) USB Type C port: Make sure ...
... guidelines: • Three (3) USB Type A ports: Connection for your Type C output device and cable support video signal transmission. Type-C Type-C 18 NOTE: The monitor supports three (3) types of USB ports. storage device). ͫ NOTE: To activate the USB Type A port, ensure your computer is also connected to the... the other end of the cable to a USB port of your computer. Then connect the other end of the cable to a USB port of the monitor. USB Connection Connect one end of a USB cable to the USB downstream port of your computer. • One (1) USB Type C port: Make sure ...

User Guide
Page 19
NOTE: When adjusting, press down firmly along the adjustment track. 19 Using the Monitor Adjusting the Viewing Angle For optimal viewing, you can adjust the viewing angle using any of the following methods: Height Adjustment Lower or raise the monitor to the desired height (0 to 130 mm).
NOTE: When adjusting, press down firmly along the adjustment track. 19 Using the Monitor Adjusting the Viewing Angle For optimal viewing, you can adjust the viewing angle using any of the following methods: Height Adjustment Lower or raise the monitor to the desired height (0 to 130 mm).

User Guide
Page 20
Tilt Angle Adjustment Tilt the monitor forwards or backwards to the desired viewing angle (-5° to the highest position, then it can support 40° tilt. Screen Orientation Adjustment (Monitor Pivot) 1. NOTE: • When adjusting, support the stand firmly with one hand while tilting the monitor forwards or backwards with the other hand. • The monitor must be lifted to 40°). Then tilt the monitor backwards to the highest position. Adjust the monitor height to the full tilt position. 20
Tilt Angle Adjustment Tilt the monitor forwards or backwards to the desired viewing angle (-5° to the highest position, then it can support 40° tilt. Screen Orientation Adjustment (Monitor Pivot) 1. NOTE: • When adjusting, support the stand firmly with one hand while tilting the monitor forwards or backwards with the other hand. • The monitor must be lifted to 40°). Then tilt the monitor backwards to the highest position. Adjust the monitor height to the full tilt position. 20
User Guide
Page 21
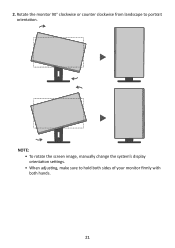
NOTE: • To rotate the screen image, manually change the system's display orientation settings. • When adjusting, make sure to portrait orientation. 2. Rotate the monitor 90° clockwise or counter clockwise from landscape to hold both sides of your monitor firmly with both hands. 21
NOTE: • To rotate the screen image, manually change the system's display orientation settings. • When adjusting, make sure to portrait orientation. 2. Rotate the monitor 90° clockwise or counter clockwise from landscape to hold both sides of your monitor firmly with both hands. 21

User Guide
Page 23
NOTE: The monitor will still consume some power as long as the power cord is not being used for a long period of time, please disconnect the power plug from the power outlet. 23 To turn on the monitor. 3. If the monitor is connected to turn the monitor off, press the Power button again. Turning the Device On/Off 1. Press the Power button to the power outlet. Plug the power cord into a power outlet. 2.
NOTE: The monitor will still consume some power as long as the power cord is not being used for a long period of time, please disconnect the power plug from the power outlet. 23 To turn on the monitor. 3. If the monitor is connected to turn the monitor off, press the Power button again. Turning the Device On/Off 1. Press the Power button to the power outlet. Plug the power cord into a power outlet. 2.
User Guide
Page 37
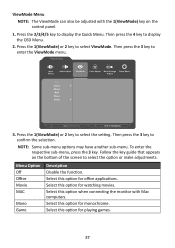
Press the 1(ViewMode) or 2 key to display the OSD Menu. 2. Select this option when connecting the monitor with the 1(ViewMode) key on the bottom of the screen to select the option or make adjustments. Then press the 4 key to select the setting. ...
Press the 1(ViewMode) or 2 key to display the OSD Menu. 2. Select this option when connecting the monitor with the 1(ViewMode) key on the bottom of the screen to select the option or make adjustments. Then press the 4 key to select the setting. ...
User Guide
Page 39
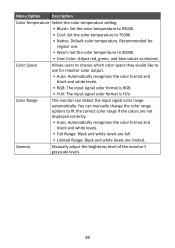
...which color space they would like to 5000K. • User Color: Adjust red, green, and blue values as desired. Color Range The monitor can manually change the color range options to 7500K • Native: Default color temperature. Recommended for regular use. • Warm: Set ...the color temperature to use for monitor color output. • Auto: Automatically recognizes the color format and black and white levels. • RGB: The input signal color format is RGB...
...which color space they would like to 5000K. • User Color: Adjust red, green, and blue values as desired. Color Range The monitor can manually change the color range options to 7500K • Native: Default color temperature. Recommended for regular use. • Warm: Set ...the color temperature to use for monitor color output. • Auto: Automatically recognizes the color format and black and white levels. • RGB: The input signal color format is RGB...

User Guide
Page 40
Then press the 3 key to display the Quick Menu. Adjust the filter that fills the screen. 40 Select the aspect ratio of the monitor. Press the 2/3/4/5 key to confirm (if applicable). Then press the 3 key to display the OSD Menu. 2. Menu Option Sharpness Blue ...Light Filter Aspect Ratio Overscan Description Adjust the sharpness and picture quality of the monitor. Enable this option to automatically enlarge the original picture horizontally and vertically to an equal aspect ratio that blocks high-energy blue light for ...
Then press the 3 key to display the Quick Menu. Adjust the filter that fills the screen. 40 Select the aspect ratio of the monitor. Press the 2/3/4/5 key to confirm (if applicable). Then press the 3 key to display the OSD Menu. 2. Menu Option Sharpness Blue ...Light Filter Aspect Ratio Overscan Description Adjust the sharpness and picture quality of the monitor. Enable this option to automatically enlarge the original picture horizontally and vertically to an equal aspect ratio that blocks high-energy blue light for ...

User Guide
Page 42
Set the length of time the OSD Menu remains on the screen. Display the monitor information. Enable this option to allow the system to inform users that the current viewing resolution is not the ...Power Off Sleep Press the 1(ViewMode) key to hide the message or press the 3 key to disable this option to allow the monitor to On, the power indicator lights blue when the device is set to automatically turn off . Show/Hide the OSD background when...Enable this function. If the setting is turned on or off after a certain amount of idle time before the monitor enters Sleep mode. 42
Set the length of time the OSD Menu remains on the screen. Display the monitor information. Enable this option to allow the system to inform users that the current viewing resolution is not the ...Power Off Sleep Press the 1(ViewMode) key to hide the message or press the 3 key to disable this option to allow the monitor to On, the power indicator lights blue when the device is set to automatically turn off . Show/Hide the OSD background when...Enable this function. If the setting is turned on or off after a certain amount of idle time before the monitor enters Sleep mode. 42

User Guide
Page 43
Enable/Disable USB 3.1 support. Enable this option to their default values. 43 Automatically detect the input signal. Menu Option ECO Mode DisplayPort 1.2 USB 3.1 DDC/CI Auto Detect All Recall Description Choose between various modes, based on power consumption. Resets all settings to allow the monitor control via the graphics card. Enable/Disable DisplayPort 1.2 support.
Enable/Disable USB 3.1 support. Enable this option to their default values. 43 Automatically detect the input signal. Menu Option ECO Mode DisplayPort 1.2 USB 3.1 DDC/CI Auto Detect All Recall Description Choose between various modes, based on power consumption. Resets all settings to allow the monitor control via the graphics card. Enable/Disable DisplayPort 1.2 support.
User Guide
Page 46
... toggles between inputs if you have more comfortable viewing experience. Auto Detect If the current input source has no signal, the monitor will automatically switch to your device. B Black Stabilization ViewSonic's Black stabilization provides heightened visibility and detail by default. A Advanced DCR Advanced DCR technology automatically detects the image signal and intelligently...
... toggles between inputs if you have more comfortable viewing experience. Auto Detect If the current input source has no signal, the monitor will automatically switch to your device. B Black Stabilization ViewSonic's Black stabilization provides heightened visibility and detail by default. A Advanced DCR Advanced DCR technology automatically detects the image signal and intelligently...

User Guide
Page 47
C Color Range The monitor can manually change the color range options to fit the correct color range if the colors are limited. Panel Default Panel original status Bluish 9300K ... and white levels are not displayed correctly. You can detect the input signal color range automatically. Recommend for general graphic design and regular use for monitor color output (RGB, YUV). Options Description Auto The monitor automatically recognizes the color format and black and white levels.
C Color Range The monitor can manually change the color range options to fit the correct color range if the colors are limited. Panel Default Panel original status Bluish 9300K ... and white levels are not displayed correctly. You can detect the input signal color range automatically. Recommend for general graphic design and regular use for monitor color output (RGB, YUV). Options Description Auto The monitor automatically recognizes the color format and black and white levels.


