
Brochure
Page 1
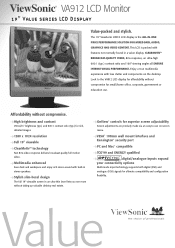
... and workspace and enjoy rich stereo sound with less clutter and components on -screen menu. >VESA® 100mm wall mount interface and Kensington® security port >PC and Mac® compatible >TCO'99 and ENERGY qualified > digital/analogue inputs expand your connectivity options Multi-mode input technology supports both digital (DVI) and analogue (VGA) signals for ultimate compatibility and configuration flexibility. This LCD is the ALL-IN-ONE PRICE PERFORMANCE SOLUTION...
... and workspace and enjoy rich stereo sound with less clutter and components on -screen menu. >VESA® 100mm wall mount interface and Kensington® security port >PC and Mac® compatible >TCO'99 and ENERGY qualified > digital/analogue inputs expand your connectivity options Multi-mode input technology supports both digital (DVI) and analogue (VGA) signals for ultimate compatibility and configuration flexibility. This LCD is the ALL-IN-ONE PRICE PERFORMANCE SOLUTION...

Brochure
Page 2
... (0) 8 50 71 30 00 1 May require optional Mac adapter Copyright © 2006 ViewSonic Corporation. Compact, multimedia, attractive styling Available colours: Black/Silver dual tone 19" LCD MONITOR WITH CLEARMOTIV™ AND MULTIMEDIA LCD PANEL Type Display Area Pixel Pitch Optimum Resolution Contrast Ratio Viewing Angles Response Time Colour Support Light Source Brightness Panel Surface 19" colour TN TFT active matrix SXGA LCD 376mm horizontal x 301mm vertical, 48.3cm diagonal 0.294mm 1280 x 1024...
... (0) 8 50 71 30 00 1 May require optional Mac adapter Copyright © 2006 ViewSonic Corporation. Compact, multimedia, attractive styling Available colours: Black/Silver dual tone 19" LCD MONITOR WITH CLEARMOTIV™ AND MULTIMEDIA LCD PANEL Type Display Area Pixel Pitch Optimum Resolution Contrast Ratio Viewing Angles Response Time Colour Support Light Source Brightness Panel Surface 19" colour TN TFT active matrix SXGA LCD 376mm horizontal x 301mm vertical, 48.3cm diagonal 0.294mm 1280 x 1024...
User Manual
Page 2
Contents TCO Information i Compliance Information 1 Important Safety Instructions 2 Copyright Information 3 Product Registration 3 Getting Started Package Contents 4 Precautions 4 Quick Installation 5 Wall Mounting (Optional 6 Using the LCD Display Setting the Timing Mode 7 OSD and Power Lock Settings 7 Adjusting the Screen Image 8 Main Menu Controls 9 Other Information Specifications 14 Troubleshooting 15 Customer Support 16 Cleaning the LCD Display 17 Limited Warranty 18 ViewSonic VA912/VA912b
Contents TCO Information i Compliance Information 1 Important Safety Instructions 2 Copyright Information 3 Product Registration 3 Getting Started Package Contents 4 Precautions 4 Quick Installation 5 Wall Mounting (Optional 6 Using the LCD Display Setting the Timing Mode 7 OSD and Power Lock Settings 7 Adjusting the Screen Image 8 Main Menu Controls 9 Other Information Specifications 14 Troubleshooting 15 Customer Support 16 Cleaning the LCD Display 17 Limited Warranty 18 ViewSonic VA912/VA912b
User Manual
Page 4
...ViewSonic VA912/VA912b ii TCO'99 requires that batteries shall not contain any mercury. TCO'99 permits the use of lead. * Bio-accumulative is defined as there today is , for TCO'99 compliance model. Cadmium** Cadmium is present in rechargeable batteries and in the colour-generating layers of flat panel monitors...found in batteries, relays and switches. TCO'99 requires that mercury is for the time being, permitted in the back light system of certain computer displays. Their purpose is sometimes found in picture tubes, display screens, solders and capacitors. It also...
...ViewSonic VA912/VA912b ii TCO'99 requires that batteries shall not contain any mercury. TCO'99 permits the use of lead. * Bio-accumulative is defined as there today is , for TCO'99 compliance model. Cadmium** Cadmium is present in rechargeable batteries and in the colour-generating layers of flat panel monitors...found in batteries, relays and switches. TCO'99 requires that mercury is for the time being, permitted in the back light system of certain computer displays. Their purpose is sometimes found in picture tubes, display screens, solders and capacitors. It also...

User Manual
Page 6
...FCC Warning To assure continued FCC compliance, the user must use grounded power supply cord and the cables which are included with Canadian ICES-003. Also, any unauthorized changes or modifications not expressly approved by 93/68/EEC Art.13 with the limits for help. Cet appareil numérique de la ...are designed to correct the interference by one or more of the FCC Rules. This equipment generates, uses, and can be determined by turning the equipment off and on a circuit different from that interference will not occur in a particular installation. ViewSonic VA912/VA912b 1
...FCC Warning To assure continued FCC compliance, the user must use grounded power supply cord and the cables which are included with Canadian ICES-003. Also, any unauthorized changes or modifications not expressly approved by 93/68/EEC Art.13 with the limits for help. Cet appareil numérique de la ...are designed to correct the interference by one or more of the FCC Rules. This equipment generates, uses, and can be determined by turning the equipment off and on a circuit different from that interference will not occur in a particular installation. ViewSonic VA912/VA912b 1
User Manual
Page 7
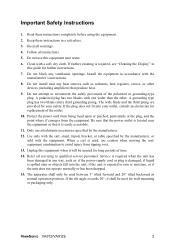
... will be unused for wall mounting or packaging only. If further cleaning is required, see "Cleaning the Display" in a safe place. 3. A grounding type plug has two blades and a third grounding prong. Be sure that the power outlet is located near water. 6. Service is exposed to qualified service personnel. Keep these instructions completely before using the equipment. 2. Heed all servicing to rain or moisture...
... will be unused for wall mounting or packaging only. If further cleaning is required, see "Cleaning the Display" in a safe place. 3. A grounding type plug has two blades and a third grounding prong. Be sure that the power outlet is located near water. 6. Service is exposed to qualified service personnel. Keep these instructions completely before using the equipment. 2. Heed all servicing to rain or moisture...

User Manual
Page 8
VESA is a registered trademark of this document may be liable for incidental or consequential damages resulting from ViewSonic Corporation. Environmental Protection Agency (EPA). No part of the U.S. For Your Records Product Name: Model Number: Document Number: Serial Number: Purchase Date: VA912/b ViewSonic 19" LCD Display VS10867 VA912/b-5_UG_ENG Rev. 1A 10-18-05 Product disposal at end of in accordance with local, state or...
VESA is a registered trademark of this document may be liable for incidental or consequential damages resulting from ViewSonic Corporation. Environmental Protection Agency (EPA). No part of the U.S. For Your Records Product Name: Model Number: Document Number: Serial Number: Purchase Date: VA912/b ViewSonic 19" LCD Display VS10867 VA912/b-5_UG_ENG Rev. 1A 10-18-05 Product disposal at end of in accordance with local, state or...

User Manual
Page 9
..., immediately switch the LCD display off and call your dealer or ViewSonic. Save the original box and all packing material for future shipping needs. You may permanently damage the screen. Package Contents Your LCD display package includes: • LCD display • Power cord • Audio cable (stereo mini jack) • Video cable • ViewSonic Wizard CD-ROM • Quick Start Guide NOTE: The CD includes the User Guide PDF files and INF/ICM display optimization files...
..., immediately switch the LCD display off and call your dealer or ViewSonic. Save the original box and all packing material for future shipping needs. You may permanently damage the screen. Package Contents Your LCD display package includes: • LCD display • Power cord • Audio cable (stereo mini jack) • Video cable • ViewSonic Wizard CD-ROM • Quick Start Guide NOTE: The CD includes the User Guide PDF files and INF/ICM display optimization files...
User Manual
Page 10
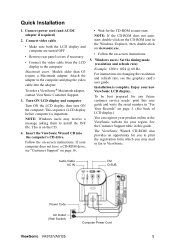
...; Wait for your new ViewSonic LCD display. Audio Cable AC IN DVI D-SUB Power Code AC Outlet (Wall Socket) Computer Power Cord ViewSonic VA912/VA912b 5 Insert the ViewSonic Wizard CD into the adapter. Quick Installation 1. Connect video cable • Make sure both the LCD display and computer are turned OFF • Remove rear panel covers if necessary • Connect the video cable from the LCD display to the computer and plug the video cable into the computer's CD drive. Windows users: Set the timing mode (resolution and refresh rate) Example: 1280 x 1024...
...; Wait for your new ViewSonic LCD display. Audio Cable AC IN DVI D-SUB Power Code AC Outlet (Wall Socket) Computer Power Cord ViewSonic VA912/VA912b 5 Insert the ViewSonic Wizard CD into the adapter. Quick Installation 1. Connect video cable • Make sure both the LCD display and computer are turned OFF • Remove rear panel covers if necessary • Connect the video cable from the LCD display to the computer and plug the video cable into the computer's CD drive. Windows users: Set the timing mode (resolution and refresh rate) Example: 1280 x 1024...
User Manual
Page 11
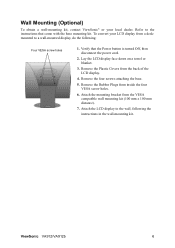
... the LCD display. 4. Remove the Plastic Covers from the VESA compatible wall mounting kit (100 mm x 100 mm distance). 7. Remove the four screws attaching the base. 5. Attach the LCD display to the instructions that the Power button is turned Off, then disconnect the power cord. 2. Verify that come with the base mounting kit. Remove the Rubber Plugs from a deskmounted to a wall-mounted display, do the following the instructions in the wall-mounting kit. ViewSonic VA912/VA912b 6 Wall Mounting (Optional) To obtain a wall-mounting kit, contact ViewSonic...
... the LCD display. 4. Remove the Plastic Covers from the VESA compatible wall mounting kit (100 mm x 100 mm distance). 7. Remove the four screws attaching the base. 5. Attach the LCD display to the instructions that the Power button is turned Off, then disconnect the power cord. 2. Verify that come with the base mounting kit. Remove the Rubber Plugs from a deskmounted to a wall-mounted display, do the following the instructions in the wall-mounting kit. ViewSonic VA912/VA912b 6 Wall Mounting (Optional) To obtain a wall-mounting kit, contact ViewSonic...
User Manual
Page 12
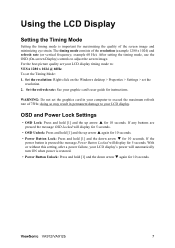
... seconds. If any buttons are pressed the message OSD Locked will display for 5 seconds. WARNING: Do not set the resolution. 2. example 60 Hz). To set your LCD display timing mode to your graphic card's user guide for 10 seconds. OSD and Power Lock Settings • OSD Lock: Press and hold [1] and the down arrow T for instructions. ViewSonic VA912/VA912b 7 For the best picture quality set the Timing Mode: 1. If the power button is restored. • Power Button Unlock: Press and hold...
... seconds. If any buttons are pressed the message OSD Locked will display for 5 seconds. WARNING: Do not set the resolution. 2. example 60 Hz). To set your LCD display timing mode to your graphic card's user guide for 10 seconds. OSD and Power Lock Settings • OSD Lock: Press and hold [1] and the down arrow T for instructions. ViewSonic VA912/VA912b 7 For the best picture quality set the Timing Mode: 1. If the power button is restored. • Power Button Unlock: Press and hold...

User Manual
Page 13
Audio Mute button turns the sound off ViewSonic VA912/VA912b Scrolls through menu options and adjusts the displayed control. Also a shortcut to toggle analog and digital connection. Displays the control screen for the highlighted control. Also toggles between two controls on the screen. The OSD controls are explained at the top of the next page and are defined in detail Displays the Main Menu or exits the control screen and saves adjustments. Power light Green = ON Orange = Power Saving Standby Power On/Off 8 Also...
Audio Mute button turns the sound off ViewSonic VA912/VA912b Scrolls through menu options and adjusts the displayed control. Also a shortcut to toggle analog and digital connection. Displays the control screen for the highlighted control. Also toggles between two controls on the screen. The OSD controls are explained at the top of the next page and are defined in detail Displays the Main Menu or exits the control screen and saves adjustments. Power light Green = ON Orange = Power Saving Standby Power On/Off 8 Also...

User Manual
Page 14
... exit the screen. 4. To adjust the setting, press the up or down T buttons. 5. To save the adjustments and exit the menu, press button [1] twice. The following to the LCD display. (Look for instructions on "changing the refresh rate" in the graphics card's user guide.) • If necessary, make small adjustments using H. POSITION until the screen image is selected, press button [2]. To display the Main Menu, press button [1]. The command line at the bottom of the LCD display.) ViewSonic VA912/VA912b 9 To...
... exit the screen. 4. To adjust the setting, press the up or down T buttons. 5. To save the adjustments and exit the menu, press button [1] twice. The following to the LCD display. (Look for instructions on "changing the refresh rate" in the graphics card's user guide.) • If necessary, make small adjustments using H. POSITION until the screen image is selected, press button [2]. To display the Main Menu, press button [1]. The command line at the bottom of the LCD display.) ViewSonic VA912/VA912b 9 To...

User Manual
Page 15
... T buttons. Color Adjust provides several color adjustment modes, including preset color temperatures and a User Color mode which allows independent adjustment of the screen image. The factory setting for this product is 6500K (6500 Kelvin). 9300K-Adds blue to the screen image for cooler white (used in most office settings with fluorescent lighting). 6500K-Adds red to the screen image for warmer white and richer red. 5400K-Adds green to the VA912/VA912b. Brightness adjusts background black level of red (R), green (G), and blue (B). ViewSonic VA912/VA912b 10 Audio Adjust Volume increases...
... T buttons. Color Adjust provides several color adjustment modes, including preset color temperatures and a User Color mode which allows independent adjustment of the screen image. The factory setting for this product is 6500K (6500 Kelvin). 9300K-Adds blue to the screen image for cooler white (used in most office settings with fluorescent lighting). 6500K-Adds red to the screen image for warmer white and richer red. 5400K-Adds green to the VA912/VA912b. Brightness adjusts background black level of red (R), green (G), and blue (B). ViewSonic VA912/VA912b 10 Audio Adjust Volume increases...

User Manual
Page 16
...instructions on changing the resolution and refresh rate (vertical frequency). To adjust selected color, pressSandT. NOTE: VESA 1280 x 1024 @ 60Hz (recommended) means that the resolution is 1280 x 1024 and the refresh rate is set to a Preset Timing Mode, colors return to the screen image for a darker color. H./V. Manual Image Adjust H. Size (Horizontal Size) adjusts the width of the screen image. See your graphics card's user guide for red (R), green (G), and blue (B). 1. To select color (R, G or B) press button [2]. 2. Information displays the timing mode (video signal input...
...instructions on changing the resolution and refresh rate (vertical frequency). To adjust selected color, pressSandT. NOTE: VESA 1280 x 1024 @ 60Hz (recommended) means that the resolution is 1280 x 1024 and the refresh rate is set to a Preset Timing Mode, colors return to the screen image for a darker color. H./V. Manual Image Adjust H. Size (Horizontal Size) adjusts the width of the screen image. See your graphics card's user guide for red (R), green (G), and blue (B). 1. To select color (R, G or B) press button [2]. 2. Information displays the timing mode (video signal input...

User Manual
Page 17
ViewSonic VA912/VA912b 12 Resolution Notice allows the user to move the OSD menus and control screens. If you enable the Resolution Notice shown above and your computer is not pushed within 30 seconds, the display screen disappears. For example, with pixel boundaries. NOTE: Try Auto Image Adjust first. Sharpness adjusts the clarity and focus of time the OSD screen is displayed. OSD Position allows the user to enable or disable this notice...
ViewSonic VA912/VA912b 12 Resolution Notice allows the user to move the OSD menus and control screens. If you enable the Resolution Notice shown above and your computer is not pushed within 30 seconds, the display screen disappears. For example, with pixel boundaries. NOTE: Try Auto Image Adjust first. Sharpness adjusts the clarity and focus of time the OSD screen is displayed. OSD Position allows the user to enable or disable this notice...
User Manual
Page 18
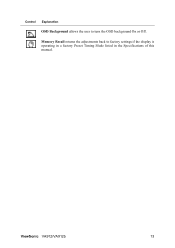
Control Explanation OSD Background allows the user to factory settings if the display is operating in a factory Preset Timing Mode listed in the Specifications of this manual. ViewSonic VA912/VA912b 13 Memory Recall returns the adjustments back to turn the OSD background On or Off.
Control Explanation OSD Background allows the user to factory settings if the display is operating in a factory Preset Timing Mode listed in the Specifications of this manual. ViewSonic VA912/VA912b 13 Memory Recall returns the adjustments back to turn the OSD background On or Off.
User Manual
Page 19
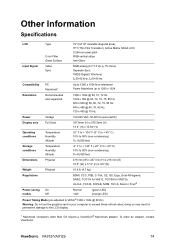
... Information Specifications LCD Type Color Filter Glass Surface 19" (full 19" viewable diagonal area), TFT (Thin Film Transistor), Active Matrix SXGA LCD, 0.294 mm pixel pitch RGB vertical stripe Anti-Glare Input Signal Video Sync RGB analog (0.7/1.0 Vp-p, 75 ohms) Separate Sync, TMDS Digital (100ohms) fh:30-82 kHz, fv:50-85 Hz Compatibility PC Macintosh1 Up to 1280 x 1024 Non-interlaced Power Macintosh up to 1280 x 1024 Resolution...
... Information Specifications LCD Type Color Filter Glass Surface 19" (full 19" viewable diagonal area), TFT (Thin Film Transistor), Active Matrix SXGA LCD, 0.294 mm pixel pitch RGB vertical stripe Anti-Glare Input Signal Video Sync RGB analog (0.7/1.0 Vp-p, 75 ohms) Separate Sync, TMDS Digital (100ohms) fh:30-82 kHz, fv:50-85 Hz Compatibility PC Macintosh1 Up to 1280 x 1024 Non-interlaced Power Macintosh up to 1280 x 1024 Resolution...

User Manual
Page 20
... the LCD display, tightly secure it to the LCD display. • Adjust brightness and contrast. • If you are missing, check the video cable to make sure it is tightly secured to the LCD display. • Plug another computer. • If you need a Macintosh adapter. ViewSonic VA912/VA912b 15 Troubleshooting No power • Make sure power button (or switch) is ON. • Make sure A/C power cord is securely connected to the video output port on the back of the video cable is supplying...
... the LCD display, tightly secure it to the LCD display. • Adjust brightness and contrast. • If you are missing, check the video cable to make sure it is tightly secured to the LCD display. • Plug another computer. • If you need a Macintosh adapter. ViewSonic VA912/VA912b 15 Troubleshooting No power • Make sure power button (or switch) is ON. • Make sure A/C power cord is securely connected to the video output port on the back of the video cable is supplying...

User Manual
Page 23
... exclusions may include remanufactured or refurbished parts or components. Removal, installation, and set-up service charges. You will , at its products to be required to provide your product's serial number. 2. To obtain service under warranty, contact ViewSonic Customer Support. Take or ship the product freight prepaid in the product, damages based upon inconvenience, loss of use of the product, loss of time...
... exclusions may include remanufactured or refurbished parts or components. Removal, installation, and set-up service charges. You will , at its products to be required to provide your product's serial number. 2. To obtain service under warranty, contact ViewSonic Customer Support. Take or ship the product freight prepaid in the product, damages based upon inconvenience, loss of use of the product, loss of time...


