
Quick Start Guide
Page 1
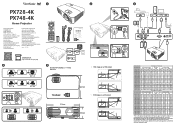
... Pattern Blank 3D ID Set Brightness 3 Gaming 6 Eco Mode 1 Contrast 4 Standard 7 Movie 2 Color Temp 5 Sports 8 User 2 PX728-4K PX748-4K Home Projector Quick Start Guide Vodič za brzo pokretanje Úvodní příručka Aan de slag Pika-aloitusopas Guide de dé...četek Guía de inicio rápido Snabbstartsguide Hızlı Başlangıç Kılavuzu Panduan Mulai Cepat ViewSonic Projector http://vsweb.us Download Link http://vsweb.us/q/dn.php 3 1 HHDDCMPI21.2 HHDDCMPI22.2 2 MENU EXIT SOURCE BLANK COLOR MODE On Off 4...
... Pattern Blank 3D ID Set Brightness 3 Gaming 6 Eco Mode 1 Contrast 4 Standard 7 Movie 2 Color Temp 5 Sports 8 User 2 PX728-4K PX748-4K Home Projector Quick Start Guide Vodič za brzo pokretanje Úvodní příručka Aan de slag Pika-aloitusopas Guide de dé...četek Guía de inicio rápido Snabbstartsguide Hızlı Başlangıç Kılavuzu Panduan Mulai Cepat ViewSonic Projector http://vsweb.us Download Link http://vsweb.us/q/dn.php 3 1 HHDDCMPI21.2 HHDDCMPI22.2 2 MENU EXIT SOURCE BLANK COLOR MODE On Off 4...
User Guide
Page 1
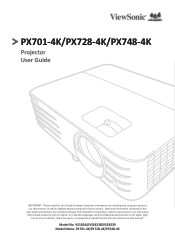
VS18244/VS18338/VS18339 Model Name: PX701-4K/PX728-4K/PX748-4K "Antes de operar su equipo lea cu idadosamente las instrucciones en este manual" Model No. PX701-4K/PX728-4K/PX748-4K Projector User Guide IMPORTANT: Please read this User Guide will describe your product for future service. Warranty... information contained in this User Guide to obtain important information on our web site at http://www.viewsonic.com in English, or...
VS18244/VS18338/VS18339 Model Name: PX701-4K/PX728-4K/PX748-4K "Antes de operar su equipo lea cu idadosamente las instrucciones en este manual" Model No. PX701-4K/PX728-4K/PX748-4K Projector User Guide IMPORTANT: Please read this User Guide will describe your product for future service. Warranty... information contained in this User Guide to obtain important information on our web site at http://www.viewsonic.com in English, or...

User Guide
Page 3
.... There are dangerous high voltages inside which may cause death if you should come into the projector may increase the temperature of the projector to drop or bump the projector on anything on the projector that may cause it from the power supply and call your eyes. • Do not ...at an angle of sustained heat. Do not place anything . • Do not place any heavy objects on the projector or connection cables. • Do not stand the projector on an uneven or unstable surface. Safety Precautions Please read the following Safety Precautions before you may sense some heated ...
.... There are dangerous high voltages inside which may cause death if you should come into the projector may increase the temperature of the projector to drop or bump the projector on anything on the projector that may cause it from the power supply and call your eyes. • Do not ...at an angle of sustained heat. Do not place anything . • Do not place any heavy objects on the projector or connection cables. • Do not stand the projector on an uneven or unstable surface. Safety Precautions Please read the following Safety Precautions before you may sense some heated ...

User Guide
Page 4
...than the other. In areas where voltage may fluctuate or cut out, it emerges from this product. If the plug does not fit into your projector through a power stabilizer, surge protector, or uninterruptable power supply (UPS). • If smoke, an abnormal noise, or a strange odor is designed...The wide and third blade are NEVER REMOVED. • Protect the power cord from being used for your dealer or ViewSonic®. It is dangerous to continue using the projector. • Use only attachments/accessories specified by the manufacturer. • Disconnect the power cord from the AC outlet ...
...than the other. In areas where voltage may fluctuate or cut out, it emerges from this product. If the plug does not fit into your projector through a power stabilizer, surge protector, or uninterruptable power supply (UPS). • If smoke, an abnormal noise, or a strange odor is designed...The wide and third blade are NEVER REMOVED. • Protect the power cord from being used for your dealer or ViewSonic®. It is dangerous to continue using the projector. • Use only attachments/accessories specified by the manufacturer. • Disconnect the power cord from the AC outlet ...
User Guide
Page 5
... 11 Choosing a Location 12 Initial Setup 12 Projection Dimensions 13 PX701-4K...13 16:9 Image on a 16:9 Screen 13 16:9 Image on a 4:3 Screen 14 PX728-4K/PX748-4K 14 16:9 Image on a 16:9 Screen 14 16:9 Image on a 4:3 Screen 15 Mounting the Projector 16 Preventing Unauthorized Use 17 Using the Security Slot 17 Using the...
... 11 Choosing a Location 12 Initial Setup 12 Projection Dimensions 13 PX701-4K...13 16:9 Image on a 16:9 Screen 13 16:9 Image on a 4:3 Screen 14 PX728-4K/PX748-4K 14 16:9 Image on a 16:9 Screen 14 16:9 Image on a 4:3 Screen 15 Mounting the Projector 16 Preventing Unauthorized Use 17 Using the Security Slot 17 Using the...

User Guide
Page 6
... 23 Connecting to Audio 23 Turning the Projector On/Off 25 Starting Up the Projector 25 First Time Activation...25 Operation 25 Shutting Down the Projector 26 Selecting an Input Source 27 Adjusting the Projected Image 28 Adjusting the Projector's Height and Projection Angle 28 Auto-Adjusting... Image 28 Fine-Tuning the Image Size and Clarity 28 Correcting Keystone 29 Adjusting 4 corners 30 Hiding the Image 30 Controlling the Projector through a LAN Environment 31 Configuring the LAN Control Settings 31 General On-Screen Display (OSD) Menu Operation 33 Menu Functions 33 On...
... 23 Connecting to Audio 23 Turning the Projector On/Off 25 Starting Up the Projector 25 First Time Activation...25 Operation 25 Shutting Down the Projector 26 Selecting an Input Source 27 Adjusting the Projected Image 28 Adjusting the Projector's Height and Projection Angle 28 Auto-Adjusting... Image 28 Fine-Tuning the Image Size and Clarity 28 Correcting Keystone 29 Adjusting 4 corners 30 Hiding the Image 30 Controlling the Projector through a LAN Environment 31 Configuring the LAN Control Settings 31 General On-Screen Display (OSD) Menu Operation 33 Menu Functions 33 On...

User Guide
Page 7
Appendix 60 Projector Dimensions 61 Timing Chart...61 HDMI (PC)...61 HDMI (Video)...62 Troubleshooting...64 Common Problems 64 LED Indicators...65 Maintenance...66 General Precautions 66 Cleaning the Lens 66 Cleaning the Case 66 Storing the Projector 66 Disclaimer...66 Light Source Information 67 Light Source Hour 67 Extending Light Source Life 67 Light Source Replacement Timing 68 Replacing the Light Source 68 7
Appendix 60 Projector Dimensions 61 Timing Chart...61 HDMI (PC)...61 HDMI (Video)...62 Troubleshooting...64 Common Problems 64 LED Indicators...65 Maintenance...66 General Precautions 66 Cleaning the Lens 66 Cleaning the Case 66 Storing the Projector 66 Disclaimer...66 Light Source Information 67 Light Source Hour 67 Extending Light Source Life 67 Light Source Replacement Timing 68 Replacing the Light Source 68 7

User Guide
Page 9
... Remote IR sensor Focus Ring Zoom Ring Key [ ] Power [ / / / ] Keystone Keys [/ / /] Left/Right/Up/Down Menu/Exit Source Blank Enter [ ] Corner Adjustment Description Toggles the projector between standby mode and Power On. Displays the input source selection bar. Enacts the selected On-Screen Display (OSD) Menu item when the OSD Menu...
... Remote IR sensor Focus Ring Zoom Ring Key [ ] Power [ / / / ] Keystone Keys [/ / /] Left/Right/Up/Down Menu/Exit Source Blank Enter [ ] Corner Adjustment Description Toggles the projector between standby mode and Power On. Displays the input source selection bar. Enacts the selected On-Screen Display (OSD) Menu item when the OSD Menu...

User Guide
Page 13
... sensor(s) should not exceed 8 m (26 ft.) NOTE: Refer to the illustration for an extended period of time, remove the batteries to avoid damage to the projector's IR remote control sensor(s). 2. NOTE: Observe the battery's polarities as indicated. 3. Remove the battery cover from the rear of the remote control by the battery...
... sensor(s) should not exceed 8 m (26 ft.) NOTE: Refer to the illustration for an extended period of time, remove the batteries to avoid damage to the projector's IR remote control sensor(s). 2. NOTE: Observe the battery's polarities as indicated. 3. Remove the battery cover from the rear of the remote control by the battery...

User Guide
Page 14
... required. 4. Front The projector is placed near the floor behind the screen. Rear The projector is designed to be installed in front of the screen. 3. The projector is placed near the floor in front of the screen. 2. Rear Ceiling The projector is suspeneded upsidedown from the... Location of a suitable power outlet. • Location and Distance between the projector and other equipment. Choosing a Location Personal preference and room layout will decide the installation location. Front Ceiling The projector is suspended upside-down from the ceiling in one of the following : •...
... required. 4. Front The projector is placed near the floor behind the screen. Rear The projector is designed to be installed in front of the screen. 3. The projector is placed near the floor in front of the screen. 2. Rear Ceiling The projector is suspeneded upsidedown from the... Location of a suitable power outlet. • Location and Distance between the projector and other equipment. Choosing a Location Personal preference and room layout will decide the installation location. Front Ceiling The projector is suspended upside-down from the ceiling in one of the following : •...

User Guide
Page 15
Projection Dimensions NOTE: See "Specifications" on page 62 for the native display resolution of this projector. • 16:9 Image on a 16:9 Screen (b) (a) (d) (c) (f) (e) (a) (e) (f) (c) (d) (b) • 16:9 Image on a 4:3 Screen (b) (a) (d) (c) (f) (e) (a) (e) (f) (c) (d) (b) NOTE: (e) = Screen / (f) = Center of Lens PX701-4K 16:9 Image on a 16:9 Screen (a) Screen Size in . mm 60 1524 70 1778 80 2032 90 2286 100 2540...
Projection Dimensions NOTE: See "Specifications" on page 62 for the native display resolution of this projector. • 16:9 Image on a 16:9 Screen (b) (a) (d) (c) (f) (e) (a) (e) (f) (c) (d) (b) • 16:9 Image on a 4:3 Screen (b) (a) (d) (c) (f) (e) (a) (e) (f) (c) (d) (b) NOTE: (e) = Screen / (f) = Center of Lens PX701-4K 16:9 Image on a 16:9 Screen (a) Screen Size in . mm 60 1524 70 1778 80 2032 90 2286 100 2540...

User Guide
Page 16
... . mm in . mm in . It is a 3% tolerance among these numbers due to physically test the projection size and distance before permanently installing the projector. mm in . mm in . PX728-4K/PX748-4K 16:9 Image on a 4:3 Screen (a) Screen Size in. mm 35 897 35.3 897 41 1046 41.2 1046 47 1195 47.1 1195 53 1345...
... . mm in . mm in . It is a 3% tolerance among these numbers due to physically test the projection size and distance before permanently installing the projector. mm in . mm in . PX728-4K/PX748-4K 16:9 Image on a 4:3 Screen (a) Screen Size in. mm 35 897 35.3 897 41 1046 41.2 1046 47 1195 47.1 1195 53 1345...

User Guide
Page 17
... 4580 234 5954 (c) Image Height in . It is a 3% tolerance among these numbers due to physically test the projection size and distance before permanently installing the projector. 17 mm 60 1524 70 1778 80 2032 90 2286 100 2540 110 2794 120 3048 130 3302 140 3556 150 3810 160 4064 170...
... 4580 234 5954 (c) Image Height in . It is a 3% tolerance among these numbers due to physically test the projection size and distance before permanently installing the projector. 17 mm 60 1524 70 1778 80 2032 90 2286 100 2540 110 2794 120 3048 130 3302 140 3556 150 3810 160 4064 170...

User Guide
Page 18
... specifications: • Screw type: M4 x 8 • Maximum Screw length: 8 mm 65.89 65.89 113.54 60.01 NOTE: • Avoid installing the projector near a heat source. • Keep at least a 10 cm gap between the ceiling and the bottom of the mounting plate. 1. To ensure the most secure... installation, please use the correct screw size. Mounting the Projector NOTE: If you buy a third-party mount, please use a ViewSonic® wall or ceiling mount. 2. Screw size can vary depending on the thickness of the...
... specifications: • Screw type: M4 x 8 • Maximum Screw length: 8 mm 65.89 65.89 113.54 60.01 NOTE: • Avoid installing the projector near a heat source. • Keep at least a 10 cm gap between the ceiling and the bottom of the mounting plate. 1. To ensure the most secure... installation, please use the correct screw size. Mounting the Projector NOTE: If you buy a third-party mount, please use a ViewSonic® wall or ceiling mount. 2. Screw size can vary depending on the thickness of the...

User Guide
Page 19
Preventing Unauthorized Use The projector has several built-in security features to the ceiling. 19 Below is an example of setting up a security slot locking device: HDMI 1 HDCP2.2 HDMI 2 HDCP2.2 RS-232 USB 5V/1.5A OUT AUDIO OUT (Service) NOTE: The security slot can also be used as a safety anchor if the projector is mounted to prevent theft, access, or accidental setting changes. Using the Security Slot To help prevent the projector from being stolen, use a security slot locking device to secure the projector to a fixed object.
Preventing Unauthorized Use The projector has several built-in security features to the ceiling. 19 Below is an example of setting up a security slot locking device: HDMI 1 HDCP2.2 HDMI 2 HDCP2.2 RS-232 USB 5V/1.5A OUT AUDIO OUT (Service) NOTE: The security slot can also be used as a safety anchor if the projector is mounted to prevent theft, access, or accidental setting changes. Using the Security Slot To help prevent the projector from being stolen, use a security slot locking device to secure the projector to a fixed object.

User Guide
Page 20
...On Lock and select On by re-entering the new password. Once the password is started. 20 The password can be entered every time the projector is set through the On-Screen Display (OSD) Menu. Press Menu to open the OSD Menu and go to leave the OSD Menu. Using... the Password Function To help prevent unauthorized access or use, the projector offers a password security option. Press Exit to : SYSTEM > Security Settings and press Enter. 2. As pictured to enter a six digit password. 5. Confirm the new password...
...On Lock and select On by re-entering the new password. Once the password is started. 20 The password can be entered every time the projector is set through the On-Screen Display (OSD) Menu. Press Menu to open the OSD Menu and go to leave the OSD Menu. Using... the Password Function To help prevent unauthorized access or use, the projector offers a password security option. Press Exit to : SYSTEM > Security Settings and press Enter. 2. As pictured to enter a six digit password. 5. Confirm the new password...
User Guide
Page 22
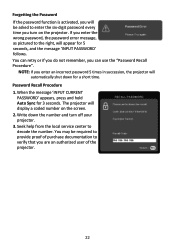
...right, will appear for 5 seconds, and the message 'INPUT PASSWORD' follows. NOTE: If you enter an incorrect password 5 times in succession, the projector will automatically shut down the number and turn on the screen. 2. If you enter the wrong password, the password error message, as pictured to ...to enter the six-digit password every time you turn off your projector. 3. You can retry or if you do not remember, you can use the "Password Recall Procedure". The projector will display a coded number on the projector. Forgetting the Password If the password function is activated, you will...
...right, will appear for 5 seconds, and the message 'INPUT PASSWORD' follows. NOTE: If you enter an incorrect password 5 times in succession, the projector will automatically shut down the number and turn on the screen. 2. If you enter the wrong password, the password error message, as pictured to ...to enter the six-digit password every time you turn off your projector. 3. You can retry or if you do not remember, you can use the "Password Recall Procedure". The projector will display a coded number on the projector. Forgetting the Password If the password function is activated, you will...

User Guide
Page 23
Press Menu to open the OSD Menu and go to confirm. 4. NOTE: You can prevent your settings from being changed accidentally (by children, for 3 seconds. Locking the Control Keys With the control keys on the projector will operate except Power. 1. NOTE: When the Panel Key Lock is On, no control keys on the projector locked, you can also use the remote control to select On. 3. Select Yes and press Enter to : SYSTEM > Panel Key Lock. 2. To release panel key lock, press and hold on the projector for example). Press / to enter the SYSTEM > Panel Key Lock menu and select Off. 23
Press Menu to open the OSD Menu and go to confirm. 4. NOTE: You can prevent your settings from being changed accidentally (by children, for 3 seconds. Locking the Control Keys With the control keys on the projector will operate except Power. 1. NOTE: When the Panel Key Lock is On, no control keys on the projector locked, you can also use the remote control to select On. 3. Select Yes and press Enter to : SYSTEM > Panel Key Lock. 2. To release panel key lock, press and hold on the projector for example). Press / to enter the SYSTEM > Panel Key Lock menu and select Off. 23

User Guide
Page 24
If a fault should occur during operation of the projector. 2. HHDDCMPI21.2 HHDDCMPI22.2 NOTE: When installing the projector, incorporate a readily accessible disconnect device in the fixed wiring, or connect the power plug to switch off the power supply, or disconnect the power plug. ...24 Plug the power cord into a power outlet. Connect the power cord to connect the projector with other equipment. Making Connections This section guides you on how to the AC IN jack at the rear of the...
If a fault should occur during operation of the projector. 2. HHDDCMPI21.2 HHDDCMPI22.2 NOTE: When installing the projector, incorporate a readily accessible disconnect device in the fixed wiring, or connect the power plug to switch off the power supply, or disconnect the power plug. ...24 Plug the power cord into a power outlet. Connect the power cord to connect the projector with other equipment. Making Connections This section guides you on how to the AC IN jack at the rear of the...

User Guide
Page 25
...1 or HDMI 2 port of your projector. Connecting to Video/Computer Sources HDMI Connection Connect one end of an HDMI cable to the HDMI port of your video device. The connection illustrations below are commercially available from electronics stores. PX701-4K HDMI 1 HDCP2.2 HDMI 2 HDCP2....2 RS-232 USB 5V/1.5A OUT AUDIO OUT (Service) 25 Connecting to the AUDIO OUT port of the projector. NOTE: The audio output is equipped with each projector model. The connecting jacks available on the projector vary with speakers...
...1 or HDMI 2 port of your projector. Connecting to Video/Computer Sources HDMI Connection Connect one end of an HDMI cable to the HDMI port of your video device. The connection illustrations below are commercially available from electronics stores. PX701-4K HDMI 1 HDCP2.2 HDMI 2 HDCP2....2 RS-232 USB 5V/1.5A OUT AUDIO OUT (Service) 25 Connecting to the AUDIO OUT port of the projector. NOTE: The audio output is equipped with each projector model. The connecting jacks available on the projector vary with speakers...


