PJ260D User Guide
Page 1
...dell'utente - Käyttöopas Model No. : VS11935 Guía del usuario - ViewSonic® PJ260D DLP Projector IMPORTANT: Please read this User Guide will describe your limited coverage from ViewSonic Corporation, which is also found on installing and using the Regional selection box in a safe ...corner of our website. Warranty information contained in this User Guide to obtain important information on our web site at http://www.viewsonic.com in English, or in specific languages using your product for future service. Bedienungsanleitung - Användarhandbok - Guide de ...
...dell'utente - Käyttöopas Model No. : VS11935 Guía del usuario - ViewSonic® PJ260D DLP Projector IMPORTANT: Please read this User Guide will describe your limited coverage from ViewSonic Corporation, which is also found on installing and using the Regional selection box in a safe ...corner of our website. Warranty information contained in this User Guide to obtain important information on our web site at http://www.viewsonic.com in English, or in specific languages using your product for future service. Bedienungsanleitung - Användarhandbok - Guide de ...

PJ260D User Guide
Page 5
...errors or omissions contained herein; For Your Records Product Name: Model Number: Document Number: Serial Number: Purchase Date: PJ260D ViewSonic DLP Projector VS11935 PJ260D_UG_ENG Rev. 1B 11-21-07 The lamp in the United States and other countries. DPMS and DDC are ...registered trademarks of continuing product improvement, ViewSonic Corporation reserves the right to change without notice. Product Registration To meet your future needs, and to ViewSonic. PS/2, VGA and XGA are registered trademarks of the Video Electronics Standards Association. Please...
...errors or omissions contained herein; For Your Records Product Name: Model Number: Document Number: Serial Number: Purchase Date: PJ260D ViewSonic DLP Projector VS11935 PJ260D_UG_ENG Rev. 1B 11-21-07 The lamp in the United States and other countries. DPMS and DDC are ...registered trademarks of continuing product improvement, ViewSonic Corporation reserves the right to change without notice. Product Registration To meet your future needs, and to ViewSonic. PS/2, VGA and XGA are registered trademarks of the Video Electronics Standards Association. Please...
PJ260D User Guide
Page 6
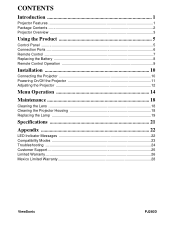
... Panel ...5 Connection Ports ...6 Remote Control ...7 Replacing the Battery 8 Remote Control Operation 9 Installation 10 Connecting the Projector 10 Powering On/Off the Projector 11 Adjusting the Projector 12 Menu Operation 14 Maintenance 18 Cleaning the Lens ...18 Cleaning the Projector Housing 18 Replacing the Lamp 19 Specifications 21 Appendix 22 LED Indicator Messages 22 Compatibility...
... Panel ...5 Connection Ports ...6 Remote Control ...7 Replacing the Battery 8 Remote Control Operation 9 Installation 10 Connecting the Projector 10 Powering On/Off the Projector 11 Adjusting the Projector 12 Menu Operation 14 Maintenance 18 Cleaning the Lens ...18 Cleaning the Projector Housing 18 Replacing the Lamp 19 Specifications 21 Appendix 22 LED Indicator Messages 22 Compatibility...
PJ260D User Guide
Page 7
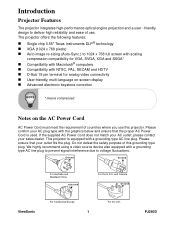
... AC plug type with a grounding type AC line plug to prevent signal interference due to voltage fluctuations. ViewSonic Ground 1 PJ260D The projector offers the following features: „ Single chip 0.55" Texas Instruments DLP® technology „ XGA (1024 x 768 pixels) „ Auto image re-sizing (Auto-Sync.) to deliver high reliability and ease of...
... AC plug type with a grounding type AC line plug to prevent signal interference due to voltage fluctuations. ViewSonic Ground 1 PJ260D The projector offers the following features: „ Single chip 0.55" Texas Instruments DLP® technology „ XGA (1024 x 768 pixels) „ Auto image re-sizing (Auto-Sync.) to deliver high reliability and ease of...

PJ260D User Guide
Page 8
For maximum protection, repack your unit. ViewSonic 2 PJ260D Package Contents When you unpack the projector, make sure you ever to D-SUB) Remote Control (IR) AAA size batteries for remote control CD-Wizard Quick Start Guide Projector Carrying Case „ Save the original shipping carton and packing material; they will comein handy if you have all these components: Projector with Lens Cap AC Power Cord VGA Cable (D-SUB to ship your unit as it was originally packed at the factory. „ Accessories and components may vary by retailer and region.
For maximum protection, repack your unit. ViewSonic 2 PJ260D Package Contents When you unpack the projector, make sure you ever to D-SUB) Remote Control (IR) AAA size batteries for remote control CD-Wizard Quick Start Guide Projector Carrying Case „ Save the original shipping carton and packing material; they will comein handy if you have all these components: Projector with Lens Cap AC Power Cord VGA Cable (D-SUB to ship your unit as it was originally packed at the factory. „ Accessories and components may vary by retailer and region.

PJ260D User Guide
Page 9
Projector Overview Front View 1 Lens cap 2 Projection lens 3 Lens cap strap 4 Front IR remote control sensor 5 Ventilation holes 6 Control panel 7 Zoom ring 8 Focus ring 9 Speaker ViewSonic 3 PJ260D
Projector Overview Front View 1 Lens cap 2 Projection lens 3 Lens cap strap 4 Front IR remote control sensor 5 Ventilation holes 6 Control panel 7 Zoom ring 8 Focus ring 9 Speaker ViewSonic 3 PJ260D
PJ260D User Guide
Page 11
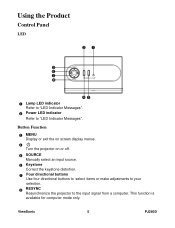
... source. 6 Keystone Correct the keystone distortion. 7 Four directional buttons Use four directional buttons to select items or make adjustments to your selection. 8 RESYNC Resynchronize the projector to "LED Indicator Messages". Using the Product Control Panel LED 2 1 5 6 7 8 43 1 Lamp LED indicator Refer to "LED Indicator Messages". 2 Power LED indicator Refer to the...
... source. 6 Keystone Correct the keystone distortion. 7 Four directional buttons Use four directional buttons to select items or make adjustments to your selection. 8 RESYNC Resynchronize the projector to "LED Indicator Messages". Using the Product Control Panel LED 2 1 5 6 7 8 43 1 Lamp LED indicator Refer to "LED Indicator Messages". 2 Power LED indicator Refer to the...

PJ260D User Guide
Page 13
Press again to the input signal from a computer. Press again to cancel the Mute function. 7 Resync Resynchronize the projector to cancel the Freeze function. Press again to cancel the Blank Screen function. 9 ViewMatch Switch the white peaking. 10 ... "Freeze" to activate the laser pointer. 5 Keystone + / Correct the keystone distortion. 6 Mute Cut off the sound temporarily. ViewSonic 7 PJ260D Remote Control 1 Power Turn the projector on or off. 2 Four directional buttons Use four directional buttons to select items or make adjustments to your selection. 3 MENU Display...
Press again to the input signal from a computer. Press again to cancel the Mute function. 7 Resync Resynchronize the projector to cancel the Freeze function. Press again to cancel the Blank Screen function. 9 ViewMatch Switch the white peaking. 10 ... "Freeze" to activate the laser pointer. 5 Keystone + / Correct the keystone distortion. 6 Mute Cut off the sound temporarily. ViewSonic 7 PJ260D Remote Control 1 Power Turn the projector on or off. 2 Four directional buttons Use four directional buttons to select items or make adjustments to your selection. 3 MENU Display...
PJ260D User Guide
Page 15
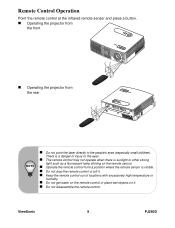
ViewSonic 9 PJ260D There is sunlight or other strong light such as a fluorescent lamp shining on the remote sensor. „ Operate the remote control from the rear &#...'s eyes (especially small children). Remote Control Operation Point the remote control at the infrared remote sensor and press a button. „ Operating the projector from the front „ Operating the projector from a position where the remote sensor is visible. „ Do not drop the remote control or jolt it . „ Do not disassemble...
ViewSonic 9 PJ260D There is sunlight or other strong light such as a fluorescent lamp shining on the remote sensor. „ Operate the remote control from the rear &#...'s eyes (especially small children). Remote Control Operation Point the remote control at the infrared remote sensor and press a button. „ Operating the projector from the front „ Operating the projector from a position where the remote sensor is visible. „ Do not drop the remote control or jolt it . „ Do not disassemble...

PJ260D User Guide
Page 16
Installation Connecting the Projector 1 USB Cable 2 VGA Cable (D-Sub to D-Sub) 3 Audio Cable 4 VGA (D-SUB) to HDTV (RCA) Cable 5 S-Video Cable 6 Composite Video Cable „ When connecting cable, power ... disconnected from the above is a sample connection. The included cables are based on actual shipment delivery. This does not mean that all of both a projector and external equipment should be connected simultaneously. „ The cables that come with the projector may differ from AC outlet. „ The figure above illustration. ViewSonic 10 PJ260D
Installation Connecting the Projector 1 USB Cable 2 VGA Cable (D-Sub to D-Sub) 3 Audio Cable 4 VGA (D-SUB) to HDTV (RCA) Cable 5 S-Video Cable 6 Composite Video Cable „ When connecting cable, power ... disconnected from the above is a sample connection. The included cables are based on actual shipment delivery. This does not mean that all of both a projector and external equipment should be connected simultaneously. „ The cables that come with the projector may differ from AC outlet. „ The figure above illustration. ViewSonic 10 PJ260D

PJ260D User Guide
Page 17
... multiple sources to turn on the projector. Powering Off the Projector: 1. Disconnect the AC power cord from the electrical outlet and the projector. 4. Do not turn the projector back on, you are not allowed to turn off the projector lamp. Complete the AC power cord...cooling fans continue to restart the projector. 3. Press button to warm up. 4. Powering On/Off the Projector Powering On the Projector: 1. ViewSonic 11 PJ260D Remove the projector lens cap. 2. Once in stand-by mode. The projector takes a minute or so to turn on the projector immediately following a power off ...
... multiple sources to turn on the projector. Powering Off the Projector: 1. Disconnect the AC power cord from the electrical outlet and the projector. 4. Do not turn the projector back on, you are not allowed to turn off the projector lamp. Complete the AC power cord...cooling fans continue to restart the projector. 3. Press button to warm up. 4. Powering On/Off the Projector Powering On the Projector: 1. ViewSonic 11 PJ260D Remove the projector lens cap. 2. Once in stand-by mode. The projector takes a minute or so to turn on the projector immediately following a power off ...

PJ260D User Guide
Page 18
... are fully retracted before placing the projector in its carrying case. Adjusting the Projector Zoom and Focus Zoom ring Focus ring 1. Adjust the image by rotating the focus ring. To raise or lower the image: 1. Focus the image by sliding the zoom ring. ViewSonic 12 PJ260D A still image is ...equipped with an elevator foot to adjust the image height. To raise or lower the image, press the elevator button and raise or lower the front of the projector. To level the image on the screen, ...
... are fully retracted before placing the projector in its carrying case. Adjusting the Projector Zoom and Focus Zoom ring Focus ring 1. Adjust the image by rotating the focus ring. To raise or lower the image: 1. Focus the image by sliding the zoom ring. ViewSonic 12 PJ260D A still image is ...equipped with an elevator foot to adjust the image height. To raise or lower the image, press the elevator button and raise or lower the front of the projector. To level the image on the screen, ...

PJ260D User Guide
Page 19
... length) Wide (inches) Tele (inches) 40.7 34.6 50.8 43.2 75.3 64.1 125.2 106.7 250 213.0 300 255.5 „ Position the projector in a smoky environment. other positions can cause heat build-up on critical parts (i.e. Smoke residue may cause build-up and damage to determine the screen... size and projection distance. DMD, lens assembly, etc.) ViewSonic 13 PJ260D Adjusting Projection Image Size Refer to the graphic and table below to the projector. „ Make sure the heat ventilation holes are not blocked. „ Do not use ...
... length) Wide (inches) Tele (inches) 40.7 34.6 50.8 43.2 75.3 64.1 125.2 106.7 250 213.0 300 255.5 „ Position the projector in a smoky environment. other positions can cause heat build-up on critical parts (i.e. Smoke residue may cause build-up and damage to determine the screen... size and projection distance. DMD, lens assembly, etc.) ViewSonic 13 PJ260D Adjusting Projection Image Size Refer to the graphic and table below to the projector. „ Make sure the heat ventilation holes are not blocked. „ Do not use ...

PJ260D User Guide
Page 20
ViewSonic 14 PJ260D Menu Operation The projector has multilingual on-screen display menus that allow you to make image adjustments and change a variety of settings.
ViewSonic 14 PJ260D Menu Operation The projector has multilingual on-screen display menus that allow you to make image adjustments and change a variety of settings.

PJ260D User Guide
Page 21
After selecting the desired main menu feature, press X to select any feature in the main menu. 3. At higher temperature the screen looks colder; ViewSonic 15 PJ260D Color Setting Adjust the color temperature. If you select "User", "Red", "Green" and "Blue" cab be scaled to fit the projection screen.... menu. 6. How to fit the width of the screen. To exit OSD, press the MENU button again. The OSD menu will close and the projector will look brighter. Aspect Ratio Select how the picture fits on the screen: „ 4:3 :The input source will be adjusted. White Intensity Increase ...
After selecting the desired main menu feature, press X to select any feature in the main menu. 3. At higher temperature the screen looks colder; ViewSonic 15 PJ260D Color Setting Adjust the color temperature. If you select "User", "Red", "Green" and "Blue" cab be scaled to fit the projection screen.... menu. 6. How to fit the width of the screen. To exit OSD, press the MENU button again. The OSD menu will close and the projector will look brighter. Aspect Ratio Select how the picture fits on the screen: „ 4:3 :The input source will be adjusted. White Intensity Increase ...

PJ260D User Guide
Page 22
Video Image (Video Mode) Color Adjust the intensity of the projector relative to match the orientation of the projector: upright or upside-down within the projection area. ViewSonic 16 PJ260D Computer Image (Computer Mode) Frequency Adjust the timing of colors. Tint Shift colors toward red or green. Projection Adjust the picture to the ...
Video Image (Video Mode) Color Adjust the intensity of the projector relative to match the orientation of the projector: upright or upside-down within the projection area. ViewSonic 16 PJ260D Computer Image (Computer Mode) Frequency Adjust the timing of colors. Tint Shift colors toward red or green. Projection Adjust the picture to the ...
PJ260D User Guide
Page 23
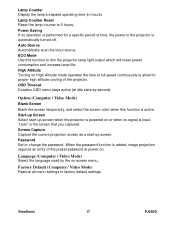
...stays active (at full speed continuously to allow for a specific period of the projector. When the password function is input. ECO Mode Use this function is automatically turned off. ViewSonic 17 PJ260D Lamp Counter Reset Reset the lamp counter to factory default settings. ... life. Option (Computer / Video Mode) Blank Screen Blank the screen temporarily, and select the screen color when this function to the projector is active. Auto Source Automatically scan the input source. Lamp Counter Display the lamp's elapsed operating time (in hours). Factory Default (...
...stays active (at full speed continuously to allow for a specific period of the projector. When the password function is input. ECO Mode Use this function is automatically turned off. ViewSonic 17 PJ260D Lamp Counter Reset Reset the lamp counter to factory default settings. ... life. Option (Computer / Video Mode) Blank Screen Blank the screen temporarily, and select the screen color when this function to the projector is active. Auto Source Automatically scan the input source. Lamp Counter Display the lamp's elapsed operating time (in hours). Factory Default (...
PJ260D User Guide
Page 24
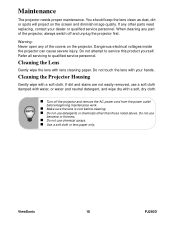
... or water and neutral detergent, and wipe dry with your dealer or qualified service personnel. Warning: Never open any of the projector, always switch off the projector and remove the AC power cord from the power outlet before beginning maintenance work. „ Make sure the lens is cool ...all servicing to service this product yourself. Do not touch the lens with a soft, dry cloth. „ Turn off and unplug the projector first. ViewSonic 18 PJ260D If any part of the covers on the screen and diminish image quality. Cleaning the Lens Gently wipe the lens with a soft ...
... or water and neutral detergent, and wipe dry with your dealer or qualified service personnel. Warning: Never open any of the projector, always switch off the projector and remove the AC power cord from the power outlet before beginning maintenance work. „ Make sure the lens is cool ...all servicing to service this product yourself. Do not touch the lens with a soft, dry cloth. „ Turn off and unplug the projector first. ViewSonic 18 PJ260D If any part of the covers on the screen and diminish image quality. Cleaning the Lens Gently wipe the lens with a soft ...
PJ260D User Guide
Page 25
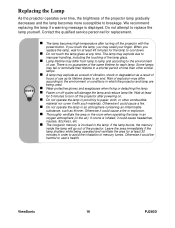
...on . „ Do not operate the lamp in proximity to avoid the inhalation of mercury fumes. Do not attempt to user's health. ViewSonic 19 PJ260D If the lamp bursts, the mercury inside the lamp will damage the lamp and reduce lamp life. Contact the qualified service personnel ...for replacement. „ The lamp becomes high temperature after powering on -off the projector with such materials. There is involved in the lamp. Some lamps may explode as a result of vibration, shock or degradation as thinner. ...
...on . „ Do not operate the lamp in proximity to avoid the inhalation of mercury fumes. Do not attempt to user's health. ViewSonic 19 PJ260D If the lamp bursts, the mercury inside the lamp will damage the lamp and reduce lamp life. Contact the qualified service personnel ...for replacement. „ The lamp becomes high temperature after powering on -off the projector with such materials. There is involved in the lamp. Some lamps may explode as a result of vibration, shock or degradation as thinner. ...
PJ260D User Guide
Page 26
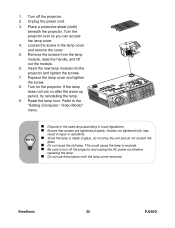
... „ Ensure that screws are tightened properly. Turn off the projector and unplug the AC power cord before replacing the lamp. „ Do not use the projector with the lamp cover removed. ViewSonic 20 PJ260D Turn the projector over so you can access the lamp cover. 4. If the ...lamp does not turn off the projector. 2. Unplug the power cord. 3. Place a protective sheet (cloth) beneath the projector. Insert the new lamp module...
... „ Ensure that screws are tightened properly. Turn off the projector and unplug the AC power cord before replacing the lamp. „ Do not use the projector with the lamp cover removed. ViewSonic 20 PJ260D Turn the projector over so you can access the lamp cover. 4. If the ...lamp does not turn off the projector. 2. Unplug the power cord. 3. Place a protective sheet (cloth) beneath the projector. Insert the new lamp module...


