

User Guide
Page 3
Keep this manual for angled projections • Input source automatically detected ViewSonic Cine1000 ii Important Safety Information Congratulations on the topic at 16.7 million colors to ...is strongly recommended that may damage the unit. The following boxes are used in this section carefully before using the projector. Symbols Used Warning symbols are used on the remote control to deliver crisp, clear images • Flexible setup ...Provides additional information that should not be overlooked. Note: Provides additional information on purchasing the DLP projector!
Keep this manual for angled projections • Input source automatically detected ViewSonic Cine1000 ii Important Safety Information Congratulations on the topic at 16.7 million colors to ...is strongly recommended that may damage the unit. The following boxes are used in this section carefully before using the projector. Symbols Used Warning symbols are used on the remote control to deliver crisp, clear images • Flexible setup ...Provides additional information that should not be overlooked. Note: Provides additional information on purchasing the DLP projector!

User Guide
Page 4
...way of foot traffic. ¾ Remove the batteries from the projection lamp, there are relevant to your convenience and to install and operate the DLP projector. About this manual and on an unstable surface, cart, or stand. ¾ Avoid using the system near water, in use the supplied power...on the unit. This printer-friendly format is intended for end users and describes how to help save paper and thereby protect the environment. ViewSonic Cine1000 iii Power Safety ¾ Only use for your needs. Aside from the remote control when storing or not in direct sunlight, or near...
...way of foot traffic. ¾ Remove the batteries from the projection lamp, there are relevant to your convenience and to install and operate the DLP projector. About this manual and on an unstable surface, cart, or stand. ¾ Avoid using the system near water, in use the supplied power...on the unit. This printer-friendly format is intended for end users and describes how to help save paper and thereby protect the environment. ViewSonic Cine1000 iii Power Safety ¾ Only use for your needs. Aside from the remote control when storing or not in direct sunlight, or near...

User Guide
Page 5
...Number: Document Number: Serial Number: Purchase Date: Cine1000 ViewSonic DLP Projector VS11182 Cine1000 -1_UG_ENG Rev.1A 12-06-05 The lamp in accordance with local, state or federal laws. ViewSonic, the three birds logo, OnView, ViewMatch, and ViewMeter are registered ...PS/2, VGA and XGA are registered trademarks of in this product. ViewSonic Cine1000 iv Product Registration To meet your product on the Internet at: www.viewsonic.com. Please dispose of ViewSonic Corporation. DPMS and DDC are registered trademarks of VESA. Macintosh and...
...Number: Document Number: Serial Number: Purchase Date: Cine1000 ViewSonic DLP Projector VS11182 Cine1000 -1_UG_ENG Rev.1A 12-06-05 The lamp in accordance with local, state or federal laws. ViewSonic, the three birds logo, OnView, ViewMatch, and ViewMeter are registered ...PS/2, VGA and XGA are registered trademarks of in this product. ViewSonic Cine1000 iv Product Registration To meet your product on the Internet at: www.viewsonic.com. Please dispose of ViewSonic Corporation. DPMS and DDC are registered trademarks of VESA. Macintosh and...

User Guide
Page 6
...26 Language Menu ...27 Status Menu...28 MAINTENANCE AND SECURITY...29 REPLACING THE PROJECTION LAMP...29 Resetting the Lamp...30 CLEANING THE PROJECTOR...31 Cleaning the Lens ...31 Cleaning the Case ...32 USING THE KENSINGTON LOCK ...32 TROUBLESHOOTING ...33 COMMON PROBLEMS AND SOLUTIONS...34 IMAGE PROBLEMS...34 LAMP PROBLEMS ...35 REMOTE CONTROL PROBLEMS ...35 AUDIO PROBLEMS...35 HAVING THE PROJECTOR SERVICED ...36 SPECIFICATIONS...37 SPECIFICATIONS...37 Input/output connectors ...38 PROJECTION DISTANCE VERSUS PROJECTION SIZE...39 TIMING MODE TABLE ...40 DIMENSIONS ...41 ViewSonic Cine1000 v
...26 Language Menu ...27 Status Menu...28 MAINTENANCE AND SECURITY...29 REPLACING THE PROJECTION LAMP...29 Resetting the Lamp...30 CLEANING THE PROJECTOR...31 Cleaning the Lens ...31 Cleaning the Case ...32 USING THE KENSINGTON LOCK ...32 TROUBLESHOOTING ...33 COMMON PROBLEMS AND SOLUTIONS...34 IMAGE PROBLEMS...34 LAMP PROBLEMS ...35 REMOTE CONTROL PROBLEMS ...35 AUDIO PROBLEMS...35 HAVING THE PROJECTOR SERVICED ...36 SPECIFICATIONS...37 SPECIFICATIONS...37 Input/output connectors ...38 PROJECTION DISTANCE VERSUS PROJECTION SIZE...39 TIMING MODE TABLE ...40 DIMENSIONS ...41 ViewSonic Cine1000 v

User Guide
Page 7
... projector into the soft case. ViewSonic Cine1000 1 Leave the power cable plugged in dusty environments. 2. Avoid using the projector in (for 5-10 minutes) until the projector returns to break down. GGeettttiinngg SSttaarrtteedd--VViieewwss ooff PPrroojjeeccttoorr PPaarrttss GETTING STARTED Packing Checklist Carefully unpack the projector and check that the following items are included: DLP PROJECTOR ..., appear damaged, or if the unit does not work. Caution: 1. Be sure to attach the lens cap and place the projector into the case soon after switching off the power could cause the...
... projector into the soft case. ViewSonic Cine1000 1 Leave the power cable plugged in dusty environments. 2. Avoid using the projector in (for 5-10 minutes) until the projector returns to break down. GGeettttiinngg SSttaarrtteedd--VViieewwss ooff PPrroojjeeccttoorr PPaarrttss GETTING STARTED Packing Checklist Carefully unpack the projector and check that the following items are included: DLP PROJECTOR ..., appear damaged, or if the unit does not work. Caution: 1. Be sure to attach the lens cap and place the projector into the case soon after switching off the power could cause the...
User Guide
Page 8
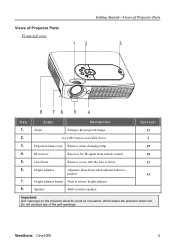
Do not obstruct any of Projector Parts Front-left view GGeettttiinngg SSttaarrtteedd--VViieewwss ooff PPrroojjeeccttoorr PPaarrttss 12 3 8 76 5 4 ITEM 1. 2. 3. 4. 5. 6. 7. 8. ViewSonic Cine1000 2 LABEL DESCRIPTION Zoom Enlarges the projected image See OSD buttons and LEDs below Projection lamp cover Remove when changing lamp IR receiver ... Push to release height adjuster Speaker Built-in mono speaker SEE PAGE: 15 3 29 10 15 14 Important: Grill openings on the projector allow for good air circulation, which keeps the projector lamp cool. Views of the grill openings.
Do not obstruct any of Projector Parts Front-left view GGeettttiinngg SSttaarrtteedd--VViieewwss ooff PPrroojjeeccttoorr PPaarrttss 12 3 8 76 5 4 ITEM 1. 2. 3. 4. 5. 6. 7. 8. ViewSonic Cine1000 2 LABEL DESCRIPTION Zoom Enlarges the projected image See OSD buttons and LEDs below Projection lamp cover Remove when changing lamp IR receiver ... Push to release height adjuster Speaker Built-in mono speaker SEE PAGE: 15 3 29 10 15 14 Important: Grill openings on the projector allow for good air circulation, which keeps the projector lamp cool. Views of the grill openings.

User Guide
Page 9
... 7. Volume/ right cursor ViewSonic Cine1000 11 10 DESCRIPTION SEE PAGE: Decreases volume Navigates and changes settings in the OSD 16,17 Corrects image-trapezoid (narrower top) effect Navigates and changes settings in the OSD 15, 17 Orange Lamp ready-you can safely turn on or off the projector Flashing Lamp not ready...-do not press the power button Turns the projector on or off (main power switch must 13 be turned on first, see item 8 on page 5) Green...
... 7. Volume/ right cursor ViewSonic Cine1000 11 10 DESCRIPTION SEE PAGE: Decreases volume Navigates and changes settings in the OSD 16,17 Corrects image-trapezoid (narrower top) effect Navigates and changes settings in the OSD 15, 17 Orange Lamp ready-you can safely turn on or off the projector Flashing Lamp not ready...-do not press the power button Turns the projector on or off (main power switch must 13 be turned on first, see item 8 on page 5) Green...

User Guide
Page 13
Bottom view 12 3 GGeettttiinngg SSttaarrtteedd--VViieewwss ooff PPrroojjeeccttoorr PPaarrttss 3 3 2 1 ITEM 1. 2. 3. ViewSonic Cine1000 7 LABEL Height adjuster buttons Height adjusters Ceiling support holes DESCRIPTION SEE PAGE: Push to release height adjusters 14 Adjusters drop down when adjuster buttons are pushed Contact your dealer for information on mounting the projector on a ceiling.
Bottom view 12 3 GGeettttiinngg SSttaarrtteedd--VViieewwss ooff PPrroojjeeccttoorr PPaarrttss 3 3 2 1 ITEM 1. 2. 3. ViewSonic Cine1000 7 LABEL Height adjuster buttons Height adjusters Ceiling support holes DESCRIPTION SEE PAGE: Push to release height adjusters 14 Adjusters drop down when adjuster buttons are pushed Contact your dealer for information on mounting the projector on a ceiling.
User Guide
Page 14
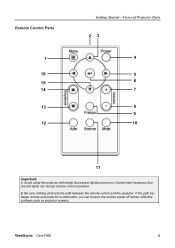
Avoid using the projector with bright fluorescent lighting turned on. If the path between the remote control and the projector. Be sure nothing obstructs the path between remote and projector is obstructed, you can disrupt remote control operation. 2. ViewSonic Cine1000 8 Certain high-frequency fluorescent lights can bounce the remote signal off certain reflective surfaces such as projector screens. Remote Control Parts 1 16 15 14 13 12 GGeettttiinngg SSttaarrtteedd--VViieewwss ooff PPrroojjeeccttoorr PPaarrttss 23 4 5 6 7 8 9 10 11 Important: 1.
Avoid using the projector with bright fluorescent lighting turned on. If the path between the remote control and the projector. Be sure nothing obstructs the path between remote and projector is obstructed, you can disrupt remote control operation. 2. ViewSonic Cine1000 8 Certain high-frequency fluorescent lights can bounce the remote signal off certain reflective surfaces such as projector screens. Remote Control Parts 1 16 15 14 13 12 GGeettttiinngg SSttaarrtteedd--VViieewwss ooff PPrroojjeeccttoorr PPaarrttss 23 4 5 6 7 8 9 10 11 Important: 1.
User Guide
Page 15
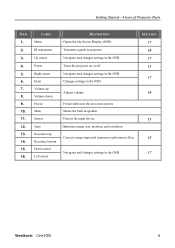
.... 12. 13. 14. 15. 16. LABEL Menu DESCRIPTION Opens the On-Screen Display (OSD) IR transmitter Transmits signals to projector Up cursor Navigates and changes settings in the OSD Power Turns the projector on or off Right cursor Navigates and changes settings in the OSD Enter Volume up Volume down Freeze Mute... Corrects image-trapezoid (narrower top/bottom) effect Navigates and changes settings in the OSD SEE PAGE: 17 10 17 13 17 16 13 15 17 ViewSonic Cine1000 9
.... 12. 13. 14. 15. 16. LABEL Menu DESCRIPTION Opens the On-Screen Display (OSD) IR transmitter Transmits signals to projector Up cursor Navigates and changes settings in the OSD Power Turns the projector on or off Right cursor Navigates and changes settings in the OSD Enter Volume up Volume down Freeze Mute... Corrects image-trapezoid (narrower top/bottom) effect Navigates and changes settings in the OSD SEE PAGE: 17 10 17 13 17 16 13 15 17 ViewSonic Cine1000 9

User Guide
Page 16
... both as the volume down button and as the left cursor key in use. ViewSonic Cine1000 10 The following illustration shows the corresponding buttons on the remote control and on the projector have two functions. GGeettttiinngg SSttaarrtteedd--VViieewwss ooff PPrroojjeeccttoorr PPaarrttss Remote Control Operating Range The remote control uses infrared transmission to point...
... both as the volume down button and as the left cursor key in use. ViewSonic Cine1000 10 The following illustration shows the corresponding buttons on the remote control and on the projector have two functions. GGeettttiinngg SSttaarrtteedd--VViieewwss ooff PPrroojjeeccttoorr PPaarrttss Remote Control Operating Range The remote control uses infrared transmission to point...
User Guide
Page 17
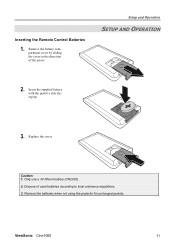
Remove the battery compartment cover by sliding the cover in the direction of used batteries according to local ordinance regulations. 3. Caution: 1. ViewSonic Cine1000 11 Replace the cover. Dispose of the arrow. Inserting the Remote Control Batteries 1. Remove the batteries when not using the projector for prolonged periods. Insert the supplied battery with the positive side facing up. 3. SSeettuupp aanndd OOppeerraattiioonn SETUP AND OPERATION 2. Only use a 3V lithium battery (CR2025). 2.
Remove the battery compartment cover by sliding the cover in the direction of used batteries according to local ordinance regulations. 3. Caution: 1. ViewSonic Cine1000 11 Replace the cover. Dispose of the arrow. Inserting the Remote Control Batteries 1. Remove the batteries when not using the projector for prolonged periods. Insert the supplied battery with the positive side facing up. 3. SSeettuupp aanndd OOppeerraattiioonn SETUP AND OPERATION 2. Only use a 3V lithium battery (CR2025). 2.

User Guide
Page 18
...a video device. Video Connect a composite video cable (supplied) from a computer. Connect a VGA cable (not supplied) to the projector and connecting devices before making connections. Warning: As a safety precaution, disconnect all power to a monitor. Video devices include DVD, ... connected to confirm it has the appropriate output connector. Check the user manual of the connecting device to the projector at the same time. A B C D EF DVI-I IN RGB IN RGB OUT RS-232C USB AUDIO...S-video Connect the supplied S-video cable from a video device. ViewSonic Cine1000 12
...a video device. Video Connect a composite video cable (supplied) from a computer. Connect a VGA cable (not supplied) to the projector and connecting devices before making connections. Warning: As a safety precaution, disconnect all power to a monitor. Video devices include DVD, ... connected to confirm it has the appropriate output connector. Check the user manual of the connecting device to the projector at the same time. A B C D EF DVI-I IN RGB IN RGB OUT RS-232C USB AUDIO...S-video Connect the supplied S-video cable from a video device. ViewSonic Cine1000 12

User Guide
Page 19
... the power cord to switch among devices. Ensure the Lamp-ready LED is on the projector. The projector turns off the projector normally and unplug the power cord before moving the projector ViewSonic Cine1000 13 Remove the lens cover. 3. When the "Power Off?/Press Power again" message appears..., press the Power button. The projector splash screen displays and connected devices are detected. If more than one input device is...
... the power cord to switch among devices. Ensure the Lamp-ready LED is on the projector. The projector turns off the projector normally and unplug the power cord before moving the projector ViewSonic Cine1000 13 Remove the lens cover. 3. When the "Power Off?/Press Power again" message appears..., press the Power button. The projector splash screen displays and connected devices are detected. If more than one input device is...
User Guide
Page 20
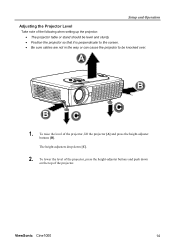
To lower the level of the projector. SSeettuupp aanndd OOppeerraattiioonn Adjusting the Projector Level Take note of the projector, lift the projector [A] and press the height-adjuster buttons [B]. ViewSonic Cine1000 14 The height-adjusters drop down on the top of the projector, press the height-adjuster buttons and push down [C]. 2. To raise the level of the following when...
To lower the level of the projector. SSeettuupp aanndd OOppeerraattiioonn Adjusting the Projector Level Take note of the projector, lift the projector [A] and press the height-adjuster buttons [B]. ViewSonic Cine1000 14 The height-adjusters drop down on the top of the projector, press the height-adjuster buttons and push down [C]. 2. To raise the level of the following when...

User Guide
Page 21
SSeettuupp aanndd OOppeerraattiioonn ViewSonic Cine1000 15 Use the Image-zoom control (on the projector only) to resize the projected image and screen size A . 2. Use the Image-focus control (on the projector only) to sharpen the projected image B 3. The keystone control appears on the projector or the remote control) to correct image-trapezoid (wider top or bottom) effect. Adjust the Zoom, Focus and Keystone 1. Use the Keystone buttons (on the display.
SSeettuupp aanndd OOppeerraattiioonn ViewSonic Cine1000 15 Use the Image-zoom control (on the projector only) to resize the projected image and screen size A . 2. Use the Image-focus control (on the projector only) to sharpen the projected image B 3. The keystone control appears on the projector or the remote control) to correct image-trapezoid (wider top or bottom) effect. Adjust the Zoom, Focus and Keystone 1. Use the Keystone buttons (on the display.
User Guide
Page 22
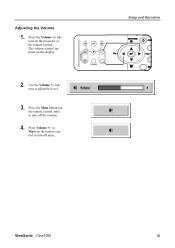
The volume control appears on the remote control only) to turn off the volume. 4. Use the Volume +/- buttons to turn off mute. Press the Mute button (on the display. 2. Press the Volume +/- or Mute on the projector or the remote control. SSeettuupp aanndd OOppeerraattiioonn ViewSonic Cine1000 16 Press Volume +/- Adjusting the Volume 1. buttons on the remote control to adjust the level. 3.
The volume control appears on the remote control only) to turn off the volume. 4. Use the Volume +/- buttons to turn off mute. Press the Mute button (on the display. 2. Press the Volume +/- or Mute on the projector or the remote control. SSeettuupp aanndd OOppeerraattiioonn ViewSonic Cine1000 16 Press Volume +/- Adjusting the Volume 1. buttons on the remote control to adjust the level. 3.
User Guide
Page 23
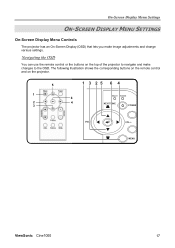
OOnn--SSccrreeeenn DDiissppllaayy MMeennuu SSeettttiinnggss ON-SCREEN DISPLAY MENU SETTINGS On-Screen Display Menu Controls The projector has an On-Screen Display (OSD) that lets you make changes to navigate and make image adjustments and change various settings. VOL + MENU ViewSonic Cine1000 17 Navigating the OSD You can use the remote control or the buttons on the projector. 5 1 2 Blank 3 1 3 25 6 4 READY POWER 6 4 KEYSTONE POWER VOL - The following illustration shows the corresponding buttons on the remote control and on the top of the projector to the OSD.
OOnn--SSccrreeeenn DDiissppllaayy MMeennuu SSeettttiinnggss ON-SCREEN DISPLAY MENU SETTINGS On-Screen Display Menu Controls The projector has an On-Screen Display (OSD) that lets you make changes to navigate and make image adjustments and change various settings. VOL + MENU ViewSonic Cine1000 17 Navigating the OSD You can use the remote control or the buttons on the projector. 5 1 2 Blank 3 1 3 25 6 4 READY POWER 6 4 KEYSTONE POWER VOL - The following illustration shows the corresponding buttons on the remote control and on the top of the projector to the OSD.

User Guide
Page 24
The Main menu appears. 2. Press until Language is highlighted. 3. Press the Menu button. Press the Enter button to close the OSD. Press the Menu button twice to select the language. 5. ViewSonic Cine1000 18 Set the OSD language to reference the OSD on your preference before continuing. (The default language is highlighted. 4. Press until the language you want to your projector while reading this section. OOnn--SSccrreeeenn DDiissppllaayy MMeennuu SSeettttiinnggss Setting the OSD Language You may want is English.) 1.
The Main menu appears. 2. Press until Language is highlighted. 3. Press the Menu button. Press the Enter button to close the OSD. Press the Menu button twice to select the language. 5. ViewSonic Cine1000 18 Set the OSD language to reference the OSD on your preference before continuing. (The default language is highlighted. 4. Press until the language you want to your projector while reading this section. OOnn--SSccrreeeenn DDiissppllaayy MMeennuu SSeettttiinnggss Setting the OSD Language You may want is English.) 1.

User Guide
Page 28
... Peak- Press to select a color. Logo Dis- Press to move to open the OSD menu. Press to move to default values ViewSonic Cine1000 22 OOnn--SSccrreeeenn DDiissppllaayy MMeennuu SSeettttiinnggss Advance Feature Press the Menu button to the Advance Feature, press Enter. ITEM DESCRIPTION DEFAULT User Color ... the brightest whites without changing 10 ing the blacks and dark grays. Press to enable or disable the logo displays when the projector starts, and On play when no source is detected. (Range: On-Off) Reset Resets all White Peaking, Logo Display settings...
... Peak- Press to select a color. Logo Dis- Press to move to open the OSD menu. Press to move to default values ViewSonic Cine1000 22 OOnn--SSccrreeeenn DDiissppllaayy MMeennuu SSeettttiinnggss Advance Feature Press the Menu button to the Advance Feature, press Enter. ITEM DESCRIPTION DEFAULT User Color ... the brightest whites without changing 10 ing the blacks and dark grays. Press to enable or disable the logo displays when the projector starts, and On play when no source is detected. (Range: On-Off) Reset Resets all White Peaking, Logo Display settings...


