

English Owners Manual
Page 2
... 6 Step 1: Checking the package contents 7 Step 2: Setting up the base unit 8 Step 3: Installing the handset battery pack 10 Step 4: Setting Caller ID options 12 Entering your Area Code 13 Memory Dialing Storing phone numbers and names 21 Making calls with memory dialing 23 Editing a stored name and/or phone number 25 Erasing a stored name and phone number 26 Telephone Features 3-way conferencing 28 Intercom Feature 29 Call Transfer Feature 30 Basics Making a call Receiving a call Mute Adjusting the volume Redialing a call Traveling...
... 6 Step 1: Checking the package contents 7 Step 2: Setting up the base unit 8 Step 3: Installing the handset battery pack 10 Step 4: Setting Caller ID options 12 Entering your Area Code 13 Memory Dialing Storing phone numbers and names 21 Making calls with memory dialing 23 Editing a stored name and/or phone number 25 Erasing a stored name and phone number 26 Telephone Features 3-way conferencing 28 Intercom Feature 29 Call Transfer Feature 30 Basics Making a call Receiving a call Mute Adjusting the volume Redialing a call Traveling...
English Owners Manual
Page 4
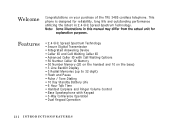
... Welcome Congratulations on the base) • 3 Line Backlit Display • 3 Redial Memories (up to 32 digit) • Flash and Pause • Pulse / Tone Dialing • 10 Day Standby Battery Life • 6 Hour Talk Time • Handset Earpiece and Ringer Volume Control • Base Speakerphone with Call Waiting Options • 50 Number Caller ID Memory • 30 Number Memory (20 on the handset and 10 on your purchase of the TRU 3485 cordless telephone. This phone is designed for...
... Welcome Congratulations on the base) • 3 Line Backlit Display • 3 Redial Memories (up to 32 digit) • Flash and Pause • Pulse / Tone Dialing • 10 Day Standby Battery Life • 6 Hour Talk Time • Handset Earpiece and Ringer Volume Control • Base Speakerphone with Call Waiting Options • 50 Number Caller ID Memory • 30 Number Memory (20 on the handset and 10 on your purchase of the TRU 3485 cordless telephone. This phone is designed for...
English Owners Manual
Page 8
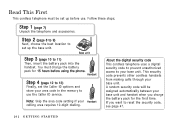
... service. Note: Skip the area code setting if your base unit. A random security code will be set up before using the phone. This security code prevents other cordless handsets from making calls through your Handset calling area requires 10-digit dialing. Step 1 (page 7) Unpack the telephone and accessories. Handset Step 4 (page 12 to 13) Finally, set the Caller ID options and store your area code in the memory to set up the base unit. Read This First This cordless telephone must charge the battery...
... service. Note: Skip the area code setting if your base unit. A random security code will be set up before using the phone. This security code prevents other cordless handsets from making calls through your Handset calling area requires 10-digit dialing. Step 1 (page 7) Unpack the telephone and accessories. Handset Step 4 (page 12 to 13) Finally, set the Caller ID options and store your area code in the memory to set up the base unit. Read This First This cordless telephone must charge the battery...

English Owners Manual
Page 9
GETTING STARTED Checking the Package Contents Make sure you have received the following items in the package. If any of these items are missing or damaged, contact the Uniden Parts Department (see below). • Base unit • Handset • AC adapter (AD-312) • Rechargeable battery pack (BT-905) • Telephone line cord • Beltclip • This Owner´s Manual • Quick Reference Guide • Precautions and...
GETTING STARTED Checking the Package Contents Make sure you have received the following items in the package. If any of these items are missing or damaged, contact the Uniden Parts Department (see below). • Base unit • Handset • AC adapter (AD-312) • Rechargeable battery pack (BT-905) • Telephone line cord • Beltclip • This Owner´s Manual • Quick Reference Guide • Precautions and...

English Owners Manual
Page 11
... [ 9 ] Choose the dialing mode Depending on your dialing system, set the PULSE-TONE switch as follows: If your dialing system, make a trial call connects, leave the switch as shown. If you can unplug the AC adapter easily. GETTING STARTED Connect the base unit 1 Connect the telephone line cord to the TEL LINE jack and to a telephone outlet. 2 Connect the AC adapter to the DC IN 9V jack and to PULSE. If your telephone outlet isn...
... [ 9 ] Choose the dialing mode Depending on your dialing system, set the PULSE-TONE switch as follows: If your dialing system, make a trial call connects, leave the switch as shown. If you can unplug the AC adapter easily. GETTING STARTED Connect the base unit 1 Connect the telephone line cord to the TEL LINE jack and to a telephone outlet. 2 Connect the AC adapter to the DC IN 9V jack and to PULSE. If your telephone outlet isn...
English Owners Manual
Page 14
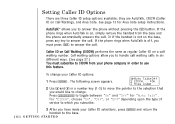
... answer the call waiting number. If the phone rings when AutoTalk is not on the base, press any key to answer the phone without pressing the talk button. Press to CIDCW from the base and the phone automatically answers the call waiting calls in order to change your Caller ID selections, press handset to answer the call. Setting Caller ID Options There are AutoTalk, CIDCW (Caller ID on Call Waiting), and Area Code. See page 13 for Area Code setup instructions...
... answer the call waiting number. If the phone rings when AutoTalk is not on the base, press any key to answer the phone without pressing the talk button. Press to CIDCW from the base and the phone automatically answers the call waiting calls in order to change your Caller ID selections, press handset to answer the call. Setting Caller ID Options There are AutoTalk, CIDCW (Caller ID on Call Waiting), and Area Code. See page 13 for Area Code setup instructions...
English Owners Manual
Page 15
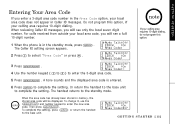
... the setting. When reviewing Caller ID messages, you will see a full 10-digit number. 1 When the phone is entered. 6 Press to enter the new area code. A tone sounds and the displayed area code is in the standby mode, press . Then press . If your calling area requires 10-digit dialing, do not program this option, if your calling area requires 10-digit dialing. G E T T I N G S T A R T E D [ 13 ] The handset returns to the base unit. To complete the setting...
... the setting. When reviewing Caller ID messages, you will see a full 10-digit number. 1 When the phone is entered. 6 Press to enter the new area code. A tone sounds and the displayed area code is in the standby mode, press . Then press . If your calling area requires 10-digit dialing, do not program this option, if your calling area requires 10-digit dialing. G E T T I N G S T A R T E D [ 13 ] The handset returns to the base unit. To complete the setting...

English Owners Manual
Page 16
...; Refer to pulse mode) To enter a pause within the dialing sequence Do this Press during a call -time Talk 0:00 display appears. 8178583300 3 To hang up, press talk or place the handset on Page 3 if necessary. Talk 2 The number is displayed. Other Operations To To improve the reception To adjust the earpiece volume To temporarily switch to tone dial (When the base is set to terminology...
...; Refer to pulse mode) To enter a pause within the dialing sequence Do this Press during a call -time Talk 0:00 display appears. 8178583300 3 To hang up, press talk or place the handset on Page 3 if necessary. Talk 2 The number is displayed. Other Operations To To improve the reception To adjust the earpiece volume To temporarily switch to tone dial (When the base is set to terminology...

English Owners Manual
Page 17
... the base 1 Press speaker . 2 Dial the number on the base. The base microphone is displayed. 2 Dial the phone number. Example: Enter 8178583300 Talk 0:17 8178583300 3 To hang up, press talk or place the handset on the keypad. 3 When you f inish the call, press speaker to the base as possible and speak clearly. BASICS Microphone B A S I C S [ 15 ] Talk Then current volume setting is located under the phone. "Talk" flashes on the display.
... the base 1 Press speaker . 2 Dial the number on the base. The base microphone is displayed. 2 Dial the phone number. Example: Enter 8178583300 Talk 0:17 8178583300 3 To hang up, press talk or place the handset on the keypad. 3 When you f inish the call, press speaker to the base as possible and speak clearly. BASICS Microphone B A S I C S [ 15 ] Talk Then current volume setting is located under the phone. "Talk" flashes on the display.

English Owners Manual
Page 18
... the new call , simply lif t the handset from the base unit to answer the phone. The call-time will see the name and number of f the base, press any handset key to use this feature. When a call is an incoming call . See "SETTING CALLER ID OPTIONS" on the base. Call Waiting Note: You must subscribe to Call Waiting service to answer the incoming call waiting. (See page 36.) If you also subscribe to Call Waiting on Caller ID, you will be displayed for...
... the new call , simply lif t the handset from the base unit to answer the phone. The call-time will see the name and number of f the base, press any handset key to use this feature. When a call is an incoming call . See "SETTING CALLER ID OPTIONS" on the base. Call Waiting Note: You must subscribe to Call Waiting service to answer the incoming call waiting. (See page 36.) If you also subscribe to Call Waiting on Caller ID, you will be displayed for...

English Owners Manual
Page 21
..., press talk or place the handset on Page 3, if necessary. Redialing a Call The last three phone numbers dialed can be displayed for redialed. • Press and hold delete/int com to delete the displayed redial number. • Refer to terminology explanation on the base. Each press of the last three numbers dialed. BASICS 3 Press talk . B A S I C S [ 19 ] The call-time will display one of will be quickly redialed.
..., press talk or place the handset on Page 3, if necessary. Redialing a Call The last three phone numbers dialed can be displayed for redialed. • Press and hold delete/int com to delete the displayed redial number. • Refer to terminology explanation on the base. Each press of the last three numbers dialed. BASICS 3 Press talk . B A S I C S [ 19 ] The call-time will display one of will be quickly redialed.
English Owners Manual
Page 23
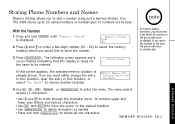
... a two-digit number (01 - 20) to select the memory location where you must either change the entry in this location, clear the entry in the base. In memory dialing operation, you would like to store the number. Storing Phone Numbers and Names Memory Dialing allows you return the handset to the base, the phone will return to standby. With the Handset 1 Press and hold delete/int com to delete all...
... a two-digit number (01 - 20) to select the memory location where you must either change the entry in this location, clear the entry in the base. In memory dialing operation, you would like to store the number. Storing Phone Numbers and Names Memory Dialing allows you return the handset to the base, the phone will return to standby. With the Handset 1 Press and hold delete/int com to delete all...

English Owners Manual
Page 24
..., the new number will overwrite the previous one digit and represents a two second delay of time between digits. • The 10 memory locations in the dialing sequence. The phone number cannot exceed 20 digits. • Use to standby mode. The display shows a "P". The handset beeps and displays the confirmation screen. Store Number 8178583300 Memory07 Stored Memory Store 07 UNIDEN CORP 08 8 Press to return to enter pause in the base are...
..., the new number will overwrite the previous one digit and represents a two second delay of time between digits. • The 10 memory locations in the dialing sequence. The phone number cannot exceed 20 digits. • Use to standby mode. The display shows a "P". The handset beeps and displays the confirmation screen. Store Number 8178583300 Memory07 Stored Memory Store 07 UNIDEN CORP 08 8 Press to return to enter pause in the base are...
English Owners Manual
Page 25
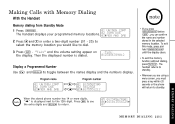
... volume setting appear on Talk the display. Press # to see the extra digits and to the 12th digit. To exit this mode, press and hold delete/int com until the display clears. • To exit the memory function without dialing, press . Then the displayed number is displayed next to return. 05 012345678901 06 011813554329 07 MEMORY DIALING M E M O R Y D I A L I N G [ 23 ] Making Calls with Memory Dialing With the Handset Memory dialing from Standby Mode 1 Press . 01 UNIDEN CORP The handset displays...
... volume setting appear on Talk the display. Press # to see the extra digits and to the 12th digit. To exit this mode, press and hold delete/int com until the display clears. • To exit the memory function without dialing, press . Then the displayed number is displayed next to return. 05 012345678901 06 011813554329 07 MEMORY DIALING M E M O R Y D I A L I N G [ 23 ] Making Calls with Memory Dialing With the Handset Memory dialing from Standby Mode 1 Press . 01 UNIDEN CORP The handset displays...

English Owners Manual
Page 33
... for memory dialing. When the phone number and name data are some typical displays; When the Telephone Rings 1 When the Caller ID message is stored in the Caller ID record. The date and time received Caller's name Caller's phone number 5/11 12:30PM 01 UNIDEN CORP 817-858-3300 Number of calls. When the telephone rings, the Caller ID feature allows you to view the caller´s name and phone number on the display (up to use this...
... for memory dialing. When the phone number and name data are some typical displays; When the Telephone Rings 1 When the Caller ID message is stored in the Caller ID record. The date and time received Caller's name Caller's phone number 5/11 12:30PM 01 UNIDEN CORP 817-858-3300 Number of calls. When the telephone rings, the Caller ID feature allows you to view the caller´s name and phone number on the display (up to use this...

English Owners Manual
Page 38
... a new incoming call arrives during your current telephone call . You will be put on hold. 3 To return to handle the new call , the phone number and the name of ways to the f irst caller, press flash again. Choose an option using the • and ª keys and press to the "Caller ID on call waiting number. CIDCW (Caller ID on Call Waiting) performs the same as regular Caller ID on a call waiting (CIDCW) services...
... a new incoming call arrives during your current telephone call . You will be put on hold. 3 To return to handle the new call , the phone number and the name of ways to the f irst caller, press flash again. Choose an option using the • and ª keys and press to the "Caller ID on call waiting number. CIDCW (Caller ID on Call Waiting) performs the same as regular Caller ID on a call waiting (CIDCW) services...
English Owners Manual
Page 40
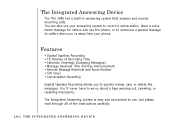
... TRU 3485 has a built-in answering system that answers and records incoming calls. You´ll never have to callers when you to quickly review, save or delete the messages. The Integrated Answering System is easy and convenient to use the phone, or to announce a special message to worry about a tape wearing out, jamming, or resetting improperly. You can also use your answering system to record a conversation, leave a voice memo message...
... TRU 3485 has a built-in answering system that answers and records incoming calls. You´ll never have to callers when you to quickly review, save or delete the messages. The Integrated Answering System is easy and convenient to use the phone, or to announce a special message to worry about a tape wearing out, jamming, or resetting improperly. You can also use your answering system to record a conversation, leave a voice memo message...
English Owners Manual
Page 44
... been reviewed. 3 Af ter you have new messages, and af ter four rings if there is designed to avoid billing charges. Once the greeting has started , you cannot stop the message. If the display is blinking, then there are played. The message counter LED stops flashing to indicate that all of rings the caller hears before starting your old messages again. This way, if you call at another phone extension...
... been reviewed. 3 Af ter you have new messages, and af ter four rings if there is designed to avoid billing charges. Once the greeting has started , you cannot stop the message. If the display is blinking, then there are played. The message counter LED stops flashing to indicate that all of rings the caller hears before starting your old messages again. This way, if you call at another phone extension...

English Owners Manual
Page 53
... the base. • Check both ends of the base unit telephone line cord. • Make sure the AC adapter is plugged into the base unit and wall outlet. • Make sure the handset is set to a different location away from metal objects or appliances and try these simple steps f irst. Charge the battery on the handset and base unit are not too far from appliances or metal objects. • Reset the digital security code...
... the base. • Check both ends of the base unit telephone line cord. • Make sure the AC adapter is plugged into the base unit and wall outlet. • Make sure the handset is set to a different location away from metal objects or appliances and try these simple steps f irst. Charge the battery on the handset and base unit are not too far from appliances or metal objects. • Reset the digital security code...

English Owners Manual
Page 57
...Setting up 39 Using 42 B Base ringer switch 18 Base speaker volume 18 Battery pack Preparing and charging. . . . . 10 Replacement and handling . . 49 C Caller ID Caller ID service 31 Calling 34 Call Waiting 37 Deleting 33 Features 12 Setting 12 Storing 35 Using 34 Viewing 32 Connection 9 D Dialing mode 9 Digital security code 6, 47 E, F, G Earpiece volume 18 H Headset installation 48 I, J, K, L Installing the beltclip 48 Intercom 29 S Setting up your answering system Selecting a PIN code 41 Selecting the message record time 41 Setting ring time switch . . . . 42 Setting...
...Setting up 39 Using 42 B Base ringer switch 18 Base speaker volume 18 Battery pack Preparing and charging. . . . . 10 Replacement and handling . . 49 C Caller ID Caller ID service 31 Calling 34 Call Waiting 37 Deleting 33 Features 12 Setting 12 Storing 35 Using 34 Viewing 32 Connection 9 D Dialing mode 9 Digital security code 6, 47 E, F, G Earpiece volume 18 H Headset installation 48 I, J, K, L Installing the beltclip 48 Intercom 29 S Setting up your answering system Selecting a PIN code 41 Selecting the message record time 41 Setting ring time switch . . . . 42 Setting...


