User Manual
Page 1
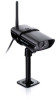
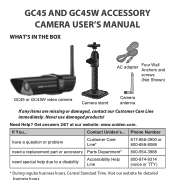
...) * During regular business hours, Central Standard Time. Contact Uniden's... Get answers 24/7 at our website: www.uniden.com. Never use damaged products! gc45 and gc45W Accessory Camera User's Manual What's in the Box AC adapter Four Wall Anchors and screws (Not Shown) GC45 or GC45W video camera Camera stand Camera antenna If any items are missing or damaged...
...) * During regular business hours, Central Standard Time. Contact Uniden's... Get answers 24/7 at our website: www.uniden.com. Never use damaged products! gc45 and gc45W Accessory Camera User's Manual What's in the Box AC adapter Four Wall Anchors and screws (Not Shown) GC45 or GC45W video camera Camera stand Camera antenna If any items are missing or damaged...
User Manual
Page 3
...long periods between the ages of 13 and 18, review these terms, conditions and safety warnings with any children under the age of air. Uniden assumes no userserviceable parts inside. •• Do not expose the equipment to persons caused by any object such as a blanket. SAVE THESE... INSTRUCTIONS! Do not cover the camera or receiver with your equipment, follow the instructions in direct sunlight for damages to property or injury to high temperatures; For best results: To ...
...long periods between the ages of 13 and 18, review these terms, conditions and safety warnings with any children under the age of air. Uniden assumes no userserviceable parts inside. •• Do not expose the equipment to persons caused by any object such as a blanket. SAVE THESE... INSTRUCTIONS! Do not cover the camera or receiver with your equipment, follow the instructions in direct sunlight for damages to property or injury to high temperatures; For best results: To ...
User Manual
Page 4
... to Parents and Other Users 2 For best results 3 Getting to know the camera..5 Camera components and indicators 5 What the lights mean 5 Mount the Camera Stand.......6 General Guidelines 6 Placement Considerations.... 6 Attach the camera 7 Pairing Cameras 9 Some things to know about pairing cameras 9 Pair Camera 9 Troubleshooting camera Pairing 10 Product Specifications.........11 Additional Information........13 Recycling and Disposal Information 13...
... to Parents and Other Users 2 For best results 3 Getting to know the camera..5 Camera components and indicators 5 What the lights mean 5 Mount the Camera Stand.......6 General Guidelines 6 Placement Considerations.... 6 Attach the camera 7 Pairing Cameras 9 Some things to know about pairing cameras 9 Pair Camera 9 Troubleshooting camera Pairing 10 Product Specifications.........11 Additional Information........13 Recycling and Disposal Information 13...
User Manual
Page 5
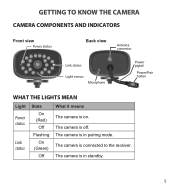
Getting to the receiver. The camera is on. The camera is connected to know the camera CAMERA COMPONENTS AND INDICATORS Front view Power status Back view Antenna connector Link status Light sensor Microphone Power pigtail Power/Pair button What the lights mean Light Power status Link status State On (Red) Off Flashing On (Green) Off What it means The camera is in pairing mode. The camera is off. The camera is in standby. 5
Getting to the receiver. The camera is on. The camera is connected to know the camera CAMERA COMPONENTS AND INDICATORS Front view Power status Back view Antenna connector Link status Light sensor Microphone Power pigtail Power/Pair button What the lights mean Light Power status Link status State On (Red) Off Flashing On (Green) Off What it means The camera is in pairing mode. The camera is off. The camera is in standby. 5
User Manual
Page 6
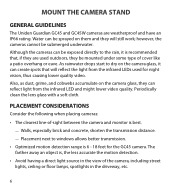
...clean the lens glass with a soft cloth. Walls, especially brick and concrete, shorten the transmission distance. -- Placement next to dry on the camera glass, it is , the less accurate the motion detection. •• Avoid having a direct light source in the driveway, etc. 6... it can create spots that , if they are weatherproof and have an IP66 rating. Mount the Camera Stand General Guidelines The Uniden Guardian GC45 and GC45W cameras are used for the GC45 camera. As rainwater drops start to windows allows better transmission. •• Optimized motion detection range is ...
...clean the lens glass with a soft cloth. Walls, especially brick and concrete, shorten the transmission distance. -- Placement next to dry on the camera glass, it is , the less accurate the motion detection. •• Avoid having a direct light source in the driveway, etc. 6... it can create spots that , if they are weatherproof and have an IP66 rating. Mount the Camera Stand General Guidelines The Uniden Guardian GC45 and GC45W cameras are used for the GC45 camera. As rainwater drops start to windows allows better transmission. •• Optimized motion detection range is ...

User Manual
Page 7
...the wingnut until the post is securely in the wind - it's much easier to make sure it is locked into place. 5. ATTACH THE CAMERA Before attaching the camera, tug gently on the ceiling). Tighten it a few turns. 4. Use the included screws and anchors to attach the base to the mounting screw...ceiling. Unlock the mounting post by turning the wingnut to secure it and mark the location of the camera. 7 Tighten the camera brace up against the camera to the left a few turns, then turn the camera to face the direction you might want to the rear of the screw holes. 2. Attach the ...
...the wingnut until the post is securely in the wind - it's much easier to make sure it is locked into place. 5. ATTACH THE CAMERA Before attaching the camera, tug gently on the ceiling). Tighten it a few turns. 4. Use the included screws and anchors to attach the base to the mounting screw...ceiling. Unlock the mounting post by turning the wingnut to secure it and mark the location of the camera. 7 Tighten the camera brace up against the camera to the left a few turns, then turn the camera to face the direction you might want to the rear of the screw holes. 2. Attach the ...

User Manual
Page 8
... into a 120 volt AC (standard indoor) power outlet (if necessary, connect the extension cord to the camera's pigtail and connect the AC 2 Tighten the brace against the camera to secure it in place. 1 Attach the camera to the desired direction. Antenna Power/ Pair button 8 6. If it to the mounting screw and turn... it doesn't, try reconnecting the AC adapter, and make sure the power outlet isn't controlled by a wall switch. adapter to the camera's power pigtail and plug the other end into place. 7. Connect one end of an AC adapter to the extension cord).
... into a 120 volt AC (standard indoor) power outlet (if necessary, connect the extension cord to the camera's pigtail and connect the AC 2 Tighten the brace against the camera to secure it in place. 1 Attach the camera to the desired direction. Antenna Power/ Pair button 8 6. If it to the mounting screw and turn... it doesn't, try reconnecting the AC adapter, and make sure the power outlet isn't controlled by a wall switch. adapter to the camera's power pigtail and plug the other end into place. 7. Connect one end of an AC adapter to the extension cord).

User Manual
Page 9
... and release the Pairing button on page 10. Some things to know about pairing cameras •• If a camera is , you can communicate). Pair Camera 1. Pairing Cameras Your receiver supports a total of four active cameras at a time! The system automatically adjusts the Camera On screen accordingly. If you want to a different channel. 9 The receiver links to...
... and release the Pairing button on page 10. Some things to know about pairing cameras •• If a camera is , you can communicate). Pair Camera 1. Pairing Cameras Your receiver supports a total of four active cameras at a time! The system automatically adjusts the Camera On screen accordingly. If you want to a different channel. 9 The receiver links to...
User Manual
Page 10
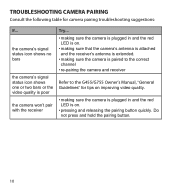
...press and hold the pairing button. 10 the camera's signal status icon shows no bars the camera's signal status icon shows one or two bars or the video quality is poor the camera won't pair with the receiver Try... • making sure the camera is on. • pressing and releasing the... pairing button quickly. Troubleshooting camera Pairing Consult the following table for tips on improving video quality. •...
...press and hold the pairing button. 10 the camera's signal status icon shows no bars the camera's signal status icon shows one or two bars or the video quality is poor the camera won't pair with the receiver Try... • making sure the camera is on. • pressing and releasing the... pairing button quickly. Troubleshooting camera Pairing Consult the following table for tips on improving video quality. •...
User Manual
Page 11
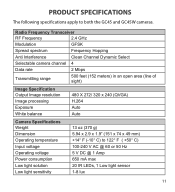
...area (line of sight) Image Specification Output Image resolution Image processing Exposure White balance 480 X 272/ 320 x 240 (QVGA) H.264 Auto Auto Camera Specifications Weight Dimension Operating temperature Input voltage Operating voltage Power consumption Low light solution Low light sensitivity 13 oz (370 g) 5.94 x 2.9 x ...1.9" (151 x 74 x 49 mm) +14° F (-10° C) to both the GC45 and GC45W cameras. Product Specifications The following specifications apply to 122° F ( +50° C) 100-240 V AC @ 60 or 50 Hz 5 V DC @ 1 Amp...
...area (line of sight) Image Specification Output Image resolution Image processing Exposure White balance 480 X 272/ 320 x 240 (QVGA) H.264 Auto Auto Camera Specifications Weight Dimension Operating temperature Input voltage Operating voltage Power consumption Low light solution Low light sensitivity 13 oz (370 g) 5.94 x 2.9 x ...1.9" (151 x 74 x 49 mm) +14° F (-10° C) to both the GC45 and GC45W cameras. Product Specifications The following specifications apply to 122° F ( +50° C) 100-240 V AC @ 60 or 50 Hz 5 V DC @ 1 Amp...


