English Owners Manual
Page 2
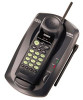
... Battery Pack • Flash and Pause • Pulse / Tone Dialing • Page • 4 Hour Talk Time • 7 Day Standby Battery Time • Handset Earpiece and Ringer Volume Control • Hearing Aid Compatible • Lighted Keypad Digital Spread Spectrum Technology utilizes a "wider frequency band" vs. AutoStandby allows you hang up by other cordless phone. The EXS 9910 features include AutoTalkTM and AutoStandbyTM AutoTalk allows you to answer a call by just removing...
... Battery Pack • Flash and Pause • Pulse / Tone Dialing • Page • 4 Hour Talk Time • 7 Day Standby Battery Time • Handset Earpiece and Ringer Volume Control • Hearing Aid Compatible • Lighted Keypad Digital Spread Spectrum Technology utilizes a "wider frequency band" vs. AutoStandby allows you hang up by other cordless phone. The EXS 9910 features include AutoTalkTM and AutoStandbyTM AutoTalk allows you to answer a call by just removing...

English Owners Manual
Page 4
... 2. Handset ring switch 5. Volume up key 13. Power LED 24. Base antenna 22. Pulse-Tone switch 26. Phone jack 25 26 27 Headset jack cover 3. Redial/Pause key 15. Status LED 23. Handset battery compartment 4. Flash key 14. DC power input 27. Talk/Batt LED 7. Talk key 8. Tone key 11. Handset retainer clip 19. 1. Handset microphone 12. Handset battery charging contacts 18. Spare battery charge compartment 20. Page/Find key 25. Mute key 10. One-touch memory keys 17. Base charging contacts 21. Handset speaker 6. Volume down key 9. Memory key...
... 2. Handset ring switch 5. Volume up key 13. Power LED 24. Base antenna 22. Pulse-Tone switch 26. Phone jack 25 26 27 Headset jack cover 3. Redial/Pause key 15. Status LED 23. Handset battery compartment 4. Flash key 14. DC power input 27. Talk/Batt LED 7. Talk key 8. Tone key 11. Handset retainer clip 19. 1. Handset microphone 12. Handset battery charging contacts 18. Spare battery charge compartment 20. Page/Find key 25. Mute key 10. One-touch memory keys 17. Base charging contacts 21. Handset speaker 6. Volume down key 9. Memory key...
English Owners Manual
Page 5
...Step 2: Setting up the base unit 5 Mounting the base unit on a wall ...........8 Step 3: Installing the handset battery pack........10 Charging optional battery packs 11 Automatic digital code security 12 Basics Making a call 13 Receiving a call 14 Flash and Call Waiting 15 Adjusting the ringer and earpiece volume .........15 Redialing a call 16 Mute 16 Using page feature 17 Memory Dialing Storing phone numbers 18 Making calls with memory dialing 19 Erasing a stored phone number 20 Additional Information Installing the beltclip 21 Headset installation 21 Note on power sources 22...
...Step 2: Setting up the base unit 5 Mounting the base unit on a wall ...........8 Step 3: Installing the handset battery pack........10 Charging optional battery packs 11 Automatic digital code security 12 Basics Making a call 13 Receiving a call 14 Flash and Call Waiting 15 Adjusting the ringer and earpiece volume .........15 Redialing a call 16 Mute 16 Using page feature 17 Memory Dialing Storing phone numbers 18 Making calls with memory dialing 19 Erasing a stored phone number 20 Additional Information Installing the beltclip 21 Headset installation 21 Note on power sources 22...
English Owners Manual
Page 6
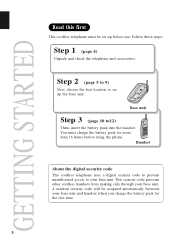
... your base unit. This security code prevents other cordless handsets from making calls through your base unit and handset when you charge the battery pack for more than 16 hours before use. SPSECPDTRRI GAEMIATDA L 900MHz backupobpaetntery status power page/find Base unit Step 3 (page 10 to12) Then, insert the battery pack into the handset. Handset About the digital security code This cordless telephone uses a digital security code to prevent unauthorized access to set up the base unit. A random security code will be set up before using the phone...
... your base unit. This security code prevents other cordless handsets from making calls through your base unit and handset when you charge the battery pack for more than 16 hours before use. SPSECPDTRRI GAEMIATDA L 900MHz backupobpaetntery status power page/find Base unit Step 3 (page 10 to12) Then, insert the battery pack into the handset. Handset About the digital security code This cordless telephone uses a digital security code to prevent unauthorized access to set up the base unit. A random security code will be set up before using the phone...
English Owners Manual
Page 7
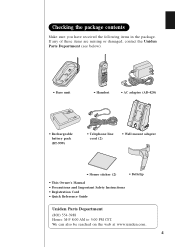
SPSECPDTRRI GAEMIATDA L 900MHz backupobpaetntery status power page/find • Base unit • Handset • AC adapter (AD-420) • Rechargeable battery pack (BT-999) • Telephone line cord (2) • Wall mount adapter • Memo sticker (2) • Beltclip • This Owner's Manual • Precautions and Important Safety Instructions • Registration Card • Quick Reference Guide Uniden Parts Department (800) 554-3988 Hours: M-F 8:00 AM to 5:00 PM CST. If any of these...
SPSECPDTRRI GAEMIATDA L 900MHz backupobpaetntery status power page/find • Base unit • Handset • AC adapter (AD-420) • Rechargeable battery pack (BT-999) • Telephone line cord (2) • Wall mount adapter • Memo sticker (2) • Beltclip • This Owner's Manual • Precautions and Important Safety Instructions • Registration Card • Quick Reference Guide Uniden Parts Department (800) 554-3988 Hours: M-F 8:00 AM to 5:00 PM CST. If any of these...

English Owners Manual
Page 8
Setting up the base unit Do the following steps. • Choose the best location • Connect the base unit • Choose the dialing mode Choose the best location Before choosing a location for your handset for more than 16 hours before using the phone. • The location should charge your new phone, read the INSTALLATION CONSIDERATIONS included in the PRECAUTIONS AND IMPORTANT SAFETY INSTRUCTIONS brochure. Here are some...
Setting up the base unit Do the following steps. • Choose the best location • Connect the base unit • Choose the dialing mode Choose the best location Before choosing a location for your handset for more than 16 hours before using the phone. • The location should charge your new phone, read the INSTALLATION CONSIDERATIONS included in the PRECAUTIONS AND IMPORTANT SAFETY INSTRUCTIONS brochure. Here are some...

English Owners Manual
Page 9
.... 3 Set the base unit on a desk or tabletop and place the handset on the wall, see page 8. Route the cord. Place the power cord so it does not create a trip hazard, or where it could become chafed and create a fire or electrical hazard. 2 To AC outlet To DC IN 9V AC adapter 1 (supplied) To telephone outlet Telephone line cord (supplied) To TEL LINE 1 Connect the telephone line cord to the TEL LINE...
.... 3 Set the base unit on a desk or tabletop and place the handset on the wall, see page 8. Route the cord. Place the power cord so it does not create a trip hazard, or where it could become chafed and create a fire or electrical hazard. 2 To AC outlet To DC IN 9V AC adapter 1 (supplied) To telephone outlet Telephone line cord (supplied) To TEL LINE 1 Connect the telephone line cord to the TEL LINE...

English Owners Manual
Page 10
... adapter. Do not use any other AC adapter. Place the base unit close to PULSE. 7 Polarity of your telephone company for assistance. If your telephone outlet isn't modular, contact your dialing system Make a trial call connects, leave the switch as follows: If your dialing system is ; Modular Choose the dialing mode PULSE TONE Depending on your dialing system, set to TONE. If the call with the PULSE-TONE switch set the PULSE-TONE switch as is Tone Pulse Set...
... adapter. Do not use any other AC adapter. Place the base unit close to PULSE. 7 Polarity of your telephone company for assistance. If your telephone outlet isn't modular, contact your dialing system Make a trial call connects, leave the switch as follows: If your dialing system is ; Modular Choose the dialing mode PULSE TONE Depending on your dialing system, set to TONE. If the call with the PULSE-TONE switch set the PULSE-TONE switch as is Tone Pulse Set...
English Owners Manual
Page 12
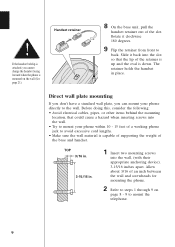
.... 9 Flip the retainer from front to mount the telephone. 9 Direct wall plate mounting If you don't have a standard wall plate, you cannot charge the handset facing forward when the phone is capable of supporting the weight of the slot. Before doing this, consider the following: • Avoid electrical cables, pipes, or other items behind the mounting location, that the lip of an inch...
.... 9 Flip the retainer from front to mount the telephone. 9 Direct wall plate mounting If you don't have a standard wall plate, you cannot charge the handset facing forward when the phone is capable of supporting the weight of the slot. Before doing this, consider the following: • Avoid electrical cables, pipes, or other items behind the mounting location, that the lip of an inch...

English Owners Manual
Page 13
... 5 Make sure that the handset makes good contact with your phone. 1 Press in and that the "status" LED lights. Use only Uniden Battery (BT-999) supplied with the base charging contacts. If the LED doesn't light, check to see that the AC adapter is plugged in on the battery cover release and slide the cover down . 3 Slide the battery cover on the base. Installing the handset battery pack Charge the battery...
... 5 Make sure that the handset makes good contact with your phone. 1 Press in and that the "status" LED lights. Use only Uniden Battery (BT-999) supplied with the base charging contacts. If the LED doesn't light, check to see that the AC adapter is plugged in on the battery cover release and slide the cover down . 3 Slide the battery cover on the base. Installing the handset battery pack Charge the battery...

English Owners Manual
Page 14
... being used as possible and return the handset to the base unit after a telephone call for charging the battery. To avoid this memory effect, on the handset and base unit about once a month. Hours are from your spare battery pack can obtain an extra battery pack from 8:00 a.m. Central Time, Monday through Friday. When the battery charge becomes low When the voltage of battery charger. 2. Complete your authorized Uniden dealer to "Installing...
... being used as possible and return the handset to the base unit after a telephone call for charging the battery. To avoid this memory effect, on the handset and base unit about once a month. Hours are from your spare battery pack can obtain an extra battery pack from 8:00 a.m. Central Time, Monday through Friday. When the battery charge becomes low When the voltage of battery charger. 2. Complete your authorized Uniden dealer to "Installing...

English Owners Manual
Page 15
Your phone's handset and base share this code, which is randomly set each time you place the handset on your phone line, a digital code was added to the EXS 9910. Automatic digital code security To prevent other parties from making unauthorized calls on the base. 12
Your phone's handset and base share this code, which is randomly set each time you place the handset on your phone line, a digital code was added to the EXS 9910. Automatic digital code security To prevent other parties from making unauthorized calls on the base. 12
English Owners Manual
Page 16
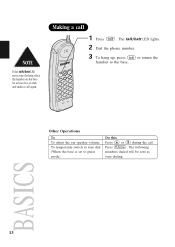
The following numbers dialed will be sent as tone dialing. BASICS 13 The talk/batt LED lights. 2 Dial the phone number. 3 To hang up, press talk or return the handset to pulse mode) Do this Press • or ª during the call again. Other Operations To To adjust the ear speaker volume To temporarily switch to tone dial (When the base is set to the base. Press * /tone . If the talk/batt LED never stops flashing, place the handset on the base for at least five seconds and make a call . Making a call 1 Press talk .
The following numbers dialed will be sent as tone dialing. BASICS 13 The talk/batt LED lights. 2 Dial the phone number. 3 To hang up, press talk or return the handset to pulse mode) Do this Press • or ª during the call again. Other Operations To To adjust the ear speaker volume To temporarily switch to tone dial (When the base is set to the base. Press * /tone . If the talk/batt LED never stops flashing, place the handset on the base for at least five seconds and make a call . Making a call 1 Press talk .
English Owners Manual
Page 18
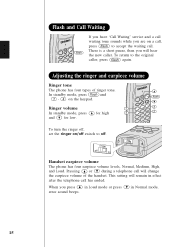
... the telephone call will hear the new caller. When you will change the earpiece volume of ringer tone. • In standby mode, press flash and flash 1 - 4 on Handset earpiece volume The phone has four earpiece volume levels, Normal, Medium, High, and Loud. Adjusting the ringer and earpiece volume Ringer tone The phone has four types of the handset. To return to the original caller, press flash again. Pressing • or ª during a telephone call has...
... the telephone call will hear the new caller. When you will change the earpiece volume of ringer tone. • In standby mode, press flash and flash 1 - 4 on Handset earpiece volume The phone has four earpiece volume levels, Normal, Medium, High, and Loud. Adjusting the ringer and earpiece volume Ringer tone The phone has four types of the handset. To return to the original caller, press flash again. Pressing • or ª during a telephone call has...
English Owners Manual
Page 21
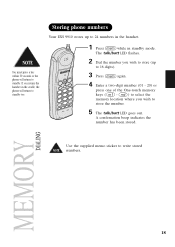
.... MEMORY DIALING 18 A confirmation beep indicates the number has been stored. You must press a key within 30 seconds or the phone will return to standby too. Storing phone numbers Your EXS 9910 stores up to 16 digits). 3 Press mem again. 4 Enter a two-digit number (01 - 20) or press one of the One-touch memory keys ( m1 - m4 ) to standby. The talk/batt LED flashes. 2 Dial the number...
.... MEMORY DIALING 18 A confirmation beep indicates the number has been stored. You must press a key within 30 seconds or the phone will return to standby too. Storing phone numbers Your EXS 9910 stores up to 16 digits). 3 Press mem again. 4 Enter a two-digit number (01 - 20) or press one of the One-touch memory keys ( m1 - m4 ) to standby. The talk/batt LED flashes. 2 Dial the number...

English Owners Manual
Page 22
m4 ) you wish to dial. 4 To hang up , press talk or return the handset to the base. Making calls with memory dialing Memory dialing 1 Press talk . The talk/batt LED lights. 2 Press mem . 3 Enter a two-digit number (01 - 20) to select the memory location you wish to dial. 2 To hang up , press talk or return the handset to the base. 19 One-touch memory dialing 1 Press one of the One-touch memory keys ( m1 -
m4 ) you wish to dial. 4 To hang up , press talk or return the handset to the base. Making calls with memory dialing Memory dialing 1 Press talk . The talk/batt LED lights. 2 Press mem . 3 Enter a two-digit number (01 - 20) to select the memory location you wish to dial. 2 To hang up , press talk or return the handset to the base. 19 One-touch memory dialing 1 Press one of the One-touch memory keys ( m1 -

English Owners Manual
Page 25
...a pencil eraser or other chemical products. Caution • Use the specified battery pack. • Do not remove the battery from the handset to a store that the power is recharged, please replace the battery. When the charging terminals become...used nickelcadmium battery packs to charge it. • Never throw the battery into a fire, disassemble it, or heat it. • Do not remove or damage the battery casing. Note on power sources Battery replacement and handling When the operating time becomes short, even after a battery is off, you will not be able to make or receive calls...
...a pencil eraser or other chemical products. Caution • Use the specified battery pack. • Do not remove the battery from the handset to a store that the power is recharged, please replace the battery. When the charging terminals become...used nickelcadmium battery packs to charge it. • Never throw the battery into a fire, disassemble it, or heat it. • Do not remove or damage the battery casing. Note on power sources Battery replacement and handling When the operating time becomes short, even after a battery is off, you will not be able to make or receive calls...
English Owners Manual
Page 26
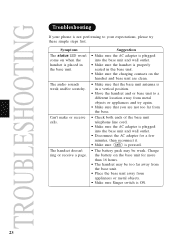
.... • Make sure Ringer switch is pressed. • The battery pack may be weak. TROUBLESHOOTING Troubleshooting If your expectations, please try again. • Make sure that you are not too far from the base. • Check both ends of the base unit telephone line cord. • Make sure the AC adapter is plugged into the base unit and wall outlet. • Make sure the handset is properly seated in the base unit.
.... • Make sure Ringer switch is pressed. • The battery pack may be weak. TROUBLESHOOTING Troubleshooting If your expectations, please try again. • Make sure that you are not too far from the base. • Check both ends of the base unit telephone line cord. • Make sure the AC adapter is plugged into the base unit and wall outlet. • Make sure the handset is properly seated in the base unit.

English Owners Manual
Page 27
... Standby mode 7 days TYP Specifications, features, and availability of optional accessories are all subject to 7:00 PM CST. 24 Our Uniden representatives will be happy to help you with any assistance with FCC Parts 15 and 68. If you for purchasing a Uniden product. Frequency control: PLL Modulation: Frequency shift keying Operating temperature: 0°C to +50°C (+32°F to +122°F) Base unit Frequency: Power...
... Standby mode 7 days TYP Specifications, features, and availability of optional accessories are all subject to 7:00 PM CST. 24 Our Uniden representatives will be happy to help you with any assistance with FCC Parts 15 and 68. If you for purchasing a Uniden product. Frequency control: PLL Modulation: Frequency shift keying Operating temperature: 0°C to +50°C (+32°F to +122°F) Base unit Frequency: Power...

English Owners Manual
Page 28
... B Battery pack Preparing and charging 10 Replacement and handling 22 Beltclip installation 21 C Connection 6 D Dialing mode 7 Digital security code ........3, 12 E, F, G Earpiece volume 15 H, I, J, K, L Handset ringer tone 15 Headset installation 21 M, N, O Maintenance 22 Making a call 13 Memory dialing Making calls with memory dialing......19 Erasing a stored phone number 20 Storing phone numbers 18 Mounting the base unit to a wall 8 Mute 16 P, Q Package contents 4 Page feature 17 R Receiving a call 14 Redialing a call 16 S Setup Base unit 5 Handset 10 Specifications 24...
... B Battery pack Preparing and charging 10 Replacement and handling 22 Beltclip installation 21 C Connection 6 D Dialing mode 7 Digital security code ........3, 12 E, F, G Earpiece volume 15 H, I, J, K, L Handset ringer tone 15 Headset installation 21 M, N, O Maintenance 22 Making a call 13 Memory dialing Making calls with memory dialing......19 Erasing a stored phone number 20 Storing phone numbers 18 Mounting the base unit to a wall 8 Mute 16 P, Q Package contents 4 Page feature 17 R Receiving a call 14 Redialing a call 16 S Setup Base unit 5 Handset 10 Specifications 24...

