
English Owners Manual
Page 2
... you don't have to waste time pushing buttons. Note: Some illustrations in this manual may differ from your phone when the handset is a registered trademark of Uniden America Corporation. AutoStandby allows you for the handset and base. Also, be sure to exacting standards that provide ...™ and AutoStandby™. To protect you against misbilled calls which automatically selects one of Uniden America Corporation. 2 Be sure to visit our web site at: www.uniden.com Uniden is on the base. This phone is designed to complete and mail the product registration form.
... you don't have to waste time pushing buttons. Note: Some illustrations in this manual may differ from your phone when the handset is a registered trademark of Uniden America Corporation. AutoStandby allows you for the handset and base. Also, be sure to exacting standards that provide ...™ and AutoStandby™. To protect you against misbilled calls which automatically selects one of Uniden America Corporation. 2 Be sure to visit our web site at: www.uniden.com Uniden is on the base. This phone is designed to complete and mail the product registration form.
English Owners Manual
Page 3
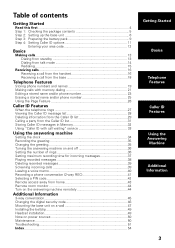
...the handset 16 Receiving a call from the base 18 Telephone Features Storing phone numbers and names 19 Making calls with memory dialing 21 Editing a stored name and/or phone number 23 Erasing a stored name and/or phone number 25 Using the Page Feature 26 Caller ID Features When the ... time for incoming messages 37 Playing recorded messages 38 Deleting recorded messages 39 Screening incoming calls 39 Leaving a voice memo 40 Recording a phone conversation (2-way REC 41 Selecting a PIN code 42 Remote access away from home 43 Remote room monitor 44 Turn on the answering machine...
...the handset 16 Receiving a call from the base 18 Telephone Features Storing phone numbers and names 19 Making calls with memory dialing 21 Editing a stored name and/or phone number 23 Erasing a stored name and/or phone number 25 Using the Page Feature 26 Caller ID Features When the ... time for incoming messages 37 Playing recorded messages 38 Deleting recorded messages 39 Screening incoming calls 39 Leaving a voice memo 40 Recording a phone conversation (2-way REC 41 Selecting a PIN code 42 Remote access away from home 43 Remote room monitor 44 Turn on the answering machine...

English Owners Manual
Page 4
... to 12) Finally, set up the base unit. Step 1 (page 5) Unpack the telephone and accessories. Handset Step 4 (page 11 to set up before using the phone. Follow these steps; Note: Skip the setting of area code if your base unit. Handset About the digital security code This cordless telephone uses a digital...
... to 12) Finally, set up the base unit. Step 1 (page 5) Unpack the telephone and accessories. Handset Step 4 (page 11 to set up before using the phone. Follow these steps; Note: Skip the setting of area code if your base unit. Handset About the digital security code This cordless telephone uses a digital...

English Owners Manual
Page 6
... dialing mode Choose the best location Before choosing a location for 12-15 hours before using the phone. • The location should charge your handset for your new phone, read the INSTALLATION CONSIDERATIONS included in the PRECAUTIONS AND IMPORTANT SAFETY INSTRUCTIONS brochure. Here are some ...mechanical vibration, or shock Choose a central location Avoid personal computers Avoid other cordless telephones • You should be close to both a phone jack and a continuous power outlet which is not switchable. • Keep the base and handset away from sources of electrical noise such ...
... dialing mode Choose the best location Before choosing a location for 12-15 hours before using the phone. • The location should charge your handset for your new phone, read the INSTALLATION CONSIDERATIONS included in the PRECAUTIONS AND IMPORTANT SAFETY INSTRUCTIONS brochure. Here are some ...mechanical vibration, or shock Choose a central location Avoid personal computers Avoid other cordless telephones • You should be close to both a phone jack and a continuous power outlet which is not switchable. • Keep the base and handset away from sources of electrical noise such ...
English Owners Manual
Page 9
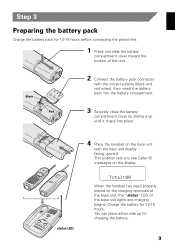
...-15 hours. Charge the battery for charging the battery. 9 Step 3 Preparing the battery pack Charge the battery pack for 12-15 hours before connecting the phone line. 1 Press and slide the battery compartment cover toward the bottom of the base unit lights and charging begins. When the handset has been properly...
...-15 hours. Charge the battery for charging the battery. 9 Step 3 Preparing the battery pack Charge the battery pack for 12-15 hours before connecting the phone line. 1 Press and slide the battery compartment cover toward the bottom of the base unit lights and charging begins. When the handset has been properly...

English Owners Manual
Page 10
... is not being used, it will operate. Notes • Even when the battery pack is important to save power. For optimum performance, be charged, the phone eliminates functions to clean all battery contacts on the handset and base unit with a dry cloth or pencil eraser, if necessary, about once a month. When... discharge over a long period. Do not use , "Low Battery" flashes and none of battery pack is in use any liquids or solvents. 10 If the phone is not in the standby mode. Complete your conversation as quickly as possible and return the handset to the base unit for up to the...
... is not being used, it will operate. Notes • Even when the battery pack is important to save power. For optimum performance, be charged, the phone eliminates functions to clean all battery contacts on the handset and base unit with a dry cloth or pencil eraser, if necessary, about once a month. When... discharge over a long period. Do not use , "Low Battery" flashes and none of battery pack is in use any liquids or solvents. 10 If the phone is not in the standby mode. Complete your conversation as quickly as possible and return the handset to the base unit for up to the...
English Owners Manual
Page 11
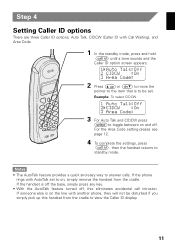
... will not be set to toggle between on , simply remove the handset from the cradle to answer calls. If the phone rings with AutoTalk set . Example: To select CIDCW 3 For Auto Talk and CIDCW press to on and off , this handset from the cradle. If the ...
... will not be set to toggle between on , simply remove the handset from the cradle to answer calls. If the phone rings with AutoTalk set . Example: To select CIDCW 3 For Auto Talk and CIDCW press to on and off , this handset from the cradle. If the ...

English Owners Manual
Page 12
... the stored area code will be displayed. Then press . To delete the area code, press and hold until the stored number is necessary because the phone must enter your calling area requires 10 digit dialing. The handset returns to the base unit. 12 Step 4 (continued) Entering your area code Note Skip... this phone for the first time, or move to an area that has a different area code, you use the number keypad to properly dial calls from the...
... the stored area code will be displayed. Then press . To delete the area code, press and hold until the stored number is necessary because the phone must enter your calling area requires 10 digit dialing. The handset returns to the base unit. 12 Step 4 (continued) Entering your area code Note Skip... this phone for the first time, or move to an area that has a different area code, you use the number keypad to properly dial calls from the...

English Owners Manual
Page 13
... seconds. Example: Volume level "High" 3 The number is set to 32 digits.) Example: Enter 817-858-3300 2 Press . Making calls Dialing from standby 1 Dial the phone number. (up , press or place the handset on the display.
... seconds. Example: Volume level "High" 3 The number is set to 32 digits.) Example: Enter 817-858-3300 2 Press . Making calls Dialing from standby 1 Dial the phone number. (up , press or place the handset on the display.

English Owners Manual
Page 14
The phone returns to standby. 14 Example: Enter 817-858-3300 4 To hang up the handset. 2 Press . The call -time display appears. After about 5 seconds, the call -time will be displayed for about 5 seconds. Making calls (continued) Dialing from talk mode 1 Pick up , press or place the handset on the display. 3 Dial the phone number. "Talk" and the volume setting appear on the base.
The phone returns to standby. 14 Example: Enter 817-858-3300 4 To hang up the handset. 2 Press . The call -time display appears. After about 5 seconds, the call -time will be displayed for about 5 seconds. Making calls (continued) Dialing from talk mode 1 Pick up , press or place the handset on the display. 3 Dial the phone number. "Talk" and the volume setting appear on the base.

English Owners Manual
Page 15
...After about 5 seconds. Redialing from the talk mode 1 Press . The call -time display appears. 4 Press or place the handset on the display. 3 Then the phone number is dialed. The call . "Talk" appears flashing on the display. 2 Press . 3 Press or place the handset on the display. 2 Press . Note ..., the call -time will be displayed for redialing. Making calls (continued) Redialing The redial key redials the last number dialed. The phone number that was last dialed appears on the base to end the telephone call -time will be up to end the telephone call.
...After about 5 seconds. Redialing from the talk mode 1 Press . The call -time display appears. 4 Press or place the handset on the display. 3 Then the phone number is dialed. The call . "Talk" appears flashing on the display. 2 Press . 3 Press or place the handset on the display. 2 Press . Note ..., the call -time will be displayed for redialing. Making calls (continued) Redialing The redial key redials the last number dialed. The phone number that was last dialed appears on the base to end the telephone call -time will be up to end the telephone call.

English Owners Manual
Page 16
.... Any key when ringing When the Auto Talk setting is on and the handset is an incoming call, simply lift the handset from the handset 1 Phone rings. 2 Press . Call Waiting Note: You must subscribe to Call Waiting service to use this feature. If you also subscribe to Caller ID on and... there is off as the default setting. Receiving calls Receiving a call from the base unit to answer the phone. Auto Talk when ringing When the Auto Talk setting is on call waiting, you will be displayed for about 5 seconds.
.... Any key when ringing When the Auto Talk setting is on and the handset is an incoming call, simply lift the handset from the handset 1 Phone rings. 2 Press . Call Waiting Note: You must subscribe to Call Waiting service to use this feature. If you also subscribe to Caller ID on and... there is off as the default setting. Receiving calls Receiving a call from the base unit to answer the phone. Auto Talk when ringing When the Auto Talk setting is on call waiting, you will be displayed for about 5 seconds.

English Owners Manual
Page 19
... screen, you would like to standby. Memory storing You can store up to be entered. If this screen appears, the memory location is displayed. Storing phone numbers and names 1 Press and hold until a tone sounds and "Memory Store" is ready for the name to 10... phone numbers in the cradle, the phone will return to store the number. The cursor flashes indicating that the display is displayed. 2 Press or to scroll to the memory location where you ...
... screen, you would like to standby. Memory storing You can store up to be entered. If this screen appears, the memory location is displayed. Storing phone numbers and names 1 Press and hold until a tone sounds and "Memory Store" is ready for the name to 10... phone numbers in the cradle, the phone will return to store the number. The cursor flashes indicating that the display is displayed. 2 Press or to scroll to the memory location where you ...

English Owners Manual
Page 20
... sequence. Note The pause feature is useful for the number to be up to 16 digits. • Use the key to enter the name. The phone number can be entered. 6 Use the keypad, , , or keys to delete digits needed . 5 Press . Each pause counts as needed . 7 Press . The display shows a ... 7, the display shows "Memory 7 Stored". The cursor flashes indicating that require a pause between the digits. • Use the key to enter the phone number. Memory storage is ready for long distance calling, credit card dialing, or sequences that the display is complete.
... sequence. Note The pause feature is useful for the number to be up to 16 digits. • Use the key to enter the name. The phone number can be entered. 6 Use the keypad, , , or keys to delete digits needed . 5 Press . Each pause counts as needed . 7 Press . The display shows a ... 7, the display shows "Memory 7 Stored". The cursor flashes indicating that require a pause between the digits. • Use the key to enter the phone number. Memory storage is ready for long distance calling, credit card dialing, or sequences that the display is complete.

English Owners Manual
Page 21
For example if you must press a key within 20 seconds or the phone will return to the next memory location number. Notes • To cancel memory selection, press during memory dialing. The handset displays your programmed memory locations. 2 ...
For example if you must press a key within 20 seconds or the phone will return to the next memory location number. Notes • To cancel memory selection, press during memory dialing. The handset displays your programmed memory locations. 2 ...

English Owners Manual
Page 22
... is dialed. Note Memory location 0 follows memory location 9. 22 Program name Program number keys to select the memory location of the phone number are displayed. Then the number is displayed. Memory dialing (continued) Display a Programmed Number Press , then use the and and the number displays. "Talk" and ...the volume setting appear on the display. 2 Press . 3 Press the number keypad to toggle between the name Program name Note When the stored phone number has 15 or more digits, the first 14 digits of the desired...
... is dialed. Note Memory location 0 follows memory location 9. 22 Program name Program number keys to select the memory location of the phone number are displayed. Then the number is displayed. Memory dialing (continued) Display a Programmed Number Press , then use the and and the number displays. "Talk" and ...the volume setting appear on the display. 2 Press . 3 Press the number keypad to toggle between the name Program name Note When the stored phone number has 15 or more digits, the first 14 digits of the desired...

English Owners Manual
Page 23
For example, if you would like to edit. 3 Press . Memory editing Editing a stored name and/or phone number 1 Press and hold until a tone sounds and "Memory Store" is displayed. 2 Press the or keys or number keypad to select the memory location you ... screen appears. The cursor flashes indicating that the display is ready for the number to edit the name. (See page 20.) To edit only the phone number, skip this step. 6 Press . When a name has not been stored, the cursor appears at the beginning of the second line. 5 Press , , , , or to be...
For example, if you would like to edit. 3 Press . Memory editing Editing a stored name and/or phone number 1 Press and hold until a tone sounds and "Memory Store" is displayed. 2 Press the or keys or number keypad to select the memory location you ... screen appears. The cursor flashes indicating that the display is ready for the number to edit the name. (See page 20.) To edit only the phone number, skip this step. 6 Press . When a name has not been stored, the cursor appears at the beginning of the second line. 5 Press , , , , or to be...

English Owners Manual
Page 24
...mode. The memory storage is not to edit the phone number. The handset beeps and displays the confirmation screen. After about 2 seconds, "Memory Store" is displayed. 9 Press to toggle between the names and the numbers display. The phone number cannot exceed 16 digits. (See page 20.)... When the phone number is complete. Program name Program number Program name 24 For example if you store a name and number into...
...mode. The memory storage is not to edit the phone number. The handset beeps and displays the confirmation screen. After about 2 seconds, "Memory Store" is displayed. 9 Press to toggle between the names and the numbers display. The phone number cannot exceed 16 digits. (See page 20.)... When the phone number is complete. Program name Program number Program name 24 For example if you store a name and number into...

English Owners Manual
Page 25
...". 7 Press or . You may select another number to delete (return to step 2). 9 Press to return to erase. 3 Press . Memory erasing Erasing a stored name and/or phone number 1 Press and hold until a tone sounds and "Memory Store" is deleted. A tone sounds and the memory is displayed. 2 Press the or keys or number...
...". 7 Press or . You may select another number to delete (return to step 2). 9 Press to return to erase. 3 Press . Memory erasing Erasing a stored name and/or phone number 1 Press and hold until a tone sounds and "Memory Store" is deleted. A tone sounds and the memory is displayed. 2 Press the or keys or number...

English Owners Manual
Page 27
... Caller ID message will not appear. • When the call is received via a telephone company that does not offer Caller ID service, the caller's phone number and name do not appear. (This includes international calls.) • When the call information is via a private branch exchange (PBX), the caller...'s phone number and name may not appear. • Data errors appear as "2". 27 If the Caller ID service includes the caller's name, it appears on...
... Caller ID message will not appear. • When the call is received via a telephone company that does not offer Caller ID service, the caller's phone number and name do not appear. (This includes international calls.) • When the call information is via a private branch exchange (PBX), the caller...'s phone number and name may not appear. • Data errors appear as "2". 27 If the Caller ID service includes the caller's name, it appears on...

