

English Owners Manual
Page 1
... operate the unit. Plus, new built-in Speaker • Pre-Programmed Scanner covers all , you with Strength Meter • Local Police Coverage • Highway Patrol Coverage • 9 Level Strength Meter • Windshield Mountable • Instant Weather • Built-in technology sounds an alarm when a highway patrol unit using a mobile extender is detected! Just set the BCT-10 for easy operation and dependability. Please read this Operating Guide...
... operate the unit. Plus, new built-in Speaker • Pre-Programmed Scanner covers all , you with Strength Meter • Local Police Coverage • Highway Patrol Coverage • 9 Level Strength Meter • Windshield Mountable • Instant Weather • Built-in technology sounds an alarm when a highway patrol unit using a mobile extender is detected! Just set the BCT-10 for easy operation and dependability. Please read this Operating Guide...

English Owners Manual
Page 2
A frequency is a transmitter/receiver that receives the signal from the patrol car are sent to their cars, signals from the station and transmits it will trigger an audio and visual alarm. 2 The mobile extender is the number of times in the channels it finds a frequency with a signal, for example someone talking on a different, but lower, frequency. The BCT-10's Highway Patrol Alert System also looks for "activity" in...
A frequency is a transmitter/receiver that receives the signal from the patrol car are sent to their cars, signals from the station and transmits it will trigger an audio and visual alarm. 2 The mobile extender is the number of times in the channels it finds a frequency with a signal, for example someone talking on a different, but lower, frequency. The BCT-10's Highway Patrol Alert System also looks for "activity" in...
English Owners Manual
Page 5
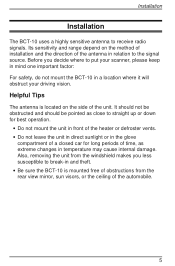
... car for best operation. • Do not mount the unit in front of the unit. Its sensitivity and range depend on the side of the heater or defroster vents. • Do not leave the unit in direct sunlight or in temperature may cause internal damage. Helpful Tips The antenna is mounted free of obstructions from the windshield makes you decide where to receive radio signals...
... car for best operation. • Do not mount the unit in front of the unit. Its sensitivity and range depend on the side of the heater or defroster vents. • Do not leave the unit in direct sunlight or in temperature may cause internal damage. Helpful Tips The antenna is mounted free of obstructions from the windshield makes you decide where to receive radio signals...

English Owners Manual
Page 12
Connect the other wire to a 12V DC source in your vehicle's fuse box. 2. Connecting the Power Direct Connection WARNING: The BCT-10 is designed to operate only with the unit has bare wires at one end, and a small connector at the other end. 1. The straight power cord provided with 12V DC, negative ground power systems. Operation of the unit on other voltages or polarities will cause damage to the unit and may create a fire hazard. Connect the positive wire to ground. 12 OFF HIGHWAY SYSTEM ALARM HOLD MUTE MODE L/0 STATE Fuse Box
Connect the other wire to a 12V DC source in your vehicle's fuse box. 2. Connecting the Power Direct Connection WARNING: The BCT-10 is designed to operate only with the unit has bare wires at one end, and a small connector at the other end. 1. The straight power cord provided with 12V DC, negative ground power systems. Operation of the unit on other voltages or polarities will cause damage to the unit and may create a fire hazard. Connect the positive wire to ground. 12 OFF HIGHWAY SYSTEM ALARM HOLD MUTE MODE L/0 STATE Fuse Box

English Owners Manual
Page 13
Run the power cord from the fuse box to the BCT-10. Plug the power cord connector into the jack on the side of your vehicle. 13 Insert the small connector into the Control Unit at the jack labeled "DC 12V." Note: Push the connector firmly into the cigarette lighter socket of the unit. OFF HIGHWAY SYSTEM ALARM HOLD MUTE MODE L/0 STATE 2. Note: Ensure the cord does not interfere with vehicle operation or cause a tripping hazard. 4. Using the Cigarette Lighter Adapter 1. Insert the other end into the jack. Connecting the Power 3.
Run the power cord from the fuse box to the BCT-10. Plug the power cord connector into the jack on the side of your vehicle. 13 Insert the small connector into the Control Unit at the jack labeled "DC 12V." Note: Push the connector firmly into the cigarette lighter socket of the unit. OFF HIGHWAY SYSTEM ALARM HOLD MUTE MODE L/0 STATE 2. Note: Ensure the cord does not interfere with vehicle operation or cause a tripping hazard. 4. Using the Cigarette Lighter Adapter 1. Insert the other end into the jack. Connecting the Power 3.
English Owners Manual
Page 14
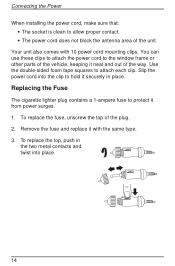
... the clip to hold it with 10 power cord mounting clips. Slip the power cord into place. 14 To replace the top, push in place. Connecting the Power When installing the power cord, make sure that: • The socket is clean to allow proper contact. • The power cord does not block the antenna area of the plug. 2. To replace the fuse, unscrew the top of the unit.
... the clip to hold it with 10 power cord mounting clips. Slip the power cord into place. 14 To replace the top, push in place. Connecting the Power When installing the power cord, make sure that: • The socket is clean to allow proper contact. • The power cord does not block the antenna area of the plug. 2. To replace the fuse, unscrew the top of the unit.
English Owners Manual
Page 15
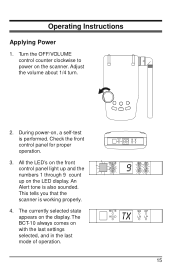
... HOLD 15 Adjust the volume about 1/4 turn. 2. During power-on, a self-test is also sounded. The currently selected state appears on with the last settings selected, and in the last mode of operation. Turn the OFF/VOLUME control counter clockwise to power on the LED display. All the LED's on the front control panel light up and the numbers 1 through 9 count up on the scanner. This tells...
... HOLD 15 Adjust the volume about 1/4 turn. 2. During power-on, a self-test is also sounded. The currently selected state appears on with the last settings selected, and in the last mode of operation. Turn the OFF/VOLUME control counter clockwise to power on the LED display. All the LED's on the front control panel light up and the numbers 1 through 9 count up on the scanner. This tells...

English Owners Manual
Page 17
... area. When set fully counterclockwise, Squelch limits the Alert range to reduce the range of the Alert feature. Turn the SQUELCH conrol back counter clockwise just until the "rushing" noise stops. If this happens, turn the BCT-10 off, and back on, to reset the Alert feature. Operating Instructions 3. Note: In metropolitan areas, you may want to adjust the Squelch control more counterclockwise...
... area. When set fully counterclockwise, Squelch limits the Alert range to reduce the range of the Alert feature. Turn the SQUELCH conrol back counter clockwise just until the "rushing" noise stops. If this happens, turn the BCT-10 off, and back on, to reset the Alert feature. Operating Instructions 3. Note: In metropolitan areas, you may want to adjust the Squelch control more counterclockwise...

English Owners Manual
Page 20
Operating Instructions Selecting the Frequencies to Scan Scanning All Frequencies Note: The Alert feature is blinking on the LED display. To scan all frequencies (except Weather), press the S key repeatedly or press and hold the S key until "XX" is not active in this mode. 1. When the BCT-10 finds an active frequency it activates a buit-in XX mode. 20 All frequencies, except weather channels, are scanned for an active transmission. 3. MUTE XX HOLD Note: The M key does not operate in two second delay before it resumes scanning. MUTE XX HOLD 2.
Operating Instructions Selecting the Frequencies to Scan Scanning All Frequencies Note: The Alert feature is blinking on the LED display. To scan all frequencies (except Weather), press the S key repeatedly or press and hold the S key until "XX" is not active in this mode. 1. When the BCT-10 finds an active frequency it activates a buit-in XX mode. 20 All frequencies, except weather channels, are scanned for an active transmission. 3. MUTE XX HOLD Note: The M key does not operate in two second delay before it resumes scanning. MUTE XX HOLD 2.

English Owners Manual
Page 21
To scan highway patrol frequencies exclusively, press the M key repeatedly until HP is blinking in the LED. When the BCT-10 detects an active frequency, it resumes scanning. While scanning, the BCT-10 displays the state code for two seconds before it displays HP in the LED display. HIGHWAY SYSTEM ALARM MUTE MODE HOLD STATE L/0 2. and stops for the state you selected. The HP LED lights up. 3. MUTE HP HOLD MUTE HP HOLD MUTE TX HOLD MUTE HP HOLD 21 Operating Instructions Scanning Highway Patrol Frequencies 1.
To scan highway patrol frequencies exclusively, press the M key repeatedly until HP is blinking in the LED. When the BCT-10 detects an active frequency, it resumes scanning. While scanning, the BCT-10 displays the state code for two seconds before it displays HP in the LED display. HIGHWAY SYSTEM ALARM MUTE MODE HOLD STATE L/0 2. and stops for the state you selected. The HP LED lights up. 3. MUTE HP HOLD MUTE HP HOLD MUTE TX HOLD MUTE HP HOLD 21 Operating Instructions Scanning Highway Patrol Frequencies 1.

English Owners Manual
Page 22
... the state code displayed on the LED display. The BCT-10 will light up. 3. HIGHWAY SYSTEM ALARM MUTE MODE HOLD STATE L/0 2. To scan highway patrol and local police frequencies, press the M key repeatedly until LP is blinking on the LED. 22 MUTE LP HOLD MUTE LP HOLD MUTE TX HOLD MUTE LP HOLD MUTE HP HOLD Operating Instructions Scanning All Police Frequencies 1. The LP...
... the state code displayed on the LED display. The BCT-10 will light up. 3. HIGHWAY SYSTEM ALARM MUTE MODE HOLD STATE L/0 2. To scan highway patrol and local police frequencies, press the M key repeatedly until LP is blinking on the LED. 22 MUTE LP HOLD MUTE LP HOLD MUTE TX HOLD MUTE LP HOLD MUTE HP HOLD Operating Instructions Scanning All Police Frequencies 1. The LP...

English Owners Manual
Page 23
... display. In long range mode, all signal strengths from 1- 9. The time the ALARM LED will stay on depends on the signal strength. MUTE 04 HOLD MUTE HP HOLD Strength 1-2 3-5 6-8 9 Duration 3 Minutes 2 Minutes 1 Minute 30 Seconds Setting the Highway Patrol Alarm Range A range setting is measured from 1- 9 will trigger an alert tone. HIGHWAY SYSTEM ALARM MUTE MODE HOLD STATE L/0 23 To select the range: 1. Operating Instructions Highway Patrol Alarm...
... display. In long range mode, all signal strengths from 1- 9. The time the ALARM LED will stay on depends on the signal strength. MUTE 04 HOLD MUTE HP HOLD Strength 1-2 3-5 6-8 9 Duration 3 Minutes 2 Minutes 1 Minute 30 Seconds Setting the Highway Patrol Alarm Range A range setting is measured from 1- 9 will trigger an alert tone. HIGHWAY SYSTEM ALARM MUTE MODE HOLD STATE L/0 23 To select the range: 1. Operating Instructions Highway Patrol Alarm...

English Owners Manual
Page 27
Monitoring Weather Frequencies 1. To monitor weather frequencies, press the M key repeatedly until WX is blinking on the LED display. Operating Instructions HIGHWAY SYSTEM ALARM MUTE MODE HOLD STATE L/0 2. While scanning, the BCT-10 will display WX. MUTE WX HOLD MUTE WX HOLD MUTE W2 HOLD SYSTEM ALARM MUTE MODE HOLD STATE L/0 27 When the BCT-10 detects an active frequency, it displays the weather channel in the LED and stops scanning. 3. Press the L key to make the BCT-10 scan for the next weather frequency.
Monitoring Weather Frequencies 1. To monitor weather frequencies, press the M key repeatedly until WX is blinking on the LED display. Operating Instructions HIGHWAY SYSTEM ALARM MUTE MODE HOLD STATE L/0 2. While scanning, the BCT-10 will display WX. MUTE WX HOLD MUTE WX HOLD MUTE W2 HOLD SYSTEM ALARM MUTE MODE HOLD STATE L/0 27 When the BCT-10 detects an active frequency, it displays the weather channel in the LED and stops scanning. 3. Press the L key to make the BCT-10 scan for the next weather frequency.

English Owners Manual
Page 28
... frequency. SYSTEM ALARM MUTE MODE HOLD STATE L/0 2. You cannot lock out all of your BCT-10 may be received until the deleted frequencies are restored or a new state is selected. Caution: When you , or a frequency may not be inactive on the undesired frequency, press L one time. You can delete a maximum of immediate interest to be of 50 frequencies. No further alarms will sound...
... frequency. SYSTEM ALARM MUTE MODE HOLD STATE L/0 2. You cannot lock out all of your BCT-10 may be received until the deleted frequencies are restored or a new state is selected. Caution: When you , or a frequency may not be inactive on the undesired frequency, press L one time. You can delete a maximum of immediate interest to be of 50 frequencies. No further alarms will sound...

English Owners Manual
Page 29
Operating Instructions Restoring Deleted Frequencies Please note that you hear two beeps. To stop the unit from scanning, turn the SQUELCH knob toward the front of the BCT-10. 2. Press and hold the L key until you can only restore all deleted frequencies at the same time. All deleted frequencies are now restored. 29 SYSTEM ALARM MUTE MODE HOLD STATE L/0 3. Make sure the BCT-10 is not scanning. To restore the deleted frequencies: 1.
Operating Instructions Restoring Deleted Frequencies Please note that you hear two beeps. To stop the unit from scanning, turn the SQUELCH knob toward the front of the BCT-10. 2. Press and hold the L key until you can only restore all deleted frequencies at the same time. All deleted frequencies are now restored. 29 SYSTEM ALARM MUTE MODE HOLD STATE L/0 3. Make sure the BCT-10 is not scanning. To restore the deleted frequencies: 1.
English Owners Manual
Page 31
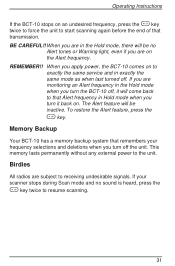
... service and in Hold mode when you turn it will come back to that Alert frequency in exactly the same mode as when last turned off. To restore the Alert feature, press the H key. This memory lasts permanently without any external power to start scanning again before the end of that remembers your scanner stops during Scan mode and no Alert tones or Warning light...
... service and in Hold mode when you turn it will come back to that Alert frequency in exactly the same mode as when last turned off. To restore the Alert feature, press the H key. This memory lasts permanently without any external power to start scanning again before the end of that remembers your scanner stops during Scan mode and no Alert tones or Warning light...

English Owners Manual
Page 32
... antenna connection, or change antenna. Fort Worth, TX 76155 (800) 297-1023 Monday through Friday, 8:00 a.m. Scan won 't work. Check the Volume and Squelch settings. Central 32 Signal is not performing properly, try the steps listed below. Weather Search (WX) won 't stop. Check Squelch adjustment. to receive product information or return the unit for service, please call or write the Uniden Parts and Service Division at: Uniden America Corporation 4700 Amon Carter Blvd. Troubleshooting...
... antenna connection, or change antenna. Fort Worth, TX 76155 (800) 297-1023 Monday through Friday, 8:00 a.m. Scan won 't work. Check the Volume and Squelch settings. Central 32 Signal is not performing properly, try the steps listed below. Weather Search (WX) won 't stop. Check Squelch adjustment. to receive product information or return the unit for service, please call or write the Uniden Parts and Service Division at: Uniden America Corporation 4700 Amon Carter Blvd. Troubleshooting...

English Owners Manual
Page 37
On/Off Volume D. Windshield Bumpers I HIGHWAY SYSTEM ALARM HOLD MUTE MODE L/0 STATE J KI L M A. MUTE Keym K. Squelch Control L. MODE KeyM M. MUTE LED 3. 2 Digit LED Display 4. HOLD LED 7. Antenna J. Controls and Indicators A B C D E F G OFF H I . ALARM KeyA E. Highway Patrol LED 6. HOLD Key H F. ALARM LED 2. Local Police LED Standard Range LED 78 5. STATE Key S H. L/O (Lock Out) Key L 1 23 MUTE HOLD 45 SR HP LR LP 6 1. DC Input B. Control Panel G. Long Range LED 8. Speaker Out C.
On/Off Volume D. Windshield Bumpers I HIGHWAY SYSTEM ALARM HOLD MUTE MODE L/0 STATE J KI L M A. MUTE Keym K. Squelch Control L. MODE KeyM M. MUTE LED 3. 2 Digit LED Display 4. HOLD LED 7. Antenna J. Controls and Indicators A B C D E F G OFF H I . ALARM KeyA E. Highway Patrol LED 6. HOLD Key H F. ALARM LED 2. Local Police LED Standard Range LED 78 5. STATE Key S H. L/O (Lock Out) Key L 1 23 MUTE HOLD 45 SR HP LR LP 6 1. DC Input B. Control Panel G. Long Range LED 8. Speaker Out C.

English Owners Manual
Page 38
... BCT-10 Scanner 4 Installation 5 Helpful Tips 5 Installing the Antenna 6 BCT-10 Antenna 6 Flexible Mobile Antenna 6 Mounting the BCT-10 7 Visor Mounting 7 Windshield Mounting 9 Connecting the Power 12 Direct Connection 12 Using the Cigarette Lighter Adapter 13 Replacing the Fuse 14 Operating Instructions 15 Applying Power 15 Adjusting the Squelch 16 Selecting the State 18 State Codes 19 Selecting the Frequencies to Scan 20 Scanning All Frequencies 20 Scanning Highway Patrol Frequencies 21 Scanning All Police Frequencies 22 Highway Patrol Alarm 23 Setting the Highway...
... BCT-10 Scanner 4 Installation 5 Helpful Tips 5 Installing the Antenna 6 BCT-10 Antenna 6 Flexible Mobile Antenna 6 Mounting the BCT-10 7 Visor Mounting 7 Windshield Mounting 9 Connecting the Power 12 Direct Connection 12 Using the Cigarette Lighter Adapter 13 Replacing the Fuse 14 Operating Instructions 15 Applying Power 15 Adjusting the Squelch 16 Selecting the State 18 State Codes 19 Selecting the Frequencies to Scan 20 Scanning All Frequencies 20 Scanning Highway Patrol Frequencies 21 Scanning All Police Frequencies 22 Highway Patrol Alarm 23 Setting the Highway...

English Owners Manual
Page 39
... further effect 12 months after following the instructions in this Operating Guide you . WARRANTY DURATION: This warranty to the original user shall terminate and be shipped freight prepaid by traceable means, or delivered, to warrantor at any configurations not sold by Uniden, (C) improperly installed, (D) serviced or repaired by the Operating Guide for warranty service. One Year Limited Warranty Important: Evidence of...
... further effect 12 months after following the instructions in this Operating Guide you . WARRANTY DURATION: This warranty to the original user shall terminate and be shipped freight prepaid by traceable means, or delivered, to warrantor at any configurations not sold by Uniden, (C) improperly installed, (D) serviced or repaired by the Operating Guide for warranty service. One Year Limited Warranty Important: Evidence of...


