English Manual
Page 42
...you to 'Clr All L/O IDs' and press E/ . 2. See also Adjust Audio AGC. 1. Analog - The default setting is locked out. 3. Scroll to review locked out IDs in the system to return. At 'Unlock?' Scroll to turn the AGC feature on to 'Set Record' and press E/ . 2. Set Audio ...to return. Press MENU to 'Rvw ID:Srch L/O' and press E/ . 2. Press MENU to the REC jack, regardless of three settings and press E/ . The scanner sends the audio for channels that have the record option turned on or off . 1. Scroll to 'Emergency Alert' and press E/ . 2. Scroll to 'Set ...
...you to 'Clr All L/O IDs' and press E/ . 2. See also Adjust Audio AGC. 1. Analog - The default setting is locked out. 3. Scroll to review locked out IDs in the system to return. At 'Unlock?' Scroll to turn the AGC feature on to 'Set Record' and press E/ . 2. Set Audio ...to return. Press MENU to 'Rvw ID:Srch L/O' and press E/ . 2. Press MENU to the REC jack, regardless of three settings and press E/ . The scanner sends the audio for channels that have the record option turned on or off . 1. Scroll to 'Emergency Alert' and press E/ . 2. Scroll to 'Set ...
English Manual
Page 52
... Search - Copying a system will copy all the locked IDs in a system. 1. To Delete a System: 1. The scanner only sends the audio for a channel. Clr All L/O IDs (no EDACS SCAT) allows you to review locked out IDs in the system to turn the AGC feature on for channels that include the programmed... NAC. 3. The scanner opens squelch for the system. Rvw ID:Srch L/O (no EDACS SCAT) allows you to...
... Search - Copying a system will copy all the locked IDs in a system. 1. To Delete a System: 1. The scanner only sends the audio for a channel. Clr All L/O IDs (no EDACS SCAT) allows you to review locked out IDs in the system to turn the AGC feature on for channels that include the programmed... NAC. 3. The scanner opens squelch for the system. Rvw ID:Srch L/O (no EDACS SCAT) allows you to...
English Manual
Page 64
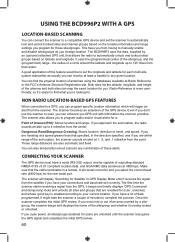
...automatically unlock and lockout sites/ groups based on the location information and range settings you GPS unit with information the scanner provides. Once the scanner completes the initial GPS review, if you move into or out of an area covered by an (optional) attached GPS unit, that the cable... A GPS LOCATION-BASED SCANNING You can receive at least a handful in any combination of these alerts. The BCD996P2 uses the data, supplied by a site/ group, the scanner beeps and displays the name of outputting standard NMEA-0183 v3.01 compliant location data, and GGA/RMC data sentences at ...
...automatically unlock and lockout sites/ groups based on the location information and range settings you GPS unit with information the scanner provides. Once the scanner completes the initial GPS review, if you move into or out of an area covered by an (optional) attached GPS unit, that the cable... A GPS LOCATION-BASED SCANNING You can receive at least a handful in any combination of these alerts. The BCD996P2 uses the data, supplied by a site/ group, the scanner beeps and displays the name of outputting standard NMEA-0183 v3.01 compliant location data, and GGA/RMC data sentences at ...

English Manual
Page 66
...level is 'Auto', the default color is 'Cyan' and default pattern is 'Fast Blink'. 1. At 'Set Level' scroll to 'Level 1-15 or Auto' (the scanner sets the alert beep to On, Slow Blink, or Fast Blink and press E/ . 8. At 'Set Pattern' scroll to the master volume level) and press E/...to 'POI', 'Dangerous Xing', or 'Dangerous Road' and press E/ to 'Set Alert' and press E/ . 2. Scroll to save and exit. GPS DISPLAY MODE GPS Review Location Mode Edit Name the default name is P (POI), X (dangerous crossing), R (dangerous road), then YYMMDD hhmmss that location. 1. Press MENU to the 'Program ...
...level is 'Auto', the default color is 'Cyan' and default pattern is 'Fast Blink'. 1. At 'Set Level' scroll to 'Level 1-15 or Auto' (the scanner sets the alert beep to On, Slow Blink, or Fast Blink and press E/ . 8. At 'Set Pattern' scroll to the master volume level) and press E/...to 'POI', 'Dangerous Xing', or 'Dangerous Road' and press E/ to 'Set Alert' and press E/ . 2. Scroll to save and exit. GPS DISPLAY MODE GPS Review Location Mode Edit Name the default name is P (POI), X (dangerous crossing), R (dangerous road), then YYMMDD hhmmss that location. 1. Press MENU to the 'Program ...

English Manual
Page 68
... The right side of the 2nd line displays the elevation of travel. Set Speed Limit (Dangerous Road/Xing only) decides whether the scanner alerts you each time you approach the location or only when you can see the current location information as well as information about your... time. Rotating will select different POI's. 2. Set Lockout the default setting is 'Unlocked'. 1. Enter a speed from 0 through 200 mi/km, in 'Review Location Mode' by pressing L/O. Scroll to save and exit. Note: you are traveling above a certain speed. To make the alert speed-dependent, enter the...
... The right side of the 2nd line displays the elevation of travel. Set Speed Limit (Dangerous Road/Xing only) decides whether the scanner alerts you each time you approach the location or only when you can see the current location information as well as information about your... time. Rotating will select different POI's. 2. Set Lockout the default setting is 'Unlocked'. 1. Enter a speed from 0 through 200 mi/km, in 'Review Location Mode' by pressing L/O. Scroll to save and exit. Note: you are traveling above a certain speed. To make the alert speed-dependent, enter the...
English Manual
Page 70
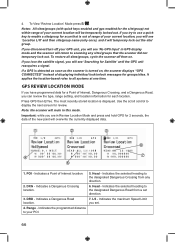
... Dangerous Road from any sites/groups that is displayed. Press GPS then E/Yes. Note: the scanner will be temporarily locked out. Indicates a Dangerous Road location. 7. LS - GPS REVIEW LOCATION MODE If you have programmed data for a Point of Interest, Dangerous Crossing, and a Dangerous... Indicates a Point of displaying individual lock/unlock messages for review. Important: while you try to use a quick key to your GPS unit, you can review the type, range setting, and location information for scan that the scanner did not temporary lock out. DXG - 4. Indicates the...
... Dangerous Road from any sites/groups that is displayed. Press GPS then E/Yes. Note: the scanner will be temporarily locked out. Indicates a Dangerous Road location. 7. LS - GPS REVIEW LOCATION MODE If you have programmed data for a Point of Interest, Dangerous Crossing, and a Dangerous... Indicates a Point of displaying individual lock/unlock messages for review. Important: while you try to use a quick key to your GPS unit, you can review the type, range setting, and location information for scan that the scanner did not temporary lock out. DXG - 4. Indicates the...
English Manual
Page 71
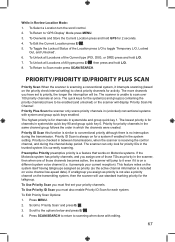
... scanner will use standard trunking priority for 2 seconds. 4. Scroll to scan over 100 priority channels at once. The more channels you assign as priority in (unlocked) conventional systems with editing. 67 Priority for each system. Scroll to check priority channels for a system if enabled in Review... of those TGs as priority is no interruption during the channel delay period. PRIORITY/PRIORITY ID/PRIORITY PLUS SCAN Priority Scan When the scanner is always on the priority check interval setting) to 'Priority Scan' and press E/ . 3. Priority ID Scan is scanning a conventional...
... scanner will use standard trunking priority for 2 seconds. 4. Scroll to scan over 100 priority channels at once. The more channels you assign as priority in (unlocked) conventional systems with editing. 67 Priority for each system. Scroll to check priority channels for a system if enabled in Review... of those TGs as priority is no interruption during the channel delay period. PRIORITY/PRIORITY ID/PRIORITY PLUS SCAN Priority Scan When the scanner is always on the priority check interval setting) to 'Priority Scan' and press E/ . 3. Priority ID Scan is scanning a conventional...
English Manual
Page 83
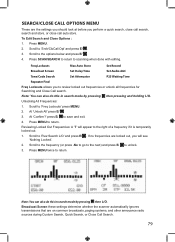
...out. 1. Press MENU twice to return. Press MENU to return. Press SCAN/SEARCH to return to 'Rvw Search L/O' and press E/ . Reviewing Locked Out Frequencies: A 'T' will see 'Nothing Locked'. 2. Note: You can also do this in search mode by pressing Unlocking All Frequencies...: You can also do this in search mode by pressing then L/O. At 'Confirm?' Broadcast Screen these settings determine whether the scanner automatically ignores transmissions that are on common broadcasts, paging systems, and other annoyance radio sources during Custom Search, Quick Search, or...
...out. 1. Press MENU twice to return. Press MENU to return. Press SCAN/SEARCH to return to 'Rvw Search L/O' and press E/ . Reviewing Locked Out Frequencies: A 'T' will see 'Nothing Locked'. 2. Note: You can also do this in search mode by pressing Unlocking All Frequencies...: You can also do this in search mode by pressing then L/O. At 'Confirm?' Broadcast Screen these settings determine whether the scanner automatically ignores transmissions that are on common broadcasts, paging systems, and other annoyance radio sources during Custom Search, Quick Search, or...
English Manual
Page 85
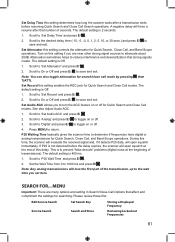
... analog transmissions for search/close call mode by pressing then 7(ATT). Edit Service Search Set Search Key Storing a Displayed Frequency Service Search Search and Store Reviewing Locked out Frequencies 81 Scroll to 'Set Audio AGC' and press E/ . 2. Scroll to 'Analog' and press E/ to toggle on or off for... and Close Call modes. This is not detected before resuming Quick Search and Close Call Search operations. Set Delay Time this time, the scanner will evaluate the received signal and, if it detects P25 data, will lose the first part of the transmission, up to the wait ...
... analog transmissions for search/close call mode by pressing then 7(ATT). Edit Service Search Set Search Key Storing a Displayed Frequency Service Search Search and Store Reviewing Locked out Frequencies 81 Scroll to 'Set Audio AGC' and press E/ . 2. Scroll to 'Analog' and press E/ to toggle on or off for... and Close Call modes. This is not detected before resuming Quick Search and Close Call Search operations. Set Delay Time this time, the scanner will evaluate the received signal and, if it detects P25 data, will lose the first part of the transmission, up to the wait ...
English Manual
Page 92
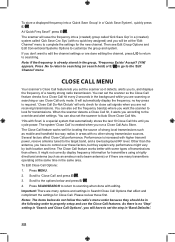
... with Scan' is required. 'Close Call Do-Not-Disturb' will be in the group, 'Frequency Exists' Accept? (Y/N)' appears. When the scanner detects a Close Call hit, it detects, alerts you are scanning or searching or use the Close Call features. You can also set the... scanner so it alerts you are not receiving transmissions. Please review those first. press E/ . The scanner will save the frequency into a 'Quick Save Group' in a (created) system called 'Qck Save Grp'...
... with Scan' is required. 'Close Call Do-Not-Disturb' will be in the group, 'Frequency Exists' Accept? (Y/N)' appears. When the scanner detects a Close Call hit, it detects, alerts you are scanning or searching or use the Close Call features. You can also set the... scanner so it alerts you are not receiving transmissions. Please review those first. press E/ . The scanner will save the frequency into a 'Quick Save Group' in a (created) system called 'Qck Save Grp'...

