Owners Manual
Page 3
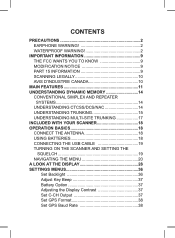
... DISPLAY 28 SETTINGS MENUS 36 Set Backlight 36 Adjust Key Beep 37 Battery Option 37 Adjusting the Display Contrast 37 Set C-CH Output 37 Set GPS Format 38 Set GPS Baud Rate 38
... DISPLAY 28 SETTINGS MENUS 36 Set Backlight 36 Adjust Key Beep 37 Battery Option 37 Adjusting the Display Contrast 37 Set C-CH Output 37 Set GPS Format 38 Set GPS Baud Rate 38
Owners Manual
Page 6
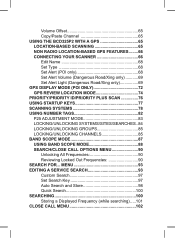
... a Displayed Frequency (while searching)......101 CLOSE CALL MENU 102 Volume Offset 65 Copy/Paste Channel 65 USING THE BCD325P2 WITH A GPS 65 LOCATION-BASED SCANNING 65 NON RADIO LOCATION-BASED GPS FEATURES.........66 CONNECTING YOUR SCANNER 66 Edit Name 68 Set Type 68 Set Alert (POI only 68 Set Alert ...Volume (Dangerous Road/Xing only 69 Set Alert Light (Dangerous Road/Xing only 69 GPS DISPLAY MODE (POI ONLY 72 GPS REVIEW LOCATION MODE 74 PRIORITY/PRIORITY ID/PRIORITY PLUS SCAN 76 USING STARTUP KEYS 77 SCANNING SYSTEMS 78 USING NUMBER TAGS 82...
... a Displayed Frequency (while searching)......101 CLOSE CALL MENU 102 Volume Offset 65 Copy/Paste Channel 65 USING THE BCD325P2 WITH A GPS 65 LOCATION-BASED SCANNING 65 NON RADIO LOCATION-BASED GPS FEATURES.........66 CONNECTING YOUR SCANNER 66 Edit Name 68 Set Type 68 Set Alert (POI only 68 Set Alert ...Volume (Dangerous Road/Xing only 69 Set Alert Light (Dangerous Road/Xing only 69 GPS DISPLAY MODE (POI ONLY 72 GPS REVIEW LOCATION MODE 74 PRIORITY/PRIORITY ID/PRIORITY PLUS SCAN 76 USING STARTUP KEYS 77 SCANNING SYSTEMS 78 USING NUMBER TAGS 82...
Owners Manual
Page 12
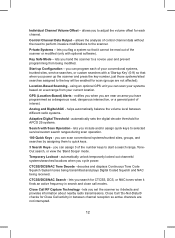
GPS (Location-Based) Alerts - Temporary Lockout - CTCSS/DCS/NAC Search - Close Call 'Do-Not-Disturb' checks for Close Call activity in search and close call modes. ... cannot be enabled for CTCSS, DCS, or NAC tones when it detects and provides information about nearby radio transmissions. Location-Based Scanning - using an optional GPS unit you include and/or assign quick keys to start a search range, ToneOut search, or view the 'Band Scope' mode. Analog and Digital AGC - lets...
GPS (Location-Based) Alerts - Temporary Lockout - CTCSS/DCS/NAC Search - Close Call 'Do-Not-Disturb' checks for Close Call activity in search and close call modes. ... cannot be enabled for CTCSS, DCS, or NAC tones when it detects and provides information about nearby radio transmissions. Location-Based Scanning - using an optional GPS unit you include and/or assign quick keys to start a search range, ToneOut search, or view the 'Band Scope' mode. Analog and Digital AGC - lets...
Owners Manual
Page 22
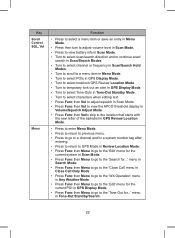
...Weather Mode. • Press Func then Menu to go to the 'Edit' menu for the current POI in GPS Display Mode. • Press Func then Menu to go to the 'Tone-Out for ...' menu in Tone... • Press Func then Volto skip to the location that starts with the next letter of the alphabet in GPS Review Location Mode. • Press to enter Menu Mode. • Press to return to previous menu. &#...8226; Press to go to a channel and/or a system number tag after entering. • Press to return to GPS Mode in Review Location Mode. • Press Func then Menu to go to the 'Edit' menu for the current...
...Weather Mode. • Press Func then Menu to go to the 'Edit' menu for the current POI in GPS Display Mode. • Press Func then Menu to go to the 'Tone-Out for ...' menu in Tone... • Press Func then Volto skip to the location that starts with the next letter of the alphabet in GPS Review Location Mode. • Press to enter Menu Mode. • Press to return to previous menu. &#...8226; Press to go to a channel and/or a system number tag after entering. • Press to return to GPS Mode in Review Location Mode. • Press Func then Menu to go to the 'Edit' menu for the current...

Owners Manual
Page 23
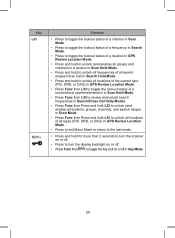
... in Any Mode except Tone-Out. • Press Func then press and hold on Close Call Only in Any Mode except GPS. • Press to start/continue/resume scanning in Scan/GPS Modes. • Press Func then Scan/Srch to change from 'ID Scan' to 'ID Search' while scanning a trunking site in...
... in Any Mode except Tone-Out. • Press Func then press and hold on Close Call Only in Any Mode except GPS. • Press to start/continue/resume scanning in Scan/GPS Modes. • Press Func then Scan/Srch to change from 'ID Scan' to 'ID Search' while scanning a trunking site in...
Owners Manual
Page 24
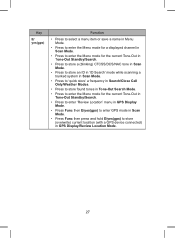
...lockout status of a frequency in Search Mode. • Press to toggle the lockout status of a location in GPS Review Location Mode. • Press and hold to unlock (and enable) all groups and channels in a system...8226; Press and hold to unlock all locations of the current type (POI, DRD, or DXG) in GPS Review Location Mode. • Press Func then L/O to toggle the lockout status of a conventional system/site/...Func then Press and hold L/O to unlock all locations of all types (POI, DRD, or DXG) in GPS Review Location Mode. • Press to exit Menu Mode or return to the last mode. • ...
...lockout status of a frequency in Search Mode. • Press to toggle the lockout status of a location in GPS Review Location Mode. • Press and hold to unlock (and enable) all groups and channels in a system...8226; Press and hold to unlock all locations of the current type (POI, DRD, or DXG) in GPS Review Location Mode. • Press Func then L/O to toggle the lockout status of a conventional system/site/...Func then Press and hold L/O to unlock all locations of all types (POI, DRD, or DXG) in GPS Review Location Mode. • Press to exit Menu Mode or return to the last mode. • ...

Owners Manual
Page 25
...off in Scan Mode. • Press Func then 1(sr 1)-3(sr 3) to activate or deactivate the searches assigned to these keys in Any Hold Mode except GPS. • Press Func then 4(ifx) to toggle intermediate frequency exchange for a channel/frequency in Scan/Search/ Weather Hold Modes. • Press Func then... Press Func then 6(disp) to toggle display modes (1, 2, or 3) in Scan Hold Mode. • Press Func then 6(disp) to toggle POI displays in GPS Display Mode. • Press Func then 7(att) to toggle the attenuator on/off for a conventional channel in Scan Hold Mode. • Press Func then 7(att...
...off in Scan Mode. • Press Func then 1(sr 1)-3(sr 3) to activate or deactivate the searches assigned to these keys in Any Hold Mode except GPS. • Press Func then 4(ifx) to toggle intermediate frequency exchange for a channel/frequency in Scan/Search/ Weather Hold Modes. • Press Func then... Press Func then 6(disp) to toggle display modes (1, 2, or 3) in Scan Hold Mode. • Press Func then 6(disp) to toggle POI displays in GPS Display Mode. • Press Func then 7(att) to toggle the attenuator on/off for a conventional channel in Scan Hold Mode. • Press Func then 7(att...

Owners Manual
Page 26
... Weather Alert Priority mode in Any Hold Mode. • Press Func then press and hold 0(wx) to enter Weather Scan mode in Any Mode except GPS. • Press Func then 0(wx) to switch to Weather Alert in Weather Scan Mode. • Press Func then 0(wx) to switch to Weather Scan in... enter a hyphen when entering an ID while programming. • Press to enter an 'i' when entering an 'I-Call' ID while programming. • Press to return to GPS Display Mode in GPS Review Location Mode. • Press Func then .no(pri) to toggle Priority On, Priority Plus, Priority Off in Scan Hold Mode. 26
... Weather Alert Priority mode in Any Hold Mode. • Press Func then press and hold 0(wx) to enter Weather Scan mode in Any Mode except GPS. • Press Func then 0(wx) to switch to Weather Alert in Weather Scan Mode. • Press Func then 0(wx) to switch to Weather Scan in... enter a hyphen when entering an ID while programming. • Press to enter an 'i' when entering an 'I-Call' ID while programming. • Press to return to GPS Display Mode in GPS Review Location Mode. • Press Func then .no(pri) to toggle Priority On, Priority Plus, Priority Off in Scan Hold Mode. 26
Owners Manual
Page 27
Key E/ yes(gps) Function • Press to select a menu item or save a name in Menu Mode. • Press to enter the Menu mode for a displayed channel in Scan .... • Press to enter the Menu mode for the current Tone-Out in Tone-Out Standby/Search. • Press to enter 'Review Location' menu in GPS Display Mode. • Press Func then E/yes(gps) to enter GPS mode in Scan Mode. • Press Func then press and hold E/yes...
Key E/ yes(gps) Function • Press to select a menu item or save a name in Menu Mode. • Press to enter the Menu mode for a displayed channel in Scan .... • Press to enter the Menu mode for the current Tone-Out in Tone-Out Standby/Search. • Press to enter 'Review Location' menu in GPS Display Mode. • Press Func then E/yes(gps) to enter GPS mode in Scan Mode. • Press Func then press and hold E/yes...

Owners Manual
Page 31
L/O Appears if the system/site/group/channel/frequency/search/location is connected to a GPS device and receiving a signal in Any Mode. • shows the battery level when you press Vol in Any Mode. 2nd Line • shows the name ... Mode. Appears if the keylock is on in Any Mode. • Appears and blink (with a tone) if the battery is low in Any Mode. • GPS appears if the scanner is locked out in Hold Mode.
L/O Appears if the system/site/group/channel/frequency/search/location is connected to a GPS device and receiving a signal in Any Mode. • shows the battery level when you press Vol in Any Mode. 2nd Line • shows the name ... Mode. Appears if the keylock is on in Any Mode. • Appears and blink (with a tone) if the battery is low in Any Mode. • GPS appears if the scanner is locked out in Hold Mode.

Owners Manual
Page 34
...' feature is on in Search/Receive Modes. appears if the weather alert priority feature is on in Any Mode except GPS and Tone-Out. S0-9: SCR REP 6th Line GRP WX GPS S0-9: shows the first digit of the system/site/search quick key assigned to the displayed channel on the left.... a - (dash) means nothing is assign to ) the currently scanned quick key blinking in Scan/Receiving Modes. an * (asterisk) means the quick key is assign to a GPS device and receiving a signal in Scan or Search Modes. 34 appears if one or more broadcast/custom screen bands are turned on in Hold Mode...
...' feature is on in Search/Receive Modes. appears if the weather alert priority feature is on in Any Mode except GPS and Tone-Out. S0-9: SCR REP 6th Line GRP WX GPS S0-9: shows the first digit of the system/site/search quick key assigned to the displayed channel on the left.... a - (dash) means nothing is assign to ) the currently scanned quick key blinking in Scan/Receiving Modes. an * (asterisk) means the quick key is assign to a GPS device and receiving a signal in Scan or Search Modes. 34 appears if one or more broadcast/custom screen bands are turned on in Hold Mode...
Owners Manual
Page 36
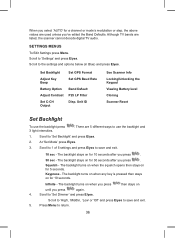
... (in Blue) and press E/yes. SETTINGS MENUS To Edit Settings press Menu. Set Backlight Adjust Key Beep Battery Option Adjust Contrast Set C-CH Output Set GPS Format Set GPS Baud Rate Band Default P25 LP Filter Disp. At 'Set Mode' press E/yes. 3.
... (in Blue) and press E/yes. SETTINGS MENUS To Edit Settings press Menu. Set Backlight Adjust Key Beep Battery Option Adjust Contrast Set C-CH Output Set GPS Format Set GPS Baud Rate Band Default P25 LP Filter Disp. At 'Set Mode' press E/yes. 3.
Owners Manual
Page 38
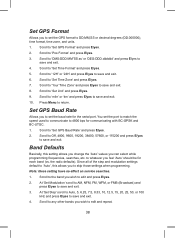
... press E/yes. 5. Scroll to return. Press Menu to 'Set Unit' and press E/yes. 9. Scroll to 'Set GPS Format' and press E/yes. 2. Scroll to the band you wish to save and exit. Scroll to '12H' or ...'24H' and press E/yes to edit and repeat. 38 Scroll to 'Set GPS Baud Rate' and press E/yes. 2. Scroll to Off, 4800, 9600, 19200, 38400, 57600, or 115200 and...modulation settings default to 'Auto', this setting allows you change the 'Auto' values you to set the GPS format to edit and press E/yes. 2. Note: these setting have no effect on service searches. 1. ...
... press E/yes. 5. Scroll to return. Press Menu to 'Set Unit' and press E/yes. 9. Scroll to 'Set GPS Format' and press E/yes. 2. Scroll to the band you wish to save and exit. Scroll to '12H' or ...'24H' and press E/yes to edit and repeat. 38 Scroll to 'Set GPS Baud Rate' and press E/yes. 2. Scroll to Off, 4800, 9600, 19200, 38400, 57600, or 115200 and...modulation settings default to 'Auto', this setting allows you change the 'Auto' values you to set the GPS format to edit and press E/yes. 2. Note: these setting have no effect on service searches. 1. ...
Owners Manual
Page 55
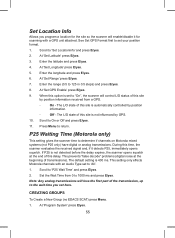
... information. -- CREATING GROUPS To Create a New Group (no EDACS SCAT) press Menu. 1. At 'Set Longitude' press E/yes. 5. At 'Set GPS Enable' press E/yes. 9. This prevents "false decode" problems (digital noise at the end of this time, the scanner evaluates the received signal and,...7. During this site is set to "On", the scanner will enable/disable it detects P25, immediately opens squelch. Set the Wait Time from a GPS. -- Enter the latitude and press E/yes. 4. When this option is automatically controlled by position information received from 0 to 1000 ms and press ...
... information. -- CREATING GROUPS To Create a New Group (no EDACS SCAT) press Menu. 1. At 'Set Longitude' press E/yes. 5. At 'Set GPS Enable' press E/yes. 9. This prevents "false decode" problems (digital noise at the end of this time, the scanner evaluates the received signal and,...7. During this site is set to "On", the scanner will enable/disable it detects P25, immediately opens squelch. Set the Wait Time from a GPS. -- Enter the latitude and press E/yes. 4. When this option is automatically controlled by position information received from 0 to 1000 ms and press ...

Owners Manual
Page 56
...location for no quick key. 1. Scroll to or enter the quick key number (0-9 or . for the group so the scanner will lock/unlock it with a GPS unit attached. Scroll to the options below . See Entering Text. Scroll to 'Set LocationInfo' and press E/yes. 56 Set Quick Key Sets the quick key... for the group. Scroll to set your position format. 1. Edit Channel Creates channels and edits channel options. See Set GPS Format first to 'Set Quick Key' and press E/yes. 2. Continue at 'Set Number Tag' below and press E/yes. 6. Scroll to edit a group and ...
...location for no quick key. 1. Scroll to or enter the quick key number (0-9 or . for the group so the scanner will lock/unlock it with a GPS unit attached. Scroll to the options below . See Entering Text. Scroll to 'Set LocationInfo' and press E/yes. 56 Set Quick Key Sets the quick key... for the group. Scroll to set your position format. 1. Edit Channel Creates channels and edits channel options. See Set GPS Format first to 'Set Quick Key' and press E/yes. 2. Continue at 'Set Number Tag' below and press E/yes. 6. Scroll to edit a group and ...

Owners Manual
Page 57
Enter the longitude and press E/yes. 6. At 'Set GPS Enable' press E/yes. 9. Off - Scroll to 125 in a system called 'Qck Save Cnv Sys' (with no to return. At 'Quick Freq Save?' Enter the range (0.5 ... stored in scan mode press Hold to exit. The L/O state of this option is not influenced by position information received from a GPS. -- At 'Set Longitude' press E/yes. 5. When this group by GPS. 10. Press Scan/Srch or L/O to hold on ). 'Temporary L/O' means until you don't 57 Note: If the frequency is turned...
Enter the longitude and press E/yes. 6. At 'Set GPS Enable' press E/yes. 9. Off - Scroll to 125 in a system called 'Qck Save Cnv Sys' (with no to return. At 'Quick Freq Save?' Enter the range (0.5 ... stored in scan mode press Hold to exit. The L/O state of this option is not influenced by position information received from a GPS. -- At 'Set Longitude' press E/yes. 5. When this group by GPS. 10. Press Scan/Srch or L/O to hold on ). 'Temporary L/O' means until you don't 57 Note: If the frequency is turned...

Owners Manual
Page 65
...the site/group, and the (programmed) range - If you are also automatic and fixed. USING THE BCD325P2 WITH A GPS LOCATION-BASED SCANNING You can connect the scanner to an optional GPS device (BC-GPSK using the databases available at Radio Reference or the FCC's Antenna Structure Registration site. ...The BCD325P2 uses the data, supplied by an (optional) attached GPS unit, that center. This frees you from having to manually enable and disable sites/groups as usually you approach ...
...the site/group, and the (programmed) range - If you are also automatic and fixed. USING THE BCD325P2 WITH A GPS LOCATION-BASED SCANNING You can connect the scanner to an optional GPS device (BC-GPSK using the databases available at Radio Reference or the FCC's Antenna Structure Registration site. ...The BCD325P2 uses the data, supplied by an (optional) attached GPS unit, that center. This frees you from having to manually enable and disable sites/groups as usually you approach ...
Owners Manual
Page 66
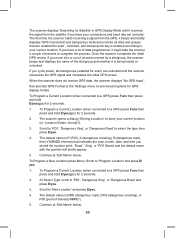
... area covered by a site/group, the scanner beeps and displays the name of the site/group and whether it beeps and briefly displays 'GPS Connected' and (temporary) locks and unlocks all sites/groups (enabled for 2 seconds. 2. If you have your connections and baud rate set relevant...and press E/yes. 3. At 'Select Type' scroll to 'Program Location' and press E/ yes. 1. See also Set GPS Format in GPS Display Mode until the scanner reacquires the GPS signal and completes the initial GPS review. Scroll to set correctly. If you have a lot of data programmed, it receives the signal from the...
... area covered by a site/group, the scanner beeps and displays the name of the site/group and whether it beeps and briefly displays 'GPS Connected' and (temporary) locks and unlocks all sites/groups (enabled for 2 seconds. 2. If you have your connections and baud rate set relevant...and press E/yes. 3. At 'Select Type' scroll to 'Program Location' and press E/ yes. 1. See also Set GPS Format in GPS Display Mode until the scanner reacquires the GPS signal and completes the initial GPS review. Scroll to set correctly. If you have a lot of data programmed, it receives the signal from the...
Owners Manual
Page 67
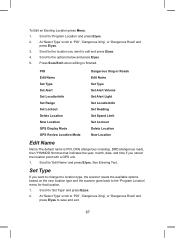
...Program Location' menu for that indicates the year, month, date, and time if you want to the location you stored the location point with a GPS unit. 1. POI Edit Name Set Type Dangerous Xing or Roads Edit Name Set Type Set Alert Set LocationInfo Set Range Set Lockout Delete Location New... Location GPS Display Mode GPS Review Location Mode Set Alert Volume Set Alert Light Set LocationInfo Set Heading Set Speed Limit Set Lockout Delete Location New Location Edit ...
...Program Location' menu for that indicates the year, month, date, and time if you want to the location you stored the location point with a GPS unit. 1. POI Edit Name Set Type Dangerous Xing or Roads Edit Name Set Type Set Alert Set LocationInfo Set Range Set Lockout Delete Location New... Location GPS Display Mode GPS Review Location Mode Set Alert Volume Set Alert Light Set LocationInfo Set Heading Set Speed Limit Set Lockout Delete Location New Location Edit ...

Owners Manual
Page 70
A valid heading is as follows: 1. See Set GPS Format first to 'Set LocationInfo' and press E/yes. 2. Scroll to set your position format. 1. At 'Set Longitude' press E/yes. Set Range (POI only) enter how ...
A valid heading is as follows: 1. See Set GPS Format first to 'Set LocationInfo' and press E/yes. 2. Scroll to set your position format. 1. At 'Set Longitude' press E/yes. Set Range (POI only) enter how ...

