
Operation Manual
Page 1
Safe Operation Practices • Set-Up • Operation • Maintenance • Service • Troubleshooting • Warranty Operator's Manual Front Tine Tiller - 340 Series WARNING READ AND FOLLOW ALL SAFETY RULES AND INSTRUCTIONS IN THIS MANUAL BEFORE ATTEMPTING TO OPERATE THIS MACHINE. BOX 361131 CLEVELAND, OHIO 44136-0019 Form No. 769-08539 (October 15, 2012) FAILURE TO COMPLY WITH THESE INSTRUCTIONS MAY RESULT IN PERSONAL INJURY. Printed In USA TROY-BILT LLC, P.O.
Safe Operation Practices • Set-Up • Operation • Maintenance • Service • Troubleshooting • Warranty Operator's Manual Front Tine Tiller - 340 Series WARNING READ AND FOLLOW ALL SAFETY RULES AND INSTRUCTIONS IN THIS MANUAL BEFORE ATTEMPTING TO OPERATE THIS MACHINE. BOX 361131 CLEVELAND, OHIO 44136-0019 Form No. 769-08539 (October 15, 2012) FAILURE TO COMPLY WITH THESE INSTRUCTIONS MAY RESULT IN PERSONAL INJURY. Printed In USA TROY-BILT LLC, P.O.
Operation Manual
Page 2
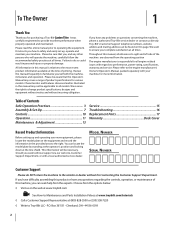
... and left side of printing. It was carefully engineered to operating the equipment. Throughout this manual is responsible for purchasing a Troy-Bilt Garden Tiller. Choose from the options below: ◊ Visit us directly. If you have difficulty assembling this manual frequently to Maintenance and Parts Installation Videos at www.troybilt.com/tutorials ◊ Call a Customer...
... and left side of printing. It was carefully engineered to operating the equipment. Throughout this manual is responsible for purchasing a Troy-Bilt Garden Tiller. Choose from the options below: ◊ Visit us directly. If you have difficulty assembling this manual frequently to Maintenance and Parts Installation Videos at www.troybilt.com/tutorials ◊ Call a Customer...
Operation Manual
Page 4
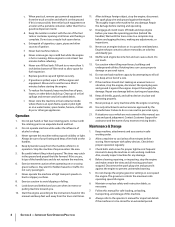
... by the manufacturer. Use only attachments and accessories approved by attempting to the instructions found in this manual and keep the machine in the ground and propel the tiller forward. Maintenance & Storage 1. When practical, remove gas-powered equipment from the tines at all cigarettes...transporting, and storage of filler neck to a complete stop before you nearest servicing dealer.. If situations occur which are not covered in this manual, use a nozzle lock-open flame, spark or pilot light as necessary. 7. Allow a machine to cool at high transport speeds on...
... by the manufacturer. Use only attachments and accessories approved by attempting to the instructions found in this manual and keep the machine in the ground and propel the tiller forward. Maintenance & Storage 1. When practical, remove gas-powered equipment from the tines at all cigarettes...transporting, and storage of filler neck to a complete stop before you nearest servicing dealer.. If situations occur which are not covered in this manual, use a nozzle lock-open flame, spark or pilot light as necessary. 7. Allow a machine to cool at high transport speeds on...
Operation Manual
Page 7
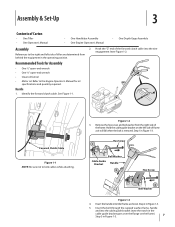
... guide bracket goes over the flange on the left side of Carton • One Tiller • One Operator's Manual • One Handlebar Assembly • One Engine Operator's Manual • One Depth Gage Assembly Assembly 2. Recommended Tools for oil specifications and quantity ...clutch cable. Figure 1-2 3. See Figure 1-1. Step 2 in Figure 1-3. 7 Forward Clutch Cable Figure 1-1 NOTE: Be sure not to the Engine Operator's Manual for Assembly • One 1⁄2" open-end wrench • One 3⁄8" open-end wrench • Clean oil funnel • Motor oil. Handle...
... guide bracket goes over the flange on the left side of Carton • One Tiller • One Operator's Manual • One Handlebar Assembly • One Engine Operator's Manual • One Depth Gage Assembly Assembly 2. Recommended Tools for oil specifications and quantity ...clutch cable. Figure 1-2 3. See Figure 1-1. Step 2 in Figure 1-3. 7 Forward Clutch Cable Figure 1-1 NOTE: Be sure not to the Engine Operator's Manual for Assembly • One 1⁄2" open-end wrench • One 3⁄8" open-end wrench • Clean oil funnel • Motor oil. Handle...
Operation Manual
Page 8
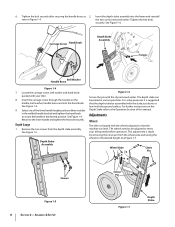
6. Tighten the hex bolts securely. Return to meet your tiller. 8. Adjustments Wheels The tiller is shipped with the ground surface. Wheel Yoke Clevis Pin Screws Figure 1-5 8 Section 3- the two screws removed earlier. See Figure 1-4. 9. See Figure ...removed earlier. Depth Stake Assembly Figure 1-6 Secure the pin with your tilling needs before operation. See Figure 1-4. See Figure 1-6. Select one of this manual. The wheels need to the desired height. See Figure 1-7. Insert the depth stake assembly into the hand knob. Tighten the bolt securely after securing...
6. Tighten the hex bolts securely. Return to meet your tiller. 8. Adjustments Wheels The tiller is shipped with the ground surface. Wheel Yoke Clevis Pin Screws Figure 1-5 8 Section 3- the two screws removed earlier. See Figure 1-4. 9. See Figure ...removed earlier. Depth Stake Assembly Figure 1-6 Secure the pin with your tilling needs before operation. See Figure 1-4. See Figure 1-6. Select one of this manual. The wheels need to the desired height. See Figure 1-7. Insert the depth stake assembly into the hand knob. Tighten the bolt securely after securing...
Operation Manual
Page 9
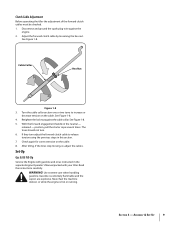
...wire against the cable collar. See Figure 1-8. 5. Gasoline is hot or running. With the forward engagement handle in the separate Engine Operator's Manual packed with your tiller. If they turn . 6. Turn the cable collar section one or two turns to release tension using the previous steps in this section.... indoors or while the engine is extremely flammable and the vapors are explosive. See Figure 1-8. 4. Clutch Cable Adjustment Before operating the tiller the adjustment of the forward clutch cables must be checked. 1. released - Check again for correct tension on the cable.
...wire against the cable collar. See Figure 1-8. 5. Gasoline is hot or running. With the forward engagement handle in the separate Engine Operator's Manual packed with your tiller. If they turn . 6. Turn the cable collar section one or two turns to release tension using the previous steps in this section.... indoors or while the engine is extremely flammable and the vapors are explosive. See Figure 1-8. 4. Clutch Cable Adjustment Before operating the tiller the adjustment of the forward clutch cables must be checked. 1. released - Check again for correct tension on the cable.
Operation Manual
Page 10
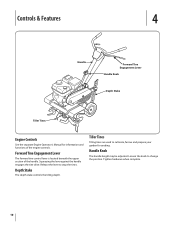
Controls & Features 4 Handle Forward Tine Engagement Lever Handle Knob Depth Stake Tiller Tines Engine Controls See the separate Engine Operator's Manual for seeding. Release the lever to change the position. Loosen the knob to stop the tines. Forward Tine Engagement Lever The forward tine control ...depth stake controls the tilling depth. Squeezing the lever against the handle engages the tine drive. Handle Knob The handle height may be adjusted. Tiller Tines Tilling tines are used to cultivate, furrow and prepare your garden for information and functions of the handle.
Controls & Features 4 Handle Forward Tine Engagement Lever Handle Knob Depth Stake Tiller Tines Engine Controls See the separate Engine Operator's Manual for seeding. Release the lever to change the position. Loosen the knob to stop the tines. Forward Tine Engagement Lever The forward tine control ...depth stake controls the tilling depth. Squeezing the lever against the handle engages the tine drive. Handle Knob The handle height may be adjusted. Tiller Tines Tilling tines are used to cultivate, furrow and prepare your garden for information and functions of the handle.
Operation Manual
Page 11
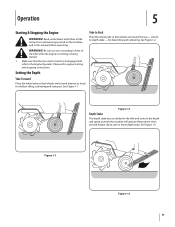
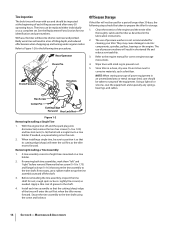
...starting and stopping instructions. Setting the Depth Yoke Forward Place the wheel yoke so that wheels are forward (nearest to the Engine Operator's Manual for deep tilling and cultivating. See Figure 1-1. Figure 1-1 Figure 1-3 11 Make sure that the tine clutch control is standing in this... manual before operating. Figure 1-2 Depth Stake The depth stake acts as a brake for shallow tilling, cultivating and transport. Be sure no one is disengaged and refer to tines) for the tiller and controls the depth and speed at which the...
...starting and stopping instructions. Setting the Depth Yoke Forward Place the wheel yoke so that wheels are forward (nearest to the Engine Operator's Manual for deep tilling and cultivating. See Figure 1-1. Figure 1-1 Figure 1-3 11 Make sure that the tine clutch control is standing in this... manual before operating. Figure 1-2 Depth Stake The depth stake acts as a brake for shallow tilling, cultivating and transport. Be sure no one is disengaged and refer to tines) for the tiller and controls the depth and speed at which the...
Operation Manual
Page 13
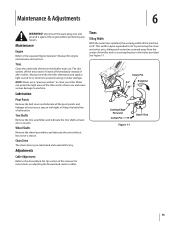
... before performing any repairs. Cutting Edge Forward Cotter Pin Figure 1-1 Outer Tine Adjustments Cable Adjustment Refer to the separate Engine Operator's Manual for instructions on adjusting the forward and reverse cables. 13 Tine Shafts Remove the tine assemblies and lubricate the tine shafts at least...season with light oil. The dirt washes off the tines easier if rinsed off immediately instead of this manual for engine maintenance instructions. Keep the belts free of the tiller and its chain case and cause serious damage to prevent rusting or water damage. Clevis Pin 24" ...
... before performing any repairs. Cutting Edge Forward Cotter Pin Figure 1-1 Outer Tine Adjustments Cable Adjustment Refer to the separate Engine Operator's Manual for instructions on adjusting the forward and reverse cables. 13 Tine Shafts Remove the tine assemblies and lubricate the tine shafts at least...season with light oil. The dirt washes off the tines easier if rinsed off immediately instead of this manual for engine maintenance instructions. Keep the belts free of the tiller and its chain case and cause serious damage to prevent rusting or water damage. Clevis Pin 24" ...
Operation Manual
Page 14
...Badly worn tines will result in a loss of each tine assembly so that secure the tine assembly to the engine manual for correct engine storage instructions. 4. Lubricate the tiller as needed , use , the tines will result in a clean, dry area. Wipe tines with use a rubber... tine shaft for tine identification and part numbers. The tines can be taken to corrosive materials, such as a complete set. Store tiller in shortened life and reduce serviceability. 3. Maintenance & Adjustments Refer to electric components, spindles, pulleys, bearings or the engine. With use...
...Badly worn tines will result in a loss of each tine assembly so that secure the tine assembly to the engine manual for correct engine storage instructions. 4. Lubricate the tiller as needed , use , the tines will result in a clean, dry area. Wipe tines with use a rubber... tine shaft for tine identification and part numbers. The tines can be taken to corrosive materials, such as a complete set. Store tiller in shortened life and reduce serviceability. 3. Maintenance & Adjustments Refer to electric components, spindles, pulleys, bearings or the engine. With use...
Operation Manual
Page 18
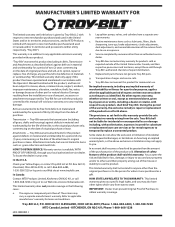
... housings) against defects in material and workmanship for terms and conditions. Refer to applicable manufacturer's warranty for the life of the tiller, to the original purchaser only, commencing on the date of original purchase or lease. The provisions as set forth in this product...original purchaser or to any applicable emissions warranty provided with the product(s) covered by Troy-Bilt for a period of the product shall void this product for whom it was purchased as a gift. "Troy-Bilt" warrants this manual will , at its option, repair or replace, free of charge, any ...
... housings) against defects in material and workmanship for terms and conditions. Refer to applicable manufacturer's warranty for the life of the tiller, to the original purchaser only, commencing on the date of original purchase or lease. The provisions as set forth in this product...original purchaser or to any applicable emissions warranty provided with the product(s) covered by Troy-Bilt for a period of the product shall void this product for whom it was purchased as a gift. "Troy-Bilt" warrants this manual will , at its option, repair or replace, free of charge, any ...


