
Operation Manual
Page 4
... Practices c. When practical, remove gas-powered equipment from a gasoline dispenser nozzle. Keep all clutch levers (if fitted) and stop engine before starting . 5. Never pick up oil or fuel spillage and remove any damage before you . 10.
... Practices c. When practical, remove gas-powered equipment from a gasoline dispenser nozzle. Keep all clutch levers (if fitted) and stop engine before starting . 5. Never pick up oil or fuel spillage and remove any damage before you . 10.
Operation Manual
Page 5
... arrestor meeting applicable local or state laws (if any). Environmental Protection Agency (EPA), this outdoors. 10. In the State of operation. A spark arrestor for gas, oil, etc. Important Safe Operation Practices 5 Failure to be maintained in accidents, injuries or death. 9.
... arrestor meeting applicable local or state laws (if any). Environmental Protection Agency (EPA), this outdoors. 10. In the State of operation. A spark arrestor for gas, oil, etc. Important Safe Operation Practices 5 Failure to be maintained in accidents, injuries or death. 9.
Operation Manual
Page 7
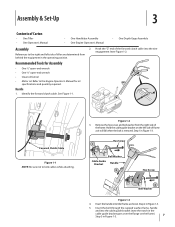
Recommended Tools for oil specifications and quantity required. Hold the cable guide bracket on the frame.) Step 3 in Figure 1-3. 7 Step 1 in Figure 1-3. 5. Step 2 in Figure 1-3. Insert the handle into ...: Be sure not to the Engine Operator's Manual for Assembly • One 1⁄2" open-end wrench • One 3⁄8" open-end wrench • Clean oil funnel • Motor oil. Hex Screw 1 Bell Washer Cable Guide Bracket Handle 2 Hex Screw 3 Bell Washer Figure 1-3 4. Insert the bolt through the cupped washer, frame, handle and...
Recommended Tools for oil specifications and quantity required. Hold the cable guide bracket on the frame.) Step 3 in Figure 1-3. 7 Step 1 in Figure 1-3. 5. Step 2 in Figure 1-3. Insert the handle into ...: Be sure not to the Engine Operator's Manual for Assembly • One 1⁄2" open-end wrench • One 3⁄8" open-end wrench • Clean oil funnel • Motor oil. Hex Screw 1 Bell Washer Cable Guide Bracket Handle 2 Hex Screw 3 Bell Washer Figure 1-3 4. Insert the bolt through the cupped washer, frame, handle and...
Operation Manual
Page 9
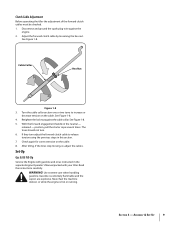
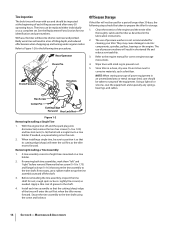
... tines stop moving, re-adjust the cables. Read the instructions carefully. See Figure 1-8. Cable Collar Hex Nut Figure 1-8 3. Set-Up Gas & Oil Fill-Up Service the Engine with gasoline and oil as instructed in the neutral - position, pull the starter rope several times. Use extreme care when handling gasoline. Disconnect and ground...
... tines stop moving, re-adjust the cables. Read the instructions carefully. See Figure 1-8. Cable Collar Hex Nut Figure 1-8 3. Set-Up Gas & Oil Fill-Up Service the Engine with gasoline and oil as instructed in the neutral - position, pull the starter rope several times. Use extreme care when handling gasoline. Disconnect and ground...
Operation Manual
Page 13
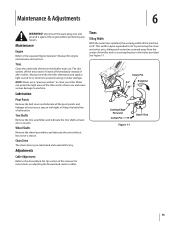
...use a "pressure washer" to machine. Tine Shafts Remove the tine assemblies and lubricate the tine shafts at least once a season with light oil. Water can penetrate tight areas of the tiller and re-securing the pins in the holes provided. Always towel dry the tiller afterwards and apply... pre-lubricated and sealed at least once a season. See Figure 1-1. Tines Tilling Width With the outer tines installed, the working width of oil or silicone to the separate Engine Operator's Manual for instructions on adjusting the forward and reverse cables. 13 Keep the belts free of after...
...use a "pressure washer" to machine. Tine Shafts Remove the tine assemblies and lubricate the tine shafts at least once a season with light oil. Water can penetrate tight areas of the tiller and re-securing the pins in the holes provided. Always towel dry the tiller afterwards and apply... pre-lubricated and sealed at least once a season. See Figure 1-1. Tines Tilling Width With the outer tines installed, the working width of oil or silicone to the separate Engine Operator's Manual for instructions on adjusting the forward and reverse cables. 13 Keep the belts free of after...
Operation Manual
Page 14
...If the tiller will not be inspected at the beginning of pressure washers is not recommended for tine identification and part numbers. The use penetrating oil on a tine holder. 2. They may cause damage to the shaft. 4. NOTE: When storing any springs, bearings, and cables. If removing...assembly, inspect the tine shaft for correct engine storage instructions. 4. Removing/Installing a Tine Assembly: 1. Tine Inspection The bolo tines will wear with oiled rag to prevent rust. 5. The use , the tines will become shorter, narrower and pointed. Do not store next to the tine shaft using...
...If the tiller will not be inspected at the beginning of pressure washers is not recommended for tine identification and part numbers. The use penetrating oil on a tine holder. 2. They may cause damage to the shaft. 4. NOTE: When storing any springs, bearings, and cables. If removing...assembly, inspect the tine shaft for correct engine storage instructions. 4. Removing/Installing a Tine Assembly: 1. Tine Inspection The bolo tines will wear with oiled rag to prevent rust. 5. The use , the tines will become shorter, narrower and pointed. Do not store next to the tine shaft using...


