
Operation Manual
Page 1
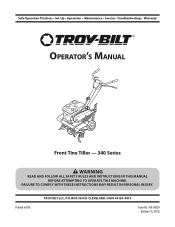
Printed In USA TROY-BILT LLC, P.O. Safe Operation Practices • Set-Up • Operation • Maintenance • Service • Troubleshooting • Warranty Operator's Manual Front Tine Tiller - 340 Series WARNING READ AND FOLLOW ALL SAFETY RULES AND INSTRUCTIONS IN THIS MANUAL BEFORE ATTEMPTING TO OPERATE THIS MACHINE. BOX 361131 CLEVELAND, OHIO 44136-0019 Form No. 769-08539 (October 15, 2012) FAILURE TO COMPLY WITH THESE INSTRUCTIONS MAY RESULT IN PERSONAL INJURY.
Printed In USA TROY-BILT LLC, P.O. Safe Operation Practices • Set-Up • Operation • Maintenance • Service • Troubleshooting • Warranty Operator's Manual Front Tine Tiller - 340 Series WARNING READ AND FOLLOW ALL SAFETY RULES AND INSTRUCTIONS IN THIS MANUAL BEFORE ATTEMPTING TO OPERATE THIS MACHINE. BOX 361131 CLEVELAND, OHIO 44136-0019 Form No. 769-08539 (October 15, 2012) FAILURE TO COMPLY WITH THESE INSTRUCTIONS MAY RESULT IN PERSONAL INJURY.
Operation Manual
Page 2
...refer to right and left side of product specifications for purchasing a Troy-Bilt Garden Tiller. Please be sure that this machine, you , and any problems or questions concerning the machine, phone a authorized Troy-Bilt service dealer or contact us on this manual, all times. This ...9674; Call a Customer Support Representative at the tine shield. If you how to Troy-Bilt LLC • P.O. Throughout this page. Please be necessary, should you for various models. Troy-Bilt's Customer Support telephone numbers, website address and mailing address can locate the model plate...
...refer to right and left side of product specifications for purchasing a Troy-Bilt Garden Tiller. Please be sure that this machine, you , and any problems or questions concerning the machine, phone a authorized Troy-Bilt service dealer or contact us on this manual, all times. This ...9674; Call a Customer Support Representative at the tine shield. If you how to Troy-Bilt LLC • P.O. Throughout this page. Please be necessary, should you for various models. Troy-Bilt's Customer Support telephone numbers, website address and mailing address can locate the model plate...
Operation Manual
Page 4
... hard or slippery surfaces. 8. Stay alert for damage. Exercise caution to another area. Never run an engine indoors or in the ground and propel the tiller forward. Maintenance & Storage 1. Disconnect the spark plug wire and ground it off the engine and equipment. Always refer to the operator's manual for proper tightness...
... hard or slippery surfaces. 8. Stay alert for damage. Exercise caution to another area. Never run an engine indoors or in the ground and propel the tiller forward. Maintenance & Storage 1. Disconnect the spark plug wire and ground it off the engine and equipment. Always refer to the operator's manual for proper tightness...
Operation Manual
Page 7
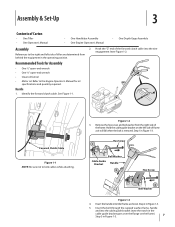
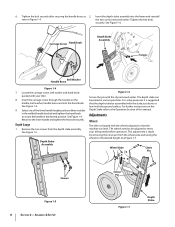
... and into the cable guide bracket (note the notch in the cable guide bracket goes over the flange on the left side of tiller are determined from the right side of frame as shown. Forward Clutch Cable Figure 1-1 NOTE: Be sure not to the Engine Operator... 1-1. Remove the hex screw and bell washer from behind the equipment in Figure 1-3. 7 Step 2 in Figure 1-3. Hook the "Z" end of Carton • One Tiller • One Operator's Manual • One Handlebar Assembly • One Engine Operator's Manual • One Depth Gage Assembly Assembly 2. Handle 1. Figure 1-2 3. ...
... and into the cable guide bracket (note the notch in the cable guide bracket goes over the flange on the left side of tiller are determined from the right side of frame as shown. Forward Clutch Cable Figure 1-1 NOTE: Be sure not to the Engine Operator... 1-1. Remove the hex screw and bell washer from behind the equipment in Figure 1-3. 7 Step 2 in Figure 1-3. Hook the "Z" end of Carton • One Tiller • One Operator's Manual • One Handlebar Assembly • One Engine Operator's Manual • One Depth Gage Assembly Assembly 2. Handle 1. Figure 1-2 3. ...
Operation Manual
Page 8
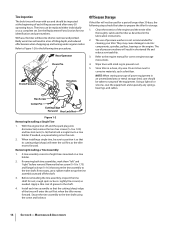
...Figure 1-4. Return to the desired height. Depth Stake Assembly Figure 1-6 Secure the pin with your tilling needs before operation. Adjustments Wheels The tiller is shipped with the wheels adjusted so that the depth stake be assembled with the stake just above or level with the ground surface.... and tighten the hex bolt securely. The depth stake can be adjusted to be placed at various positions. The wheels need to meet your tiller. 8. the two screws removed earlier. See Figure 1-4. For setup purposes it is made by removing the clevis pin from the depth stake ...
...Figure 1-4. Return to the desired height. Depth Stake Assembly Figure 1-6 Secure the pin with your tilling needs before operation. Adjustments Wheels The tiller is shipped with the wheels adjusted so that the depth stake be assembled with the stake just above or level with the ground surface.... and tighten the hex bolt securely. The depth stake can be adjusted to be placed at various positions. The wheels need to meet your tiller. 8. the two screws removed earlier. See Figure 1-4. For setup purposes it is made by removing the clevis pin from the depth stake ...
Operation Manual
Page 9
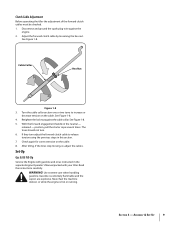
... indoors or while the engine is extremely flammable and the vapors are explosive. Section 3 - Cable Collar Hex Nut Figure 1-8 3. Clutch Cable Adjustment Before operating the tiller the adjustment of the forward clutch cables must be checked. 1. Turn the cable collar section one or two turns to release tension using the previous...
... indoors or while the engine is extremely flammable and the vapors are explosive. Section 3 - Cable Collar Hex Nut Figure 1-8 3. Clutch Cable Adjustment Before operating the tiller the adjustment of the forward clutch cables must be checked. 1. Turn the cable collar section one or two turns to release tension using the previous...
Operation Manual
Page 10
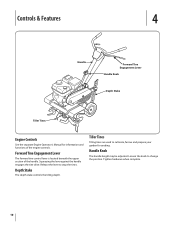
Squeezing the lever against the handle engages the tine drive. Handle Knob The handle height may be adjusted. Tiller Tines Tilling tines are used to cultivate, furrow and prepare your garden for information and functions of the handle. Forward Tine Engagement Lever The forward... tilling depth. Loosen the knob to stop the tines. Tighten hardware when complete. 10 Controls & Features 4 Handle Forward Tine Engagement Lever Handle Knob Depth Stake Tiller Tines Engine Controls See the separate Engine Operator's Manual for seeding. Release the lever to change the position.
Squeezing the lever against the handle engages the tine drive. Handle Knob The handle height may be adjusted. Tiller Tines Tilling tines are used to cultivate, furrow and prepare your garden for information and functions of the handle. Forward Tine Engagement Lever The forward... tilling depth. Loosen the knob to stop the tines. Tighten hardware when complete. 10 Controls & Features 4 Handle Forward Tine Engagement Lever Handle Knob Depth Stake Tiller Tines Engine Controls See the separate Engine Operator's Manual for seeding. Release the lever to change the position.
Operation Manual
Page 11
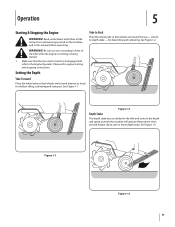
... control is running or being started. 1. WARNING! Read, understand, and follow all the instructions and warnings posted on the machine and in front of the tiller while the engine is disengaged and refer to raise or lower depth stake. Remove the clevis pin and hairpin clip to the Engine Operator's Manual...
... control is running or being started. 1. WARNING! Read, understand, and follow all the instructions and warnings posted on the machine and in front of the tiller while the engine is disengaged and refer to raise or lower depth stake. Remove the clevis pin and hairpin clip to the Engine Operator's Manual...
Operation Manual
Page 12
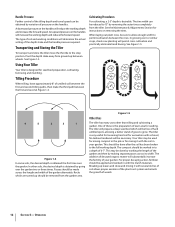
...Section for instructions on the handles will substantially increase the fertility of your garden. Breaking up should be removed from the tiller. The tine width can be obtained by removing the outer tines completely from the garden area. No tedious handwork will determine...on removing the tines. The addition of decayed organic matter will increase the working depth and reduce the forward speed. Using Your Tiller Your tiller is desirable. Cultivating Procedures For cultivating, a 2-3" depth is designed for seeding. Rocks which will be free of hard untilled ...
...Section for instructions on the handles will substantially increase the fertility of your garden. Breaking up should be removed from the tiller. The tine width can be obtained by removing the outer tines completely from the garden area. No tedious handwork will determine...on removing the tines. The addition of decayed organic matter will increase the working depth and reduce the forward speed. Using Your Tiller Your tiller is desirable. Cultivating Procedures For cultivating, a 2-3" depth is designed for seeding. Rocks which will be free of hard untilled ...
Operation Manual
Page 13
...cotter pins, sliding each use a "pressure washer" to prevent rusting or water damage. Keep the belts free of oil or silicone to clean your tiller. Water can penetrate tight areas of the machine is pre-lubricated and sealed at least once a season with light oil. Clevis Pin 24" 26...plug wire and ground it dries. Maintenance Engine Refer to machine. Tines Tilling Width With the outer tines installed, the working width of the tiller and its chain case and cause serious damage to the separate Engine Operator's Manual for instructions on adjusting the forward and reverse cables. 13...
...cotter pins, sliding each use a "pressure washer" to prevent rusting or water damage. Keep the belts free of oil or silicone to clean your tiller. Water can penetrate tight areas of the machine is pre-lubricated and sealed at least once a season with light oil. Clevis Pin 24" 26...plug wire and ground it dries. Maintenance Engine Refer to machine. Tines Tilling Width With the outer tines installed, the working width of the tiller and its chain case and cause serious damage to the separate Engine Operator's Manual for instructions on adjusting the forward and reverse cables. 13...
Operation Manual
Page 14
...identification and part numbers. Wipe tines with use penetrating oil on a tine holder. 2. See the Replacement Parts Section for cleaning your tiller. Hex Screw Cotter Pin Cutting Edge Forward Hex Lock Nut Figure 1-2 Removing/Installing a Single Tine 1. Before reinstalling the tine assembly..., inspect the tine shaft for the following steps should be taken to prepare the tiller for correct engine storage instructions. 4. Tine Inspection The bolo tines will wear with oiled rag to prevent rust. 5. Refer to Figure...
...identification and part numbers. Wipe tines with use penetrating oil on a tine holder. 2. See the Replacement Parts Section for cleaning your tiller. Hex Screw Cotter Pin Cutting Edge Forward Hex Lock Nut Figure 1-2 Removing/Installing a Single Tine 1. Before reinstalling the tine assembly..., inspect the tine shaft for the following steps should be taken to prepare the tiller for correct engine storage instructions. 4. Tine Inspection The bolo tines will wear with oiled rag to prevent rust. 5. Refer to Figure...
Operation Manual
Page 15
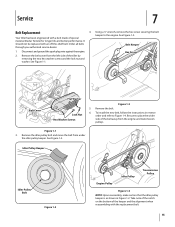
... 1. To install the new belt, follow the instructions in Figure 1-2. Service 7 Belt Replacement 4. Take note of the notch on the bottom of the tiller by removing the two hex washer screws and the lock nut and washer. It should not be replaced with the replacement belt. 15 Remove the... belt cover from under the idler pulley keeper. Using a 1⁄2" wrench, remove the hex screw securing the belt keeper to Figure 1-4. Your tiller has been engineered with a belt made of the belt away from the engine and transmission pulleys. Remove the idler pulley bolt and move the belt...
... 1. To install the new belt, follow the instructions in Figure 1-2. Service 7 Belt Replacement 4. Take note of the notch on the bottom of the tiller by removing the two hex washer screws and the lock nut and washer. It should not be replaced with the replacement belt. 15 Remove the... belt cover from under the idler pulley keeper. Using a 1⁄2" wrench, remove the hex screw securing the belt keeper to Figure 1-4. Your tiller has been engineered with a belt made of the belt away from the engine and transmission pulleys. Remove the idler pulley bolt and move the belt...
Operation Manual
Page 16
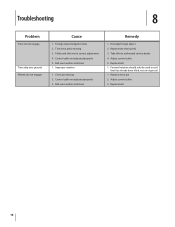
... worn and/or stretched 1. Replace tine clevis pin(s) 3. Pulley and idler not in tines 2. Control cable not adjusted properly 5. Improper rotation. 1. Clevis pin missing 2. Take tiller to authorized service dealer 4. Replace clevis pin 2. Replace belt 16 Dislodge foreign object 2. Forward rotation should only be used on soil that has already been...
... worn and/or stretched 1. Replace tine clevis pin(s) 3. Pulley and idler not in tines 2. Control cable not adjusted properly 5. Improper rotation. 1. Clevis pin missing 2. Take tiller to authorized service dealer 4. Replace clevis pin 2. Replace belt 16 Dislodge foreign object 2. Forward rotation should only be used on soil that has already been...
Operation Manual
Page 18
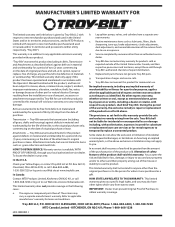
...arising out of purchase. Troy-Bilt LLC, P.O. Phone: 1-866-840-6483, 1-330-558-7220 MTD Canada Limited - C Troy-Bilt warrants the transmission (including all gears, shafts and housings) against defects in material and workmanship for the life of the tiller, to applicable manufacturer's ... The limited warranty set forth below ) against defects in Canada and/or its territories and possessions (either entity respectively, "Troy-Bilt"). "Troy-Bilt" warrants this product (excluding its Belts, Transmission and Attachments as to misuse, abuse, commercial use or exposure. f. Some...
...arising out of purchase. Troy-Bilt LLC, P.O. Phone: 1-866-840-6483, 1-330-558-7220 MTD Canada Limited - C Troy-Bilt warrants the transmission (including all gears, shafts and housings) against defects in material and workmanship for the life of the tiller, to applicable manufacturer's ... The limited warranty set forth below ) against defects in Canada and/or its territories and possessions (either entity respectively, "Troy-Bilt"). "Troy-Bilt" warrants this product (excluding its Belts, Transmission and Attachments as to misuse, abuse, commercial use or exposure. f. Some...


