

User Guide
Page 6
Contents Chapter 1: Getting to Know Your Camcorder 9 Overview 9 Check the components 10 System requirements 10 Front view 11 Rear view 11 Side views 12 Underside view 12 Chapter 2: Getting Started 13 Loading the battery 13 Charge your battery 14 Inserting and removing an SD™ Card (optional).....18 Turning the camcorder on and getting started .......19 Turning off the camcorder 19 Chapter 3: Record Mode 20 Button functions 20 LCD touch screen information 21 Menu options 22 Movie recording 24 6
Contents Chapter 1: Getting to Know Your Camcorder 9 Overview 9 Check the components 10 System requirements 10 Front view 11 Rear view 11 Side views 12 Underside view 12 Chapter 2: Getting Started 13 Loading the battery 13 Charge your battery 14 Inserting and removing an SD™ Card (optional).....18 Turning the camcorder on and getting started .......19 Turning off the camcorder 19 Chapter 3: Record Mode 20 Button functions 20 LCD touch screen information 21 Menu options 22 Movie recording 24 6

User Guide
Page 7
... Using the Flash or digital light function 25 Using zoom 26 Record menu options 26 Movie Record mode menu 26 Picture record mode menu 27 Record mode operations 27 Movie resolution 28 Picture resolution 28 White balance 29 Scene 29 Movie effects 30 Stabilization 30 Macro mode 31 Motion Detection 31 ...
... Using the Flash or digital light function 25 Using zoom 26 Record menu options 26 Movie Record mode menu 26 Picture record mode menu 27 Record mode operations 27 Movie resolution 28 Picture resolution 28 White balance 29 Scene 29 Movie effects 30 Stabilization 30 Macro mode 31 Motion Detection 31 ...
User Guide
Page 8
... Pictures and Movies on a Computer ...... 51 Installing bundled software 51 Transferring pictures or movies to a computer.......52 Chapter 8: Burning Recorded Clips to DVD 53 Chapter 9: Uploading Video Files to YouTube 57 Chapter 10: Video File Converter 63 Chapter 11: Specifications 66 ...Operating Environment Conditions 67 Chapter 12: Troubleshooting 68 Chapter 13: Other Information 70 Toshiba Support 70 Before you call 70 Contacting Toshiba 71 Toshiba's technical support Web site 71 Toshiba voice contact 71 Warranty 71 Online Warranty Information 71 Warranty Service 71
... Pictures and Movies on a Computer ...... 51 Installing bundled software 51 Transferring pictures or movies to a computer.......52 Chapter 8: Burning Recorded Clips to DVD 53 Chapter 9: Uploading Video Files to YouTube 57 Chapter 10: Video File Converter 63 Chapter 11: Specifications 66 ...Operating Environment Conditions 67 Chapter 12: Troubleshooting 68 Chapter 13: Other Information 70 Toshiba Support 70 Before you call 70 Contacting Toshiba 71 Toshiba's technical support Web site 71 Toshiba voice contact 71 Warranty 71 Online Warranty Information 71 Warranty Service 71
User Guide
Page 9
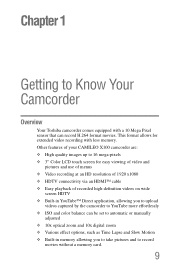
...YouTube™ Direct application, allowing you to upload videos captured by the camcorder to YouTube more effortlessly ❖ ISO and color balance can record H.264 format movies. Other features of your CAMILEO X100 camcorder are: ❖ High quality images up to 16 mega-pixels ❖ 3" Color LCD touch screen for extended video... options, such as Time Lapse and Slow Motion ❖ Built-in memory allowing you to take pictures and to Know Your Camcorder Overview Your Toshiba camcorder comes equipped with less memory. Chapter 1 Getting to record movies without a memory card. 9
...YouTube™ Direct application, allowing you to upload videos captured by the camcorder to YouTube more effortlessly ❖ ISO and color balance can record H.264 format movies. Other features of your CAMILEO X100 camcorder are: ❖ High quality images up to 16 mega-pixels ❖ 3" Color LCD touch screen for extended video... options, such as Time Lapse and Slow Motion ❖ Built-in memory allowing you to take pictures and to Know Your Camcorder Overview Your Toshiba camcorder comes equipped with less memory. Chapter 1 Getting to record movies without a memory card. 9
User Guide
Page 10
..., red, blue or green) may appear on the lens before using extremely highprecision technology. NOTE A portion of the manufacturing process, and do not affect the recording.
..., red, blue or green) may appear on the lens before using extremely highprecision technology. NOTE A portion of the manufacturing process, and do not affect the recording.

User Guide
Page 12
12 Getting to Know Your Camcorder Overview Side views LCD touch screen Power button SD™ Card slot Pre-Record/YouTube™ Direct button TV port Mini USB 2.0 port HDMI port (Sample Illustration) Side views Underside view Self-timer indicator light Tripod socket Battery cover (Sample Illustration) Underside view Safety latch
12 Getting to Know Your Camcorder Overview Side views LCD touch screen Power button SD™ Card slot Pre-Record/YouTube™ Direct button TV port Mini USB 2.0 port HDMI port (Sample Illustration) Side views Underside view Self-timer indicator light Tripod socket Battery cover (Sample Illustration) Underside view Safety latch
User Guide
Page 19
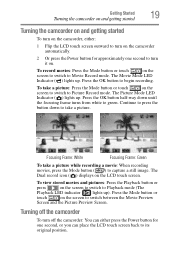
... ( ) displays on the screen to switch to capture a still image. Press the Mode button or touch on the screen to begin recording. Turning off the camcorder To turn off the camcorder: You can place the LCD touch screen back to its original position. Getting Started 19 Turning ... to take a picture: Press the Mode button or touch on the screen to switch to Picture Record mode. Press the OK button to switch between the Movie Preview Screen and the Picture Preview Screen. To record movies: Press the Mode button or touch on the LCD touch screen. The Movie Mode LED...
... ( ) displays on the screen to switch to capture a still image. Press the Mode button or touch on the screen to begin recording. Turning off the camcorder To turn off the camcorder: You can place the LCD touch screen back to its original position. Getting Started 19 Turning ... to take a picture: Press the Mode button or touch on the screen to switch to Picture Record mode. Press the OK button to switch between the Movie Preview Screen and the Picture Preview Screen. To record movies: Press the Mode button or touch on the LCD touch screen. The Movie Mode LED...
User Guide
Page 20
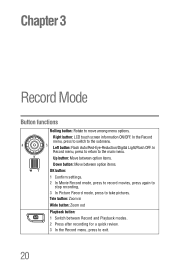
...press to switch to the main menu. Up button: Move between option items. Down button: Move between Record and Playback modes. 2 Press after recording for a quick review. 3 In the Record menu, press to exit. 20 Tele button: Zoom in Wide button: Zoom out Playback button: 1 ...Switch between option items. OK button: 1 Confirm settings. 2 In Movie Record mode, press to record movies, press again to stop recording, 3 In Picture Record mode, press to move among menu options. Chapter 3 Record Mode Button functions Rolling button: Rotate to take pictures.
...press to switch to the main menu. Up button: Move between option items. Down button: Move between Record and Playback modes. 2 Press after recording for a quick review. 3 In the Record menu, press to exit. 20 Tele button: Zoom in Wide button: Zoom out Playback button: 1 ...Switch between option items. OK button: 1 Confirm settings. 2 In Movie Record mode, press to record movies, press again to stop recording, 3 In Picture Record mode, press to move among menu options. Chapter 3 Record Mode Button functions Rolling button: Rotate to take pictures.

User Guide
Page 21
Power button: Press down for one second to activate the Pre-Record function and the movie will be recorded 3 seconds before the OK button is pressed. LCD touch screen information The indicators shown below may appear on or off. Pre-Record/YouTube™ Direct button: In Record mode, press to turn the camcorder on the LCD touch screen when recording movies and/or taking pictures: (Sample Image) LCD touch screen icons Record Mode 21 LCD touch screen information Mode button: 1 Switch between Movie mode and Picture mode. 2 When recording movies, press to capture a still image.
Power button: Press down for one second to activate the Pre-Record function and the movie will be recorded 3 seconds before the OK button is pressed. LCD touch screen information The indicators shown below may appear on or off. Pre-Record/YouTube™ Direct button: In Record mode, press to turn the camcorder on the LCD touch screen when recording movies and/or taking pictures: (Sample Image) LCD touch screen icons Record Mode 21 LCD touch screen information Mode button: 1 Switch between Movie mode and Picture mode. 2 When recording movies, press to capture a still image.

User Guide
Page 22
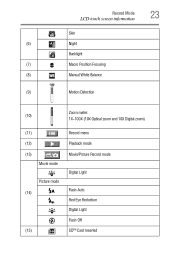
22 Record Mode LCD touch screen information Menu options Movie Resolution FHD (1080i/60fps) FHD (1080p/30fps) HD (720p/60fps) HD (720p/30fps) (1) VGA (4:3) Slow motion (Record movies at 320 x 240 resolution) Picture resolution High (16 MP) Standard (10 MP) Low (3 MP) Remaining time of recording that can be made at the current resolution (2) Number of images that can still be taken at the current resolution Self-timer enabled (3) Dual Record (to take a still picture while recording a movie) (4) Stabilization (5) Scene Pre-Record Mode Time Lapse
22 Record Mode LCD touch screen information Menu options Movie Resolution FHD (1080i/60fps) FHD (1080p/30fps) HD (720p/60fps) HD (720p/30fps) (1) VGA (4:3) Slow motion (Record movies at 320 x 240 resolution) Picture resolution High (16 MP) Standard (10 MP) Low (3 MP) Remaining time of recording that can be made at the current resolution (2) Number of images that can still be taken at the current resolution Self-timer enabled (3) Dual Record (to take a still picture while recording a movie) (4) Stabilization (5) Scene Pre-Record Mode Time Lapse
User Guide
Page 23
Record Mode 23 LCD touch screen information Skin (6) Night Backlight (7) Macro Position Focusing (8) Manual White Balance (9) Motion Detection Zoom meter: (10) 1X~100X (10X Optical zoom and 10X Digital zoom) (11) (12) (13) Movie mode Picture mode (14) (15) Record menu Playback mode Movie/Picture Record mode Digital Light Flash Auto Red Eye Reduction Digital Light Flash Off SD™ Card Inserted
Record Mode 23 LCD touch screen information Skin (6) Night Backlight (7) Macro Position Focusing (8) Manual White Balance (9) Motion Detection Zoom meter: (10) 1X~100X (10X Optical zoom and 10X Digital zoom) (11) (12) (13) Movie mode Picture mode (14) (15) Record menu Playback mode Movie/Picture Record mode Digital Light Flash Auto Red Eye Reduction Digital Light Flash Off SD™ Card Inserted
User Guide
Page 24
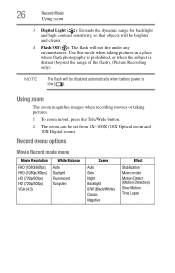
...still image resolution captured during the recording of a movie is an optional function that allows you to start recording. To use Dual Record, press the Mode button ( ) to view a recorded movie. Press the Playback button to capture a still image. 24 (16) Record Mode Movie recording Battery: Full power Battery: ... LCD touch screen. When a movie is lit), press the OK button to take a still picture while recording a movie. Movie recording In Movie Record mode (The Movie Record indicator light ( ) is being recorded, a time indicator will display on the LCD touch screen.
...still image resolution captured during the recording of a movie is an optional function that allows you to start recording. To use Dual Record, press the Mode button ( ) to view a recorded movie. Press the Playback button to capture a still image. 24 (16) Record Mode Movie recording Battery: Full power Battery: ... LCD touch screen. When a movie is lit), press the OK button to take a still picture while recording a movie. Movie recording In Movie Record mode (The Movie Record indicator light ( ) is being recorded, a time indicator will display on the LCD touch screen.

User Guide
Page 25
...pressed. To use the function again, repeat steps 1-3 above. Use this mode for general photography, (Picture Recording only). 2 Red Eye Reduction ( ): The pre-flash will not miss any critical recording opportunities, as movies are : Image Quality High Quality: 16 Mega Pixels Standard Quality: 5 Mega Pixels Low... button to take a picture. NOTE The Time Lapse function cannot be dark or in Record mode. Record Mode 25 Using the pre-record function Using the pre-record function The Pre-record function ensures that allows you to increase the brightness of an object, which may be ...
...pressed. To use the function again, repeat steps 1-3 above. Use this mode for general photography, (Picture Recording only). 2 Red Eye Reduction ( ): The pre-flash will not miss any critical recording opportunities, as movies are : Image Quality High Quality: 16 Mega Pixels Standard Quality: 5 Mega Pixels Low... button to take a picture. NOTE The Time Lapse function cannot be dark or in Record mode. Record Mode 25 Using the pre-record function Using the pre-record function The Pre-record function ensures that allows you to increase the brightness of an object, which may be ...
User Guide
Page 26
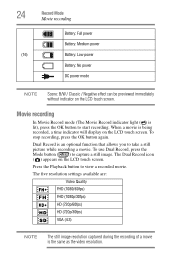
.../Wide button. 2 The zoom can be disabled automatically when battery power is distant (beyond the range of the flash), (Picture Recording only). Record menu options Movie Record mode menu Movie Resolution FHD (1080i/60fps) FHD (1080p/30fps) HD (720p/60fps) HD (720p/30fps) VGA (4:3) White Balance... this mode when taking pictures. 1 To zoom in a place where flash photography is prohibited, or when the subject is low ( ). 26 Record Mode Using zoom 3 Digital Light ( ): Extends the dynamic range for backlight and high contrast sensitivity, so that objects will be brighter and clearer...
.../Wide button. 2 The zoom can be disabled automatically when battery power is distant (beyond the range of the flash), (Picture Recording only). Record menu options Movie Record mode menu Movie Resolution FHD (1080i/60fps) FHD (1080p/30fps) HD (720p/60fps) HD (720p/30fps) VGA (4:3) White Balance... this mode when taking pictures. 1 To zoom in a place where flash photography is prohibited, or when the subject is low ( ). 26 Record Mode Using zoom 3 Digital Light ( ): Extends the dynamic range for backlight and high contrast sensitivity, so that objects will be brighter and clearer...

User Guide
Page 27
... ( ) to exit without any making any changes. 6 Touch the on-screen Page Up ( ) and Page Down ( ) icons to scroll through the pages. Record Mode 27 Record mode operations Picture record mode menu Movie Resolution High (16 MP) Standard (10 MP) Low (3 MP) White Balance Auto Daylight Fluorescent Tungsten Scene Auto Skin Night Backlight...
... ( ) to exit without any making any changes. 6 Touch the on-screen Page Up ( ) and Page Down ( ) icons to scroll through the pages. Record Mode 27 Record mode operations Picture record mode menu Movie Resolution High (16 MP) Standard (10 MP) Low (3 MP) White Balance Auto Daylight Fluorescent Tungsten Scene Auto Skin Night Backlight...
User Guide
Page 28
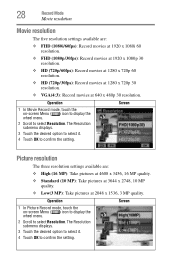
...1080i 60 resolution. ❖ FHD (1080p/30fps): Record movies at 1920 x 1080p 30 resolution. ❖ HD (720p/60fps): Record movies at 1280 x 720p 60 resolution. ❖ HD (720p/30fps): Record movies at 1280 x 720p 30 resolution. ❖ VGA(4:3): Record movies at 2048 x 1536, 3 MP quality. The... confirm the setting. The Resolution submenu displays. 3 Touch the desired option to select it . 4 Touch OK to confirm the setting. 28 Record Mode Movie resolution Movie resolution The five resolution settings available are : ❖ High (16 MP): Take pictures at 4608 x 3456, 16 MP...
...1080i 60 resolution. ❖ FHD (1080p/30fps): Record movies at 1920 x 1080p 30 resolution. ❖ HD (720p/60fps): Record movies at 1280 x 720p 60 resolution. ❖ HD (720p/30fps): Record movies at 1280 x 720p 30 resolution. ❖ VGA(4:3): Record movies at 2048 x 1536, 3 MP quality. The... confirm the setting. The Resolution submenu displays. 3 Touch the desired option to select it . 4 Touch OK to confirm the setting. 28 Record Mode Movie resolution Movie resolution The five resolution settings available are : ❖ High (16 MP): Take pictures at 4608 x 3456, 16 MP...
User Guide
Page 29
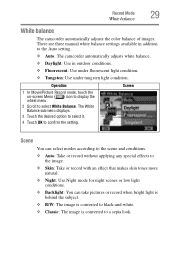
...skin tones more natural. ❖ Night: Use Night mode for night scenes or low light conditions. ❖ Backlight: You can take pictures or record when bright light is behind the subject. ❖ B/W: The image is converted to black-and-white. ❖ Classic: The image is converted ...to select White Balance. Operation Screen 1 In Movie/Picture Record mode, touch the on-screen Menu ( ) icon to display the wheel menu. 2 Scroll to a sepia look. There are three manual white balance settings...
...skin tones more natural. ❖ Night: Use Night mode for night scenes or low light conditions. ❖ Backlight: You can take pictures or record when bright light is behind the subject. ❖ B/W: The image is converted to black-and-white. ❖ Classic: The image is converted ...to select White Balance. Operation Screen 1 In Movie/Picture Record mode, touch the on-screen Menu ( ) icon to display the wheel menu. 2 Scroll to a sepia look. There are three manual white balance settings...

User Guide
Page 30
Movie effects Operation 1 In Movie Record mode, touch the on-screen Menu ( ) icon to display the wheel menu. 2 Scroll to select from: Stabilization, Macro mode, Motion Detection, Slow Motion and Time ... select it . 3 Touch OK to help reduce shaking and create clearer videos. Screen Operation Screen 1 In Movie/Picture Record mode, touch the on a flat, steady surface, or use a tripod when taking photos in Night Mode. 30 Record Mode Movie effects ❖ Negative: The image is converted to a negative version of the original.
Movie effects Operation 1 In Movie Record mode, touch the on-screen Menu ( ) icon to display the wheel menu. 2 Scroll to select from: Stabilization, Macro mode, Motion Detection, Slow Motion and Time ... select it . 3 Touch OK to help reduce shaking and create clearer videos. Screen Operation Screen 1 In Movie/Picture Record mode, touch the on a flat, steady surface, or use a tripod when taking photos in Night Mode. 30 Record Mode Movie effects ❖ Negative: The image is converted to a negative version of the original.
User Guide
Page 31
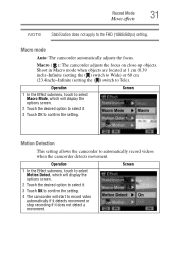
... This setting allows the camcorder to Tele). Operation 1 In the Effect submenu, touch to select Motion Detect, which will start to record video automatically if it detects movement or stop recording if it . 3 Touch OK to the FHD (1080i/60fps) setting. Shoot in Macro mode when objects are located at 1 cm (0.39... inch)~Infinite (setting the ( ) switch to Wide) or 60 cm (23.4inch)~Infinite (setting the ( ) switch to automatically record videos when the camcorder detects movement. Macro ( ): The camcorder adjusts the focus on close-up objects...
... This setting allows the camcorder to Tele). Operation 1 In the Effect submenu, touch to select Motion Detect, which will start to record video automatically if it detects movement or stop recording if it . 3 Touch OK to the FHD (1080i/60fps) setting. Shoot in Macro mode when objects are located at 1 cm (0.39... inch)~Infinite (setting the ( ) switch to Wide) or 60 cm (23.4inch)~Infinite (setting the ( ) switch to automatically record videos when the camcorder detects movement. Macro ( ): The camcorder adjusts the focus on close-up objects...

User Guide
Page 32
...them to confirm the setting. Operation 1 In the Effect submenu, touch to select Slow Motion, which will be longer than the actual recording time. Operation 1 In the Effect submenu, touch Time Lapse to display the options screen. 2 Touch the desired option to select ... file. ❖ Off: Disables Time Lapse. ❖ 1 Sec: Record one frame per second. ❖ 3 Sec: Record one frame every 3 seconds. ❖ 5 Sec: Record one frame every 5 seconds. 32 Record Mode Movie effects Slow Motion This setting records videos with a slow motion effect. When the video is activated.
...them to confirm the setting. Operation 1 In the Effect submenu, touch to select Slow Motion, which will be longer than the actual recording time. Operation 1 In the Effect submenu, touch Time Lapse to display the options screen. 2 Touch the desired option to select ... file. ❖ Off: Disables Time Lapse. ❖ 1 Sec: Record one frame per second. ❖ 3 Sec: Record one frame every 3 seconds. ❖ 5 Sec: Record one frame every 5 seconds. 32 Record Mode Movie effects Slow Motion This setting records videos with a slow motion effect. When the video is activated.
