Owners Manual
Page 6
...place where the cold wind from an air conditioned room. Moisture condensation occurs during the following carefully. When you use the DVD/VCR in a room where you place this DVD/VCR near the DVD/VCR. When you pour a cold drink into a glass on a warm day. Remove the disc or the video tape, ...use . The top and rear panels of solvent, such as thinner and benzine, as it may damage the surface of the DVD/VCR. Notes on and use the DVD/VCR occasionally. Do not use any moisture. It's too warm! This is not in handy. Introduction Precautions Notes on handling Notes...
...place where the cold wind from an air conditioned room. Moisture condensation occurs during the following carefully. When you use the DVD/VCR in a room where you place this DVD/VCR near the DVD/VCR. When you pour a cold drink into a glass on a warm day. Remove the disc or the video tape, ...use . The top and rear panels of solvent, such as thinner and benzine, as it may damage the surface of the DVD/VCR. Notes on and use the DVD/VCR occasionally. Do not use any moisture. It's too warm! This is not in handy. Introduction Precautions Notes on handling Notes...
Owners Manual
Page 8
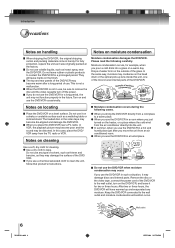
... Playable discs This owner's manual explains the basic instructions of this DVD/VCR is 1. The following discs. This is not available for their playable area, are rare. As one of the creators of DVD technology, Toshiba DVD players are manufactured using the menu displayed on the TV screen (Menu... Playback). Alternatively, this DVD/VCR in the unit. ROM, Photo CD, etc., or non standardized discs even if ...
... Playable discs This owner's manual explains the basic instructions of this DVD/VCR is 1. The following discs. This is not available for their playable area, are rare. As one of the creators of DVD technology, Toshiba DVD players are manufactured using the menu displayed on the TV screen (Menu... Playback). Alternatively, this DVD/VCR in the unit. ROM, Photo CD, etc., or non standardized discs even if ...
Owners Manual
Page 10
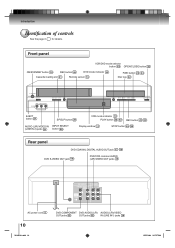
Introduction Identification of controls See the page in for details. Front panel VCR/DVD mode selector button 19 OPEN/CLOSE button 32 ON/STANDBY button 19 REC button 26 DVD mode indicator 32 Cassette loading slot 21 Remote sensor 13 FWD button 22 34 Disc tray 32 EJECT button 21... jacks 31 button 26 Display window 11 STOP button 22 32 Rear panel DVD COAXIAL DIGITAL AUDIO OUT jack 17 18 DVD S-VIDEO OUT jack 16 DVD/VCR common AUDIO (L/R)/VIDEO OUT jacks 15 AC power cord 5 10 2K10101A.indb 10 DVD COMPONENT DVD AUDIO (L/R) AUDIO (L/R)/VIDEO OUT jacks 16 OUT jacks 16 IN (LINE...
Introduction Identification of controls See the page in for details. Front panel VCR/DVD mode selector button 19 OPEN/CLOSE button 32 ON/STANDBY button 19 REC button 26 DVD mode indicator 32 Cassette loading slot 21 Remote sensor 13 FWD button 22 34 Disc tray 32 EJECT button 21... jacks 31 button 26 Display window 11 STOP button 22 32 Rear panel DVD COAXIAL DIGITAL AUDIO OUT jack 17 18 DVD S-VIDEO OUT jack 16 DVD/VCR common AUDIO (L/R)/VIDEO OUT jacks 15 AC power cord 5 10 2K10101A.indb 10 DVD COMPONENT DVD AUDIO (L/R) AUDIO (L/R)/VIDEO OUT jacks 16 OUT jacks 16 IN (LINE...
Owners Manual
Page 13
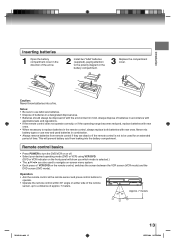
...to operate. • Operate the remote control within 30° angle on the remote control, switches the screen between the VCR screen (VCR mode) and the DVD screen (DVD mode). This will show you which mode is selected.) • The are dead or if the remote control is not ...cover. Always dispose of the arrow. 2 Install two "AAA" batteries (supplied), paying attention to turn the DVD/VCR on or off. • Select your desired operating mode (DVD or VCR) using VCR DVD. (DVD or VCR indicator on the front panel will prevent battery acid from remote control if they are also used for an...
...to operate. • Operate the remote control within 30° angle on the remote control, switches the screen between the VCR screen (VCR mode) and the DVD screen (DVD mode). This will show you which mode is selected.) • The are dead or if the remote control is not ...cover. Always dispose of the arrow. 2 Install two "AAA" batteries (supplied), paying attention to turn the DVD/VCR on or off. • Select your desired operating mode (DVD or VCR) using VCR DVD. (DVD or VCR indicator on the front panel will prevent battery acid from remote control if they are also used for an...

Owners Manual
Page 14
DVD/VCR to Cable/Satellite Box connection Signal flow To wall outlet (yellow) To VIDEO IN (white) (red) To ANALOG AUDIO IN Audio/video cable (not supplied) ... from the wall outlet before making any connections. 14 2K10101A.indb 14 12/22/2006 5:07:29 PM For recording TV programs, you connect the DVD/VCR to other equipment, be sure to either Cable or Satellite Box. Connections Connecting to a Cable or Satellite Box This...
DVD/VCR to Cable/Satellite Box connection Signal flow To wall outlet (yellow) To VIDEO IN (white) (red) To ANALOG AUDIO IN Audio/video cable (not supplied) ... from the wall outlet before making any connections. 14 2K10101A.indb 14 12/22/2006 5:07:29 PM For recording TV programs, you connect the DVD/VCR to other equipment, be sure to either Cable or Satellite Box. Connections Connecting to a Cable or Satellite Box This...
Owners Manual
Page 15
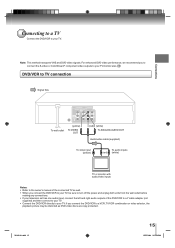
... input, connect the left and right audio outputs of the DVD/VCR to a Y cable adapter (not supplied) and then connect to your TV. • Connect the DVD/VCR directly to your TV. Note: This method transports VHS and DVD-video signals. For enhanced DVD-video performance, we recommend you to connect the S-video or... ColorStream® component video outputs to your TV/monitor also. 16 DVD/VCR to TV connection Signal flow Connections To wall outlet (yellow) To VIDEO OUT (red) (white) To ANALOG AUDIO OUT Audio/video cable (supplied) To...
... input, connect the left and right audio outputs of the DVD/VCR to a Y cable adapter (not supplied) and then connect to your TV. • Connect the DVD/VCR directly to your TV. Note: This method transports VHS and DVD-video signals. For enhanced DVD-video performance, we recommend you to connect the S-video or... ColorStream® component video outputs to your TV/monitor also. 16 DVD/VCR to TV connection Signal flow Connections To wall outlet (yellow) To VIDEO OUT (red) (white) To ANALOG AUDIO OUT Audio/video cable (supplied) To...

Owners Manual
Page 16
... flicker. Audio cable (not supplied) To Y video input To PB/CB video input To PR/CR video input To audio inputs of the DVD/VCR has a wide dynamic range. Connecting to these inputs allows you to view the highest quality pictures with component video inputs that the Progressive indicator...be distorted. Notes: • To switch the scan mode between the interlace and progressive modes, see any connections. • If you place the DVD/VCR near a tuner or radio, the radio broadcast sound might be damaged by a sudden high volume sound. • Turn off the Progressive indicator, ...
... flicker. Audio cable (not supplied) To Y video input To PB/CB video input To PR/CR video input To audio inputs of the DVD/VCR has a wide dynamic range. Connecting to these inputs allows you to view the highest quality pictures with component video inputs that the Progressive indicator...be distorted. Notes: • To switch the scan mode between the interlace and progressive modes, see any connections. • If you place the DVD/VCR near a tuner or radio, the radio broadcast sound might be damaged by a sudden high volume sound. • Turn off the Progressive indicator, ...

Owners Manual
Page 17
... with a Dolby® Digital decoder Dolby Digital Dolby Digital is now available to reproduce this dynamic realistic sound by connecting the DVD/VCR to optional audio • This selection uses the following reference mark. TO COAXIAL DIGITAL AUDIO OUT Connecting to an amplifier equipped ... Dolby Digital recording system. Connections Connecting to optional audio equipment You can enjoy high quality dynamic sounds of DVD video discs or audio CDs by connecting the DVD/VCR to a 6 channel amplifier equipped with a Dolby Digital decoder or Dolby Digital processor. To COAXIAL DIGITAL ...
... with a Dolby® Digital decoder Dolby Digital Dolby Digital is now available to reproduce this dynamic realistic sound by connecting the DVD/VCR to optional audio • This selection uses the following reference mark. TO COAXIAL DIGITAL AUDIO OUT Connecting to an amplifier equipped ... Dolby Digital recording system. Connections Connecting to optional audio equipment You can enjoy high quality dynamic sounds of DVD video discs or audio CDs by connecting the DVD/VCR to a 6 channel amplifier equipped with a Dolby Digital decoder or Dolby Digital processor. To COAXIAL DIGITAL ...

Owners Manual
Page 18
... incompatible with an MPEG2 audio decoder or MPEG2 audio processor. If you should take proper precautions when the ANALOG AUDIO OUT (L/R) jacks of the DVD/VCR are connected to an amplification system. (Do not leave the ANALOG AUDIO OUT (L/R) wires dangling.) To enjoy DTS Digital Surround™ playback, ...an external 5.1 channel DTS Digital Surround™ decoder system must be connected to the COAXIAL DIGITAL AUDIO OUT jack of the DVD/VCR has a wide dynamic range. To avoid possible damage to the audio system, you leave the amplifier's power on your hearing may be ...
... incompatible with an MPEG2 audio decoder or MPEG2 audio processor. If you should take proper precautions when the ANALOG AUDIO OUT (L/R) jacks of the DVD/VCR are connected to an amplification system. (Do not leave the ANALOG AUDIO OUT (L/R) wires dangling.) To enjoy DTS Digital Surround™ playback, ...an external 5.1 channel DTS Digital Surround™ decoder system must be connected to the COAXIAL DIGITAL AUDIO OUT jack of the DVD/VCR has a wide dynamic range. To avoid possible damage to the audio system, you leave the amplifier's power on your hearing may be ...
Owners Manual
Page 19
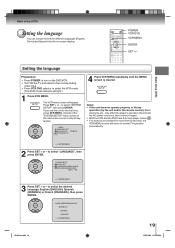
...) or French (FRANCAIS), then press ENTER. to select "LANGUAGE", then press ENTER. Disconnect the AC power cord once, then connect it again. • Both the VCR and the DVD have their own player menus 48 . • If no buttons are pressed for more than 60 seconds, the...;OL FRANCAIS 〈+/-/ENTER/MENU 〉 2K10101A.indb 19 19 12/22/2006 5:07:30 PM If you use the unit for the on the DVD/VCR. • Turn ON the TV and select to the corresponding video input. • Press VCR DVD selector to select "SYSTEM SETUP", then press ENTER. POWER...
...) or French (FRANCAIS), then press ENTER. to select "LANGUAGE", then press ENTER. Disconnect the AC power cord once, then connect it again. • Both the VCR and the DVD have their own player menus 48 . • If no buttons are pressed for more than 60 seconds, the...;OL FRANCAIS 〈+/-/ENTER/MENU 〉 2K10101A.indb 19 19 12/22/2006 5:07:30 PM If you use the unit for the on the DVD/VCR. • Turn ON the TV and select to the corresponding video input. • Press VCR DVD selector to select "SYSTEM SETUP", then press ENTER. POWER...
Owners Manual
Page 20
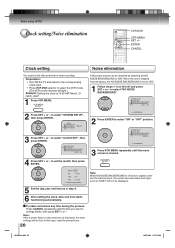
... ON OFF SYSTEM SETUP 3 Press SET + or - Preparation: • Turn ON the TV and select to the corresponding video input. • Press VCR DVD selector to "ON". 1 Follow steps 1~2 on the left and press SET + or - SYSTEM SETUP CLOCK SET LANGUAGE/IDIOMA/LANGUE NO NOISE BACKGROUND ON ... becomes black and signs such as in step 4. 6 After setting the clock, date and time starts functioning automatically. Basic setup (VCR) Clock setting/Noise elimination VCR DVD VCR MENU SET +/- Noise elimination A Blue back screen can be displayed. 2K10101A.indb 20 12/22/2006 5:07:31 PM to set...
... ON OFF SYSTEM SETUP 3 Press SET + or - Preparation: • Turn ON the TV and select to the corresponding video input. • Press VCR DVD selector to "ON". 1 Follow steps 1~2 on the left and press SET + or - SYSTEM SETUP CLOCK SET LANGUAGE/IDIOMA/LANGUE NO NOISE BACKGROUND ON ... becomes black and signs such as in step 4. 6 After setting the clock, date and time starts functioning automatically. Basic setup (VCR) Clock setting/Noise elimination VCR DVD VCR MENU SET +/- Noise elimination A Blue back screen can be displayed. 2K10101A.indb 20 12/22/2006 5:07:31 PM to set...
Owners Manual
Page 21
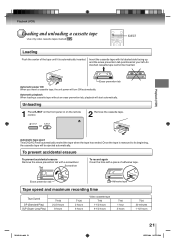
... a cassette tape Use only video cassette tapes marked . Insert the cassette tape with a screwdriver. or Automatic tape eject This DVD/VCR will be inserted. Screwdriver To record again Cover the hole with a piece of the tape until it is rewound to its labeled...Once the tape is automatically inserted. An inverted cassette tape cannot be ejected automatically. EJECT Loading Push the center of adhesive tape. Playback (VCR) Erase prevention tab Automatic power ON When you insert a cassette tape, the unit power will start automatically. Unloading 1 Press EJECT on the...
... a cassette tape Use only video cassette tapes marked . Insert the cassette tape with a screwdriver. or Automatic tape eject This DVD/VCR will be inserted. Screwdriver To record again Cover the hole with a piece of the tape until it is rewound to its labeled...Once the tape is automatically inserted. An inverted cassette tape cannot be ejected automatically. EJECT Loading Push the center of adhesive tape. Playback (VCR) Erase prevention tab Automatic power ON When you insert a cassette tape, the unit power will start automatically. Unloading 1 Press EJECT on the...
Owners Manual
Page 23
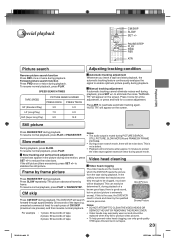
...to reactivate automatic tracking again. In the Press PAUSE/STEP during playback. need to check and clean by frame picture which the DVD/VCR reads the picture from the tape during pause mode. Snowy Picture unwanted commercial time) for a coarse adjustment. Forward picture search ... quality VHS tapes. unlikely event that the heads become dirty enough to enable optimum picture quality during playback, press SET +/- The DVD/VCR will appear on the screen. Video head cleaning If the still picture jitters excessively, press SET +/- The picture advances frame by...
...to reactivate automatic tracking again. In the Press PAUSE/STEP during playback. need to check and clean by frame picture which the DVD/VCR reads the picture from the tape during pause mode. Snowy Picture unwanted commercial time) for a coarse adjustment. Forward picture search ... quality VHS tapes. unlikely event that the heads become dirty enough to enable optimum picture quality during playback, press SET +/- The DVD/VCR will appear on the screen. Video head cleaning If the still picture jitters excessively, press SET +/- The picture advances frame by...
Owners Manual
Page 26
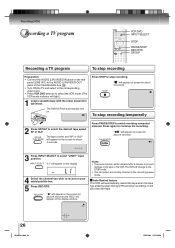
... the AUDIO (L/R)/VIDEO OUT jacks of the Cable/Satellite box. 14 • Turn ON the TV and select to the corresponding video input. • Press VCR DVD selector to select "LINE1" input position. " " will appear on your cable/satellite box. 5 Press REC/OTR. " " will appear on screen for ... SP Press PAUSE/STEP to continue the recording. " " will appear on the screen for about 4 seconds and "REC" will appear on . The DVD/VCR will automatically rewind the tape when the tape has ended (except during OTR and timer recording). Press again to avoid recording unwanted material. The...
... the AUDIO (L/R)/VIDEO OUT jacks of the Cable/Satellite box. 14 • Turn ON the TV and select to the corresponding video input. • Press VCR DVD selector to select "LINE1" input position. " " will appear on your cable/satellite box. 5 Press REC/OTR. " " will appear on screen for ... SP Press PAUSE/STEP to continue the recording. " " will appear on the screen for about 4 seconds and "REC" will appear on . The DVD/VCR will automatically rewind the tape when the tape has ended (except during OTR and timer recording). Press again to avoid recording unwanted material. The...
Owners Manual
Page 29
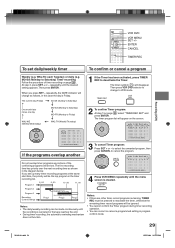
Then press ENTER. The timer symbol ( ) will appear on the screen. Then press VCR DVD selector to change as shown in this case the day is Friday. The first recording time has priority over the next recording time as follows,...; If the programs overlap another Do not overlap timer programs as portions of timer recording on page 28 select "TIMER REC SET" and press ENTER. VCR DVD VCR MENU SET +/- Program 1 8 : 00 9 : 00 10 : 00 11 : 00 Program 2 Program 3 Recording Control Settings Prog.1 Deleted Parts Non Recorded Portion Parts Prog.2 Prog.3 Notes: &#...
Then press ENTER. The timer symbol ( ) will appear on the screen. Then press VCR DVD selector to change as shown in this case the day is Friday. The first recording time has priority over the next recording time as follows,...; If the programs overlap another Do not overlap timer programs as portions of timer recording on page 28 select "TIMER REC SET" and press ENTER. VCR DVD VCR MENU SET +/- Program 1 8 : 00 9 : 00 10 : 00 11 : 00 Program 2 Program 3 Recording Control Settings Prog.1 Deleted Parts Non Recorded Portion Parts Prog.2 Prog.3 Notes: &#...
Owners Manual
Page 30
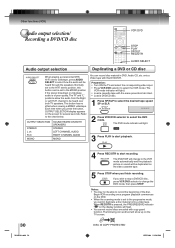
...several seconds. DISC IS COPY PROTECTED 12/22/2006 5:12:01 PM Each time when you wish to stop a DVD/CD disc, press VCR DVD selector to change to the VCR mode automatically and the playback picture or sound will be duplicated on the TV screen. The following icon and text ... a video tape. Refer to the progressive mode, you finish recording. The DVD/VCR will change the DVD mode, then press STOP. Normally set to the Hi-Fi stereo position, this DVD/VCR. Begin VCR recording once program playback commences on the DVD. • When the scanning mode is set to the chart below. This...
...several seconds. DISC IS COPY PROTECTED 12/22/2006 5:12:01 PM Each time when you wish to stop a DVD/CD disc, press VCR DVD selector to change to the VCR mode automatically and the playback picture or sound will be duplicated on the TV screen. The following icon and text ... a video tape. Refer to the progressive mode, you finish recording. The DVD/VCR will change the DVD mode, then press STOP. Normally set to the Hi-Fi stereo position, this DVD/VCR. Begin VCR recording once program playback commences on the DVD. • When the scanning mode is set to the chart below. This...
Owners Manual
Page 31
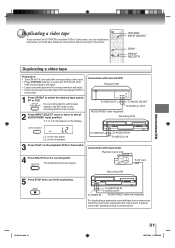
...8226; Turn ON the TV and select the corresponding video input. • Press VCR DVD selector to select the VCR mode. (The VCR mode indicator will appear on the playback VCR or Camcorder. Connection with second VCR Playback VCR To VIDEO OUT To AUDIO (R) OUT To AUDIO (L) OUT AUDIO/VIDEO cable (...instructions. It is shown above. 2K10101A.indb 31 31 12/22/2006 5:12:03 PM Other functions (VCR) Duplicating a video tape If you connect the DVD/VCR to another VCR or Camcorder, you finish duplicating. A typical camcorder dubbing hookup is recommended to set the tape speed to...
...8226; Turn ON the TV and select the corresponding video input. • Press VCR DVD selector to select the VCR mode. (The VCR mode indicator will appear on the playback VCR or Camcorder. Connection with second VCR Playback VCR To VIDEO OUT To AUDIO (R) OUT To AUDIO (L) OUT AUDIO/VIDEO cable (...instructions. It is shown above. 2K10101A.indb 31 31 12/22/2006 5:12:03 PM Other functions (VCR) Duplicating a video tape If you connect the DVD/VCR to another VCR or Camcorder, you finish duplicating. A typical camcorder dubbing hookup is recommended to set the tape speed to...

Owners Manual
Page 32
... Press STOP to end playback. • The unit records the stopped point, depending on . 2 Press VCR/DVD to the DVD/VCR. 1 Press ON/STANDBY. ON/STANDBY VCR/DVD STOP Disc tray Display window PLAY OPEN/CLOSE DVD VCD Basic playback CD Preparations: • When you want to enjoy the sound of discs from the scene... point). • If you press STOP again (" ■ " appears on the audio system and select the input connected to select the DVD mode. The DVD/VCR turns on the disc. If the disc is out of the disc tray as it is closing. Disconnect the AC power cord once, then...
... Press STOP to end playback. • The unit records the stopped point, depending on . 2 Press VCR/DVD to the DVD/VCR. 1 Press ON/STANDBY. ON/STANDBY VCR/DVD STOP Disc tray Display window PLAY OPEN/CLOSE DVD VCD Basic playback CD Preparations: • When you want to enjoy the sound of discs from the scene... point). • If you press STOP again (" ■ " appears on the audio system and select the input connected to select the DVD mode. The DVD/VCR turns on the disc. If the disc is out of the disc tray as it is closing. Disconnect the AC power cord once, then...
Owners Manual
Page 33
... Audio CDs and CD-R/RW CDs. ■ To pause playback (still mode) Press PAUSE/STEP during playback. Follow steps 1~5 on page 26 . • If the DVD/VCR is completed. Doing so may not work the resuming facility. • Resuming cannot function when you leave the unit in... disc again 8 52 . • Some discs may be a slight delay between the button is recording or standing by software producers. To turn on the DVD/VCR. 2) Press VCR DVD selector to high resolution pictures on these discs which include a lot of noise depends on the TV you want to return to the disc contents...
... Audio CDs and CD-R/RW CDs. ■ To pause playback (still mode) Press PAUSE/STEP during playback. Follow steps 1~5 on page 26 . • If the DVD/VCR is completed. Doing so may not work the resuming facility. • Resuming cannot function when you leave the unit in... disc again 8 52 . • Some discs may be a slight delay between the button is recording or standing by software producers. To turn on the DVD/VCR. 2) Press VCR DVD selector to high resolution pictures on these discs which include a lot of noise depends on the TV you want to return to the disc contents...
Owners Manual
Page 34
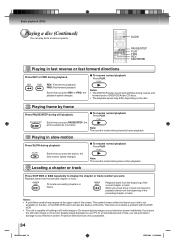
...screen display image on the disc, or the DVD/VCR cannot access the feature at this time. This does not indicate a problem with the DVD/ VCR. • The unit is muted during still playback. ■ To resume normal playback Press PLAY. DVD VCD Playing frame by frame Press PAUSE/STEP ...9632; To resume normal playback Press PLAY. Notes: • A prohibition symbol may differ depending on your television screen indefinitely. Notes: • The DVD/VCR mutes sound and subtitles during slow-motion playback. Each time you want. Playback starts from the beginning of the screen...
...screen display image on the disc, or the DVD/VCR cannot access the feature at this time. This does not indicate a problem with the DVD/ VCR. • The unit is muted during still playback. ■ To resume normal playback Press PLAY. DVD VCD Playing frame by frame Press PAUSE/STEP ...9632; To resume normal playback Press PLAY. Notes: • A prohibition symbol may differ depending on your television screen indefinitely. Notes: • The DVD/VCR mutes sound and subtitles during slow-motion playback. Each time you want. Playback starts from the beginning of the screen...


