
User Guide
Page 10
... the remote control 13 Loading a battery 14 Remote control operation 15 Installation and connections Floor-mounted projector placement 16 Projector placement angle adjustment 19 Ceiling-mounted projector placement 20 Connecting an IBM PC or compatible computer (DOS/V) ... 21 Connecting a Macintosh computer ...Cutting off the picture and sound temporarily 30 Freezing the picture 31 Enlarging the picture size 32 Adjustments Menu screen structure 33 Quick menu setting 34 Adjusting picture (Picture adjustment 36 Adjusting Image (Image adjustment 38 Adjusting RGB-level (Level adjustment...
... the remote control 13 Loading a battery 14 Remote control operation 15 Installation and connections Floor-mounted projector placement 16 Projector placement angle adjustment 19 Ceiling-mounted projector placement 20 Connecting an IBM PC or compatible computer (DOS/V) ... 21 Connecting a Macintosh computer ...Cutting off the picture and sound temporarily 30 Freezing the picture 31 Enlarging the picture size 32 Adjustments Menu screen structure 33 Quick menu setting 34 Adjusting picture (Picture adjustment 36 Adjusting Image (Image adjustment 38 Adjusting RGB-level (Level adjustment...
User Guide
Page 11
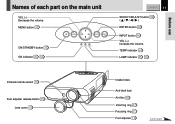
TEMP indicator 54 LAMP indicator 25 54 Infrared remote sensor 15 Foot adjuster release button 19 Lens cover 18 Intake holes Anti-theft lock Air filter 55 Zooming ring 27 Focusing ring 27 Foot adjuster 19 Continued Before use Names of each part on the main unit VOL (-) Decrease the volume. MENU button 33 ON/STANDBY button 25 ON indicator 25 54 CONTENTS 11 SELECT/ADJUST button 34 ( / / / ) ENTER button 34 INPUT button 26 VOL (+) Increase the volume.
TEMP indicator 54 LAMP indicator 25 54 Infrared remote sensor 15 Foot adjuster release button 19 Lens cover 18 Intake holes Anti-theft lock Air filter 55 Zooming ring 27 Focusing ring 27 Foot adjuster 19 Continued Before use Names of each part on the main unit VOL (-) Decrease the volume. MENU button 33 ON/STANDBY button 25 ON indicator 25 54 CONTENTS 11 SELECT/ADJUST button 34 ( / / / ) ENTER button 34 INPUT button 26 VOL (+) Increase the volume.

User Guide
Page 13
ENTER button 34 MUTE button 30 KEY STONE ON/ STANDBY FREEZE RGB VIDEO RESET MENU Ð VOL ENTER + VOL MUTE ZOOM Ð+ CT-90038 ON/STANDBY button 25 FREEZE button 31 MENU button 33 SELECT/ADJUST buttons 34 (/ / / ) VOL (+) Increase the volume. Names of each part on the remote control CONTENTS 13 Before use KEYSTONE button 29 RGB button 26 VIDEO button 26 RESET button 35 VOL (-) Decrease the volume. ZOOM buttons 32 (- / +)
ENTER button 34 MUTE button 30 KEY STONE ON/ STANDBY FREEZE RGB VIDEO RESET MENU Ð VOL ENTER + VOL MUTE ZOOM Ð+ CT-90038 ON/STANDBY button 25 FREEZE button 31 MENU button 33 SELECT/ADJUST buttons 34 (/ / / ) VOL (+) Increase the volume. Names of each part on the remote control CONTENTS 13 Before use KEYSTONE button 29 RGB button 26 VIDEO button 26 RESET button 35 VOL (-) Decrease the volume. ZOOM buttons 32 (- / +)

User Guide
Page 15
... remote control to the location being used or the surroundings. ZOOM + RESET ENTER VOL + RGB STONKEEY VIDEO FREEZE MENU STOANND/ BY About 15° About 15° Within about 5m Front side MUTE - CONTENTS 15 Before use ...About 15° About 15° MUTE STO KENYE FREEZE RGB VIDEO RESET MENU -VOL ENTER VOL + - At such times, change the direction of locations with excessively high temperature or humidity. &#...; Under unusual circumstances the remote control may not operate well due to the projector and retry the operation.
... remote control to the location being used or the surroundings. ZOOM + RESET ENTER VOL + RGB STONKEEY VIDEO FREEZE MENU STOANND/ BY About 15° About 15° Within about 5m Front side MUTE - CONTENTS 15 Before use ...About 15° About 15° MUTE STO KENYE FREEZE RGB VIDEO RESET MENU -VOL ENTER VOL + - At such times, change the direction of locations with excessively high temperature or humidity. &#...; Under unusual circumstances the remote control may not operate well due to the projector and retry the operation.

User Guide
Page 16
Floor-mounted rear projection Viewing a picture projected through the back of floor-mounted projector placement. Translucent screen Viewer Viewer Continued Perform the "Projection mode" setting on the front of the screen from a floor installation. Installation and connection Floor-mounted projector placement CONTENTS 16 There are two ways of the screen from a floor. Floor-mounted front projection Viewing a picture projected on the menu screen for the projection method. 49 For the ceiling-mounted projector placement, refer to the page 20 .
Floor-mounted rear projection Viewing a picture projected through the back of floor-mounted projector placement. Translucent screen Viewer Viewer Continued Perform the "Projection mode" setting on the front of the screen from a floor installation. Installation and connection Floor-mounted projector placement CONTENTS 16 There are two ways of the screen from a floor. Floor-mounted front projection Viewing a picture projected on the menu screen for the projection method. 49 For the ceiling-mounted projector placement, refer to the page 20 .

User Guide
Page 20
CONTENTS 20 Ceiling-mounted front projection Viewing a picture projected on the menu screen for the projection method. 49 Ceiling-mounted rear projection Viewing a picture projected through the back of the screen from a ceiling installation. Translucent screen Viewer Viewer Perform the "Projection mode" setting on the front of the screen from a ceiling installation. Installation and connection Ceiling-mounted projector placement CAUTION When a ceiling mount is required, please consult with the dealer.
CONTENTS 20 Ceiling-mounted front projection Viewing a picture projected on the menu screen for the projection method. 49 Ceiling-mounted rear projection Viewing a picture projected through the back of the screen from a ceiling installation. Translucent screen Viewer Viewer Perform the "Projection mode" setting on the front of the screen from a ceiling installation. Installation and connection Ceiling-mounted projector placement CAUTION When a ceiling mount is required, please consult with the dealer.

User Guide
Page 29
...distortion correction appears. Operations KEY Press KEYSTONE. You may be expanded on the upper side if projected upward from the projector lifted up by pressing / buttons. (-): To reduce the lower width. (+): To reduce the upper width. STONE The keystone distortion on ...the menu. 38 The projector can correct this keystone distortion automatically. After a few seconds, the fine adjustment screen disappears. Correcting the keystone distortion CONTENTS 29 A picture...
...distortion correction appears. Operations KEY Press KEYSTONE. You may be expanded on the upper side if projected upward from the projector lifted up by pressing / buttons. (-): To reduce the lower width. (+): To reduce the upper width. STONE The keystone distortion on ...the menu. 38 The projector can correct this keystone distortion automatically. After a few seconds, the fine adjustment screen disappears. Correcting the keystone distortion CONTENTS 29 A picture...

User Guide
Page 33
...flickering of setting. Notes • Select the "QUICK MENU" of adjustments and settings are made on the menu screen. • Press MENU button, to display the menu screen. • Quick menu and full menu are provided in the menu screen. Picture adjustment 36 Contrast, Brightness, Color, ... NTSC, NTSC4.43, PAL, PAL-N, SECAM, PAL60, PALM), No signal background (TOSHIBA logo, Blue background), No signal power off (OFF, 5 minutes) Quick menu, Menu position (Upper left, Upper right, Lower right, Lower left), Menu background color (Clear, Blue), On screen display (On, Off) Language (English, ...
...flickering of setting. Notes • Select the "QUICK MENU" of adjustments and settings are made on the menu screen. • Press MENU button, to display the menu screen. • Quick menu and full menu are provided in the menu screen. Picture adjustment 36 Contrast, Brightness, Color, ... NTSC, NTSC4.43, PAL, PAL-N, SECAM, PAL60, PALM), No signal background (TOSHIBA logo, Blue background), No signal power off (OFF, 5 minutes) Quick menu, Menu position (Upper left, Upper right, Lower right, Lower left), Menu background color (Clear, Blue), On screen display (On, Off) Language (English, ...

User Guide
Page 34
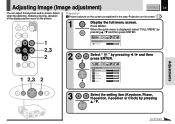
... the screen as explained in step 2.) ENTER Press ENTER. The keystone distortion on the screen". 25 1 Press MENU. MENU QUICK MENU Contrast Brightness Phase Auto keystone FULL MENU 2 Select the setting item (Contrast, Brightness, Phase, Auto keystone, FULL MENU) by pressing / . -: +: Contrast: Brightness: Phase: (-) (+) Lower Higher Darker Brighter Adjust when a flicker occurs (When selecting "Auto...
... the screen as explained in step 2.) ENTER Press ENTER. The keystone distortion on the screen". 25 1 Press MENU. MENU QUICK MENU Contrast Brightness Phase Auto keystone FULL MENU 2 Select the setting item (Contrast, Brightness, Phase, Auto keystone, FULL MENU) by pressing / . -: +: Contrast: Brightness: Phase: (-) (+) Lower Higher Darker Brighter Adjust when a flicker occurs (When selecting "Auto...

User Guide
Page 35
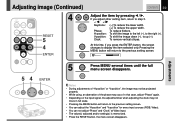
... will return to the full menu screen. 33 ENTER Adjustments 4 Press MENU several times until the quick MENU menu screen disappears. Quick menu setting (Continued) CONTENTS 35 You may perform the fine adjustment by pressing / buttons. (-): To reduce the lower width. (+): To reduce ...the upper width. After a few seconds, the fine adjustment screen disappears. (When selecting "FULL MENU" in step 2.) ENTER Press ENTER. The screen changes to the previous setting screen. • You can adjust the "Contrast" and "Brightness" for every...
... will return to the full menu screen. 33 ENTER Adjustments 4 Press MENU several times until the quick MENU menu screen disappears. Quick menu setting (Continued) CONTENTS 35 You may perform the fine adjustment by pressing / buttons. (-): To reduce the lower width. (+): To reduce ...the upper width. After a few seconds, the fine adjustment screen disappears. (When selecting "FULL MENU" in step 2.) ENTER Press ENTER. The screen changes to the previous setting screen. • You can adjust the "Contrast" and "Brightness" for every...

User Guide
Page 36
... Brightness Color Tint Sharpness 3 Select the setting item (Contrast, Brightness, Color, Tint or Sharpness) by pressing / and then press ENTER. When the quick menu is displayed, select "FULL MENU" by MENU pressing / and then press ENTER. 2 Picture adjustment Contrast Brightness Color Tint Sharpness Select " " by pressing / . Preparation 1 Project a picture on the screen as...
... Brightness Color Tint Sharpness 3 Select the setting item (Contrast, Brightness, Color, Tint or Sharpness) by pressing / and then press ENTER. When the quick menu is displayed, select "FULL MENU" by MENU pressing / and then press ENTER. 2 Picture adjustment Contrast Brightness Color Tint Sharpness Select " " by pressing / . Preparation 1 Project a picture on the screen as...

User Guide
Page 37
...at RGB input. • The value(s) adjusted and/or setting(s) is memorized. • Press the RESET button, the menu screen disappears. Pressing the MENU button will return to the previous setting screen. Adjusting picture (Continued) CONTENTS 37 4 Adjust the item by pressing / .... ENTER Contrast Adjustments 5 Press MENU several times until the full MENU menu screen disappears. If you adjust other setting item, return to step 3. -: +: (-) (+) Contrast: Lower Higher Brightness:...
...at RGB input. • The value(s) adjusted and/or setting(s) is memorized. • Press the RESET button, the menu screen disappears. Pressing the MENU button will return to the previous setting screen. Adjusting picture (Continued) CONTENTS 37 4 Adjust the item by pressing / .... ENTER Contrast Adjustments 5 Press MENU several times until the full MENU menu screen disappears. If you adjust other setting item, return to step 3. -: +: (-) (+) Contrast: Lower Higher Brightness:...
User Guide
Page 38
Picture adjustment Contrast 2 ENTER ENTER Select " " by pressing / . MENU Press MENU. Adjustments Continued Preparation 1 Project a picture on the screen as explained in the step "Projection on the screen. Image adjustment Keystone Phase H-...Clock 3 Select the setting item (Keystone, Phase, H-position, V-position or Clock) by pressing / and then press ENTER. When the quick menu is displayed, select "FULL MENU" by MENU pressing / and then press ENTER. Adjust when the distortion, flickering, blurring, deviation of the display position occur on the screen". 25 1 ...
Picture adjustment Contrast 2 ENTER ENTER Select " " by pressing / . MENU Press MENU. Adjustments Continued Preparation 1 Project a picture on the screen as explained in the step "Projection on the screen. Image adjustment Keystone Phase H-...Clock 3 Select the setting item (Keystone, Phase, H-position, V-position or Clock) by pressing / and then press ENTER. When the quick menu is displayed, select "FULL MENU" by MENU pressing / and then press ENTER. Adjust when the distortion, flickering, blurring, deviation of the display position occur on the screen". 25 1 ...
User Guide
Page 39
... Depending on the input signal, the adjustment bar when adjusting the clock may occur. Phase: To reduce flickers. Clock: To remove vertical stripes. MENU Notes • During adjustments of "H-position" or "V-position", the image may not be projected properly. • While using, an aberration of the... phase may not move in full scale. • Pressing the MENU button will return to the previous setting screen. • You can adjust the "H-position" and "V-position" for every input sources (RGB, Video)....
... Depending on the input signal, the adjustment bar when adjusting the clock may occur. Phase: To reduce flickers. Clock: To remove vertical stripes. MENU Notes • During adjustments of "H-position" or "V-position", the image may not be projected properly. • While using, an aberration of the... phase may not move in full scale. • Pressing the MENU button will return to the previous setting screen. • You can adjust the "H-position" and "V-position" for every input sources (RGB, Video)....

User Guide
Page 40
... pressing / and then press ENTER. Picture adjustment Contrast 2 Select " " by MENU pressing / and then press ENTER. ENTER Level adjustment R-level G-level B-level ENTER 3 Select the setting item (R-level, G-level or B-level) by pressing / . Preparation 1 Project a picture ...on the screen as explained in the step "Projection on the screen". 25 1 Display the full menu screen. Adjusting RGB-level (Level adjustment) CONTENTS 40 You can adjust each ratio of red, green and blue.
... pressing / and then press ENTER. Picture adjustment Contrast 2 Select " " by MENU pressing / and then press ENTER. ENTER Level adjustment R-level G-level B-level ENTER 3 Select the setting item (R-level, G-level or B-level) by pressing / . Preparation 1 Project a picture ...on the screen as explained in the step "Projection on the screen". 25 1 Display the full menu screen. Adjusting RGB-level (Level adjustment) CONTENTS 40 You can adjust each ratio of red, green and blue.

User Guide
Page 41
...setting item(s) for every input sources (RGB, Video). • The value(s) adjusted and/or setting(s) is memorized. • Press the RESET button, the menu screen disappears. If you adjust other setting item, return to step 3. -: +: R-level: (-) To reduce red (+) To increase red G-level: (-) To... blue At this time, if you press the ENTER button, the screen ENTER ENTER changes to the previous setting screen. MENU Notes • Pressing the MENU button will return to display the item selected only. Adjusting RGB-level (Continued) CONTENTS 41 4 Adjust the item by pressing / ...
...setting item(s) for every input sources (RGB, Video). • The value(s) adjusted and/or setting(s) is memorized. • Press the RESET button, the menu screen disappears. If you adjust other setting item, return to step 3. -: +: R-level: (-) To reduce red (+) To increase red G-level: (-) To... blue At this time, if you press the ENTER button, the screen ENTER ENTER changes to the previous setting screen. MENU Notes • Pressing the MENU button will return to display the item selected only. Adjusting RGB-level (Continued) CONTENTS 41 4 Adjust the item by pressing / ...
User Guide
Page 42
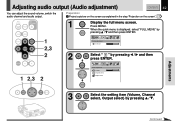
When the quick menu is displayed, select "FULL MENU" by pressing / . ENTER Audio adjustment Volume Channel select Output select ENTER 3 Select the setting item (Volume, Channel select, Output select) by MENU pressing / and then press ENTER. MENU Press MENU. Adjustments Continued Preparation 1 Project a picture on ...the screen as explained in the step "Projection on the screen". 25 1 Display the full menu screen. Picture adjustment Contrast 2 Select " " by pressing / and then press ENTER. Adjusting audio output (Audio adjustment) ...
When the quick menu is displayed, select "FULL MENU" by pressing / . ENTER Audio adjustment Volume Channel select Output select ENTER 3 Select the setting item (Volume, Channel select, Output select) by MENU pressing / and then press ENTER. MENU Press MENU. Adjustments Continued Preparation 1 Project a picture on ...the screen as explained in the step "Projection on the screen". 25 1 Display the full menu screen. Picture adjustment Contrast 2 Select " " by pressing / and then press ENTER. Adjusting audio output (Audio adjustment) ...
User Guide
Page 43
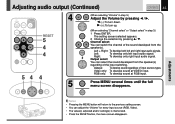
...sound developed from the speaker(s) regarding of input sources types. Video only: To develop sound at RGB input. 5 Press MENU several times until the full MENU menu screen disappears. Channel select: You can adjust the "Volume" for every input source (RGB, Video). • The ...value(s) adjusted and/or setting(s) is memorized. • Press the RESET button, the menu screen disappears. Adjusting audio output (Continued) CONTENTS 43 4 (When selecting "Volume" in step 3.) 1 Press ENTER. Left + Right: To develop ...
...sound developed from the speaker(s) regarding of input sources types. Video only: To develop sound at RGB input. 5 Press MENU several times until the full MENU menu screen disappears. Channel select: You can adjust the "Volume" for every input source (RGB, Video). • The ...value(s) adjusted and/or setting(s) is memorized. • Press the RESET button, the menu screen disappears. Adjusting audio output (Continued) CONTENTS 43 4 (When selecting "Volume" in step 3.) 1 Press ENTER. Left + Right: To develop ...
User Guide
Page 44
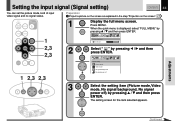
... explained in the step "Projection on the screen". 25 1 Display the full menu screen. Adjustments ENTER Continued Signal setting Picture mode Video mode No signal background No signal power off MENU ENTER INPUT 3 Select the setting item (Picture mode, Video mode, No signal...by pressing / and then press ENTER. When the quick menu is displayed, select "FULL MENU" by MENU pressing / and then press ENTER. 2 ENTER ENTER Picture adjustment Contrast Select " " by pressing / and then press ENTER ENTER. MENU Press MENU. Setting the input signal (Signal setting) CONTENTS 44 ...
... explained in the step "Projection on the screen". 25 1 Display the full menu screen. Adjustments ENTER Continued Signal setting Picture mode Video mode No signal background No signal power off MENU ENTER INPUT 3 Select the setting item (Picture mode, Video mode, No signal...by pressing / and then press ENTER. When the quick menu is displayed, select "FULL MENU" by MENU pressing / and then press ENTER. 2 ENTER ENTER Picture adjustment Contrast Select " " by pressing / and then press ENTER ENTER. MENU Press MENU. Setting the input signal (Signal setting) CONTENTS 44 ...

User Guide
Page 46
Adjustments MENU Notes • Pressing the MENU button will return to the previous setting screen. • You can not set "Picture mode" at Video input. • You can not set "Video mode" at RGB input. • The value(s) adjusted and/or setting(s) is memorized. • Press the RESET button, the menu screen disappears. Setting the input signal (Continued) CONTENTS 46 5 Press MENU several times until the full MENU menu screen disappears.
Adjustments MENU Notes • Pressing the MENU button will return to the previous setting screen. • You can not set "Picture mode" at Video input. • You can not set "Video mode" at RGB input. • The value(s) adjusted and/or setting(s) is memorized. • Press the RESET button, the menu screen disappears. Setting the input signal (Continued) CONTENTS 46 5 Press MENU several times until the full MENU menu screen disappears.