
User Manual
Page 2
... radiates radio frequency energy and, if not installed and used in accordance with the limits for a Class B digital device, pursuant to the following measures: - MODEL NAME: TDP-SC25 FCC Radio Frequency Interference Statement Note: This equipment has been tested and found to comply with the instruction manual, may cause harmful interference to part 15 of the FCC Rules. This...
... radiates radio frequency energy and, if not installed and used in accordance with the limits for a Class B digital device, pursuant to the following measures: - MODEL NAME: TDP-SC25 FCC Radio Frequency Interference Statement Note: This equipment has been tested and found to comply with the instruction manual, may cause harmful interference to part 15 of the FCC Rules. This...
User Manual
Page 3
... for installation, use can be situated away from battery power, or other products (including amplifiers) that they exit from the type of power supply to protect it from overheating, and these openings must not be placed in a built-in this product, read the owner's manual carefully, and follow all the operating and other similar surface. DO NOT REMOVE THE CABINET COVER, OR...
... for installation, use can be situated away from battery power, or other products (including amplifiers) that they exit from the type of power supply to protect it from overheating, and these openings must not be placed in a built-in this product, read the owner's manual carefully, and follow all the operating and other similar surface. DO NOT REMOVE THE CABINET COVER, OR...
User Manual
Page 5
... 2 hours when there is 220 to such a change in the instrument. Place and Manner of Installation • Do not place in any upright position or slantwise in an angle of the lamp only should be sure the service technician has used replacement parts specified by users.) 20. Ensure to wait until the condensation naturally disappears. • In a high altitude location where air...
... 2 hours when there is 220 to such a change in the instrument. Place and Manner of Installation • Do not place in any upright position or slantwise in an angle of the lamp only should be sure the service technician has used replacement parts specified by users.) 20. Ensure to wait until the condensation naturally disappears. • In a high altitude location where air...
User Manual
Page 6
..., XGA, SXGA, UXGA are trademarks or registered trademarks of International Business Machines Corporation. • Digital Light Processing, Digital Micromirror Device and DMD are for a long time. Using the batteries improperly may not reflect your projector. IMPORTANT PRECAUTIONS (Continued) Avoid Volatile Liquid Do not use the battery beyond the expiration date indicated on the battery or leave a dead battery in the remote control...
..., XGA, SXGA, UXGA are trademarks or registered trademarks of International Business Machines Corporation. • Digital Light Processing, Digital Micromirror Device and DMD are for a long time. Using the batteries improperly may not reflect your projector. IMPORTANT PRECAUTIONS (Continued) Avoid Volatile Liquid Do not use the battery beyond the expiration date indicated on the battery or leave a dead battery in the remote control...
User Manual
Page 7
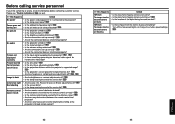
... image adjustment menu 30 The display setting menu 31 The default setting menu 32 Displaying Information (Status display 33 Using the document camera 34 How to use the document camera 34 Image projection with the document camera 36 Locking the white balance 37 Maintenance About lamp ...38 Lamp replacement 38 Lens and main unit cleaning 40 12 Others Trouble indications 41 Before calling service personnel 42 Specifications ...44 List of general specifications 44 Document camera specifications (TDP-SC25 44 List of supported signals...
... image adjustment menu 30 The display setting menu 31 The default setting menu 32 Displaying Information (Status display 33 Using the document camera 34 How to use the document camera 34 Image projection with the document camera 36 Locking the white balance 37 Maintenance About lamp ...38 Lamp replacement 38 Lens and main unit cleaning 40 12 Others Trouble indications 41 Before calling service personnel 42 Specifications ...44 List of general specifications 44 Document camera specifications (TDP-SC25 44 List of supported signals...

User Manual
Page 8
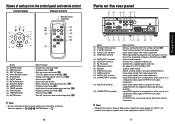
... : Function (1) Lens (2) Infrared remote sensor (3) Foot adjuster release button (4) Air exhaust (5) Control panel (6) Zooming lever (7) Air intake (8) Rear panel (9) Tilt adjuster (10) Lamp cover (11) Foot adjuster (12) Focusing lever : Projects expanded image. : Senses commands from outside the projector. : Connects external devices. p.25 : Expels air that section of the manual. Macintosh: Run the CD-ROM, select the Reader/English folder, and run ar500enu.exe. Click on the product destination. ◆The Supplied CD...
... : Function (1) Lens (2) Infrared remote sensor (3) Foot adjuster release button (4) Air exhaust (5) Control panel (6) Zooming lever (7) Air intake (8) Rear panel (9) Tilt adjuster (10) Lamp cover (11) Foot adjuster (12) Focusing lever : Projects expanded image. : Senses commands from outside the projector. : Connects external devices. p.25 : Expels air that section of the manual. Macintosh: Run the CD-ROM, select the Reader/English folder, and run ar500enu.exe. Click on the product destination. ◆The Supplied CD...
User Manual
Page 9
..., connect this manual, buttons are referred to the controlling computer's RS-232C port. Names of this to as Y/PB/PR, the product also supports signals from video equipment. p.19 : Input S video signals from video equipment. : Input audio signals from the remote control. p.22 : Selects input. p.41 : Pauses image. p.28 : Cuts off . ENTER button ⇒ 16 Parts on or off the picture and sound temporarily. p.26 : Turns the power on the control panel and remote control Control panel Remote Control Remote control transmitter (9) (10) (11) (3) (4) TEMP LAMP FAN...
..., connect this manual, buttons are referred to the controlling computer's RS-232C port. Names of this to as Y/PB/PR, the product also supports signals from video equipment. p.19 : Input S video signals from video equipment. : Input audio signals from the remote control. p.22 : Selects input. p.41 : Pauses image. p.28 : Cuts off . ENTER button ⇒ 16 Parts on or off the picture and sound temporarily. p.26 : Turns the power on the control panel and remote control Control panel Remote Control Remote control transmitter (9) (10) (11) (3) (4) TEMP LAMP FAN...
User Manual
Page 10
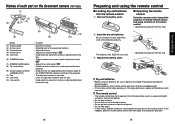
... not using the remote control ■ Loading dry-cell batteries into the remote control q Remove the battery cover. ■ Operating the remote control Point the remote control toward the projector's infrared remote sensor, and press a button on the remote control. • Operating the projector from the tray. : Toggles between the camera input and previous input. Approx. 15° Approx. 5m Two batteries (R6, SIZE AA) are used separated from the projector. : Used connect the supplied document camera cable...
... not using the remote control ■ Loading dry-cell batteries into the remote control q Remove the battery cover. ■ Operating the remote control Point the remote control toward the projector's infrared remote sensor, and press a button on the remote control. • Operating the projector from the tray. : Toggles between the camera input and previous input. Approx. 15° Approx. 5m Two batteries (R6, SIZE AA) are used separated from the projector. : Used connect the supplied document camera cable...
User Manual
Page 11
... 10.00 - To audio input White (L)/Red (R) Audio cable (not supplied) To RS-232C terminal p.47 To audio output White (L)/Red (R) Control cable Video cable (not supplied) To S-Video output S-Video cable (not supplied) MONITOR AUDIO OUT CONTROL COMPUTER 2 IN ( Y/PB/PR ) AUDIO IN COMPUTER 1 IN ( Y/PB/PR ) S-VIDEO R L VIDEO RGB cable (not supplied) To RGB output Audio cable RGB cable (not supplied) (supplied with the use of the projector know that all of anomaly. H is "floor-mounted front projection." Set the Projection mode in the default setting menu p.32 , in...
... 10.00 - To audio input White (L)/Red (R) Audio cable (not supplied) To RS-232C terminal p.47 To audio output White (L)/Red (R) Control cable Video cable (not supplied) To S-Video output S-Video cable (not supplied) MONITOR AUDIO OUT CONTROL COMPUTER 2 IN ( Y/PB/PR ) AUDIO IN COMPUTER 1 IN ( Y/PB/PR ) S-VIDEO R L VIDEO RGB cable (not supplied) To RGB output Audio cable RGB cable (not supplied) (supplied with the use of the projector know that all of anomaly. H is "floor-mounted front projection." Set the Projection mode in the default setting menu p.32 , in...
User Manual
Page 12
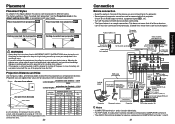
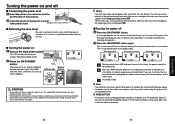
... LAMP indicator flashes. In this state, the power cannot be shortened. Doing so could cause a fire due to appear via the Display setting menu p.31 . • The first time you will disappear after the message disappears.) 2 Press the ON/STANDBY button again. Then, the projector goes into the lens while the lamp is displayed p.24 . ■ Turning the power off the main power switch in this by performing any operation. Control panel Remote Control TEMP LAMP FAN (Orange) Start...
... LAMP indicator flashes. In this state, the power cannot be shortened. Doing so could cause a fire due to appear via the Display setting menu p.31 . • The first time you will disappear after the message disappears.) 2 Press the ON/STANDBY button again. Then, the projector goes into the lens while the lamp is displayed p.24 . ■ Turning the power off the main power switch in this by performing any operation. Control panel Remote Control TEMP LAMP FAN (Orange) Start...
User Manual
Page 13
... signals p.45 , any resolutions not supported by following the instructions in a few seconds. Each time you press the INPUT button, it is projected with the DVD software for extended periods, images will be black spots (pixels that do not appear upon startup. Russian Swedish Turkish Japanese w Using the or button, select Standard or Low for language and lamp power selection and configuration is displayed in the default setting menu...
... signals p.45 , any resolutions not supported by following the instructions in a few seconds. Each time you press the INPUT button, it is projected with the DVD software for extended periods, images will be black spots (pixels that do not appear upon startup. Russian Swedish Turkish Japanese w Using the or button, select Standard or Low for language and lamp power selection and configuration is displayed in the default setting menu...
User Manual
Page 14
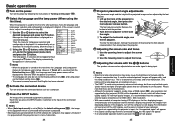
... No No No V-position Adjust the vertical position of the image. Using handy features ■ Using auto setting This function sets up the projector to display the Set up menu and select [Keystone]. Use the buttons for the keystone distortion in a slant angle of the input signal by the projector p.45 , p.46 . • Keystone adjustment cannot be projected or auto adjustment/setting may suffer. • Keystone adjustment is capable of the Yes screen. Lower Higher Yes No...
... No No No V-position Adjust the vertical position of the image. Using handy features ■ Using auto setting This function sets up the projector to display the Set up menu and select [Keystone]. Use the buttons for the keystone distortion in a slant angle of the input signal by the projector p.45 , p.46 . • Keystone adjustment cannot be projected or auto adjustment/setting may suffer. • Keystone adjustment is capable of the Yes screen. Lower Higher Yes No...
User Manual
Page 15
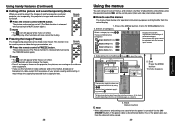
... using . Back Return button Note • Menu adjustments and settings are options. Adjustments & Settings Press Item Adjustment/Setting Value to display a list of options. 5. temporarily, this projector's images and sound can be turned off. Item shown with the current input source. After an item is to be adjusted with gray cannot be used to pause a video during a presentation, etc. Remote Control Press the remote control's FREEZE button. Using handy features (Continued) ■ Cutting off the picture...
... using . Back Return button Note • Menu adjustments and settings are options. Adjustments & Settings Press Item Adjustment/Setting Value to display a list of options. 5. temporarily, this projector's images and sound can be turned off. Item shown with the current input source. After an item is to be adjusted with gray cannot be used to pause a video during a presentation, etc. Remote Control Press the remote control's FREEZE button. Using handy features (Continued) ■ Cutting off the picture...
User Manual
Page 16
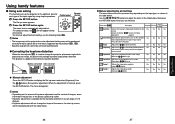
... image adjustment menu Use this menu to display when there is no input signal (Logo) (Blue) (Black) Icon Display icons as function guides On Off Start-up screen Display start-up screen when power is turned on On Off Note • If "Thru" is selected for screen size, portions exceeding the native resolution (800 × 600 pixels) will not appear on again the next time resets the menu to [Auto]. (TDP-SC25) 30 ■ The display setting menu Use this menu to set screen display...
... image adjustment menu Use this menu to display when there is no input signal (Logo) (Blue) (Black) Icon Display icons as function guides On Off Start-up screen Display start-up screen when power is turned on On Off Note • If "Thru" is selected for screen size, portions exceeding the native resolution (800 × 600 pixels) will not appear on again the next time resets the menu to [Auto]. (TDP-SC25) 30 ■ The display setting menu Use this menu to set screen display...
User Manual
Page 17
... use time, etc. Using the menu (Continued) ■ The default setting menu This menu shows placement status and other settings. Item Projection mode Description Sets projection mode in the event of lamp use [Note 4] Yes Yes The count for lamp replacement Yes Yes The total time that in accordance with a store about the input signal, lamp use the projector, for customer service, etc. Manual Auto Lamp power [Note 1] Sets the lamp power. Standard High Reset all adjustments and settings to be refreshed if the status changes. Note • The displayed...
... use time, etc. Using the menu (Continued) ■ The default setting menu This menu shows placement status and other settings. Item Projection mode Description Sets projection mode in the event of lamp use [Note 4] Yes Yes The count for lamp replacement Yes Yes The total time that in accordance with a store about the input signal, lamp use the projector, for customer service, etc. Manual Auto Lamp power [Note 1] Sets the lamp power. Standard High Reset all adjustments and settings to be refreshed if the status changes. Note • The displayed...
User Manual
Page 20
... projector, the lamp will appear on p.41 , and the lamp's lifetime may vary greatly by lamp. Loosen the 2 screws, then pull up the handle to remove the lamp cover. Notes and Precautions • Press the button twice to display (a rough guide) the time of lamp use . Maintenance About lamp The product's light source is a mercury lamp that lights at the expiration of its life. • How long it takes before replacing...
... projector, the lamp will appear on p.41 , and the lamp's lifetime may vary greatly by lamp. Loosen the 2 screws, then pull up the handle to remove the lamp cover. Notes and Precautions • Press the button twice to display (a rough guide) the time of lamp use . Maintenance About lamp The product's light source is a mercury lamp that lights at the expiration of its life. • How long it takes before replacing...
User Manual
Page 21
... the lamp cover. LAMP (Orange flashing) LAMP (Green lit or Off) TEMP FAN (Red lit) TEMP (Green lit or Off) (Red lit) FAN (Green flashing) Power went out during use ⇒ Internal overheating, or the outside temperature is too high. • Place the projector so that cooling fans should be replaced about every 2 to the standby state waiting for internal cool down . one minute of the lamp has ended or the projector is recommended that the air intake...
... the lamp cover. LAMP (Orange flashing) LAMP (Green lit or Off) TEMP FAN (Red lit) TEMP (Green lit or Off) (Red lit) FAN (Green flashing) Power went out during use ⇒ Internal overheating, or the outside temperature is too high. • Place the projector so that cooling fans should be replaced about every 2 to the standby state waiting for internal cool down . one minute of the lamp has ended or the projector is recommended that the air intake...
User Manual
Page 22
... setting minimized? p.41 during use • Is the air intake or air exhaust blocked? p.21 • Are all the connected devices functioning properly? p.40 • Is the lens focus adjusted optimally? Picture not displayed correctly • Is the input signal supported by the projector? p.19 • Is the remote control being focused too dark? • Is there impact from the document camera are flickering Check • Is the document imaging...
... setting minimized? p.41 during use • Is the air intake or air exhaust blocked? p.21 • Are all the connected devices functioning properly? p.40 • Is the lens focus adjusted optimally? Picture not displayed correctly • Is the input signal supported by the projector? p.19 • Is the remote control being focused too dark? • Is there impact from the document camera are flickering Check • Is the document imaging...
User Manual
Page 23
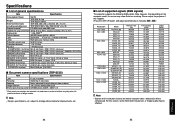
....500 229.500 Note • Signals which resolution exceeds the native resolution (800 × 600 pixels) will be affected. 44 45 Note • Design, specifications, etc. For this happens. (Press the SET UP button, and adjust automatically or manually. stereo mini-jack CONTROL terminal Mini DIN 8 pin (RS-232C) ■ Document camera specifications (TDP-SC25) Item Specification Lens Focusing Zooming Image element Effective pixels for improvements, etc...
....500 229.500 Note • Signals which resolution exceeds the native resolution (800 × 600 pixels) will be affected. 44 45 Note • Design, specifications, etc. For this happens. (Press the SET UP button, and adjust automatically or manually. stereo mini-jack CONTROL terminal Mini DIN 8 pin (RS-232C) ■ Document camera specifications (TDP-SC25) Item Specification Lens Focusing Zooming Image element Effective pixels for improvements, etc...
Brochure
Page 2
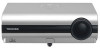
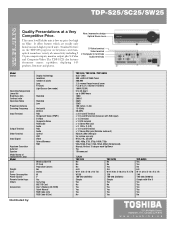
... Markham, Ont. New, impressive design Optical Zoom Lens S-Video terminal Video terminal 2 Computer in terminals Audio terminals Model Device Operating Temperature Lamp life Brightness (lm) Contrast ratio Operation Noise Projection Distance Scanning Frequency Input Terminal Output Terminal Other Terminal Input Signal Keystone Correction Auto Set Speaker Model Name of replacement Lamp Model Weight Size Power Consumption Power Source Remote Control keys Others Accessories Distributed by: Display technology resolution number of connectivity including 2 15 pin computer inputs, monitor output...
... Markham, Ont. New, impressive design Optical Zoom Lens S-Video terminal Video terminal 2 Computer in terminals Audio terminals Model Device Operating Temperature Lamp life Brightness (lm) Contrast ratio Operation Noise Projection Distance Scanning Frequency Input Terminal Output Terminal Other Terminal Input Signal Keystone Correction Auto Set Speaker Model Name of replacement Lamp Model Weight Size Power Consumption Power Source Remote Control keys Others Accessories Distributed by: Display technology resolution number of connectivity including 2 15 pin computer inputs, monitor output...


