

Owners Manual
Page 2
... correct the interference by turning the equipment off and on this product or cords associated with accessories sold with the instructions, may cause undesired operation. MODEL NAME: TDP-S9 USA only TRADE NAME: DATA PROJECTOR Tested To Comply With FCC Standards FOR HOME OR OFFICE USE MODEL NAME: TDP-S9 FCC NOTICE: This device complies with part 15 of important operating and maintenance (servicing) instructions in accordance with...
... correct the interference by turning the equipment off and on this product or cords associated with accessories sold with the instructions, may cause undesired operation. MODEL NAME: TDP-S9 USA only TRADE NAME: DATA PROJECTOR Tested To Comply With FCC Standards FOR HOME OR OFFICE USE MODEL NAME: TDP-S9 FCC NOTICE: This device complies with part 15 of important operating and maintenance (servicing) instructions in accordance with...

Owners Manual
Page 4
Source of power source indicated on . Do not look into the lens while the lamp is on the marking label. The openings should never be operated only from the type of Light After unpacking this unit will protect you if you are provided for installation, use can be repaired by placing the product on a bed, sofa, rug or other instructions. This set has been designed...
Source of power source indicated on . Do not look into the lens while the lamp is on the marking label. The openings should never be operated only from the type of Light After unpacking this unit will protect you if you are provided for installation, use can be repaired by placing the product on a bed, sofa, rug or other instructions. This set has been designed...

Owners Manual
Page 7
... of the lamp rupturing, thoroughly clean the area around the projector and discard any way. f) When the product exhibits a distinct change in damage and will often require extensive work by following conditions: a) When the power-supply cord or plug is damaged. S3125A 16. Servicing Do not attempt to the product. Before Using 15. d) If the product does not operate normally by...
... of the lamp rupturing, thoroughly clean the area around the projector and discard any way. f) When the product exhibits a distinct change in damage and will often require extensive work by following conditions: a) When the power-supply cord or plug is damaged. S3125A 16. Servicing Do not attempt to the product. Before Using 15. d) If the product does not operate normally by...

Owners Manual
Page 8
... other hazards. (Replacement of any other closed installation state. IMPORTANT SAFETY INSTRUCTIONS (Continued) 19. Safety Check Upon completion of the lamp only should be sure the service technician has used replacement parts specified by users.) 20. Do not use the product in proper operating condition. 21. This could erase the information on top of the unit or near the air exhaust for long...
... other hazards. (Replacement of any other closed installation state. IMPORTANT SAFETY INSTRUCTIONS (Continued) 19. Safety Check Upon completion of the lamp only should be sure the service technician has used replacement parts specified by users.) 20. Do not use the product in proper operating condition. 21. This could erase the information on top of the unit or near the air exhaust for long...

Owners Manual
Page 9
... air is thin, cooling efficiency is reduced so use it from a low-temperature room to ship your line voltage is an extreme or sudden change in temperature. Before Using POWER SUPPLY CORD SELECTION If your projector. Place and Manner of the projector. • Avoid locations with the ambient temperature being lowered. 9 If you ever have to a high-temperature room may condense on the lens or internal parts...
... air is thin, cooling efficiency is reduced so use it from a low-temperature room to ship your line voltage is an extreme or sudden change in temperature. Before Using POWER SUPPLY CORD SELECTION If your projector. Place and Manner of the projector. • Avoid locations with the ambient temperature being lowered. 9 If you ever have to a high-temperature room may condense on the lens or internal parts...

Owners Manual
Page 12
... part on the control panel and remote control 16 Parts on the rear panel 17 Preparing and using the remote control 18 Connection ...20 Operations 21 Turning the power on and off 21 Basic operations ...23 Using handy features 25 Manually selects an input source (Source 25 Correcting the keystone distortion (Keystone 25 Automatically adjusts frequency and phase (Auto 26 Switching the image aspect ratio (4:3/16:9 26 Cutting off the sound temporarily (Mute 26 Cutting off the screen...
... part on the control panel and remote control 16 Parts on the rear panel 17 Preparing and using the remote control 18 Connection ...20 Operations 21 Turning the power on and off 21 Basic operations ...23 Using handy features 25 Manually selects an input source (Source 25 Correcting the keystone distortion (Keystone 25 Automatically adjusts frequency and phase (Auto 26 Switching the image aspect ratio (4:3/16:9 26 Cutting off the sound temporarily (Mute 26 Cutting off the screen...

Owners Manual
Page 14
... Acrobat® Reader™. 14 See the Help menu for remote control * Lithium battery is mounted in the box, along with related information. Click on Start.pdf. Follow the on-screen instructions to install the software. ■ Viewing the manual Run the CD-ROM and double-click on a bookmark title to D-Sub) ■ (7) Carrying bag Note The shape and number of supplied power cords vary depending on p.
... Acrobat® Reader™. 14 See the Help menu for remote control * Lithium battery is mounted in the box, along with related information. Click on Start.pdf. Follow the on-screen instructions to install the software. ■ Viewing the manual Run the CD-ROM and double-click on a bookmark title to D-Sub) ■ (7) Carrying bag Note The shape and number of supplied power cords vary depending on p.

Owners Manual
Page 15
... : Outputs audio sound. Control panel : Operates the projector. p.24 Zooming lever : Adjusts screen size. Preparations Names of each part on the main unit 65 4 3 2 1 PUSH 78 Back 10 9 10 11 12 13 Front Name : Function Lens : Projects expanded image. p.24 Foot adjuster release button : Press to replace lamp. p.24 Infrared remote sensor : Senses commands from outside the projector. Air exhaust : Expels air that has grown hot inside the projector. p.24 Rear panel : Connects external devices. Lamp cover : Remove to...
... : Outputs audio sound. Control panel : Operates the projector. p.24 Zooming lever : Adjusts screen size. Preparations Names of each part on the main unit 65 4 3 2 1 PUSH 78 Back 10 9 10 11 12 13 Front Name : Function Lens : Projects expanded image. p.24 Foot adjuster release button : Press to replace lamp. p.24 Infrared remote sensor : Senses commands from outside the projector. Air exhaust : Expels air that has grown hot inside the projector. p.24 Rear panel : Connects external devices. Lamp cover : Remove to...

Owners Manual
Page 16
...remainder of each part on the control panel and remote control Control panel Remote Control Remote Control transmitter 1 3 3 2 5 4 8 6 7 2 1 9 4 10 13 5 12 11 Name : Main Function I/ ON/STANDBY button: Turns the power on/off the sound temporarily. p.27 Selection button : Menu selections and adjustments,etc. p.26 SOURCE/Source button : Manually selects an input source. Names of this manual, buttons are referred to increase the volume. p.21 MENU/Menu button : Displays menus. Keystone / button : Adjusts image distortion caused by tilting the projector. p.26 Blank...
...remainder of each part on the control panel and remote control Control panel Remote Control Remote Control transmitter 1 3 3 2 5 4 8 6 7 2 1 9 4 10 13 5 12 11 Name : Main Function I/ ON/STANDBY button: Turns the power on/off the sound temporarily. p.27 Selection button : Menu selections and adjustments,etc. p.26 SOURCE/Source button : Manually selects an input source. Names of this manual, buttons are referred to increase the volume. p.21 MENU/Menu button : Displays menus. Keystone / button : Adjusts image distortion caused by tilting the projector. p.26 Blank...
Owners Manual
Page 19
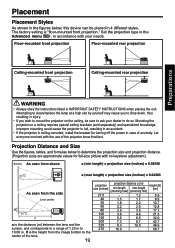
... projection size and projection distance. (Projection sizes are approximate values for turning off the power in case of the projector know that fact. The factory setting is ceiling-mounted, install the breaker for full-size picture with no keystone adjustment.) Screen As seen from above a (min length) = projection size (inches) x 0.03636 On 90° Lamp a (max length) = projection size (inches) x 0.04363 As seen from the side Lens center H 90° a a is the height from the image...
... projection size and projection distance. (Projection sizes are approximate values for turning off the power in case of the projector know that fact. The factory setting is ceiling-mounted, install the breaker for full-size picture with no keystone adjustment.) Screen As seen from above a (min length) = projection size (inches) x 0.03636 On 90° Lamp a (max length) = projection size (inches) x 0.04363 As seen from the side Lens center H 90° a a is the height from the image...
Owners Manual
Page 21
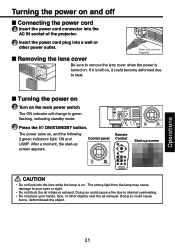
... power outlet. Operations 21 Operations Turning the power on . Power cord connector (Supplied) ■ Removing the lens cover Be sure to green flashing, indicating standby mode. 2 Press the I/ ON/STANDBY button. Control panel Remote Control (Green) Flashing Start-up screen appears. Doing so could cause a fire due to heat. ■ Turning the power on 1 Turn on . If it is turned on and off ■ Connecting the power cord 1 Insert the power cord connector into the AC IN socket of the projector. 2 Insert the power cord plug into the lens...
... power outlet. Operations 21 Operations Turning the power on . Power cord connector (Supplied) ■ Removing the lens cover Be sure to green flashing, indicating standby mode. 2 Press the I/ ON/STANDBY button. Control panel Remote Control (Green) Flashing Start-up screen appears. Doing so could cause a fire due to heat. ■ Turning the power on 1 Turn on . If it is turned on and off ■ Connecting the power cord 1 Insert the power cord connector into the AC IN socket of the projector. 2 Insert the power cord plug into the lens...
Owners Manual
Page 22
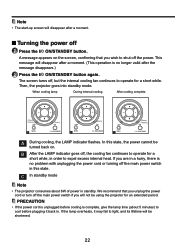
...; The projector consumes about 5 minutes) to expel excess internal heat. We recommend that you will be using the projector for a short while. Note • The start-up screen will disappear after a moment. (This operation is no problem with unplugging the power cord or turning off the main power switch in standby. When cooling lamp During internal cooling After cooling complete (Green) Flashing (Green) (Green) (Green) Flashing A B C A During cooling, the LAMP indicator flashes. In...
...; The projector consumes about 5 minutes) to expel excess internal heat. We recommend that you will be using the projector for a short while. Note • The start-up screen will disappear after a moment. (This operation is no problem with unplugging the power cord or turning off the main power switch in standby. When cooling lamp During internal cooling After cooling complete (Green) Flashing (Green) (Green) (Green) Flashing A B C A During cooling, the LAMP indicator flashes. In...

Owners Manual
Page 24
...; Although this projector supports a wide range of RGB signals p.40 , any resolutions not supported by this happens, turn off the computer's LCD display. To stow the foot adjuster, hold up the projector while pressing the foot adjuster release button, then slowly lower the projector. 6 Adjusting the screen size and focus 1 1 Use the zooming lever to adjust the screen size. 2 Use the focusing lever to fluctuate slightly. • A lamp is input, the "For best image quality, lower image resolution. Notes...
...; Although this projector supports a wide range of RGB signals p.40 , any resolutions not supported by this happens, turn off the computer's LCD display. To stow the foot adjuster, hold up the projector while pressing the foot adjuster release button, then slowly lower the projector. 6 Adjusting the screen size and focus 1 1 Use the zooming lever to adjust the screen size. 2 Use the focusing lever to fluctuate slightly. • A lamp is input, the "For best image quality, lower image resolution. Notes...

Owners Manual
Page 25
... projector is available for keystone adjustment. Operations 25 Before correction After correction Use the control panel's buttons or the remote control's Keystone Keystone buttons for the keystone distortion in a slant angle of ±15 degrees. • Keystone adjustment will not change the projector placement angle while projecting the image, the picture will detect your source. Using handy features ■ Manually selects an input source (Source) If you are connecting multiple sources to change the shape of the menus, the start-up screen...
... projector is available for keystone adjustment. Operations 25 Before correction After correction Use the control panel's buttons or the remote control's Keystone Keystone buttons for the keystone distortion in a slant angle of ±15 degrees. • Keystone adjustment will not change the projector placement angle while projecting the image, the picture will detect your source. Using handy features ■ Manually selects an input source (Source) If you are connecting multiple sources to change the shape of the menus, the start-up screen...

Owners Manual
Page 27
... the actual display. If the power cable is turned off via the I/ ON/STANDBY button. p.28 p.29 p.30 p.31 p.32 p.33 Note • Menu adjustments and settings are saved when the power is disconnected before this, or the power goes out, the data will count up on-screen menus, and conduct a number of adjustments and settings using the operation buttons p.16 on the control panel (main unit side) and remote control. ■ How...
... the actual display. If the power cable is turned off via the I/ ON/STANDBY button. p.28 p.29 p.30 p.31 p.32 p.33 Note • Menu adjustments and settings are saved when the power is disconnected before this, or the power goes out, the data will count up on-screen menus, and conduct a number of adjustments and settings using the operation buttons p.16 on the control panel (main unit side) and remote control. ■ How...

Owners Manual
Page 32
... is displayed in second). menu] [ : Select setting] [Control panel's MENU/ remote control's Enter: Apply] : Apply. : Chancel. 32 The image is inverted vertically. Uses this menu to set the related items. Item Auto Source Select Rear Ceiling ECO Mode Lamp Hours Color Space Auto Shutdown OSD Timeout Menu Position Factory Reset Description Automatically scans the input source. ON OFF * Pressing repeatly will lower power consumption and increase lamp life. Using the menu (Continued) ■ Advanced menu Use this function to dim the projector lamp light output...
... is displayed in second). menu] [ : Select setting] [Control panel's MENU/ remote control's Enter: Apply] : Apply. : Chancel. 32 The image is inverted vertically. Uses this menu to set the related items. Item Auto Source Select Rear Ceiling ECO Mode Lamp Hours Color Space Auto Shutdown OSD Timeout Menu Position Factory Reset Description Automatically scans the input source. ON OFF * Pressing repeatly will lower power consumption and increase lamp life. Using the menu (Continued) ■ Advanced menu Use this function to dim the projector lamp light output...

Owners Manual
Page 34
... "Status display". p.37 ) ■ When the lamp is recommended to use your dealer for approximate 2000 hours after use. • The risk of burst will increase if the lamp is continuously used without being replaced. • Frequently check the used hours and prepare spares when the replacement time approaches. (Refer to be exchanged. • When replacing, always use lamp "TLPLS9" (sold separately). WARNING • If the projector is mounted on...
... "Status display". p.37 ) ■ When the lamp is recommended to use your dealer for approximate 2000 hours after use. • The risk of burst will increase if the lamp is continuously used without being replaced. • Frequently check the used hours and prepare spares when the replacement time approaches. (Refer to be exchanged. • When replacing, always use lamp "TLPLS9" (sold separately). WARNING • If the projector is mounted on...

Owners Manual
Page 35
... control panel's "+" Button 3 times and "-" button 3 times. 3 Lamp Hours will be automatically reset. Maintenance 35 1 Unplug power cord. 2 Wait until the lamp cover is sufficiently cooled. Notes and Precautions • Attach the lamp cover correctly so that it is not loose. Wait for at least 1 hour. 3 Remove the lamp cover. 3 1 1 Lamp cover Loosen the screws on the bottom of the projector. 5 Mount the new lamp. 2 2 Align the orientation, press down until the bottom is reached, and lock...
... control panel's "+" Button 3 times and "-" button 3 times. 3 Lamp Hours will be automatically reset. Maintenance 35 1 Unplug power cord. 2 Wait until the lamp cover is sufficiently cooled. Notes and Precautions • Attach the lamp cover correctly so that it is not loose. Wait for at least 1 hour. 3 Remove the lamp cover. 3 1 1 Lamp cover Loosen the screws on the bottom of the projector. 5 Mount the new lamp. 2 2 Align the orientation, press down until the bottom is reached, and lock...

Owners Manual
Page 37
... condition on working. (Green) (Green) (Green) (Green) (Amber) (Green) (Green) Flashing (Green) (Amber) Flashing (Green) The lamp is in good condition and is off . Do not unplug the power cable or turn off. If the lamp is projecting at maximum brightness. Others 37 The fan motor is shutting down. The lamp has reached its fan, so the projector cannot start up. Others Status display The indicator informs you of life and must be changed soon. The projector is cooling...
... condition on working. (Green) (Green) (Green) (Green) (Amber) (Green) (Green) Flashing (Green) (Amber) Flashing (Green) The lamp is in good condition and is off . Do not unplug the power cable or turn off. If the lamp is projecting at maximum brightness. Others 37 The fan motor is shutting down. The lamp has reached its fan, so the projector cannot start up. Others Status display The indicator informs you of life and must be changed soon. The projector is cooling...
Owners Manual
Page 38
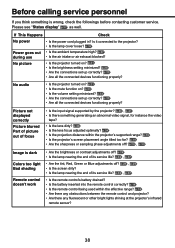
... the remote control correctly? Before calling service personnel If you think something generating an abnormal video signal, for instance the video tape? • Is the lens dirty? p.33 • Is the volume setting minimized? Picture not displayed correctly Picture blurred Part of picture out of focus • Is the input signal supported by the projector? p.24 • Is the projection distance within the effective range? p.37 during use • Is the air...
... the remote control correctly? Before calling service personnel If you think something generating an abnormal video signal, for instance the video tape? • Is the lens dirty? p.33 • Is the volume setting minimized? Picture not displayed correctly Picture blurred Part of picture out of focus • Is the input signal supported by the projector? p.24 • Is the projection distance within the effective range? p.37 during use • Is the air...


