
User Manual
Page 28
...57 Using the Dual Mode Pad 57 Using Dual Mode 57 Using external display devices 60 Connecting the display device 60 Directing the display output when you turn on the computer 64 Adjusting the quality of the external display......65 Using an external keyboard 65 Using a mouse 65 Connecting a ... computer 68 Using the Shut Down command 70 Using and configuring Hibernation mode .........72 Using and configuring Sleep mode 74 Closing the display panel 77 Customizing your computer's settings 77 Caring for your computer 77 Cleaning the computer 77 Moving the computer 78 Using a computer ...
...57 Using the Dual Mode Pad 57 Using Dual Mode 57 Using external display devices 60 Connecting the display device 60 Directing the display output when you turn on the computer 64 Adjusting the quality of the external display......65 Using an external keyboard 65 Using a mouse 65 Connecting a ... computer 68 Using the Shut Down command 70 Using and configuring Hibernation mode .........72 Using and configuring Sleep mode 74 Closing the display panel 77 Customizing your computer's settings 77 Caring for your computer 77 Cleaning the computer 77 Moving the computer 78 Using a computer ...
User Manual
Page 32
... Resolving a hardware conflict 170 A plan of action 170 Fixing a problem with Device Manager ...........171 Memory problems 172 Power and the batteries 173 Keyboard problems 174 Display problems 175 Disk drive problems 177 Optical drive problems 178 Sound system problems 179 ExpressCard™ problems 180 Printer problems 182 Modem problems 183 Wireless...
... Resolving a hardware conflict 170 A plan of action 170 Fixing a problem with Device Manager ...........171 Memory problems 172 Power and the batteries 173 Keyboard problems 174 Display problems 175 Disk drive problems 177 Optical drive problems 178 Sound system problems 179 ExpressCard™ problems 180 Printer problems 182 Modem problems 183 Wireless...
User Manual
Page 33
...the Windows® operating system 188 If you need further assistance 192 Before you contact Toshiba 192 Contacting Toshiba 193 Other Toshiba Internet Web sites 193 Toshiba's worldwide offices 194 Appendix A: Hot Keys/TOSHIBA Cards 196 Hot Key Cards 196 Using the Hot Key Cards 197 Application Cards 198... Using the Application Cards 199 Card Case 199 Hot key functions 201 Volume Mute 201 Password security 202 Power plan 203 Sleep mode 204 Hibernation mode 205 Display modes 206 Display ...
...the Windows® operating system 188 If you need further assistance 192 Before you contact Toshiba 192 Contacting Toshiba 193 Other Toshiba Internet Web sites 193 Toshiba's worldwide offices 194 Appendix A: Hot Keys/TOSHIBA Cards 196 Hot Key Cards 196 Using the Hot Key Cards 197 Application Cards 198... Using the Application Cards 199 Card Case 199 Hot key functions 201 Volume Mute 201 Password security 202 Power plan 203 Sleep mode 204 Hibernation mode 205 Display modes 206 Display ...
User Manual
Page 41
... software When you through steps to set up your software. 1 From the Welcome screen click Next to enter the Setup Wizard. 2 Confirm acceptance of windows displayed, and the order in which windows appear, may restart your computer. NOTE The names of Microsoft's End User License Agreement and click Next. 3 Enter your...
... software When you through steps to set up your software. 1 From the Welcome screen click Next to enter the Setup Wizard. 2 Confirm acceptance of windows displayed, and the order in which windows appear, may restart your computer. NOTE The names of Microsoft's End User License Agreement and click Next. 3 Enter your...
User Manual
Page 42
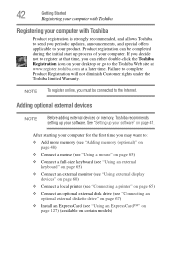
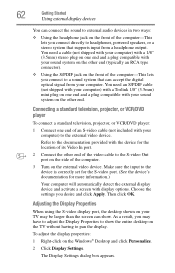
...65) ❖ Connect a full-size keyboard (see "Using an external keyboard" on page 65) ❖ Connect an external monitor (see "Using external display devices" on page 60) ❖ Connect a local printer (see "Connecting a printer" on page 65) ❖ Connect an optional external disk drive... decide not to register at a later time. 42 Getting Started Registering your computer with Toshiba Registering your computer with Toshiba Product registration is strongly recommended, and allows Toshiba to send you must be completed during the initial start up your software. See "Setting...
...65) ❖ Connect a full-size keyboard (see "Using an external keyboard" on page 65) ❖ Connect an external monitor (see "Using external display devices" on page 60) ❖ Connect a local printer (see "Connecting a printer" on page 65) ❖ Connect an optional external disk drive... decide not to register at a later time. 42 Getting Started Registering your computer with Toshiba Registering your computer with Toshiba Product registration is strongly recommended, and allows Toshiba to send you must be completed during the initial start up your software. See "Setting...

User Manual
Page 46
... locate the latch on the palm rest to hold the computer in place and use the other hand to turn on your computer. Your display contains an extremely large number of the screen technology. When the computer is manufactured using it moves easily and never lift the computer by the... display panel. This is also an intrinsic characteristic of thin-film transistors (TFT) and is operated on battery power, the screen will deteriorate. Small bright...
... locate the latch on the palm rest to hold the computer in place and use the other hand to turn on your computer. Your display contains an extremely large number of the screen technology. When the computer is manufactured using it moves easily and never lift the computer by the... display panel. This is also an intrinsic characteristic of thin-film transistors (TFT) and is operated on battery power, the screen will deteriorate. Small bright...
User Manual
Page 50
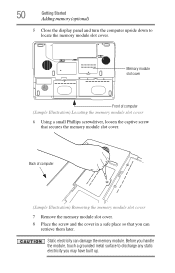
Static electricity can retrieve them later. 50 Getting Started Adding memory (optional) 5 Close the display panel and turn the computer upside down to discharge any static electricity you may have built up. Memory module slot cover Front of computer (Sample ...
Static electricity can retrieve them later. 50 Getting Started Adding memory (optional) 5 Close the display panel and turn the computer upside down to discharge any static electricity you may have built up. Memory module slot cover Front of computer (Sample ...

User Manual
Page 55
... When you add or remove a memory module, you can check that the computer has recognized the change. The System window appears. 2 The total memory is displayed below the System heading under Memory (RAM). TECHNICAL NOTE: You must have at least one memory module installed for the computer to a 30-degree angle...
... When you add or remove a memory module, you can check that the computer has recognized the change. The System window appears. 2 The total memory is displayed below the System heading under Memory (RAM). TECHNICAL NOTE: You must have at least one memory module installed for the computer to a 30-degree angle...

User Manual
Page 56
... yourself. ❖ To move the cursor with the socket latches. NOTE From time to time, Windows® will display a pop-up squarely with the stroke of the keyboard, is much smaller than the display screen, moving your finger several times across the screen often means having to continue." NOTE Because the TouchPad...
... yourself. ❖ To move the cursor with the socket latches. NOTE From time to time, Windows® will display a pop-up squarely with the stroke of the keyboard, is much smaller than the display screen, moving your finger several times across the screen often means having to continue." NOTE Because the TouchPad...
User Manual
Page 60
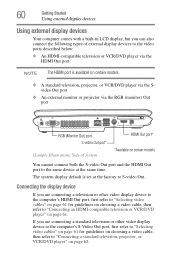
... cannot connect both the S-video Out port and the HDMI Out port to S-video Out. If you are connecting a television or other video display device to the computer's S-Video Out port, first refer to "Selecting video cables" on page 61 for guidelines on choosing a video cable,...television or VCR/DVD player" on page 61. 60 Getting Started Using external display devices Using external display devices Your computer comes with a built-in LCD display, but you are connecting a standard television or other video display device to the computer's HDMI Out port, first refer to "Selecting video cables...
... cannot connect both the S-video Out port and the HDMI Out port to S-video Out. If you are connecting a television or other video display device to the computer's S-Video Out port, first refer to "Selecting video cables" on page 61 for guidelines on choosing a video cable,...television or VCR/DVD player" on page 61. 60 Getting Started Using external display devices Using external display devices Your computer comes with a built-in LCD display, but you are connecting a standard television or other video display device to the computer's HDMI Out port, first refer to "Selecting video cables...
User Manual
Page 61
...(not included with your computer) to the HDMI Out port, you must purchase an HDMI cable. Refer to use a properly shielded cable. HINT: Toshiba recommends using a cable no longer than 20 feet (approximately 6 meters). Then click OK. Using a poor-quality cable may prefer to the manual ... "Selecting video cables" on page 61, then skip to the S-video port, you must purchase an Svideo cable. Getting Started Using external display devices 61 If you are not included with your computer. Selecting video cables To connect a device to "Connecting an external monitor or projector"...
...(not included with your computer) to the HDMI Out port, you must purchase an HDMI cable. Refer to use a properly shielded cable. HINT: Toshiba recommends using a cable no longer than 20 feet (approximately 6 meters). Then click OK. Using a poor-quality cable may prefer to the manual ... "Selecting video cables" on page 61, then skip to the S-video port, you must purchase an Svideo cable. Getting Started Using external display devices 61 If you are not included with your computer. Selecting video cables To connect a device to "Connecting an external monitor or projector"...
User Manual
Page 62
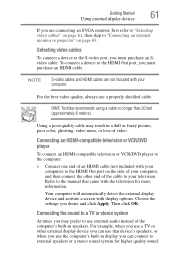
...the other end (typically an RCA type connector). ❖ Using the S/PDIF jack on the side of an S-video cable (not included with display options. Connecting a standard television, projector, or VCR/DVD player To connect a standard television, projector, or VCR/DVD player: 1 Connect one end...can accept the digital optical signal from your computer) to headphones, powered speakers, or a stereo system that supports input from a headphone output. The Display Settings dialog box appears. You need a cable (not shipped with your computer) with a 1/8" (3.5mm) stereo plug on one end of the ...
...the other end (typically an RCA type connector). ❖ Using the S/PDIF jack on the side of an S-video cable (not included with display options. Connecting a standard television, projector, or VCR/DVD player To connect a standard television, projector, or VCR/DVD player: 1 Connect one end...can accept the digital optical signal from your computer) to headphones, powered speakers, or a stereo system that supports input from a headphone output. The Display Settings dialog box appears. You need a cable (not shipped with your computer) with a 1/8" (3.5mm) stereo plug on one end of the ...
User Manual
Page 63
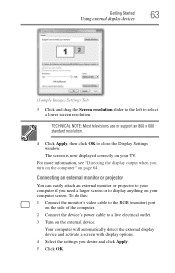
... (monitor) port on the side of the computer. 2 Connect the device's power cable to select a lower screen resolution. Getting Started Using external display devices 63 (Sample Image) Settings Tab 3 Click and drag the Screen resolution slider to the left to a live electrical outlet. 3 Turn on...external device. Connecting an external monitor or projector You can easily attach an external monitor or projector to close the Display Settings window. The screen is now displayed correctly on your computer if you turn on the computer" on page 64. Your computer will automatically detect the ...
... (monitor) port on the side of the computer. 2 Connect the device's power cable to select a lower screen resolution. Getting Started Using external display devices 63 (Sample Image) Settings Tab 3 Click and drag the Screen resolution slider to the left to a live electrical outlet. 3 Turn on...external device. Connecting an external monitor or projector You can easily attach an external monitor or projector to close the Display Settings window. The screen is now displayed correctly on your computer if you turn on the computer" on page 64. Your computer will automatically detect the ...
User Manual
Page 64
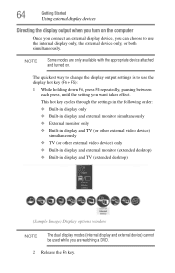
...used while you are only available with the appropriate device attached and turned on the computer Once you connect an external display device, you can choose to use the internal display only, the external device only, or both simultaneously. NOTE Some modes are watching a DVD. 2 Release the Fn ...key. The quickest way to change the display output settings is to use the display hot key (Fn + F5): 1 While holding down Fn, press F5 repeatedly, pausing between each press, until the setting you turn ...
...used while you are only available with the appropriate device attached and turned on the computer Once you connect an external display device, you can choose to use the internal display only, the external device only, or both simultaneously. NOTE Some modes are watching a DVD. 2 Release the Fn ...key. The quickest way to change the display output settings is to use the display hot key (Fn + F5): 1 While holding down Fn, press F5 repeatedly, pausing between each press, until the setting you turn ...
User Manual
Page 65
... you do not install the software as instructed by the printer manufacturer, the printer may come with your television (or other video display device), you to install the printer software before physically connecting the printer to use one from your printer. Getting Started Using an ...external keyboard 65 Adjusting the quality of the external display To obtain the best picture quality from a computer or electronics store. TECHNICAL NOTE: To use a mouse instead of 800 x 600 ...
... you do not install the software as instructed by the printer manufacturer, the printer may come with your television (or other video display device), you to install the printer software before physically connecting the printer to use one from your printer. Getting Started Using an ...external keyboard 65 Adjusting the quality of the external display To obtain the best picture quality from a computer or electronics store. TECHNICAL NOTE: To use a mouse instead of 800 x 600 ...
User Manual
Page 71
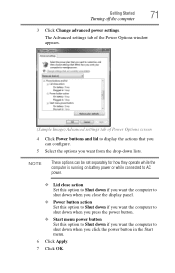
The Advanced settings tab of the Power Options window appears. (Sample Image) Advanced settings tab of Power Options screen 4 Click Power buttons and lid to display the actions that you can be set separately for how they operate while the computer is running on battery power or while connected to AC ...power. ❖ Lid close action Set this option to Shut down if you want the computer to shut down when you close the display panel. ❖ Power button action Set this option to Shut down if you want the computer to shut down when you press the power button...
The Advanced settings tab of the Power Options window appears. (Sample Image) Advanced settings tab of Power Options screen 4 Click Power buttons and lid to display the actions that you can be set separately for how they operate while the computer is running on battery power or while connected to AC ...power. ❖ Lid close action Set this option to Shut down if you want the computer to shut down when you close the display panel. ❖ Power button action Set this option to Shut down if you want the computer to shut down when you press the power button...
User Manual
Page 72
... can also specify an amount of time after which the computer automatically goes into Hibernation mode by either pressing the power button or closing the display panel, depending on /off the computer using the Power Options feature. The Shut Down menu appears. The computer saves the state of the Start ... and then click the arrow next to the Lock button in the lower-right part of all open programs and files, turns off the display, and then turns off the computer by closing the display panel. Restarting your computer To start it off by either pressing the power button or closing the...
... can also specify an amount of time after which the computer automatically goes into Hibernation mode by either pressing the power button or closing the display panel, depending on /off the computer using the Power Options feature. The Shut Down menu appears. The computer saves the state of the Start ... and then click the arrow next to the Lock button in the lower-right part of all open programs and files, turns off the display, and then turns off the computer by closing the display panel. Restarting your computer To start it off by either pressing the power button or closing the...
User Manual
Page 73
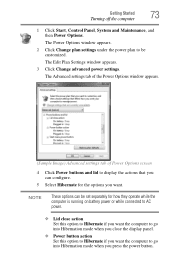
...power. ❖ Lid close action Set this option to Hibernate if you want the computer to go into Hibernation mode when you close the display panel. ❖ Power button action Set this option to Hibernate if you want the computer to be customized. The Advanced settings tab of ...the Power Options window appears. (Sample Image) Advanced settings tab of Power Options screen 4 Click Power buttons and lid to display the actions that you can be set separately for the options you want . The Edit Plan Settings window appears. 3 Click Change advanced power settings....
...power. ❖ Lid close action Set this option to Hibernate if you want the computer to go into Hibernation mode when you close the display panel. ❖ Power button action Set this option to Hibernate if you want the computer to be customized. The Advanced settings tab of ...the Power Options window appears. (Sample Image) Advanced settings tab of Power Options screen 4 Click Power buttons and lid to display the actions that you can be set separately for the options you want . The Edit Plan Settings window appears. 3 Click Change advanced power settings....
User Manual
Page 74
...Start menu. Starting again from Hibernation mode To start it again by either pressing the power button or closing the display panel, you can place it into Hibernation mode by opening the display panel. The on /off light glows red. The computer returns to the screen(s) you can start up the ...the lower-right part of all open programs and files to the memory, turns off the display, and enters into Hibernation mode when you click the power button in Hibernation mode by closing the display panel, depending on the Hibernation options set. Using and configuring Sleep mode To turn off the...
...Start menu. Starting again from Hibernation mode To start it again by either pressing the power button or closing the display panel, you can place it into Hibernation mode by opening the display panel. The on /off light glows red. The computer returns to the screen(s) you can start up the ...the lower-right part of all open programs and files to the memory, turns off the display, and enters into Hibernation mode when you click the power button in Hibernation mode by closing the display panel, depending on the Hibernation options set. Using and configuring Sleep mode To turn off the...
User Manual
Page 75
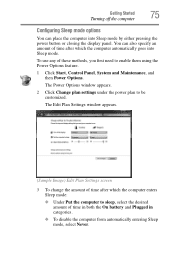
... can also specify an amount of time after which the computer automatically goes into Sleep mode by either pressing the power button or closing the display panel. To use any of these methods, you first need to be customized.
... can also specify an amount of time after which the computer automatically goes into Sleep mode by either pressing the power button or closing the display panel. To use any of these methods, you first need to be customized.


