
User Guide 2
Page 2
Model: Satellite Pro® L510 Series Recordable and/or ReWritable Drive(s) and Associated Software Warranty The computer system you may include Recordable and/or ReWritable optical disc drive(s) and associated software, among the most advanced data storage technologies available. TOSHIBA AMERICA INFORMATION SYSTEMS, INC. ("TOSHIBA"), ITS AFFILIATES AND SUPPLIERS DO NOT WARRANT THAT OPERATION OF THE PRODUCT WILL BE UNINTERRUPTED OR ERROR FREE. Wash hands after...
Model: Satellite Pro® L510 Series Recordable and/or ReWritable Drive(s) and Associated Software Warranty The computer system you may include Recordable and/or ReWritable optical disc drive(s) and associated software, among the most advanced data storage technologies available. TOSHIBA AMERICA INFORMATION SYSTEMS, INC. ("TOSHIBA"), ITS AFFILIATES AND SUPPLIERS DO NOT WARRANT THAT OPERATION OF THE PRODUCT WILL BE UNINTERRUPTED OR ERROR FREE. Wash hands after...
User Guide 2
Page 5
In order to do this equipment, for repair or standard limited warranty information, please contact Toshiba Corporation, Toshiba America Information Systems, Inc. If these changes might affect your service or the operation of your equipment, the telephone company will notify the customer as soon as possible. Also, you will notify you in advance that you to make changes in their...
In order to do this equipment, for repair or standard limited warranty information, please contact Toshiba Corporation, Toshiba America Information Systems, Inc. If these changes might affect your service or the operation of your equipment, the telephone company will notify the customer as soon as possible. Also, you will notify you in advance that you to make changes in their...
User Guide 2
Page 31
...partition 65 Recovering without changing the internal storage drive partitions 68 Creating recovery DVDs/media 70 Restoring from recovery DVDs/media 73 Erasing the Internal Storage Drive 75 Checking the internal storage drive operating status 76 Installing drivers and applications 77 Using the TouchPad 77 Adjusting TouchPad™ settings 79 Disabling or enabling the TouchPad 80 Using external display devices 80 Directing the display output when you turn on the computer 81 Adjusting the quality of the external display 82 Using an external keyboard 82 Using a mouse 82 Connecting...
...partition 65 Recovering without changing the internal storage drive partitions 68 Creating recovery DVDs/media 70 Restoring from recovery DVDs/media 73 Erasing the Internal Storage Drive 75 Checking the internal storage drive operating status 76 Installing drivers and applications 77 Using the TouchPad 77 Adjusting TouchPad™ settings 79 Disabling or enabling the TouchPad 80 Using external display devices 80 Directing the display output when you turn on the computer 81 Adjusting the quality of the external display 82 Using an external keyboard 82 Using a mouse 82 Connecting...

User Guide 2
Page 34
... to, and downloading files from, the Internet 138 Exploring audio features 138 Recording sounds 138 Using external speakers or headphones..........139 Using the Web Camera 139 Using the Memory card reader 140 Inserting memory media 140 Removing memory media 141 Chapter 5: Utilities 142 TOSHIBA Assist 143 Connect 144 Secure 145 Protect & Fix 146 Optimize 147 TOSHIBA Application Installer 148 Setting passwords 149 Using an instant password 149 Using a supervisor password 150 Using a user password 151 Deleting a user password 152 TOSHIBA Face Recognition Utility 153 TOSHIBA PC...
... to, and downloading files from, the Internet 138 Exploring audio features 138 Recording sounds 138 Using external speakers or headphones..........139 Using the Web Camera 139 Using the Memory card reader 140 Inserting memory media 140 Removing memory media 141 Chapter 5: Utilities 142 TOSHIBA Assist 143 Connect 144 Secure 145 Protect & Fix 146 Optimize 147 TOSHIBA Application Installer 148 Setting passwords 149 Using an instant password 149 Using a supervisor password 150 Using a user password 151 Deleting a user password 152 TOSHIBA Face Recognition Utility 153 TOSHIBA PC...
User Guide 2
Page 53
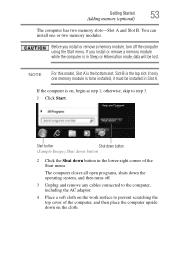
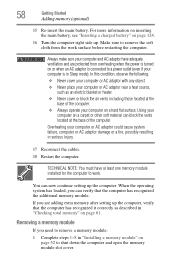
... or two memory modules. If the computer is the bottom slot. The computer closes all open programs, shuts down the operating system, and then turns off the computer using the Start menu. NOTE For this model, Slot A is on, begin at step 1; Slot B is in Slot A. Getting Started 53 Adding memory (optional) The computer has two memory slots-Slot A and Slot B. If you install or remove a memory module, turn off . 3 Unplug and remove any cables connected to the...
... or two memory modules. If the computer is the bottom slot. The computer closes all open programs, shuts down the operating system, and then turns off the computer using the Start menu. NOTE For this model, Slot A is on, begin at step 1; Slot B is in Slot A. Getting Started 53 Adding memory (optional) The computer has two memory slots-Slot A and Slot B. If you install or remove a memory module, turn off . 3 Unplug and remove any cables connected to the...
User Guide 2
Page 58
... a hard flat surface. Removing a memory module If you are protected from the work . For more information on inserting the main battery, see "Inserting a charged battery" on page 61. Using your computer and AC adaptor have at the base of the computer. ❖ Always operate your computer is in Sleep mode). TECHNICAL NOTE: You must have adequate ventilation and are adding extra memory after setting...
... a hard flat surface. Removing a memory module If you are protected from the work . For more information on inserting the main battery, see "Inserting a charged battery" on page 61. Using your computer and AC adaptor have at the base of the computer. ❖ Always operate your computer is in Sleep mode). TECHNICAL NOTE: You must have adequate ventilation and are adding extra memory after setting...

User Guide 2
Page 60
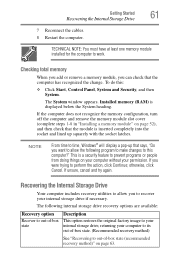
... memory (optional) 3 Gently lift the memory module to a 30-degree angle and slide it out of computer Slot B Slot A (Sample Illustration) Removing the memory module 4 Replace the memory module slot cover and secure it using the screws. 5 Re-insert the main battery. For more information on inserting the main battery, see "Inserting a charged battery" on or when an AC adaptor is connected to remove the soft cloth from overheating when the power...
... memory (optional) 3 Gently lift the memory module to a 30-degree angle and slide it out of computer Slot B Slot A (Sample Illustration) Removing the memory module 4 Replace the memory module slot cover and secure it using the screws. 5 Re-insert the main battery. For more information on inserting the main battery, see "Inserting a charged battery" on or when an AC adaptor is connected to remove the soft cloth from overheating when the power...
User Guide 2
Page 61
... : ❖ Click Start, Control Panel, System and Security, and then System. If you to your internal storage drive, returning your permission. The following program to make changes to time, Windows® will display a pop-up that the module is displayed below the System heading. If the computer does not recognize the memory configuration, turn off the computer and remove the memory module slot cover (complete steps 1-8 in "Installing a memory module" on page...
... : ❖ Click Start, Control Panel, System and Security, and then System. If you to your internal storage drive, returning your permission. The following program to make changes to time, Windows® will display a pop-up that the module is displayed below the System heading. If the computer does not recognize the memory configuration, turn off the computer and remove the memory module slot cover (complete steps 1-8 in "Installing a memory module" on page...

User Guide 2
Page 80
... type" into the Search field. To do this: 1 Read the directions that came with a built-in the Windows® Control Panel. NOTE Alternately, you can disable only the tapping feature. 80 Getting Started Using external display devices NOTE TouchPad setting options vary by default. For more information, please visit www.support.toshiba.com, and enter the phrase "Mouse pointer jumps around as you need to install new software. 2 Connect the monitor's video cable to see "Disabling or enabling...
... type" into the Search field. To do this: 1 Read the directions that came with a built-in the Windows® Control Panel. NOTE Alternately, you can disable only the tapping feature. 80 Getting Started Using external display devices NOTE TouchPad setting options vary by default. For more information, please visit www.support.toshiba.com, and enter the phrase "Mouse pointer jumps around as you need to install new software. 2 Connect the monitor's video cable to see "Disabling or enabling...
User Guide 2
Page 109
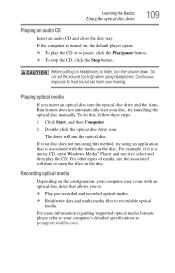
.... For more information regarding supported optical media formats please refer to recordable optical media. For example, if it is a music CD, open the files on the configuration, your disc, try using headphones. The drive will run using this , follow these steps: 1 Click Start, and then Computer. 2 Double-click the optical disc drive icon. Do not set the volume too high when using an application that allows...
.... For more information regarding supported optical media formats please refer to recordable optical media. For example, if it is a music CD, open the files on the configuration, your disc, try using headphones. The drive will run using this , follow these steps: 1 Click Start, and then Computer. 2 Double-click the optical disc drive icon. Do not set the volume too high when using an application that allows...
User Guide 2
Page 152
... enter it again to verify. 6 Click OK. 7 Click OK to remove the user password. 152 Utilities Setting passwords To register a password for the power-on password function: 1 Click Start, All Programs, TOSHIBA, Utilities, and then TOSHIBA Assist. The TOSHIBA Assist window appears. 2 On the left side, click the Secure tab. 3 Click the User Password icon. 4 Click Not Registered. 5 Follow the on-screen instructions to exit. Deleting a user password To cancel the power-on password functions: 1 Click Start...
... enter it again to verify. 6 Click OK. 7 Click OK to remove the user password. 152 Utilities Setting passwords To register a password for the power-on password function: 1 Click Start, All Programs, TOSHIBA, Utilities, and then TOSHIBA Assist. The TOSHIBA Assist window appears. 2 On the left side, click the Secure tab. 3 Click the User Password icon. 4 Click Not Registered. 5 Follow the on-screen instructions to exit. Deleting a user password To cancel the power-on password functions: 1 Click Start...
User Guide 2
Page 161
...). The collected information includes device operation time and number of actuations or status changes (e.g.: number of power button and Fn key combination uses, and AC adaptor, battery, LCD, fan, HDD, sound volume, wireless communication switch, docking and USB information), date of your computer. The TOSHIBA Service Station will automatically delete all collected information from the internal storage drive. Utilities TOSHIBA Service Station 161 TOSHIBA Service Station The TOSHIBA Service Station helps you keep your new computer running at any time...
...). The collected information includes device operation time and number of actuations or status changes (e.g.: number of power button and Fn key combination uses, and AC adaptor, battery, LCD, fan, HDD, sound volume, wireless communication switch, docking and USB information), date of your computer. The TOSHIBA Service Station will automatically delete all collected information from the internal storage drive. Utilities TOSHIBA Service Station 161 TOSHIBA Service Station The TOSHIBA Service Station helps you keep your new computer running at any time...
User Guide 2
Page 170
... match the input specifications of these problems, use the options in the Startup menu to change your work routine, you change the system in the Startup menu. Using Startup options to fix problems If the operating system fails to fix the problem. 170 If Something Goes Wrong The Windows® operating system is not working The battery light is blinking when the computer is on , this , use the options in some way such as installing a new program or adding a device.
... match the input specifications of these problems, use the options in the Startup menu to change your work routine, you change the system in the Startup menu. Using Startup options to fix problems If the operating system fails to fix the problem. 170 If Something Goes Wrong The Windows® operating system is not working The battery light is blinking when the computer is on , this , use the options in some way such as installing a new program or adding a device.

User Guide 2
Page 173
... of tabs. The operating system displays the device Properties dialog box, which lists resources assigned to another. For more information about the device. ❖ The Resources tab, which provides an array of the Start menu. Memory problems Incorrectly connected or faulty memory modules may be hardware or even software related. If Something Goes Wrong Memory problems 173 2 To view the device(s) installed, double-click the device type. 3 To view the...
... of tabs. The operating system displays the device Properties dialog box, which lists resources assigned to another. For more information about the device. ❖ The Resources tab, which provides an array of the Start menu. Memory problems Incorrectly connected or faulty memory modules may be hardware or even software related. If Something Goes Wrong Memory problems 173 2 To view the device(s) installed, double-click the device type. 3 To view the...

User Guide 2
Page 176
... are using an external monitor: ❖ Check that the monitor is turned on. ❖ Check that the cable connecting the external monitor to the computer is firmly attached. ❖ Try adjusting the contrast and brightness controls on the external monitor. ❖ Press Fn and F5 simultaneously to make sure the display priority is not set for the built-in screen, make sure the display priority is not set for an external monitor. This opens...
... are using an external monitor: ❖ Check that the monitor is turned on. ❖ Check that the cable connecting the external monitor to the computer is firmly attached. ❖ Try adjusting the contrast and brightness controls on the external monitor. ❖ Press Fn and F5 simultaneously to make sure the display priority is not set for the built-in screen, make sure the display priority is not set for an external monitor. This opens...
User Guide 2
Page 188
... on -screen instructions to back up your files. For more help ensure safe and easy installation of new hardware (printers, pointing devices, external hard drives, DVD writers, scanners, etc.) and software (applications like Microsoft® Office and Adobe® Photoshop®, or utility software such as special toolbars for "back up your backup target by connecting it may be able to easily restore the Windows® operating system to...
... on -screen instructions to back up your files. For more help ensure safe and easy installation of new hardware (printers, pointing devices, external hard drives, DVD writers, scanners, etc.) and software (applications like Microsoft® Office and Adobe® Photoshop®, or utility software such as special toolbars for "back up your backup target by connecting it may be able to easily restore the Windows® operating system to...

User Guide 2
Page 217
... activates a memory resident program. One A/V component can be magnetically coded with the Fn key can set system options or control system parameters, such as the battery save mode. (2) A key or combination of data. hot key - (1) A feature in a computer is refreshed. See also HDMI. Compare non-interlaced. interlaced - A feature of many Toshiba computers that holds 1.44 MB of keys that can control another while using this function, if connected with HDMI cables...
... activates a memory resident program. One A/V component can be magnetically coded with the Fn key can set system options or control system parameters, such as the battery save mode. (2) A key or combination of data. hot key - (1) A feature in a computer is refreshed. See also HDMI. Compare non-interlaced. interlaced - A feature of many Toshiba computers that holds 1.44 MB of keys that can control another while using this function, if connected with HDMI cables...

User Guide 2
Page 224
... changing 122 charge indicator light 48, 116 charge not lasting 175 charging 48, 115 conserving power 119 disposal 127 installing 122, 124 low charge 118 maintaining 126 monitoring power 48, 116 224 not charging 174 notifications 118 power plan 199 power plan hot key 121 real-time clock (RTC) 113, 115 remaining power 117 removing 123 safety precautions 125 BIOS Setup see TOSHIBA Hardware Setup button power 50 start 131 buttons eject, optical disc drive 107 C Call2Recycle™ battery 128 changing...
... changing 122 charge indicator light 48, 116 charge not lasting 175 charging 48, 115 conserving power 119 disposal 127 installing 122, 124 low charge 118 maintaining 126 monitoring power 48, 116 224 not charging 174 notifications 118 power plan 199 power plan hot key 121 real-time clock (RTC) 113, 115 remaining power 117 removing 123 safety precautions 125 BIOS Setup see TOSHIBA Hardware Setup button power 50 start 131 buttons eject, optical disc drive 107 C Call2Recycle™ battery 128 changing...

User Guide 2
Page 226
... restore 105 saving 102 Fn keys 98 function keys 98 H headphones using 139 Help and Support Windows® operating system 172 Hibernation mode 85 configuring 89 hot key 201 starting again from 91 hot key disabling or enabling TouchPad™ 205 disabling or enabling wireless devices 204 display brightness 203 Hibernation mode 201 keyboard overlays 207 Lock (Instant security) 198 Output (Display switch) 202 power plan 199 Sleep mode 200 volume mute 197 Zoom (Display resolution) 206 zooming in 207 zooming out 207 Hot Key Cards 193 Hot key functions...
... restore 105 saving 102 Fn keys 98 function keys 98 H headphones using 139 Help and Support Windows® operating system 172 Hibernation mode 85 configuring 89 hot key 201 starting again from 91 hot key disabling or enabling TouchPad™ 205 disabling or enabling wireless devices 204 display brightness 203 Hibernation mode 201 keyboard overlays 207 Lock (Instant security) 198 Output (Display switch) 202 power plan 199 Sleep mode 200 volume mute 197 Zoom (Display resolution) 206 zooming in 207 zooming out 207 Hot Key Cards 193 Hot key functions...
User Guide 2
Page 228
... 178 Device Manager 172 disk drive is slow 178 display is blank 176 external display not working 177 external monitor 176 faulty memory 173 high-pitched noise 180 Internet bookmarked site not found 172 Internet connection is slow 171 keyboard not responding 167 keyboard produces unexpected characters 175 missing files/trouble accessing a drive 177 modem not receiving or transmitting 181, 182 no sound 180 non-system disk or disk error 168 power and batteries 174...
... 178 Device Manager 172 disk drive is slow 178 display is blank 176 external display not working 177 external monitor 176 faulty memory 173 high-pitched noise 180 Internet bookmarked site not found 172 Internet connection is slow 171 keyboard not responding 167 keyboard produces unexpected characters 175 missing files/trouble accessing a drive 177 modem not receiving or transmitting 181, 182 no sound 180 non-system disk or disk error 168 power and batteries 174...


