User Manual
Page 20
... 45 Keeping yourself comfortable 46 Other precautions 50 Setting up your computer 50 Connecting to a power source 51 Adding memory 54 Installing a memory module 55 Removing a memory module 58 Turning on the computer 60 Opening the display panel 60 Turning on the power 60 Using the AccuPoint II...® pointing device 61 Setting up your software 62 Registering your computer with Toshiba 63 Setting up other devices 63...
... 45 Keeping yourself comfortable 46 Other precautions 50 Setting up your computer 50 Connecting to a power source 51 Adding memory 54 Installing a memory module 55 Removing a memory module 58 Turning on the computer 60 Opening the display panel 60 Turning on the power 60 Using the AccuPoint II...® pointing device 61 Setting up your software 62 Registering your computer with Toshiba 63 Setting up other devices 63...
User Manual
Page 25
... can help you .... 200 Resolving a hardware conflict 201 A plan of action 201 Resolving hardware conflicts on your own 202 Fixing a problem with Device Manager 203 Memory problems 205 Power and the batteries 205 Keyboard problems 207 Display problems 207 Disk drive problems 209 DVD-ROM or Multifunction drive problems 212 Sound...
... can help you .... 200 Resolving a hardware conflict 201 A plan of action 201 Resolving hardware conflicts on your own 202 Fixing a problem with Device Manager 203 Memory problems 205 Power and the batteries 205 Keyboard problems 207 Display problems 207 Disk drive problems 209 DVD-ROM or Multifunction drive problems 212 Sound...
User Manual
Page 39
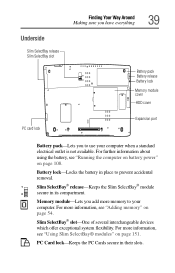
... page 54. Slim SelectBay® slot-One of several interchangeable devices which offer exceptional system flexibility. Memory module-Lets you to use your computer. For more memory to prevent accidental removal. Underside Slim SelectBay release Slim SelectBay slot PC card lock Finding Your Way Around ...Making sure you have everything 39 Battery pack Battery release Battery lock Memory module cover HDD cover Expansion port Battery pack-Lets you add more information, see "Using Slim SelectBay® modules" on page ...
... page 54. Slim SelectBay® slot-One of several interchangeable devices which offer exceptional system flexibility. Memory module-Lets you to use your computer. For more memory to prevent accidental removal. Underside Slim SelectBay release Slim SelectBay slot PC card lock Finding Your Way Around ...Making sure you have everything 39 Battery pack Battery release Battery lock Memory module cover HDD cover Expansion port Battery pack-Lets you add more information, see "Using Slim SelectBay® modules" on page ...

User Manual
Page 40
Releasing the display latch 2 Slide the display latch to two memory modules. Opening the display panel 40 Finding Your Way Around Keyboard and display features The expansion memory cover protects the slot in which you can install up to the right and lift the display panel. Keyboard and display features Front with the display panel open To view the front of the computer with the display panel open: 1 Locate the display latch on page 54. For more information on expanding your computer's memory, see "Adding memory" on the front of the computer.
Releasing the display latch 2 Slide the display latch to two memory modules. Opening the display panel 40 Finding Your Way Around Keyboard and display features The expansion memory cover protects the slot in which you can install up to the right and lift the display panel. Keyboard and display features Front with the display panel open To view the front of the computer with the display panel open: 1 Locate the display latch on page 54. For more information on expanding your computer's memory, see "Adding memory" on the front of the computer.
User Manual
Page 50
... adding external or internal components to sharp impacts. CAUTION: Some PC Cards can become hot even if only one is designed to , a mouse, keyboard, printer, memory, and PC cards. If two cards are not limited to optimize safety, minimize strain, and withstand the rigors of personal injury or damage to the...
... adding external or internal components to sharp impacts. CAUTION: Some PC Cards can become hot even if only one is designed to , a mouse, keyboard, printer, memory, and PC cards. If two cards are not limited to optimize safety, minimize strain, and withstand the rigors of personal injury or damage to the...

User Manual
Page 51
... Setting up your computer 51 To register your computer online, or to sign up for an Internet account, you may want to: ❖ Add more memory ❖ Connect a mouse ❖ Connect a full-size keyboard ❖ Connect an external monitor ❖ Connect a local printer ❖ Install PC Cards ❖ Connect a port replicator...
... Setting up your computer 51 To register your computer online, or to sign up for an Internet account, you may want to: ❖ Add more memory ❖ Connect a mouse ❖ Connect a full-size keyboard ❖ Connect an external monitor ❖ Connect a local printer ❖ Install PC Cards ❖ Connect a port replicator...
User Manual
Page 54
...'s popular applications. Your Satellite Pro® 6100 Series computer comes with enough memory to power the computer. To charge the battery, leave the computer plugged in and turned off . Adding memory HINT: To purchase additional memory modules, see the accessories information packaged with your computer, or visit toshiba.com 54 Getting Started Adding memory Charging the battery Your...
...'s popular applications. Your Satellite Pro® 6100 Series computer comes with enough memory to power the computer. To charge the battery, leave the computer plugged in and turned off . Adding memory HINT: To purchase additional memory modules, see the accessories information packaged with your computer, or visit toshiba.com 54 Getting Started Adding memory Charging the battery Your...
User Manual
Page 55
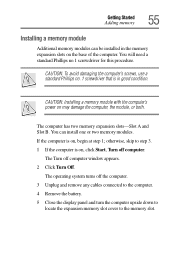
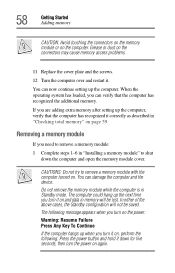
... To avoid damaging the computer's screws, use a standard Phillips no .1 screwdriver for this procedure. Getting Started Adding memory 55 Installing a memory module Additional memory modules can install one or two memory modules. The Turn off the computer. 3 Unplug and remove any cables connected to the computer. 4 Remove the ...battery. 5 Close the display panel and turn the computer upside down to locate the expansion memory slot cover to step 3. 1 If the computer is on may damage the computer, the module, or both. You can be installed...
... To avoid damaging the computer's screws, use a standard Phillips no .1 screwdriver for this procedure. Getting Started Adding memory 55 Installing a memory module Additional memory modules can install one or two memory modules. The Turn off the computer. 3 Unplug and remove any cables connected to the computer. 4 Remove the ...battery. 5 Close the display panel and turn the computer upside down to locate the expansion memory slot cover to step 3. 1 If the computer is on may damage the computer, the module, or both. You can be installed...
User Manual
Page 56
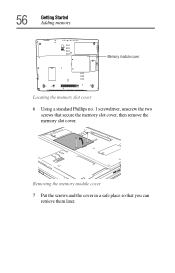
Removing the memory module cover 7 Put the screws and the cover in a safe place so that secure the memory slot cover, then remove the memory slot cover. 56 Getting Started Adding memory Memory module cover Locating the memory slot cover 6 Using a standard Phillips no. 1 screwdriver, unscrew the two screws that you can retrieve them later.
Removing the memory module cover 7 Put the screws and the cover in a safe place so that secure the memory slot cover, then remove the memory slot cover. 56 Getting Started Adding memory Memory module cover Locating the memory slot cover 6 Using a standard Phillips no. 1 screwdriver, unscrew the two screws that you can retrieve them later.

User Manual
Page 57
...click to secure the module. To avoid damaging the memory module, be level when secured in place. Inserting the memory module into the slot The clips on the memory module connector until the clips snap into place. The memory module should be careful not to discharge any static ...electricity you insert into the computer. 8 Remove the new memory module from its antistatic packaging. ...
...click to secure the module. To avoid damaging the memory module, be level when secured in place. Inserting the memory module into the slot The clips on the memory module connector until the clips snap into place. The memory module should be careful not to discharge any static ...electricity you insert into the computer. 8 Remove the new memory module from its antistatic packaging. ...
User Manual
Page 58
... recognized it on the computer. In either of the above cases, the Standby configuration will be saved. If you turn on the connectors may cause memory access problems. 11 Replace the cover plate and the screws. 12 Turn the computer over and restart it down the computer and open the... memory module cover. The following : Press the power button and hold it . Grease or dust on the power: Warning: Resume Failure Press Any Key To Continue ...
... recognized it on the computer. In either of the above cases, the Standby configuration will be saved. If you turn on the connectors may cause memory access problems. 11 Replace the cover plate and the screws. 12 Turn the computer over and restart it down the computer and open the... memory module cover. The following : Press the power button and hold it . Grease or dust on the power: Warning: Resume Failure Press Any Key To Continue ...

User Manual
Page 59
... click Control Panel 2 Click Performance and Maintenance. 3 Click System. 4 The General tab view automatically appears and shows total memory. The memory module pops partially out of "Installing a memory module" on page 55. Getting Started Adding memory 59 2 Pull the clips away from the slot. 4 Replace the cover plate and screws. 5 Turn the computer over...
... click Control Panel 2 Click Performance and Maintenance. 3 Click System. 4 The General tab view automatically appears and shows total memory. The memory module pops partially out of "Installing a memory module" on page 55. Getting Started Adding memory 59 2 Pull the clips away from the slot. 4 Replace the cover plate and screws. 5 Turn the computer over...
User Manual
Page 64
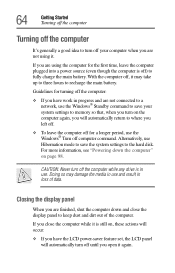
... the media in use and result in use the Windows® Standby command to save the system settings to turn off your system settings to memory so that, when you turn on the computer again, you will automatically turn off the computer while any drive is still on page 98.
... the media in use and result in use the Windows® Standby command to save the system settings to turn off your system settings to memory so that, when you turn on the computer again, you will automatically turn off the computer while any drive is still on page 98.
User Manual
Page 75
... the network you are working, you will lose all work since you last saved. See your work frequently. Your work stays in the computer's temporary memory until you must restart your computer to reconnect, or your work " on page 84 for details. 75 See "Saving your software documentation for further information...
... the network you are working, you will lose all work since you last saved. See your work frequently. Your work stays in the computer's temporary memory until you must restart your computer to reconnect, or your work " on page 84 for details. 75 See "Saving your software documentation for further information...
User Manual
Page 101
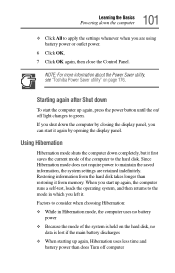
Factors to green. NOTE: For more information about the Power Saver utility, see "Toshiba Power Saver utility" on the hard disk, no data is lost if the main battery discharges ❖ When starting up again, Hibernation uses less time ..., the computer uses no battery power ❖ Because the mode of the computer to the mode in which you are retained indefinitely. Restoring information from memory. When you start up again, the computer runs a self-test, loads the operating system, and then returns to the hard disk. Using Hibernation Hibernation mode...
Factors to green. NOTE: For more information about the Power Saver utility, see "Toshiba Power Saver utility" on the hard disk, no data is lost if the main battery discharges ❖ When starting up again, Hibernation uses less time ..., the computer uses no battery power ❖ Because the mode of the computer to the mode in which you are retained indefinitely. Restoring information from memory. When you start up again, the computer runs a self-test, loads the operating system, and then returns to the hard disk. Using Hibernation Hibernation mode...

User Manual
Page 102
... more time and battery power to start up than restarting from Standby, because information is being retrieved from the hard disk rather than from memory ❖ When starting up again, the computer returns to the mode in which you left it, including all open programs and files you... were using Configuring your computer for Hibernation: 1 Open the Start menu, click Control Panel then Performance and Maintenance. 2 Click the Toshiba Power Saver icon. 3 In the Running on batteries area, select Scheme and click Details. 4 Click the System Power Mode tab. 5 Select Hibernation ...
... more time and battery power to start up than restarting from Standby, because information is being retrieved from the hard disk rather than from memory ❖ When starting up again, the computer returns to the mode in which you left it, including all open programs and files you... were using Configuring your computer for Hibernation: 1 Open the Start menu, click Control Panel then Performance and Maintenance. 2 Click the Toshiba Power Saver icon. 3 In the Running on batteries area, select Scheme and click Details. 4 Click the System Power Mode tab. 5 Select Hibernation ...

User Manual
Page 103
... power button until the on/off light turns green. Starting again from where you were using. The computer returns to eight hours in memory so that, when you restart the computer, you can continue working from Hibernation mode To start it again by either pressing the power ...configured, put the computer in Standby mode, the computer uses some battery power. NOTE: For more information about the Power Saver utility, see "Toshiba Power Saver utility" on the hibernation options taken. Using Standby The Standby command puts the computer into Hibernation when your option settings occur. If...
... power button until the on/off light turns green. Starting again from where you were using. The computer returns to eight hours in memory so that, when you restart the computer, you can continue working from Hibernation mode To start it again by either pressing the power ...configured, put the computer in Standby mode, the computer uses some battery power. NOTE: For more information about the Power Saver utility, see "Toshiba Power Saver utility" on the hibernation options taken. Using Standby The Standby command puts the computer into Hibernation when your option settings occur. If...

User Manual
Page 108
... contains a removable lithium ion (Li-ion) battery pack that stores your computer is connected to the main battery, you . The RTC battery powers the RTC memory that provides power when you are away from an AC outlet. The computer also has an internal real-time-clock (RTC) battery. This is turned...
... contains a removable lithium ion (Li-ion) battery pack that stores your computer is connected to the main battery, you . The RTC battery powers the RTC memory that provides power when you are away from an AC outlet. The computer also has an internal real-time-clock (RTC) battery. This is turned...

User Manual
Page 121
... the office as well as if it were a standard office computer. This chapter explains how to all the convenience of these optional devices: ❖ Expansion memory modules ❖ Standard 101-key keyboard ❖ Traditional mouse or trackball ❖ Printer ❖ PC Cards 121 You can provide all of the additional equipment...
... the office as well as if it were a standard office computer. This chapter explains how to all the convenience of these optional devices: ❖ Expansion memory modules ❖ Standard 101-key keyboard ❖ Traditional mouse or trackball ❖ Printer ❖ PC Cards 121 You can provide all of the additional equipment...

User Manual
Page 159
... data is being written or read. The cards can destroy data. Even when the message "copying..." You could be used with a variety of SD® memory/input/output cards. 159 Enhancing Productivity Using SD® cards Using SD® cards Your computer supports the use of digital products: digital music players...
... data is being written or read. The cards can destroy data. Even when the message "copying..." You could be used with a variety of SD® memory/input/output cards. 159 Enhancing Productivity Using SD® cards Using SD® cards Your computer supports the use of digital products: digital music players...


