
User Guide
Page 21
...Setting up your computer 39 Connecting to a power source 40 Charging the main battery 42 Using the computer for the first time 43 Initial setup 43 Setting up your software 44 Registering your computer with Toshiba 44 To Shut down your computer 45 To Restart your computer 45 To ...place your computer in Sleep mode 46 Adding optional external devices 47 Adding memory (optional 47 Installing a memory module 48 Removing a memory module 54 Checking total memory ...
...Setting up your computer 39 Connecting to a power source 40 Charging the main battery 42 Using the computer for the first time 43 Initial setup 43 Setting up your software 44 Registering your computer with Toshiba 44 To Shut down your computer 45 To Restart your computer 45 To ...place your computer in Sleep mode 46 Adding optional external devices 47 Adding memory (optional 47 Installing a memory module 48 Removing a memory module 54 Checking total memory ...
User Guide
Page 22
... optical media 87 Recording optical media 87 Removing a disc with the computer on ......... 88 Removing a disc with the computer off ......... 89 Toshiba's online resources 89 Chapter 4: Mobile Computing 90 Toshiba's energy-saver design 90 Running the computer on battery power 90 Battery Notice 91 Power management 92 Charging batteries 92 Charging the main battery 92 Charging the RTC...
... optical media 87 Recording optical media 87 Removing a disc with the computer on ......... 88 Removing a disc with the computer off ......... 89 Toshiba's online resources 89 Chapter 4: Mobile Computing 90 Toshiba's energy-saver design 90 Running the computer on battery power 90 Battery Notice 91 Power management 92 Charging batteries 92 Charging the main battery 92 Charging the RTC...
User Guide
Page 23
... Plans 98 Using the eco power plan 99 Changing the main battery 100 Removing the battery from the computer 101 Inserting a charged battery 102 Taking care of your battery 103 Safety precautions 103 Maintaining your battery 104 Disposing of your computer 104 Disposing of used batteries 105 Traveling tips 106 Chapter 5: Exploring Your Computer's Features.... 107 Exploring...
... Plans 98 Using the eco power plan 99 Changing the main battery 100 Removing the battery from the computer 101 Inserting a charged battery 102 Taking care of your battery 103 Safety precautions 103 Maintaining your battery 104 Disposing of your computer 104 Disposing of used batteries 105 Traveling tips 106 Chapter 5: Exploring Your Computer's Features.... 107 Exploring...

User Guide
Page 37
... injury or damage to the computer. ❖ Avoid prolonged physical contact with the underside or surface of your skin. You should accidentally occur, immediately: 1. Remove the battery pack, if applicable. Turn off the computer. 2. Avoid prolonged contact to prevent heat injury to skin. Exposure to liquid or moisture can become hot! If...
... injury or damage to the computer. ❖ Avoid prolonged physical contact with the underside or surface of your skin. You should accidentally occur, immediately: 1. Remove the battery pack, if applicable. Turn off the computer. 2. Avoid prolonged contact to prevent heat injury to skin. Exposure to liquid or moisture can become hot! If...
User Guide
Page 40
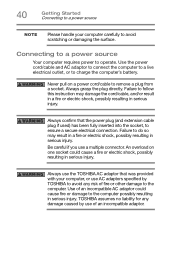
... adaptor that the power plug (and extension cable plug if used) has been fully inserted into the socket, to charge the computer's battery. Use the power cord/cable and AC adaptor to connect the computer to a live electrical outlet, or to ensure a secure electrical connection. Never pull on... for any damage caused by TOSHIBA to avoid any risk of fire or other damage to the computer. Failure to do so may damage the cord/cable, and/or result in a fire or electric shock, possibly resulting in serious injury. An overload on a power cord/cable to remove a plug from a socket. ...
... adaptor that the power plug (and extension cable plug if used) has been fully inserted into the socket, to charge the computer's battery. Use the power cord/cable and AC adaptor to connect the computer to a live electrical outlet, or to ensure a secure electrical connection. Never pull on... for any damage caused by TOSHIBA to avoid any risk of fire or other damage to the computer. Failure to do so may damage the cord/cable, and/or result in a fire or electric shock, possibly resulting in serious injury. An overload on a power cord/cable to remove a plug from a socket. ...
User Guide
Page 43
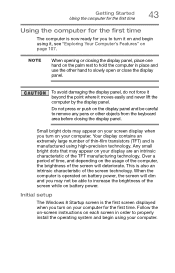
...large number of the screen technology. Any small bright dots that may not be careful to remove any pens or other hand to slowly open or close the display panel. When the computer is operated on battery power, the screen will deteriorate. To avoid damaging the display panel, do not force ...the computer, the brightness of the screen will dim and you may appear on your display are an intrinsic characteristic of the screen while on battery power. Follow the on-screen instructions on each screen in place and use the other objects from the keyboard area before closing the display ...
...large number of the screen technology. Any small bright dots that may not be careful to remove any pens or other hand to slowly open or close the display panel. When the computer is operated on battery power, the screen will deteriorate. To avoid damaging the display panel, do not force ...the computer, the brightness of the screen will dim and you may appear on your display are an intrinsic characteristic of the screen while on battery power. Follow the on-screen instructions on each screen in place and use the other objects from the keyboard area before closing the display ...
User Guide
Page 49
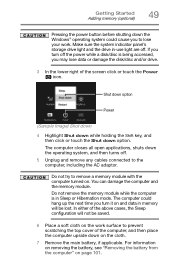
...shuts down option. If you turn it on page 101. You can damage the computer and the memory module. For information on removing the battery, see "Removing the battery from the computer" on and data in memory will not be lost. Shut down option Power (Sample Image) Shut down 4 ...the Shut down the operating system, and then turns off. 5 Unplug and remove any cables connected to lose your work surface to remove a memory module with the computer turned on the cloth. 7 Remove the main battery, if applicable. Make sure the system indicator panel's storage drive light and the...
...shuts down option. If you turn it on page 101. You can damage the computer and the memory module. For information on removing the battery, see "Removing the battery from the computer" on and data in memory will not be lost. Shut down option Power (Sample Image) Shut down 4 ...the Shut down the operating system, and then turns off. 5 Unplug and remove any cables connected to lose your work surface to remove a memory module with the computer turned on the cloth. 7 Remove the main battery, if applicable. Make sure the system indicator panel's storage drive light and the...
User Guide
Page 52
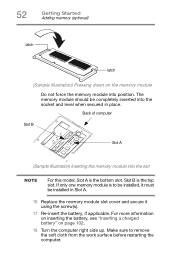
If only one memory module is the top slot. For more information on inserting the battery, see "Inserting a charged battery" on the memory module Do not force the memory module into position. The memory module should be completely inserted into the slot NOTE For this ... when secured in Slot A. 16 Replace the memory module slot cover and secure it must be installed, it using the screw(s). 17 Re-insert the battery, if applicable. 52 Getting Started Adding memory (optional) latch latch (Sample Illustration) Pressing down on page 102. 18 Turn the computer right side up. Slot...
If only one memory module is the top slot. For more information on inserting the battery, see "Inserting a charged battery" on the memory module Do not force the memory module into position. The memory module should be completely inserted into the slot NOTE For this ... when secured in Slot A. 16 Replace the memory module slot cover and secure it must be installed, it using the screw(s). 17 Re-insert the battery, if applicable. 52 Getting Started Adding memory (optional) latch latch (Sample Illustration) Pressing down on page 102. 18 Turn the computer right side up. Slot...
User Guide
Page 54
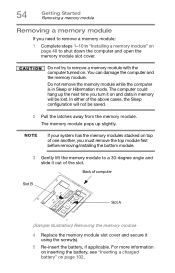
...be saved. 2 Pull the latches away from the memory module. For more information on inserting the battery, see "Inserting a charged battery" on top of computer Slot B Slot A (Sample Illustration) Removing the memory module 4 Replace the memory module slot cover and secure it using the screw(s). 5 ...Re-insert the battery, if applicable. Do not try to shut down the computer and open the memory module slot cover. 54 Getting Started Removing a memory module Removing a memory module If you must remove the top module first before removing/installing the bottom module. 3 ...
...be saved. 2 Pull the latches away from the memory module. For more information on inserting the battery, see "Inserting a charged battery" on top of computer Slot B Slot A (Sample Illustration) Removing the memory module 4 Replace the memory module slot cover and secure it using the screw(s). 5 ...Re-insert the battery, if applicable. Do not try to shut down the computer and open the memory module slot cover. 54 Getting Started Removing a memory module Removing a memory module If you must remove the top module first before removing/installing the bottom module. 3 ...

User Guide
Page 101
101 Mobile Computing Changing the main battery Removing the battery from the computer To remove the battery: 1 Save your work. 2 Turn off the computer, see "To Shut down your computer" on page 45. 3 Unplug and remove any cables connected to the computer, including the AC adaptor. 4 Close the display panel and turn the computer upside down. 5 Slide...
101 Mobile Computing Changing the main battery Removing the battery from the computer To remove the battery: 1 Save your work. 2 Turn off the computer, see "To Shut down your computer" on page 45. 3 Unplug and remove any cables connected to the computer, including the AC adaptor. 4 Close the display panel and turn the computer upside down. 5 Slide...
User Guide
Page 103
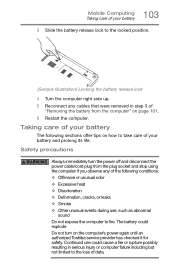
...the computer's power again until an authorized Toshiba service provider has checked it for safety. The battery could cause a fire or rupture possibly resulting in step 3 of your battery and prolong its life. 103 Mobile Computing Taking care of your battery 3 Slide the battery release lock to the locked position. ... Reconnect any of the following sections offer tips on how to take care of "Removing the battery from the plug socket and stop using the computer if you observe any cables that were removed in serious injury or computer failure including but not limited to the loss of data...
...the computer's power again until an authorized Toshiba service provider has checked it for safety. The battery could cause a fire or rupture possibly resulting in step 3 of your battery and prolong its life. 103 Mobile Computing Taking care of your battery 3 Slide the battery release lock to the locked position. ... Reconnect any of the following sections offer tips on how to take care of "Removing the battery from the plug socket and stop using the computer if you observe any cables that were removed in serious injury or computer failure including but not limited to the loss of data...
User Guide
Page 104
... dispose of a computer by burning or by throwing it on page 19, or for complete information about Toshiba's recycling programs and initiatives, please visit http://us.toshiba.com/recycle. Disposing of your local government. Heat can cause a computer to explode and/or release caustic... will allow exposure to a heating apparatus (e.g., microwave oven). For more than one month, remove the battery pack (for models with applicable laws and regulations. For models with an accessible battery only). Certain models may possibly cause serious injury. Disposal of this computer in a cool dry...
... dispose of a computer by burning or by throwing it on page 19, or for complete information about Toshiba's recycling programs and initiatives, please visit http://us.toshiba.com/recycle. Disposing of your local government. Heat can cause a computer to explode and/or release caustic... will allow exposure to a heating apparatus (e.g., microwave oven). For more than one month, remove the battery pack (for models with applicable laws and regulations. For models with an accessible battery only). Certain models may possibly cause serious injury. Disposal of this computer in a cool dry...
User Guide
Page 142
... can connect to Support Online by going to Toshiba support at support.toshiba.com. See "Contacting Toshiba" on again. Leave the battery out of the computer. 3 If the specifications do match, contact Toshiba. Turn the computer off, insert the battery, turn the computer on . 142 If Something... indicates a power mismatch. If the specifications do not match, locate and use the AC adaptor that shipped with your computer has a removable battery, connect the AC adaptor to start. ❖ The operating system responds differently from the normal routine. ❖ The screen does not...
... can connect to Support Online by going to Toshiba support at support.toshiba.com. See "Contacting Toshiba" on again. Leave the battery out of the computer. 3 If the specifications do match, contact Toshiba. Turn the computer off, insert the battery, turn the computer on . 142 If Something... indicates a power mismatch. If the specifications do not match, locate and use the AC adaptor that shipped with your computer has a removable battery, connect the AC adaptor to start. ❖ The operating system responds differently from the normal routine. ❖ The screen does not...
User Guide
Page 149
... again. If you turn on page 101. The battery does not charge while the computer is charging. See "Removing the battery from the system batteries (battery and real-time clock (RTC) battery). If the battery light does not glow after 20 minutes, let the computer continue charging the battery for at least another 20 minutes before you think...
... again. If you turn on page 101. The battery does not charge while the computer is charging. See "Removing the battery from the system batteries (battery and real-time clock (RTC) battery). If the battery light does not glow after 20 minutes, let the computer continue charging the battery for at least another 20 minutes before you think...
User Guide
Page 155
... the AC adaptor cable are properly connected to the computer and refer to a power source and turned on the computer (for example, if the battery is dirty. Close the tray carefully, making sure it clicks into place. Pencil lead can interfere with a clean cloth dipped in the small hole... next to remove a disc and cannot turn on . If the optical disc drive is closed properly. Make sure the computer is connected to the documentation that the ...
... the AC adaptor cable are properly connected to the computer and refer to a power source and turned on the computer (for example, if the battery is dirty. Close the tray carefully, making sure it clicks into place. Pencil lead can interfere with a clean cloth dipped in the small hole... next to remove a disc and cannot turn on . If the optical disc drive is closed properly. Make sure the computer is connected to the documentation that the ...
User Guide
Page 183
HDMI (High-Definition Multimedia Interface)-An interface used for voltages in the circuit. Hibernation-A feature of many Toshiba computers that are removable. When you turn on the keyboard. Hard disks hold much more information than analog signal. Compare software. function keys-The ...the computer is connected to which certain keys in combination with the Fn key can set system options or control system parameters, such as the battery save mode. (2) A key or combination of an electric circuit are connected. It has a potential of zero (0) volts, is running and...
HDMI (High-Definition Multimedia Interface)-An interface used for voltages in the circuit. Hibernation-A feature of many Toshiba computers that are removable. When you turn on the keyboard. Hard disks hold much more information than analog signal. Compare software. function keys-The ...the computer is connected to which certain keys in combination with the Fn key can set system options or control system parameters, such as the battery save mode. (2) A key or combination of an electric circuit are connected. It has a potential of zero (0) volts, is running and...
User Guide
Page 190
... 82 App, starting from Start screen 83 apps starting from Start screen 83 audio features 113 B backing up files 78, 84 Backlit keyboard 80 battery 190 battery life 91 Call2Recycle™ 106 care 103, 104 changing 100 charge indicator light 42 charge time 92 charger 92 charging 42, 92 charging the real... charge 96 maintaining 104 maximum capacity 91 monitoring power 42, 94 power management 92 power options 96 real-time clock (RTC) 92 recharge time 91 removing 101
... 82 App, starting from Start screen 83 apps starting from Start screen 83 audio features 113 B backing up files 78, 84 Backlit keyboard 80 battery 190 battery life 91 Call2Recycle™ 106 care 103, 104 changing 100 charge indicator light 42 charge time 92 charger 92 charging 42, 92 charging the real... charge 96 maintaining 104 maximum capacity 91 monitoring power 42, 94 power management 92 power options 96 real-time clock (RTC) 92 recharge time 91 removing 101
User Guide
Page 192
192 Index display, external adjusting 73 disposal information 19 disposing of used batteries 105 disposing of your computer 104 documentation 30 DVD removing with computer off 89 removing with computer on 88 DVD player troubleshooting 159 DVDs using 84 E eco power plan 99 eco Utility® 123 eject button ... Shut down 45, 46, 49, 148 Initial setup using your computer for the first time 43 installation memory module 48 installing a charged battery 102 memory modules 47 internal storage drive recovery 56 K keyboard function keys 80 special Windows® keys 80 troubleshooting 150 using 79 keys ...
192 Index display, external adjusting 73 disposal information 19 disposing of used batteries 105 disposing of your computer 104 documentation 30 DVD removing with computer off 89 removing with computer on 88 DVD player troubleshooting 159 DVDs using 84 E eco power plan 99 eco Utility® 123 eject button ... Shut down 45, 46, 49, 148 Initial setup using your computer for the first time 43 installation memory module 48 installing a charged battery 102 memory modules 47 internal storage drive recovery 56 K keyboard function keys 80 special Windows® keys 80 troubleshooting 150 using 79 keys ...
User Guide
Page 193
... installation 48 inserting into socket 51 removing 54 microphone using 113 monitor connecting 72 monitor problems troubleshooting 151 monitoring battery power 94 mouse properties 82 moving the computer 75 N network accessing 113 connecting your computer 113 networking wireless 112 notification area 111 notifications 111 O online resources Toshiba 89 optical disc Auto-Run feature...
... installation 48 inserting into socket 51 removing 54 microphone using 113 monitor connecting 72 monitor problems troubleshooting 151 monitoring battery power 94 mouse properties 82 moving the computer 75 N network accessing 113 connecting your computer 113 networking wireless 112 notification area 111 notifications 111 O online resources Toshiba 89 optical disc Auto-Run feature...
User Guide
Page 194
... plan options 98 power saving options 97 precautions safety 37 printer troubleshooting 156 problem solving contacting Toshiba 167 Startup options 143 projector connecting 72 R real-time clock (RTC) battery 92 recording sounds 113 recovery creating recovery media 57 installing drivers and applications 66 internal storage ...137 recycle bin icon 110 refresh your PC with user's data 61 registering computer 44 removing an optical disc with computer on 88 and optical disc with computer off 89 battery from the computer 101 memory module 54 restart computer 45 restore points troubleshooting 161 running...
... plan options 98 power saving options 97 precautions safety 37 printer troubleshooting 156 problem solving contacting Toshiba 167 Startup options 143 projector connecting 72 R real-time clock (RTC) battery 92 recording sounds 113 recovery creating recovery media 57 installing drivers and applications 66 internal storage ...137 recycle bin icon 110 refresh your PC with user's data 61 registering computer 44 removing an optical disc with computer on 88 and optical disc with computer off 89 battery from the computer 101 memory module 54 restart computer 45 restore points troubleshooting 161 running...


