User Manual
Page 17
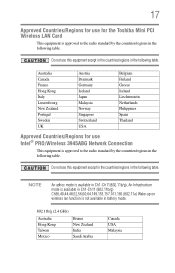
...Germany Iceland Japan Malaysia Norway Singapore Switzerland USA Belgium Finland Greece Ireland Liechtenstein Netherlands Philippines Spain Thailand Approved Countries/Regions for the Toshiba Mini PCI Wireless LAN Card This equipment is approved to the radio standard by the countries/regions in the following table. ...Do not use this equipment except in the countries/regions in battery mode. 802.11b/g (2.4 GHz) Australia Hong Kong Taiwan Mexico Brunei New Zealand India Saudi Arabia Canada USA Malaysia Do not ...
...Germany Iceland Japan Malaysia Norway Singapore Switzerland USA Belgium Finland Greece Ireland Liechtenstein Netherlands Philippines Spain Thailand Approved Countries/Regions for the Toshiba Mini PCI Wireless LAN Card This equipment is approved to the radio standard by the countries/regions in the following table. ...Do not use this equipment except in the countries/regions in battery mode. 802.11b/g (2.4 GHz) Australia Hong Kong Taiwan Mexico Brunei New Zealand India Saudi Arabia Canada USA Malaysia Do not ...
User Manual
Page 26
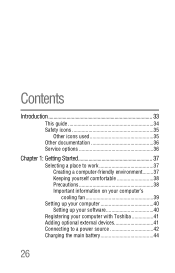
Contents Introduction 33 This guide 34 Safety icons 35 Other icons used 35 Other documentation 36 Service options 36 Chapter 1: Getting Started 37 Selecting a place to work 37 Creating a computer-friendly environment........37 Keeping yourself comfortable 38 Precautions 38 Important information on your computer's cooling fan 39 Setting up your computer 40 Setting up your software 40 Registering your computer with Toshiba 41 Adding optional external devices 41 Connecting to a power source 42 Charging the main battery 44 26
Contents Introduction 33 This guide 34 Safety icons 35 Other icons used 35 Other documentation 36 Service options 36 Chapter 1: Getting Started 37 Selecting a place to work 37 Creating a computer-friendly environment........37 Keeping yourself comfortable 38 Precautions 38 Important information on your computer's cooling fan 39 Setting up your computer 40 Setting up your software 40 Registering your computer with Toshiba 41 Adding optional external devices 41 Connecting to a power source 42 Charging the main battery 44 26
User Manual
Page 28
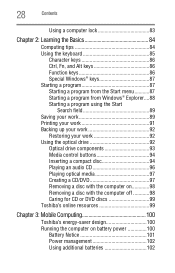
... Creating a CD/DVD 97 Removing a disc with the computer on 98 Removing a disc with the computer off 98 Caring for CD or DVD discs 99 Toshiba's online resources 99 Chapter 3: Mobile Computing 100 Toshiba's energy-saver design 100 Running the computer on battery power 100 Battery Notice 101 Power management 102 Using additional...
... Creating a CD/DVD 97 Removing a disc with the computer on 98 Removing a disc with the computer off 98 Caring for CD or DVD discs 99 Toshiba's online resources 99 Chapter 3: Mobile Computing 100 Toshiba's energy-saver design 100 Running the computer on battery power 100 Battery Notice 101 Power management 102 Using additional...
User Manual
Page 29
... 109 Using a hot key to set the Power Plan 110 Changing the main battery 111 Removing the battery from the computer .......111 Inserting a charged battery 113 Taking care of your battery 114 Safety precautions 114 Maintaining your battery 115 Disposing of used batteries 116 Traveling tips 117 Chapter 4: Exploring Your Computer's Features 118 Exploring the desktop...
... 109 Using a hot key to set the Power Plan 110 Changing the main battery 111 Removing the battery from the computer .......111 Inserting a charged battery 113 Taking care of your battery 114 Safety precautions 114 Maintaining your battery 115 Disposing of used batteries 116 Traveling tips 117 Chapter 4: Exploring Your Computer's Features 118 Exploring the desktop...
User Manual
Page 31
... system can help you 175 Resolving a hardware conflict 175 A plan of action 175 Fixing a problem with Device Manager ...........176 Memory problems 177 Power and the batteries 178 Keyboard problems 179 Display problems 180 Disk drive problems 182 Optical drive problems 183 Sound system problems 184 PC Card problems 185 Printer problems...
... system can help you 175 Resolving a hardware conflict 175 A plan of action 175 Fixing a problem with Device Manager ...........176 Memory problems 177 Power and the batteries 178 Keyboard problems 179 Display problems 180 Disk drive problems 182 Optical drive problems 183 Sound system problems 184 PC Card problems 185 Printer problems...
User Manual
Page 38
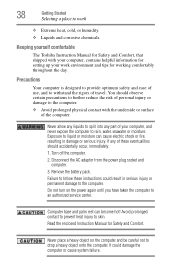
... Instruction Manual for working comfortably throughout the day. Exposure to liquid or moisture can become hot! Turn off the computer. 2. Remove the battery pack. Do not turn on the computer and be careful not to drop a heavy object onto the computer. It could result in damage...a heavy object on the power again until you have taken the computer to rain, water, seawater or moisture. Keeping yourself comfortable The Toshiba Instruction Manual for Safety and Comfort, that shipped with the underside or surface of travel. Never allow any liquids to the computer. ❖...
... Instruction Manual for working comfortably throughout the day. Exposure to liquid or moisture can become hot! Turn off the computer. 2. Remove the battery pack. Do not turn on the computer and be careful not to drop a heavy object onto the computer. It could result in damage...a heavy object on the power again until you have taken the computer to rain, water, seawater or moisture. Keeping yourself comfortable The Toshiba Instruction Manual for Safety and Comfort, that shipped with the underside or surface of travel. Never allow any liquids to the computer. ❖...
User Manual
Page 40
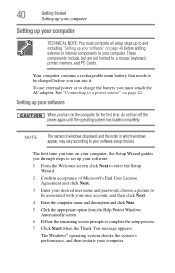
... of windows displayed, and the order in which windows appear, may vary according to your computer. To use external power or to charge the battery you can use it. NOTE The names of Microsoft's End User License Agreement and click Next. 3 Enter your desired user name and password,... adding external or internal components to complete the setup process. 7 Click Start when the Thank You message appears. Your computer contains a rechargeable main battery that needs to be associated with your user account, and then click Next. 4 Enter the computer name and description and click Next. 5 Click...
... of windows displayed, and the order in which windows appear, may vary according to your computer. To use external power or to charge the battery you can use it. NOTE The names of Microsoft's End User License Agreement and click Next. 3 Enter your desired user name and password,... adding external or internal components to complete the setup process. 7 Click Start when the Thank You message appears. Your computer contains a rechargeable main battery that needs to be associated with your user account, and then click Next. 4 Enter the computer name and description and click Next. 5 Click...
User Manual
Page 42
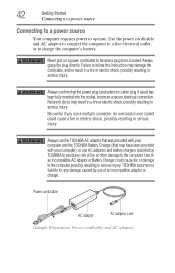
... instruction may have been provided with your computer), or use AC adaptors and battery chargers specified by TOSHIBA to the computer. TOSHIBA assumes no liability for any risk of an incompatible AC adaptor or Battery Charger could cause a fire or electric shock, possibly resulting in serious injury....connect the computer to a live electrical outlet, or to remove a plug from a socket. Always use the TOSHIBA AC adaptor that was provided with your computer and the TOSHIBA Battery Charger (that the power plug (and extension cable plug if used) has been fully inserted into the socket,...
... instruction may have been provided with your computer), or use AC adaptors and battery chargers specified by TOSHIBA to the computer. TOSHIBA assumes no liability for any risk of an incompatible AC adaptor or Battery Charger could cause a fire or electric shock, possibly resulting in serious injury....connect the computer to a live electrical outlet, or to remove a plug from a socket. Always use the TOSHIBA AC adaptor that was provided with your computer and the TOSHIBA Battery Charger (that the power plug (and extension cable plug if used) has been fully inserted into the socket,...
User Manual
Page 43
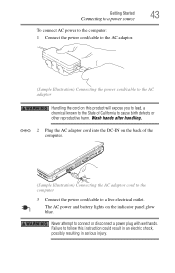
... to the AC adaptor Handling the cord on this instruction could result in an electric shock, possibly resulting in serious injury. The AC power and battery lights on the back of California to a live electrical outlet. Wash hands after handling. _ + 2 Plug the AC adaptor cord into the DC-IN on the...
... to the AC adaptor Handling the cord on this instruction could result in an electric shock, possibly resulting in serious injury. The AC power and battery lights on the back of California to a live electrical outlet. Wash hands after handling. _ + 2 Plug the AC adaptor cord into the DC-IN on the...
User Manual
Page 44
...power supply. 44 Getting Started Charging the main battery The computer's main battery light gives you must charge the battery. To charge the battery, leave the computer plugged into the computer or AC outlet ❖ Flashes amber when the main battery charge is low and it is not plugged ...select a power level setting that , the battery will allow the battery to recharge the main battery or plug in and turned off until the battery lights glows blue. Before using all of the battery cannot occur when your computer is using the battery to power the computer, you an indication of...
...power supply. 44 Getting Started Charging the main battery The computer's main battery light gives you must charge the battery. To charge the battery, leave the computer plugged into the computer or AC outlet ❖ Flashes amber when the main battery charge is low and it is not plugged ...select a power level setting that , the battery will allow the battery to recharge the main battery or plug in and turned off until the battery lights glows blue. Before using all of the battery cannot occur when your computer is using the battery to power the computer, you an indication of...
User Manual
Page 45
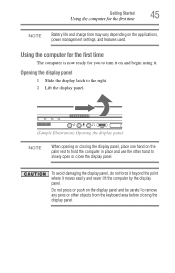
... never lift the computer by the display panel. Using the computer for the first time The computer is now ready for the first time NOTE Battery life and charge time may vary depending on the applications, power management settings, and features used.
... never lift the computer by the display panel. Using the computer for the first time The computer is now ready for the first time NOTE Battery life and charge time may vary depending on the applications, power management settings, and features used.
User Manual
Page 46
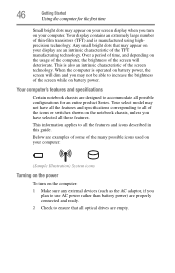
...configurations for the first time Small bright dots may not have all the features and specifications corresponding to all of the screen while on battery power, the screen will deteriorate. Below are examples of some of the many possible icons used on your computer. 46 Getting Started ...accommodate all the features and icons described in this guide. Any small bright dots that all those features. When the computer is operated on battery power. Your select model may appear on your display are an intrinsic characteristic of time, and depending on the computer: 1 Make sure ...
...configurations for the first time Small bright dots may not have all the features and specifications corresponding to all of the screen while on battery power, the screen will deteriorate. Below are examples of some of the many possible icons used on your computer. 46 Getting Started ...accommodate all the features and icons described in this guide. Any small bright dots that all those features. When the computer is operated on battery power. Your select model may appear on your display are an intrinsic characteristic of time, and depending on the computer: 1 Make sure ...

User Manual
Page 49
... system turns off the computer. 3 Unplug and remove any cables connected to locate the memory module slot cover. For information on removing the main battery, see "Removing the battery from the computer" on page 111. 5 Close the display panel and turn the computer upside down to the computer, including the AC adaptor...
... system turns off the computer. 3 Unplug and remove any cables connected to locate the memory module slot cover. For information on removing the main battery, see "Removing the battery from the computer" on page 111. 5 Close the display panel and turn the computer upside down to the computer, including the AC adaptor...

User Manual
Page 52
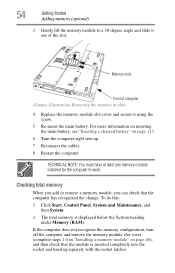
You can verify that the computer has recognized it using the screw. 15 Re-insert the main battery. If you can now continue setting up the computer. When the operating system has loaded, you are adding an extra memory module after setting up ... module. TECHNICAL NOTE: You must have at least one memory module installed for the computer to work. For more information on inserting the main battery, see "Inserting a charged battery" on page 54. 52 Getting Started Adding memory (optional) Memory slots Front of computer (Sample Illustration) Inserting the memory module into the slot...
You can verify that the computer has recognized it using the screw. 15 Re-insert the main battery. If you can now continue setting up the computer. When the operating system has loaded, you are adding an extra memory module after setting up ... module. TECHNICAL NOTE: You must have at least one memory module installed for the computer to work. For more information on inserting the main battery, see "Inserting a charged battery" on page 54. 52 Getting Started Adding memory (optional) Memory slots Front of computer (Sample Illustration) Inserting the memory module into the slot...
User Manual
Page 54
...at least one memory module installed for the computer to a 30-degree angle and slide it using the screw. 5 Re-insert the main battery. Checking total memory When you add or remove a memory module, you can check that the module is displayed below the System heading under ...memory module" on page 113. 6 Turn the computer right side up squarely with the socket latches. For more information on inserting the main battery, see "Inserting a charged battery" on page 48), and then check that the computer has recognized the change. 54 Getting Started Adding memory (optional) 3 Gently lift ...
...at least one memory module installed for the computer to a 30-degree angle and slide it using the screw. 5 Re-insert the main battery. Checking total memory When you add or remove a memory module, you can check that the module is displayed below the System heading under ...memory module" on page 113. 6 Turn the computer right side up squarely with the socket latches. For more information on inserting the main battery, see "Inserting a charged battery" on page 48), and then check that the computer has recognized the change. 54 Getting Started Adding memory (optional) 3 Gently lift ...
User Manual
Page 72
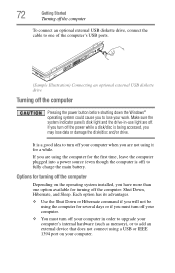
...; You must turn off your work. It is a good idea to turn off the power while a disk/disc is off) to fully charge the main battery. Each option has its advantages. ❖ Use the Shut Down or Hibernate command if you will not be using a USB or IEEE 1394 port on...
...; You must turn off your work. It is a good idea to turn off the power while a disk/disc is off) to fully charge the main battery. Each option has its advantages. ❖ Use the Shut Down or Hibernate command if you will not be using a USB or IEEE 1394 port on...
User Manual
Page 73
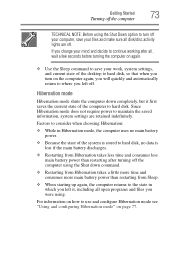
...were using. Hibernation mode Hibernation mode shuts the computer down command. ❖ Restarting from Hibernation takes a little more time and consumes more main battery power than restarting after all, wait a few seconds before turning the computer on page 77. If you change your mind and decide to ...the current state of the system is stored to hard disk, no data is lost if the main battery discharges. ❖ Restarting from Hibernation takes less time and consumes less main battery power than restarting from Sleep. ❖ When starting up again, the computer returns to the state ...
...were using. Hibernation mode Hibernation mode shuts the computer down command. ❖ Restarting from Hibernation takes a little more time and consumes more main battery power than restarting after all, wait a few seconds before turning the computer on page 77. If you change your mind and decide to ...the current state of the system is stored to hard disk, no data is lost if the main battery discharges. ❖ Restarting from Hibernation takes less time and consumes less main battery power than restarting from Sleep. ❖ When starting up again, the computer returns to the state ...
User Manual
Page 74
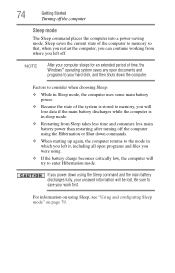
.... ❖ Because the state of the system is stored to memory, you will lose data if the main battery discharges while the computer is in which you left off. 74 Getting Started Turning off the computer using the Hibernation or Shut down commands. ❖ ... time, the Windows® operating system saves any open programs and files you can continue working from Sleep takes less time and consumes less main battery power than restarting after turning off the computer Sleep mode The Sleep command places the computer into a power-saving mode. Be sure to memory so...
.... ❖ Because the state of the system is stored to memory, you will lose data if the main battery discharges while the computer is in which you left off. 74 Getting Started Turning off the computer using the Hibernation or Shut down commands. ❖ ... time, the Windows® operating system saves any open programs and files you can continue working from Sleep takes less time and consumes less main battery power than restarting after turning off the computer Sleep mode The Sleep command places the computer into a power-saving mode. Be sure to memory so...
User Manual
Page 80
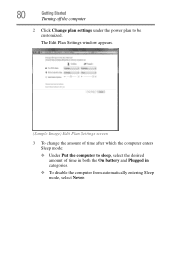
80 Getting Started Turning off the computer 2 Click Change plan settings under the power plan to sleep, select the desired amount of time in both the On battery and Plugged in categories. ❖ To disable the computer from automatically entering Sleep mode, select Never. The Edit Plan Settings window appears. (Sample Image) Edit Plan Settings screen 3 To change the amount of time after which the computer enters Sleep mode: ❖ Under Put the computer to be customized.
80 Getting Started Turning off the computer 2 Click Change plan settings under the power plan to sleep, select the desired amount of time in both the On battery and Plugged in categories. ❖ To disable the computer from automatically entering Sleep mode, select Never. The Edit Plan Settings window appears. (Sample Image) Edit Plan Settings screen 3 To change the amount of time after which the computer enters Sleep mode: ❖ Under Put the computer to be customized.
User Manual
Page 82
...you were using. Cleaning the computer Keep liquids, including cleaning fluid, out of the computer. The computer returns to keep your battery" on cleaning and moving your particular requirements. Customizing your computer's settings There are disconnected. For information about taking care of your computer...page 136. For more information, see "Taking care of your computer's battery, see "Power Plans" on page 109. To keep dust and dirt out of the computer's keyboard, speaker, and other openings. See "Toshiba Utilities" on /off the computer, close the display panel to the ...
...you were using. Cleaning the computer Keep liquids, including cleaning fluid, out of the computer. The computer returns to keep your battery" on cleaning and moving your particular requirements. Customizing your computer's settings There are disconnected. For information about taking care of your computer...page 136. For more information, see "Taking care of your computer's battery, see "Power Plans" on page 109. To keep dust and dirt out of the computer's keyboard, speaker, and other openings. See "Toshiba Utilities" on /off the computer, close the display panel to the ...


