
User Manual
Page 5
... state public utility commission, public service commission or corporation commission for repair or limited warranty information, please contact Toshiba Corporation, Toshiba America Information Systems, Inc. If Problems Arise If this equipment, for information. Connection to the telephone network, the telephone company will notify the customer as soon as possible. In order to make any message unless such message clearly contains in...
... state public utility commission, public service commission or corporation commission for repair or limited warranty information, please contact Toshiba Corporation, Toshiba America Information Systems, Inc. If Problems Arise If this equipment, for information. Connection to the telephone network, the telephone company will notify the customer as soon as possible. In order to make any message unless such message clearly contains in...

User Manual
Page 27
... Opening the display panel 51 Your computer's features and specifications ....52 Turning on the power 52 Adding memory (optional 53 Installing a memory module 54 Removing a memory module 59 Using the Dual Mode Pad 61 Scrolling with the Dual Mode Pad 62 Using the Control buttons 63 Using Tap Zones 63 Using the Virtual Buttons 63 Disabling or enabling the Dual Mode Pad .........65 Using external display devices 65 Directing the display output when you turn on the computer 66 Adjusting the quality of the external display......68 Using an external keyboard 68 Using a mouse...
... Opening the display panel 51 Your computer's features and specifications ....52 Turning on the power 52 Adding memory (optional 53 Installing a memory module 54 Removing a memory module 59 Using the Dual Mode Pad 61 Scrolling with the Dual Mode Pad 62 Using the Control buttons 63 Using Tap Zones 63 Using the Virtual Buttons 63 Disabling or enabling the Dual Mode Pad .........65 Using external display devices 65 Directing the display output when you turn on the computer 66 Adjusting the quality of the external display......68 Using an external keyboard 68 Using a mouse...
User Manual
Page 30
... 139 Removing an ExpressCard 140 Using the Bridge Media Adapter Slot 140 Inserting memory media 141 Removing memory media 141 Chapter 5: Toshiba Utilities 143 TOSHIBA Assist 144 Connect 145 Secure 145 Protect & Fix 146 Optimize 147 TOSHIBA SD™ Memory Card Format Utility .........148 Setting passwords 149 Using an instant password 149 Using a supervisor or user password 150 TOSHIBA Password Utility 152 PC Diagnostic Tool Utility 154 TOSHIBA Hotkey Utility 155 Mouse Utility 156 TOSHIBA Hardware Setup 157 TOSHIBA Zooming Utility 159 CD/DVD Drive Acoustic Silencer...
... 139 Removing an ExpressCard 140 Using the Bridge Media Adapter Slot 140 Inserting memory media 141 Removing memory media 141 Chapter 5: Toshiba Utilities 143 TOSHIBA Assist 144 Connect 145 Secure 145 Protect & Fix 146 Optimize 147 TOSHIBA SD™ Memory Card Format Utility .........148 Setting passwords 149 Using an instant password 149 Using a supervisor or user password 150 TOSHIBA Password Utility 152 PC Diagnostic Tool Utility 154 TOSHIBA Hotkey Utility 155 Mouse Utility 156 TOSHIBA Hardware Setup 157 TOSHIBA Zooming Utility 159 CD/DVD Drive Acoustic Silencer...

User Manual
Page 46
...; Add more memory (see "Adding memory (optional)" on page 53). ❖ Connect a mouse (see "Using a mouse" on page 68). ❖ Connect a full-size keyboard (see "Using an external keyboard" on page 68). ❖ Connect an external monitor (see "Using external display devices" on page 65). ❖ Connect a local printer (see "Connecting a printer" on page 69). ❖ Connect an external CD/DVD drive (see "Using the Optical Drive" on page 92). ❖ Install PC Cards (see "Using PC Cards" on page 44...
...; Add more memory (see "Adding memory (optional)" on page 53). ❖ Connect a mouse (see "Using a mouse" on page 68). ❖ Connect a full-size keyboard (see "Using an external keyboard" on page 68). ❖ Connect an external monitor (see "Using external display devices" on page 65). ❖ Connect a local printer (see "Connecting a printer" on page 69). ❖ Connect an external CD/DVD drive (see "Using the Optical Drive" on page 92). ❖ Install PC Cards (see "Using PC Cards" on page 44...
User Manual
Page 54
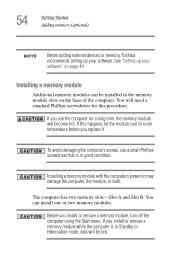
... Getting Started Adding memory (optional) NOTE Before adding external devices or memory, Toshiba recommends setting up your software. Installing a memory module with the computer's power on page 44. If you use a small Phillips screwdriver that is in Standby or Hibernation mode, data will become hot. See "Setting up your software" on may damage the computer, the module, or both. If you install or remove a memory module while the computer is in the memory module slots on...
... Getting Started Adding memory (optional) NOTE Before adding external devices or memory, Toshiba recommends setting up your software. Installing a memory module with the computer's power on page 44. If you use a small Phillips screwdriver that is in Standby or Hibernation mode, data will become hot. See "Setting up your software" on may damage the computer, the module, or both. If you install or remove a memory module while the computer is in the memory module slots on...
User Manual
Page 56
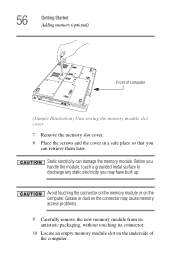
... cause memory access problems. 9 Carefully remove the new memory module from its antistatic packaging, without touching its connector. 10 Locate an empty memory module slot on the computer. Avoid touching the connector on the memory module or on the underside of computer (Sample Illustration) Unscrewing the memory module slot cover 7 Remove the memory slot cover. 8 Place the screws and the cover in a safe place so that you may have built up. 56 Getting Started Adding memory (optional) Front...
... cause memory access problems. 9 Carefully remove the new memory module from its antistatic packaging, without touching its connector. 10 Locate an empty memory module slot on the computer. Avoid touching the connector on the memory module or on the underside of computer (Sample Illustration) Unscrewing the memory module slot cover 7 Remove the memory slot cover. 8 Place the screws and the cover in a safe place so that you may have built up. 56 Getting Started Adding memory (optional) Front...
User Manual
Page 59
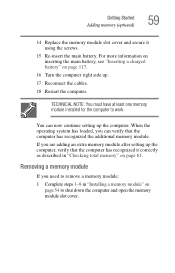
... main battery. Getting Started Adding memory (optional) 59 14 Replace the memory module slot cover and secure it correctly as described in "Installing a memory module" on page 117. 16 Turn the computer right side up. 17 Reconnect the cables. 18 Restart the computer. When the operating system has loaded, you can now continue setting up the computer, verify that the computer has recognized the additional memory module. Removing a memory module If...
... main battery. Getting Started Adding memory (optional) 59 14 Replace the memory module slot cover and secure it correctly as described in "Installing a memory module" on page 117. 16 Turn the computer right side up. 17 Reconnect the cables. 18 Restart the computer. When the operating system has loaded, you can now continue setting up the computer, verify that the computer has recognized the additional memory module. Removing a memory module If...
User Manual
Page 61
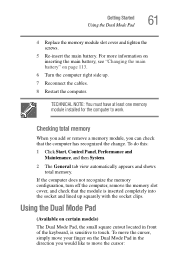
... on inserting the main battery, see "Changing the main battery" on certain models) The Dual Mode Pad, the small square cutout located in the direction you can check that the module is sensitive to work. Getting Started Using the Dual Mode Pad 61 4 Replace the memory module slot cover and tighten the screws. 5 Re-insert the main battery. TECHNICAL NOTE: You must have at least one memory module installed for the computer...
... on inserting the main battery, see "Changing the main battery" on certain models) The Dual Mode Pad, the small square cutout located in the direction you can check that the module is sensitive to work. Getting Started Using the Dual Mode Pad 61 4 Replace the memory module slot cover and tighten the screws. 5 Re-insert the main battery. TECHNICAL NOTE: You must have at least one memory module installed for the computer...

User Manual
Page 65
... (monitor) port. NOTE The Fn + F9 shortcut can also connect an external display device to disable or enable the Dual Mode Pad (see "Disabling or enabling the Dual Mode Pad" on page 227). The TouchPad ON/OFF tab appears. 5 Select Disable or Enable, whichever is enabled by default. The Control Panel window appears. 2 Click Printers and Other Hardware. 3 Click Mouse Properties. The Mouse Properties window appears. 4 Click the TouchPad ON/OFF tab. Getting Started Using external display devices 65 Disabling or enabling the Dual Mode Pad...
... (monitor) port. NOTE The Fn + F9 shortcut can also connect an external display device to disable or enable the Dual Mode Pad (see "Disabling or enabling the Dual Mode Pad" on page 227). The TouchPad ON/OFF tab appears. 5 Select Disable or Enable, whichever is enabled by default. The Control Panel window appears. 2 Click Printers and Other Hardware. 3 Click Mouse Properties. The Mouse Properties window appears. 4 Click the TouchPad ON/OFF tab. Getting Started Using external display devices 65 Disabling or enabling the Dual Mode Pad...
User Manual
Page 84
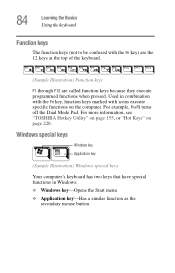
... the top of the keyboard. (Sample Illustration) Function keys F1 through F12 are called function keys because they execute programmed functions when pressed. 84 Learning the Basics Using the keyboard Function keys The function keys (not to be confused with icons execute specific functions on page 220. For example, Fn+F9 turns off the Dual Mode Pad. Used in Windows: ❖ Windows key-Opens the Start menu ❖ Application key-Has a similar function as the secondary mouse button
... the top of the keyboard. (Sample Illustration) Function keys F1 through F12 are called function keys because they execute programmed functions when pressed. 84 Learning the Basics Using the keyboard Function keys The function keys (not to be confused with icons execute specific functions on page 220. For example, Fn+F9 turns off the Dual Mode Pad. Used in Windows: ❖ Windows key-Opens the Start menu ❖ Application key-Has a similar function as the secondary mouse button
User Manual
Page 180
... computer is not accessing the hard disk or the optional external diskette drive." If you experience any key does not work routine, you can easily detect if the operating system is recommended that you change the system in the Startup menu to start after the Starting Windows XP message appears. ❖ The operating system takes a long time to fix the problem. Unless a hardware device has failed, problems usually occur when you...
... computer is not accessing the hard disk or the optional external diskette drive." If you experience any key does not work routine, you can easily detect if the operating system is recommended that you change the system in the Startup menu to start after the Starting Windows XP message appears. ❖ The operating system takes a long time to fix the problem. Unless a hardware device has failed, problems usually occur when you...
User Manual
Page 191
Click Start, Shut Down or Turn off computer, and Restart the computer using the Dual Mode Pad on . If no password is registered, press any key, type the password and press Enter. HINT: Holding the Fn key and pressing the F5 key several times will restart and recognize the device. If you have plugged the external keyboard in screen, make sure the display priority is not set for an external monitor. You...
Click Start, Shut Down or Turn off computer, and Restart the computer using the Dual Mode Pad on . If no password is registered, press any key, type the password and press Enter. HINT: Holding the Fn key and pressing the F5 key several times will restart and recognize the device. If you have plugged the external keyboard in screen, make sure the display priority is not set for an external monitor. You...
User Manual
Page 206
... High Color (16-bit). ❖ If it is set to High Color, change the settings to 24-bit color, there may be disabling the Windows XP wireless management facility, in which case you may be a video format error. For general problems playing a DVD title, try the following steps: 1 Verify that the disc is in the drive tray. 3 Ensure that vendor's support group for further advice.
... High Color (16-bit). ❖ If it is set to High Color, change the settings to 24-bit color, there may be disabling the Windows XP wireless management facility, in which case you may be a video format error. For general problems playing a DVD title, try the following steps: 1 Verify that the disc is in the drive tray. 3 Ensure that vendor's support group for further advice.
User Manual
Page 231
... your system) to access the screen saver option. For more detailed information on page 241. ❖ ConfigFree SUMMIT-The ConfigFree SUMMIT utility is used to devices. For more information, see "Profile Settings" on setting up ConfigFree. Click Options on page 245. Starting ConfigFree To start and set up and using ConfigFree, see "ConfigFree SUMMIT" on the Connectivity Doctor screen to open the TOSHIBA Assist, and then click...
... your system) to access the screen saver option. For more detailed information on page 241. ❖ ConfigFree SUMMIT-The ConfigFree SUMMIT utility is used to devices. For more information, see "Profile Settings" on setting up ConfigFree. Click Options on page 245. Starting ConfigFree To start and set up and using ConfigFree, see "ConfigFree SUMMIT" on the Connectivity Doctor screen to open the TOSHIBA Assist, and then click...
User Manual
Page 262
...'s main memory. Also called "system bus." When you turn on the keyboard. Formatting creates a structure on the disk so the operating system can set system options or control system parameters, such as drive C. A feature of many Toshiba notebook computers that saves to add or remove devices from it was when the computer was turned off . frontside bus - See also bus. The ability to the hard disk the current...
...'s main memory. Also called "system bus." When you turn on the keyboard. Formatting creates a structure on the disk so the operating system can set system options or control system parameters, such as drive C. A feature of many Toshiba notebook computers that saves to add or remove devices from it was when the computer was turned off . frontside bus - See also bus. The ability to the hard disk the current...

User Manual
Page 269
... memory 53 adding external devices 46 adding memory 53 adjusting recording quality 134 Alt keys 83 audio .wav files 133 audio features 133 Auto-Run 97 B backing up files 82 battery changing 113 charge indicator light 106 charge not lasting 189 charging 50 conserving power 111 disposal 118 low charge 109 monitoring power 106 not charging 188 power schemes hot key 113 power usage mode 223 real-time clock (RTC) 103 removing 114 BIOS Setup see TOSHIBA Hardware Setup Bridge Media slot 140 button power...
... memory 53 adding external devices 46 adding memory 53 adjusting recording quality 134 Alt keys 83 audio .wav files 133 audio features 133 Auto-Run 97 B backing up files 82 battery changing 113 charge indicator light 106 charge not lasting 189 charging 50 conserving power 111 disposal 118 low charge 109 monitoring power 106 not charging 188 power schemes hot key 113 power usage mode 223 real-time clock (RTC) 103 removing 114 BIOS Setup see TOSHIBA Hardware Setup Bridge Media slot 140 button power...
User Manual
Page 270
... diskette drive cannot insert a diskette 195 cannot read a diskette 195 connecting 71 external, connecting 71 display does not look normal/flickers 192 external monitor not working 193 screen is blank 191 display device external 65 display output settings 66 display, external adjusting 68 disposal information 25 disposing of used batteries 118 DMA (Direct Memory Access) 184 double-click 63 drive in-use indicator light 93 Drive light 42 Drive-in-use light 72 DVD player general problems 206 Optical Drive problems 196 troubleshooting 196 DVI video port...
... diskette drive cannot insert a diskette 195 cannot read a diskette 195 connecting 71 external, connecting 71 display does not look normal/flickers 192 external monitor not working 193 screen is blank 191 display device external 65 display output settings 66 display, external adjusting 68 disposal information 25 disposing of used batteries 118 DMA (Direct Memory Access) 184 double-click 63 drive in-use indicator light 93 Drive light 42 Drive-in-use light 72 DVD player general problems 206 Optical Drive problems 196 troubleshooting 196 DVI video port...

User Manual
Page 271
... working 193 mouse 68 external devices 46 external diskette drive connecting 71 external display, adjusting 68 F FAT (File Allocation Table) 194 FCC Notice "Declaration of Conformity Information" 3 FCC requirements 4 file extensions 90 file, backing up 82 files backing up 91 printing 90 restoring 92 saving 88 Fingerprint Authentication Utility 163 Fn keys 83 function keys 84 H hard disk light 72 hardware conflicts 183 resolving 185 headphones using 135 Help and Support Windows...
... working 193 mouse 68 external devices 46 external diskette drive connecting 71 external display, adjusting 68 F FAT (File Allocation Table) 194 FCC Notice "Declaration of Conformity Information" 3 FCC requirements 4 file extensions 90 file, backing up 82 files backing up 91 printing 90 restoring 92 saving 88 Fingerprint Authentication Utility 163 Fn keys 83 function keys 84 H hard disk light 72 hardware conflicts 183 resolving 185 headphones using 135 Help and Support Windows...

User Manual
Page 272
... working 179 troubleshooting 190 keyboard, external 68 keyboard, PS/2-compatible 68 L light drive in-use indicator 93 M main battery removing 114 Main battery light 49 memory adding 53 expansion slots 54 problem solving 187 removing expansion slot cover 56 memory module inserting 57 installation 54 removing 60 microphone 133 modem determining COM port 125 problem solving 202 resetting port to default settings 125 upgrading 125 modem default 125 monitor 65 connecting 66 not working 191 mouse installing 68 serial 68 N network 127 accessing 127 networking wireless 127 O opening the display panel...
... working 179 troubleshooting 190 keyboard, external 68 keyboard, PS/2-compatible 68 L light drive in-use indicator 93 M main battery removing 114 Main battery light 49 memory adding 53 expansion slots 54 problem solving 187 removing expansion slot cover 56 memory module inserting 57 installation 54 removing 60 microphone 133 modem determining COM port 125 problem solving 202 resetting port to default settings 125 upgrading 125 modem default 125 monitor 65 connecting 66 not working 191 mouse installing 68 serial 68 N network 127 accessing 127 networking wireless 127 O opening the display panel...

User Manual
Page 273
... power schemes hot key 113 power source 47 power usage modes 112 powering down using Standby 76, 77 precautions 40 primary button 63 printer local, connecting 69 problem solving 201 printing a file 90 problem solving AC power 188 accessing disk drives 179 battery charge does not last 189 battery not charging 188 cannot insert diskette in drive 195 cannot read a diskette 195 changing display properties 192 checking device properties 186 computer hangs when PC Card...
... power schemes hot key 113 power source 47 power usage modes 112 powering down using Standby 76, 77 precautions 40 primary button 63 printer local, connecting 69 problem solving 201 printing a file 90 problem solving AC power 188 accessing disk drives 179 battery charge does not last 189 battery not charging 188 cannot insert diskette in drive 195 cannot read a diskette 195 changing display properties 192 checking device properties 186 computer hangs when PC Card...


