
User Manual
Page 29
... the display panel 52 Your computer's features and specifications ....53 Turning on the power 54 Adding memory (optional 55 Installing a memory module 55 Removing a memory module 61 Using the TouchPad 63 Scrolling with the TouchPad 63 Control buttons 64 Disabling or enabling the TouchPad 64 Turning off the computer 65 Closing the...
... the display panel 52 Your computer's features and specifications ....53 Turning on the power 54 Adding memory (optional 55 Installing a memory module 55 Removing a memory module 61 Using the TouchPad 63 Scrolling with the TouchPad 63 Control buttons 64 Disabling or enabling the TouchPad 64 Turning off the computer 65 Closing the...

User Manual
Page 30
... 84 Printing your work 87 Using the DVD-ROM or multi-function drive...........88 DVD-ROM or multi-function drive components 88 CD/DVD control buttons 90 Inserting a compact disc 91 Removing a disc with the computer on 93 Removing a disc with the computer off 93 Caring for CD or DVD Discs... 93 Using PC Cards 94 Hot swapping 94 Using your computer at the office 95 Backing up your work 95 Restoring your work 96 Powering down the computer 96 Using Turn Off Computer or Shut Down ...........97 Using Hibernation 99 Using Standby 101...
... 84 Printing your work 87 Using the DVD-ROM or multi-function drive...........88 DVD-ROM or multi-function drive components 88 CD/DVD control buttons 90 Inserting a compact disc 91 Removing a disc with the computer on 93 Removing a disc with the computer off 93 Caring for CD or DVD Discs... 93 Using PC Cards 94 Hot swapping 94 Using your computer at the office 95 Backing up your work 95 Restoring your work 96 Powering down the computer 96 Using Turn Off Computer or Shut Down ...........97 Using Hibernation 99 Using Standby 101...

User Manual
Page 54
... ensure that all drives are examples of some of the many possible icons used on your computer: Sample system icons Turning on the power To turn off the power again until the on/off light on the system indicator panel glows blue-about one second. 54 Getting Started Using the computer for... any external devices (such as the AC adapter, if you turn on the computer for the first time Below are empty. 3 Press and hold the power button in until the operating system has loaded completely.
... ensure that all drives are examples of some of the many possible icons used on your computer: Sample system icons Turning on the power To turn off the power again until the on/off light on the system indicator panel glows blue-about one second. 54 Getting Started Using the computer for... any external devices (such as the AC adapter, if you turn on the computer for the first time Below are empty. 3 Press and hold the power button in until the operating system has loaded completely.

User Manual
Page 61
Removing a memory module If you need to shut down for at least ten seconds, then turn the power on page 55 to remove a memory module: 1 Complete steps 1-8 in Standby or Hibernation mode. Do...module. The memory module pops up when you turn it on, perform the following message appears when you turn on the power: Warning: Resume Failure Press Any Key To Continue If the computer hangs up slightly. 3 Gently lift the memory module ...open the memory module slot cover. In either of the slot. The following : Press the power button and hold it on and data in "Checking total memory" on .
Removing a memory module If you need to shut down for at least ten seconds, then turn the power on page 55 to remove a memory module: 1 Complete steps 1-8 in Standby or Hibernation mode. Do...module. The memory module pops up when you turn it on, perform the following message appears when you turn on the power: Warning: Resume Failure Press Any Key To Continue If the computer hangs up slightly. 3 Gently lift the memory module ...open the memory module slot cover. In either of the slot. The following : Press the power button and hold it on and data in "Checking total memory" on .

User Manual
Page 88
The CD/DVD control buttons are not available on AC power. The drive will automatically change to the left of the computer. DVD-ROM or multi-function drive components The DVD-ROM or multi-function drive ...
The CD/DVD control buttons are not available on AC power. The drive will automatically change to the left of the computer. DVD-ROM or multi-function drive components The DVD-ROM or multi-function drive ...
User Manual
Page 89
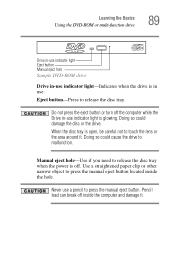
Do not press the eject button or turn off inside the hole. Never use a pencil to release the disc tray. When the... light is open, be careful not to malfunction. Manual eject hole-Use if you need to press the manual eject button located inside the computer and damage it . Learning the Basics Using the DVD-ROM or multi-function drive 89 Drive ...in-use indicator light Eject button Manual eject hole Sample DVD-ROM drive Drive in-use indicator light-Indicates when the drive is off. Use a straightened...
Do not press the eject button or turn off inside the hole. Never use a pencil to release the disc tray. When the... light is open, be careful not to malfunction. Manual eject hole-Use if you need to press the manual eject button located inside the computer and damage it . Learning the Basics Using the DVD-ROM or multi-function drive 89 Drive ...in-use indicator light Eject button Manual eject hole Sample DVD-ROM drive Drive in-use indicator light-Indicates when the drive is off. Use a straightened...
User Manual
Page 90
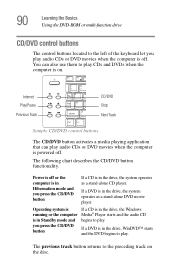
...following chart describes the CD/DVD button functionality. Power is off . Internet Play/Pause Previous Track CD/DVD Stop Next Track Sample CD/DVD control buttons The CD/DVD button activates a media playing application that can also use them to play CDs and DVDs when the computer is powered off. you press the CD/...DVD button If a DVD is in the drive, WinDVD™ starts and the DVD begins to play audio CDs or DVD movies when the computer is ...
...following chart describes the CD/DVD button functionality. Power is off . Internet Play/Pause Previous Track CD/DVD Stop Next Track Sample CD/DVD control buttons The CD/DVD button activates a media playing application that can also use them to play CDs and DVDs when the computer is powered off. you press the CD/...DVD button If a DVD is in the drive, WinDVD™ starts and the DVD begins to play audio CDs or DVD movies when the computer is ...

User Manual
Page 91
...insert a compact disc into the drive: 1 Make sure the computer is turned on. 2 Make sure the in-use indicator light is currently playing. The stop button stops a disc that is off . 4 Grasp the tray and pull it pause if currently playing. The disc tray slides partially out of the drive (about... drive. You can eject a disc when the computer is turned off and the sound subsystem is off . 3 Press the drive's eject button. The play/pause button starts playing the disc or makes it fully open if the computer's power is turned on, by pressing either the E key on the keyboard or the eject...
...insert a compact disc into the drive: 1 Make sure the computer is turned on. 2 Make sure the in-use indicator light is currently playing. The stop button stops a disc that is off . 4 Grasp the tray and pull it pause if currently playing. The disc tray slides partially out of the drive (about... drive. You can eject a disc when the computer is turned off and the sound subsystem is off . 3 Press the drive's eject button. The play/pause button starts playing the disc or makes it fully open if the computer's power is turned on, by pressing either the E key on the keyboard or the eject...

User Manual
Page 96
...again. If you change your hard disk, use light are off. Restoring your work . TECHNICAL NOTE: Before using any of these options to power down the Windows operating system could cause you to lose your work To restore information from : Turn Off (or Shut Down) Computer, Standby,..., wait a few seconds before turning the computer on diskettes if an optional external diskette drive is available. If you turn off . Powering down the computer NOTE Pushing the power button before shutting down your computer, save your operating system documentation for information on the hard disk.
...again. If you change your hard disk, use light are off. Restoring your work . TECHNICAL NOTE: Before using any of these options to power down the Windows operating system could cause you to lose your work To restore information from : Turn Off (or Shut Down) Computer, Standby,..., wait a few seconds before turning the computer on diskettes if an optional external diskette drive is available. If you turn off . Powering down the computer NOTE Pushing the power button before shutting down your computer, save your operating system documentation for information on the hard disk.

User Manual
Page 97
... Shut Down Windows dialog box appears. 2 Select Shut down from the drop-down the computer: 1 Click Start, select Turn off computer. Learning the Basics Powering down the computer 97 Using Turn Off Computer or Shut Down For the Windows XP Home operating system, follow these steps to shut down list.... 3 Click OK. NOTE Holding the Shift key while the Turn Off computer Windows dialog box is open, changes the Stand By button to "Using Hibernation" on page 99. For the Windows XP Professional operating system, follow these steps to shut down the computer: 1 Click the Start...
... Shut Down Windows dialog box appears. 2 Select Shut down from the drop-down the computer: 1 Click Start, select Turn off computer. Learning the Basics Powering down the computer 97 Using Turn Off Computer or Shut Down For the Windows XP Home operating system, follow these steps to shut down list.... 3 Click OK. NOTE Holding the Shift key while the Turn Off computer Windows dialog box is open, changes the Stand By button to "Using Hibernation" on page 99. For the Windows XP Professional operating system, follow these steps to shut down the computer: 1 Click the Start...

User Manual
Page 98
...Start, Control Panel, then click Performance and Maintenance. 2 Click the Toshiba Power Saver icon. 3 Click on the Setup Action tab. 4 Select the options you press the power button. 5 Click Apply. 6 Click OK. 98 Learning the Basics Powering down the computer Shutting down more quickly You can shut down when ...you want from the drop-down lists. ❖ When I press the power button Set this option to Shutdown to ...
...Start, Control Panel, then click Performance and Maintenance. 2 Click the Toshiba Power Saver icon. 3 Click on the Setup Action tab. 4 Select the options you press the power button. 5 Click Apply. 6 Click OK. 98 Learning the Basics Powering down the computer Shutting down more quickly You can shut down when ...you want from the drop-down lists. ❖ When I press the power button Set this option to Shutdown to ...
User Manual
Page 99
... up again, press the power button until the on/off light changes to start up again, Hibernation uses less time and battery power than does Turn off computer ❖ Restarting from Hibernation uses a little more information about the Power Saver utility, see "TOSHIBA Power Saver" on the hard disk... runs a self-test, loads the operating system, and then returns to the mode in Hibernation mode, the computer uses no battery power ❖ Because the mode of the computer to maintain the saved information, the system settings are retained indefinitely. Restoring information from the...
... up again, press the power button until the on/off light changes to start up again, Hibernation uses less time and battery power than does Turn off computer ❖ Restarting from Hibernation uses a little more information about the Power Saver utility, see "TOSHIBA Power Saver" on the hard disk... runs a self-test, loads the operating system, and then returns to the mode in Hibernation mode, the computer uses no battery power ❖ Because the mode of the computer to maintain the saved information, the system settings are retained indefinitely. Restoring information from the...

User Manual
Page 100
... Click Start, Control Panel, then click Performance and Maintenance. 2 Click the Toshiba Power Saver icon. 3 Click the Setup Action tab. 4 Select Hibernation for the options you want. ❖ When I press the power button Set this option to Hibernate so that the computer will go into Hibernation mode... when you press the power button. ❖ When I close the display panel. 5 Click Apply. 6 Click OK. The computer...
... Click Start, Control Panel, then click Performance and Maintenance. 2 Click the Toshiba Power Saver icon. 3 Click the Setup Action tab. 4 Select Hibernation for the options you want. ❖ When I press the power button Set this option to Hibernate so that the computer will go into Hibernation mode... when you press the power button. ❖ When I close the display panel. 5 Click Apply. 6 Click OK. The computer...
User Manual
Page 101
... Standby holds the current mode of the computer in Standby mode. ❖ Restarting from Standby uses less time and battery power than restarting from Hibernation mode, press the power button until the on/off light turns blue. Factors to eight hours in memory so that, when you restart the computer, you... Standby: ❖ While in which you left off. The computer returns to the mode in Standby mode, the computer uses some battery power. A fully charged main battery will be lost. Using Standby The Standby command puts the computer into a powersaving mode. NOTE If you...
... Standby holds the current mode of the computer in Standby mode. ❖ Restarting from Standby uses less time and battery power than restarting from Hibernation mode, press the power button until the on/off light turns blue. Factors to eight hours in memory so that, when you restart the computer, you... Standby: ❖ While in which you left off. The computer returns to the mode in Standby mode, the computer uses some battery power. A fully charged main battery will be lost. Using Standby The Standby command puts the computer into a powersaving mode. NOTE If you...

User Manual
Page 102
...Standby mode by either pressing the power button or closing the display panel. The computer saves the status of time after which the computer automatically goes into a low-power mode. To use any of these methods, you first need to enable them in Toshiba's Power Saver utility. 1 Click Start,... Control Panel, then click Performance and Maintenance. 2 Click the Toshiba Power Saver icon. 3 Click the Setup Action tab. 4...
...Standby mode by either pressing the power button or closing the display panel. The computer saves the status of time after which the computer automatically goes into a low-power mode. To use any of these methods, you first need to enable them in Toshiba's Power Saver utility. 1 Click Start,... Control Panel, then click Performance and Maintenance. 2 Click the Toshiba Power Saver icon. 3 Click the Setup Action tab. 4...

User Manual
Page 103
...help with future upgrades. The computer returns to the screen you can connect. 103 Learning the Basics Toshiba's online resources ❖ When I press the power button Set this option to Standby to put the computer into Standby mode when you up the computer ... provide information about the Power Saver utility, see "Contacting Toshiba" on page 157. NOTE For more information, see "TOSHIBA Power Saver" on page 209. Starting again from Standby mode, press the power button until the on/off light changes to blue. Toshiba's online resources Toshiba maintains a number of ...
...help with future upgrades. The computer returns to the screen you can connect. 103 Learning the Basics Toshiba's online resources ❖ When I press the power button Set this option to Standby to put the computer into Standby mode when you up the computer ... provide information about the Power Saver utility, see "Contacting Toshiba" on page 157. NOTE For more information, see "TOSHIBA Power Saver" on page 209. Starting again from Standby mode, press the power button until the on/off light changes to blue. Toshiba's online resources Toshiba maintains a number of ...

User Manual
Page 110
...the battery pack. When the on/off light ( ), and the power button light (above the keyboard). HINT: Be careful not to recharge the main battery or plug in the AC adapter. NOTE If the AC power light flashes amber during charging, either the battery pack is malfunctioning, or...confuse the battery light ( ), the on/ off light or power button light flashes amber, it indicates that the system is not receiving correct input from the AC power supply. NOTE Battery life and charge time may vary, depending upon power management settings, applications and features used. ❖ Flashes amber...
...the battery pack. When the on/off light ( ), and the power button light (above the keyboard). HINT: Be careful not to recharge the main battery or plug in the AC adapter. NOTE If the AC power light flashes amber during charging, either the battery pack is malfunctioning, or...confuse the battery light ( ), the on/ off light or power button light flashes amber, it indicates that the system is not receiving correct input from the AC power supply. NOTE Battery life and charge time may vary, depending upon power management settings, applications and features used. ❖ Flashes amber...

User Manual
Page 111
... and perform its calculations. 1 Click Start, Control Panel, Performance and Maintenance, and then Toshiba Power Saver. 2 Click the Toshiba Power Saver icon. 3 The Power Saver Properties window appears. 111 Mobile Computing Monitoring main battery power Power button On/off light Battery light Determining remaining battery power NOTE Wait at least 16 seconds after turning on the left side of...
... and perform its calculations. 1 Click Start, Control Panel, Performance and Maintenance, and then Toshiba Power Saver. 2 Click the Toshiba Power Saver icon. 3 The Power Saver Properties window appears. 111 Mobile Computing Monitoring main battery power Power button On/off light Battery light Determining remaining battery power NOTE Wait at least 16 seconds after turning on the left side of...

User Manual
Page 126
...that program appears on the taskbar for communications To connect to the Internet, use these buttons to use the Internet 126 Exploring Your Computer's Features Setting up for each task,...across the telephone lines with that run continuously in the System tray are Current time, Power usage mode, Mouse properties, and speaker volume. Typical tasks in the background. System... task appears. To make a program or window the currently active one comes with your Satellite® M40/M45 computer) ❖ A telephone line ❖ A browser or communications program ❖ An Internet...
...that program appears on the taskbar for communications To connect to the Internet, use these buttons to use the Internet 126 Exploring Your Computer's Features Setting up for each task,...across the telephone lines with that run continuously in the System tray are Current time, Power usage mode, Mouse properties, and speaker volume. Typical tasks in the background. System... task appears. To make a program or window the currently active one comes with your Satellite® M40/M45 computer) ❖ A telephone line ❖ A browser or communications program ❖ An Internet...

User Manual
Page 264
... start 170 energy-saving features 104 problem solving 180 turning on 54 universal power supply 220 power button 54 power mode creating new 159 customizing 159 power source 48 power usage mode hot key 115 power usage modes 114 powering down using Standby 101 precautions 42 primary button 64 printer local, connecting 69 problem solving 193 printing a file 87
... start 170 energy-saving features 104 problem solving 180 turning on 54 universal power supply 220 power button 54 power mode creating new 159 customizing 159 power source 48 power usage mode hot key 115 power usage modes 114 powering down using Standby 101 precautions 42 primary button 64 printer local, connecting 69 problem solving 193 printing a file 87

