
User Manual
Page 27
... for the first time 51 Opening the display panel 51 Your computer's features and specifications ....52 Turning on the power 52 Adding memory (optional 53 Installing a memory module 54 Removing a memory module 59 Using the TouchPad 61 Scrolling with the TouchPad 62 Control buttons 62 Disabling or enabling the TouchPad 62 Using external...
... for the first time 51 Opening the display panel 51 Your computer's features and specifications ....52 Turning on the power 52 Adding memory (optional 53 Installing a memory module 54 Removing a memory module 59 Using the TouchPad 61 Scrolling with the TouchPad 62 Control buttons 62 Disabling or enabling the TouchPad 62 Using external...
User Manual
Page 30
... 143 Removing a PC Card 143 Setting up a PC Card for your computer .........144 Using the Bridge Media Adapter Slot 144 Inserting memory media 145 Removing memory media 145 Chapter 5: Toshiba Utilities 147 TOSHIBA Assist 148 Connect 149 Secure 149 Protect & Fix 149 Optimize 149 Setting passwords 150 Using an instant password 150 Using a supervisor...
... 143 Removing a PC Card 143 Setting up a PC Card for your computer .........144 Using the Bridge Media Adapter Slot 144 Inserting memory media 145 Removing memory media 145 Chapter 5: Toshiba Utilities 147 TOSHIBA Assist 148 Connect 149 Secure 149 Protect & Fix 149 Optimize 149 Setting passwords 150 Using an instant password 150 Using a supervisor...
User Manual
Page 31
... the keyboard or pointing device to assign a key 157 Viewing existing key assignments 159 Changing or removing existing key assignments 159 TOSHIBA Hotkey Utility 160 TOSHIBA SD™ Memory Card Format Utility .........160 TOSHIBA Power Management 162 Preset Power Profiles 163 Quickly creating a new power profile 163 Customizing a power profile 164 Mouse Utility 164...
... the keyboard or pointing device to assign a key 157 Viewing existing key assignments 159 Changing or removing existing key assignments 159 TOSHIBA Hotkey Utility 160 TOSHIBA SD™ Memory Card Format Utility .........160 TOSHIBA Power Management 162 Preset Power Profiles 163 Quickly creating a new power profile 163 Customizing a power profile 164 Mouse Utility 164...
User Manual
Page 32
...hardware conflict 190 A plan of action 190 Resolving hardware conflicts on your own .....191 Fixing a problem with Device Manager ...........192 Memory problems 194 Power and the batteries 195 Keyboard problems 197 Display problems 198 Disk drive problems 200 CD-RW/DVD-ROM or ...216 Data and system configuration backup in Windows XP 217 If you need further assistance 223 Before you contact Toshiba 223 Contacting Toshiba 224 Other Toshiba Internet Web sites 225 Toshiba's worldwide offices 225 Appendix A: Hot Keys 227 Volume Mute 227 Password security 228 Without a password 228...
...hardware conflict 190 A plan of action 190 Resolving hardware conflicts on your own .....191 Fixing a problem with Device Manager ...........192 Memory problems 194 Power and the batteries 195 Keyboard problems 197 Display problems 198 Disk drive problems 200 CD-RW/DVD-ROM or ...216 Data and system configuration backup in Windows XP 217 If you need further assistance 223 Before you contact Toshiba 223 Contacting Toshiba 224 Other Toshiba Internet Web sites 225 Toshiba's worldwide offices 225 Appendix A: Hot Keys 227 Volume Mute 227 Password security 228 Without a password 228...
User Manual
Page 43
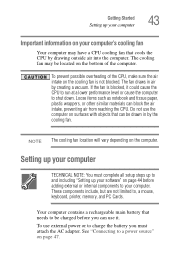
... up your software" on page 44 before you must attach the AC adapter. If the fan is not blocked. See "Connecting to , a mouse, keyboard, printer, memory, and PC Cards. NOTE The cooling fan location will vary depending on the cooling fan is blocked, it . Do not use external power or to...
... up your software" on page 44 before you must attach the AC adapter. If the fan is not blocked. See "Connecting to , a mouse, keyboard, printer, memory, and PC Cards. NOTE The cooling fan location will vary depending on the cooling fan is blocked, it . Do not use external power or to...
User Manual
Page 46
After starting your computer for the first time you may want to: ❖ Add more memory (see "Adding memory (optional)" on page 53) ❖ Connect a mouse (see "Using a mouse" on page 66) ❖ Connect a full-size keyboard (see "Using an external ... "Using PC Cards" on page 142) ❖ Install flash memory cards (see "Using the Bridge Media Adapter Slot" on page 44. 46 Getting Started Adding optional external devices Adding optional external devices NOTE Before adding external devices or memory, Toshiba recommends setting up your software. See "Setting up your software" ...
After starting your computer for the first time you may want to: ❖ Add more memory (see "Adding memory (optional)" on page 53) ❖ Connect a mouse (see "Using a mouse" on page 66) ❖ Connect a full-size keyboard (see "Using an external ... "Using PC Cards" on page 142) ❖ Install flash memory cards (see "Using the Bridge Media Adapter Slot" on page 44. 46 Getting Started Adding optional external devices Adding optional external devices NOTE Before adding external devices or memory, Toshiba recommends setting up your software. See "Setting up your software" ...
User Manual
Page 53
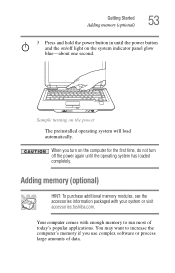
...When you use complex software or process large amounts of today's popular applications. Adding memory (optional) HINT: To purchase additional memory modules, see the accessories information packaged with enough memory to increase the computer's memory if you turn on the computer for the first time, do not turn off... light on the system indicator panel glow blue-about one second. Your computer comes with your system or visit accessories.toshiba.com. Getting Started Adding memory (optional) 53 3 Press and hold the power button in until the power button and the on/off the power ...
...When you use complex software or process large amounts of today's popular applications. Adding memory (optional) HINT: To purchase additional memory modules, see the accessories information packaged with enough memory to increase the computer's memory if you turn on the computer for the first time, do not turn off... light on the system indicator panel glow blue-about one second. Your computer comes with your system or visit accessories.toshiba.com. Getting Started Adding memory (optional) 53 3 Press and hold the power button in until the power button and the on/off the power ...

User Manual
Page 54
..., turn off the computer using the Start menu. 54 Getting Started Adding memory (optional) For more information on page 44. An additional memory module can be lost. NOTE Before adding external devices or memory, Toshiba recommends setting up your software" on memory options, check the accessories information that is in good condition. If you install...
..., turn off the computer using the Start menu. 54 Getting Started Adding memory (optional) For more information on page 44. An additional memory module can be lost. NOTE Before adding external devices or memory, Toshiba recommends setting up your software" on memory options, check the accessories information that is in good condition. If you install...
User Manual
Page 55
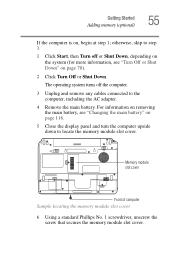
... slot cover 6 Using a standard Phillips No. 1 screwdriver, unscrew the screw that secures the memory module slot cover. The operating system turns off or Shut Down, depending on the system (for more information, see "Changing the main battery" on page ... adapter. 4 Remove the main battery. For information on removing the main battery, see "Turn Off or Shut Down" on , begin at step 1; Getting Started Adding memory (optional) 55 If the computer is on page 70). 2 Click Turn Off or Shut Down. otherwise, skip to step 3. 1 Click Start, then Turn off the...
... slot cover 6 Using a standard Phillips No. 1 screwdriver, unscrew the screw that secures the memory module slot cover. The operating system turns off or Shut Down, depending on the system (for more information, see "Changing the main battery" on page ... adapter. 4 Remove the main battery. For information on removing the main battery, see "Turn Off or Shut Down" on , begin at step 1; Getting Started Adding memory (optional) 55 If the computer is on page 70). 2 Click Turn Off or Shut Down. otherwise, skip to step 3. 1 Click Start, then Turn off the...
User Manual
Page 56
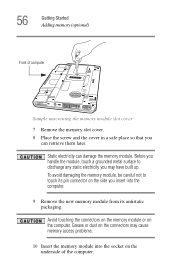
...grounded metal surface to touch its pin connector on the side you insert into the socket on the underside of computer Sample unscrewing the memory module slot cover 7 Remove the memory slot cover. 8 Place the screw and the cover in a safe place so that you may cause... memory access problems. 10 Insert the memory module into the computer. 9 Remove the new memory module from its antistatic packaging. To avoid damaging the memory module, be careful not to discharge any static electricity you can damage the memory module. Grease or dust on the computer...
...grounded metal surface to touch its pin connector on the side you insert into the socket on the underside of computer Sample unscrewing the memory module slot cover 7 Remove the memory slot cover. 8 Place the screw and the cover in a safe place so that you may cause... memory access problems. 10 Insert the memory module into the computer. 9 Remove the new memory module from its antistatic packaging. To avoid damaging the memory module, be careful not to discharge any static electricity you can damage the memory module. Grease or dust on the computer...
User Manual
Page 57
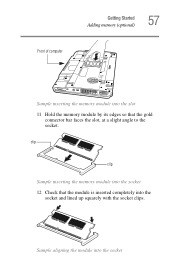
clip clip Sample inserting the memory module into the socket 12 Check that the gold connector bar faces the slot, at a slight angle to the socket. Sample aligning the module into the socket Front of computer Getting Started Adding memory (optional) 57 Sample inserting the memory module into the slot 11 Hold the memory module by its edges so that the module is inserted completely into the socket and lined up squarely with the socket clips.
clip clip Sample inserting the memory module into the socket 12 Check that the gold connector bar faces the slot, at a slight angle to the socket. Sample aligning the module into the socket Front of computer Getting Started Adding memory (optional) 57 Sample inserting the memory module into the slot 11 Hold the memory module by its edges so that the module is inserted completely into the socket and lined up squarely with the socket clips.
User Manual
Page 58
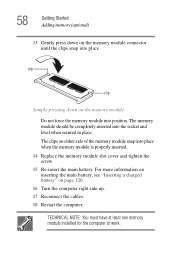
... snap into place. TECHNICAL NOTE: You must have at least one memory module installed for the computer to work. 58 Getting Started Adding memory (optional) 13 Gently press down on the memory module Do not force the memory module into the socket and level when secured in place. For more... information on inserting the main battery, see "Inserting a charged battery" on the memory module connector until the clips snap into place when the memory module is properly inserted. 14 Replace the memory module slot cover and tighten the screw. 15 Re-insert the main battery. The...
... snap into place. TECHNICAL NOTE: You must have at least one memory module installed for the computer to work. 58 Getting Started Adding memory (optional) 13 Gently press down on the memory module Do not force the memory module into the socket and level when secured in place. For more... information on inserting the main battery, see "Inserting a charged battery" on the memory module connector until the clips snap into place when the memory module is properly inserted. 14 Replace the memory module slot cover and tighten the screw. 15 Re-insert the main battery. The...
User Manual
Page 59
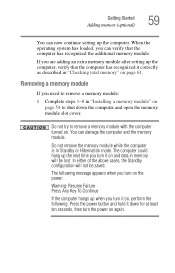
...the power: Warning: Resume Failure Press Any Key To Continue If the computer hangs up the computer, verify that the computer has recognized the additional memory module. The following message appears when you turn on , perform the following: Press the power button and hold it down the computer and open... system has loaded, you turn the power on page 61. The computer could hang up the computer. Do not remove the memory module while the computer is in "Installing a memory module" on . If you need to shut down for at least ten seconds, then turn it correctly as described in...
...the power: Warning: Resume Failure Press Any Key To Continue If the computer hangs up the computer, verify that the computer has recognized the additional memory module. The following message appears when you turn on , perform the following: Press the power button and hold it down the computer and open... system has loaded, you turn the power on page 61. The computer could hang up the computer. Do not remove the memory module while the computer is in "Installing a memory module" on . If you need to shut down for at least ten seconds, then turn it correctly as described in...

User Manual
Page 60
... a charged battery" on page 120. 6 Turn the computer right side up slightly. 3 Gently lift the memory module to work. Front of the slot. TECHNICAL NOTE: You must have at least one memory module installed for the computer to a 45 degree angle and slide it out of computer Sample removing the... memory module 4 Replace the memory module slot cover and tighten the screw. 5 Re-insert the main battery. 60...
... a charged battery" on page 120. 6 Turn the computer right side up slightly. 3 Gently lift the memory module to work. Front of the slot. TECHNICAL NOTE: You must have at least one memory module installed for the computer to a 45 degree angle and slide it out of computer Sample removing the... memory module 4 Replace the memory module slot cover and tighten the screw. 5 Re-insert the main battery. 60...
User Manual
Page 61
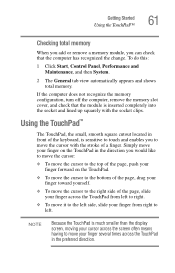
Getting Started Using the TouchPad™ 61 Checking total memory When you add or remove a memory module, you can check that the module is inserted completely into the socket and lined up squarely with the stroke of the page, slide ... preferred direction. To do this: 1 Click Start, Control Panel, Performance and Maintenance, and then System. 2 The General tab view automatically appears and shows total memory. If the computer does not recognize the memory configuration, turn off the computer, remove the memory slot cover, and check that the computer has recognized the change.
Getting Started Using the TouchPad™ 61 Checking total memory When you add or remove a memory module, you can check that the module is inserted completely into the socket and lined up squarely with the stroke of the page, slide ... preferred direction. To do this: 1 Click Start, Control Panel, Performance and Maintenance, and then System. 2 The General tab view automatically appears and shows total memory. If the computer does not recognize the memory configuration, turn off the computer, remove the memory slot cover, and check that the computer has recognized the change.
User Manual
Page 71
... consumes less main battery power than restarting from turning the computer off. ❖ Since information is being retrieved from the hard disk rather than from memory, restarting from Hibernation takes a little more time and consumes more main battery power to start up than when restarting from Standby. ❖ When starting up...
... consumes less main battery power than restarting from turning the computer off. ❖ Since information is being retrieved from the hard disk rather than from memory, restarting from Hibernation takes a little more time and consumes more main battery power to start up than when restarting from Standby. ❖ When starting up...
User Manual
Page 72
... Off Computer or Shut Down commands Depending on the operating system installed, use the following steps to consider when choosing Standby: ❖ While in system memory (RAM) so that, when you restart the computer, you were using. Factors to turn off the computer Standby mode The Standby command places the computer...
... Off Computer or Shut Down commands Depending on the operating system installed, use the following steps to consider when choosing Standby: ❖ While in system memory (RAM) so that, when you restart the computer, you were using. Factors to turn off the computer Standby mode The Standby command places the computer...

User Manual
Page 81
... can be activated. If the network you are working, you will lose all work since you last saved. Your work stays in the computer's temporary memory until you must restart your computer to reconnect, or your work frequently. See your file to the disk. This feature saves your software documentation for...
... can be activated. If the network you are working, you will lose all work since you last saved. Your work stays in the computer's temporary memory until you must restart your computer to reconnect, or your work frequently. See your file to the disk. This feature saves your software documentation for...
User Manual
Page 107
...The RTC battery does not charge while the computer is powered on batteries and accessories, see accessories.toshiba.com. Users who are not completely familiar with setup changes, contact Toshiba's Global Support Centre. You can then replace a discharged main battery and continue working. The ...RTC battery charges when the computer is turned off . For more information on . 107 Mobile Computing Running the computer on battery power The RTC battery powers the RTC memory ...
...The RTC battery does not charge while the computer is powered on batteries and accessories, see accessories.toshiba.com. Users who are not completely familiar with setup changes, contact Toshiba's Global Support Centre. You can then replace a discharged main battery and continue working. The ...RTC battery charges when the computer is turned off . For more information on . 107 Mobile Computing Running the computer on battery power The RTC battery powers the RTC memory ...

User Manual
Page 109
... the computer is almost completely discharged. HINT: Once the battery is extremely hot or cold. The RTC battery powers the System Time Clock and BIOS memory used to 26 degrees Celsius). ❖ The battery is powered off.
... the computer is almost completely discharged. HINT: Once the battery is extremely hot or cold. The RTC battery powers the System Time Clock and BIOS memory used to 26 degrees Celsius). ❖ The battery is powered off.


