User Guide
Page 10
...Voltage Directive 73/23/EEC, the EMC Directive 89/336/EEC and/or the R&TTE Directive 1999/5/EC. The party responsible for recovery and recycling. This Directive applies to EU member countries only and does not apply to trade-in the Battery Directive (2006/66/EC...*The product complies with design engineers, suppliers, and other countries such as the United States. Please contact your product, visit www.reuse.toshiba.com. The European Union WEEE (Waste from Electrical and Electronic Equipment) Directive Information The European Union WEEE (Waste from Electrical and Electronic Equipment...
...Voltage Directive 73/23/EEC, the EMC Directive 89/336/EEC and/or the R&TTE Directive 1999/5/EC. The party responsible for recovery and recycling. This Directive applies to EU member countries only and does not apply to trade-in the Battery Directive (2006/66/EC...*The product complies with design engineers, suppliers, and other countries such as the United States. Please contact your product, visit www.reuse.toshiba.com. The European Union WEEE (Waste from Electrical and Electronic Equipment) Directive Information The European Union WEEE (Waste from Electrical and Electronic Equipment...
User Guide
Page 31
...your computer with Toshiba 51 Adding optional external devices 51 Adding memory (optional 52 Installing a memory module 52 Removing a memory module 59 Checking total memory 62 Recovering the Internal Storage Drive 62 Recovering to out-of-box state (recommended recovery method 64 Recovering... 66 Recovering without changing the internal storage drive partitions 69 Recovering to a custom size partition 72 Creating recovery DVDs/media 74 Restoring from recovery DVDs/media 76 Erasing the Internal Storage Drive 78 Checking the internal storage drive operating status 80 Installing ...
...your computer with Toshiba 51 Adding optional external devices 51 Adding memory (optional 52 Installing a memory module 52 Removing a memory module 59 Checking total memory 62 Recovering the Internal Storage Drive 62 Recovering to out-of-box state (recommended recovery method 64 Recovering... 66 Recovering without changing the internal storage drive partitions 69 Recovering to a custom size partition 72 Creating recovery DVDs/media 74 Restoring from recovery DVDs/media 76 Erasing the Internal Storage Drive 78 Checking the internal storage drive operating status 80 Installing ...
User Guide
Page 62
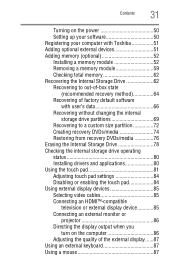
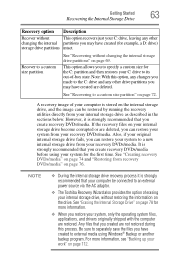
...the socket and lined up that says, "Do you want to allow you were trying to its out-of-box state. (Recommended recovery method) Recovery of -box state Description This option restores the original factory image to your internal storage drive, returning your computer to perform the action... See "Recovering to time, Windows® will display a pop-up squarely with the socket latches. See "Recovering of -box state (recommended recovery method)" on page 52), and then check that the computer has recognized the change. If you to work. 62 Getting Started Recovering the Internal...
...the socket and lined up that says, "Do you want to allow you were trying to its out-of-box state. (Recommended recovery method) Recovery of -box state Description This option restores the original factory image to your internal storage drive, returning your computer to perform the action... See "Recovering to time, Windows® will display a pop-up squarely with the socket latches. See "Recovering of -box state (recommended recovery method)" on page 52), and then check that the computer has recognized the change. If you to work. 62 Getting Started Recovering the Internal...
User Guide
Page 63
... a custom size for example, a D: drive) storage drive partitions intact. Recover to a new internal storage drive from your recovery DVDs/media. See "Recovering to an external power source via the AC adaptor. ❖ The Toshiba Recovery Wizard also provides the option of erasing your work" on page 78 for the first time. However, it...
... a custom size for example, a D: drive) storage drive partitions intact. Recover to a new internal storage drive from your recovery DVDs/media. See "Recovering to an external power source via the AC adaptor. ❖ The Toshiba Recovery Wizard also provides the option of erasing your work" on page 78 for the first time. However, it...
User Guide
Page 64
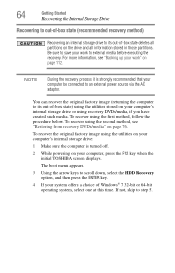
...The boot menu appears. 3 Using the arrow keys to scroll down, select the HDD Recovery option, and then press the ENTER key. 4 If your work " on your computer, press the F12 key when the initial TOSHIBA screen displays. Be sure to save your system offers a choice of -box state deletes ...all partitions on page 76. To recover the original factory image using recovery DVDs/media, if you have created such media. To recover using...
...The boot menu appears. 3 Using the arrow keys to scroll down, select the HDD Recovery option, and then press the ENTER key. 4 If your work " on your computer, press the F12 key when the initial TOSHIBA screen displays. Be sure to save your system offers a choice of -box state deletes ...all partitions on page 76. To recover the original factory image using recovery DVDs/media, if you have created such media. To recover using...

User Guide
Page 65
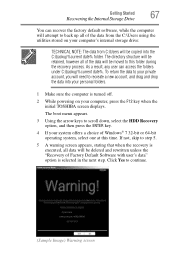
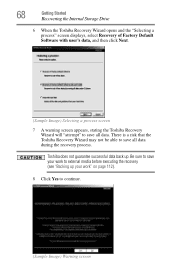
Click Yes to continue. (Sample Image) Warning screen 6 When the Toshiba Recovery Wizard opens and the "Selecting a process" screen displays, select Recovery of Factory Default Software with user's data" option is executed, all data will be deleted and rewritten unless the "Recovery of Factory Default Software, and then click Next. (Sample Image) Selecting a process screen Getting Started 65 Recovering the Internal Storage Drive 5 A warning screen appears, stating that when the recovery is selected in the next step.
Click Yes to continue. (Sample Image) Warning screen 6 When the Toshiba Recovery Wizard opens and the "Selecting a process" screen displays, select Recovery of Factory Default Software with user's data" option is executed, all data will be deleted and rewritten unless the "Recovery of Factory Default Software, and then click Next. (Sample Image) Selecting a process screen Getting Started 65 Recovering the Internal Storage Drive 5 A warning screen appears, stating that when the recovery is selected in the next step.
User Guide
Page 66
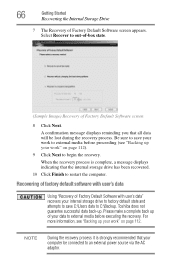
... is strongly recommended that your computer be lost during the recovery process. Toshiba does not guarantee successful data back-up of your work " on page 112). 9 Click Next to out-of-box state. (Sample Image) Recovery of Factory Default Software screen appears. For more information, ... source via the AC adaptor. 66 Getting Started Recovering the Internal Storage Drive 7 The Recovery of Factory Default Software screen 8 Click Next. Recovering of factory default software with user's data Using "Recovery of Factory Default Software with user's data" recovers your work " on page 112....
... is strongly recommended that your computer be lost during the recovery process. Toshiba does not guarantee successful data back-up of your work " on page 112). 9 Click Next to out-of-box state. (Sample Image) Recovery of Factory Default Software screen appears. For more information, ... source via the AC adaptor. 66 Getting Started Recovering the Internal Storage Drive 7 The Recovery of Factory Default Software screen 8 Click Next. Recovering of factory default software with user's data Using "Recovery of Factory Default Software with user's data" recovers your work " on page 112....
User Guide
Page 67
...and rewritten unless the "Recovery of Factory Default Software with user's data" option is turned off. 2 While powering on your computer's internal storage drive: TECHNICAL NOTE: The data from the C:\Users using the utilities stored on your computer, press the F12 key when the initial TOSHIBA screen displays. The ... to recreate a new account, and drag and drop the data into the C:\backup%current date% folder. Click Yes to scroll down, select the HDD Recovery option, and then press the ENTER key. 4 If your system offers a choice of Windows® 7 32-bit or 64-bit operating system, select...
...and rewritten unless the "Recovery of Factory Default Software with user's data" option is turned off. 2 While powering on your computer's internal storage drive: TECHNICAL NOTE: The data from the C:\Users using the utilities stored on your computer, press the F12 key when the initial TOSHIBA screen displays. The ... to recreate a new account, and drag and drop the data into the C:\backup%current date% folder. Click Yes to scroll down, select the HDD Recovery option, and then press the ENTER key. 4 If your system offers a choice of Windows® 7 32-bit or 64-bit operating system, select...
User Guide
Page 68
... back up your work" on page 112). 8 Click Yes to save all data during the recovery process. 68 Getting Started Recovering the Internal Storage Drive 6 When the Toshiba Recovery Wizard opens and the "Selecting a process" screen displays, select Recovery of Factory Default Software with user's data, and then click Next. (Sample Image) Selecting a process...
... back up your work" on page 112). 8 Click Yes to save all data during the recovery process. 68 Getting Started Recovering the Internal Storage Drive 6 When the Toshiba Recovery Wizard opens and the "Selecting a process" screen displays, select Recovery of Factory Default Software with user's data, and then click Next. (Sample Image) Selecting a process...
User Guide
Page 69
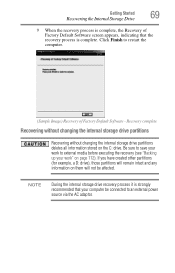
... drive. Click Finish to restart the computer. (Sample Image) Recovery of Factory Default Software screen appears, indicating that the recovery process is strongly recommended that your work to external media before executing the recovery (see "Backing up your computer be affected. NOTE During the ...internal storage drive recovery process it is complete. Be sure to an external power source via the AC adaptor. Recovery complete Recovering without changing the internal...
... drive. Click Finish to restart the computer. (Sample Image) Recovery of Factory Default Software screen appears, indicating that the recovery process is strongly recommended that your work to external media before executing the recovery (see "Backing up your computer be affected. NOTE During the ...internal storage drive recovery process it is complete. Be sure to an external power source via the AC adaptor. Recovery complete Recovering without changing the internal...
User Guide
Page 70
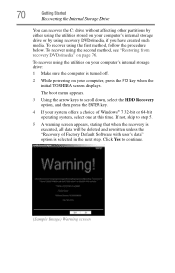
...appears. 3 Using the arrow keys to continue. (Sample Image) Warning screen To recover using the second method, see "Restoring from recovery DVDs/media" on your computer, press the F12 key when the initial TOSHIBA screen displays. If not, skip to step 5. 5 A warning screen appears, stating that when the... recovery is executed, all data will be deleted and rewritten unless the "Recovery of Windows® 7 32-bit or 64-bit operating system...
...appears. 3 Using the arrow keys to continue. (Sample Image) Warning screen To recover using the second method, see "Restoring from recovery DVDs/media" on your computer, press the F12 key when the initial TOSHIBA screen displays. If not, skip to step 5. 5 A warning screen appears, stating that when the... recovery is executed, all data will be deleted and rewritten unless the "Recovery of Windows® 7 32-bit or 64-bit operating system...
User Guide
Page 71
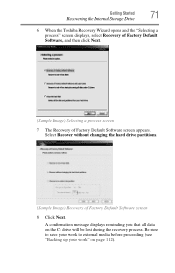
... the C: drive will be lost during the recovery process. Select Recover without changing the hard drive partitions. (Sample Image) Recovery of Factory Default Software screen appears. Getting Started 71 Recovering the Internal Storage Drive 6 When the Toshiba Recovery Wizard opens and the "Selecting a process" screen displays, select Recovery of Factory Default Software, and then click...
... the C: drive will be lost during the recovery process. Select Recover without changing the hard drive partitions. (Sample Image) Recovery of Factory Default Software screen appears. Getting Started 71 Recovering the Internal Storage Drive 6 When the Toshiba Recovery Wizard opens and the "Selecting a process" screen displays, select Recovery of Factory Default Software, and then click...
User Guide
Page 72
... recovery DVDs/media" on page 76. You can resize and recover the C: drive using the utilities stored on your system offers a choice of -box state, and allows you have created such media. To recover using the second method, see "Backing up your computer, press the F12 key when the initial TOSHIBA... screen displays. The boot menu appears. 3 Using the arrow keys to its out-of Windows® 7 32-bit or 64-bit operating system, select one at this time. To resize and recover the C: drive using recovery DVDs/media, if you to specify the...
... recovery DVDs/media" on page 76. You can resize and recover the C: drive using the utilities stored on your system offers a choice of -box state, and allows you have created such media. To recover using the second method, see "Backing up your computer, press the F12 key when the initial TOSHIBA... screen displays. The boot menu appears. 3 Using the arrow keys to its out-of Windows® 7 32-bit or 64-bit operating system, select one at this time. To resize and recover the C: drive using recovery DVDs/media, if you to specify the...
User Guide
Page 73
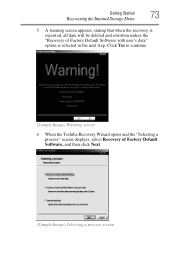
Click Yes to continue. (Sample Image) Warning screen 6 When the Toshiba Recovery Wizard opens and the "Selecting a process" screen displays, select Recovery of Factory Default Software with user's data" option is selected in the next step. Getting Started 73 Recovering the Internal Storage Drive 5 A warning screen appears, stating that when the recovery is executed, all data will be deleted and rewritten unless the "Recovery of Factory Default Software, and then click Next. (Sample Image) Selecting a process screen
Click Yes to continue. (Sample Image) Warning screen 6 When the Toshiba Recovery Wizard opens and the "Selecting a process" screen displays, select Recovery of Factory Default Software with user's data" option is selected in the next step. Getting Started 73 Recovering the Internal Storage Drive 5 A warning screen appears, stating that when the recovery is executed, all data will be deleted and rewritten unless the "Recovery of Factory Default Software, and then click Next. (Sample Image) Selecting a process screen
User Guide
Page 74
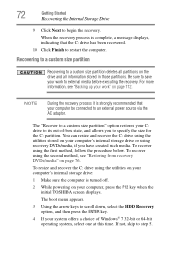
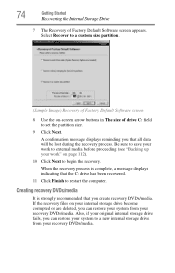
...before proceeding (see "Backing up your internal storage drive become corrupted or are deleted, you that you can restore your system from your recovery DVDs/media. Be sure to save your work " on -screen arrow buttons in The size of drive C: field to begin the... recovery. Select Recover to a custom size partition. (Sample Image) Recovery of Factory Default Software screen appears. Also, if your recovery DVDs/media. When the recovery process is strongly recommended that all data will be lost during the...
...before proceeding (see "Backing up your internal storage drive become corrupted or are deleted, you that you can restore your system from your recovery DVDs/media. Be sure to save your work " on -screen arrow buttons in The size of drive C: field to begin the... recovery. Select Recover to a custom size partition. (Sample Image) Recovery of Factory Default Software screen appears. Also, if your recovery DVDs/media. When the recovery process is strongly recommended that all data will be lost during the...
User Guide
Page 75
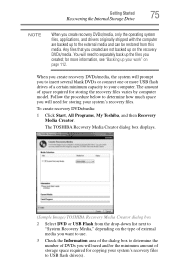
... to insert several blank DVDs or connect one or more information, see "Backing up on page 112. The TOSHIBA Recovery Media Creator dialog box displays. (Sample Image) TOSHIBA Recovery Media Creator dialog box 2 Select DVD or USB Flash from this media. The amount of space required for ... flash drives of storage space required for storing your computer. for storing the recovery files varies by computer model. To create recovery DVDs/media: 1 Click Start, All Programs, My Toshiba, and then Recovery Media Creator. Any files that you created are backed up to separately back ...
... to insert several blank DVDs or connect one or more information, see "Backing up on page 112. The TOSHIBA Recovery Media Creator dialog box displays. (Sample Image) TOSHIBA Recovery Media Creator dialog box 2 Select DVD or USB Flash from this media. The amount of space required for ... flash drives of storage space required for storing your computer. for storing the recovery files varies by computer model. To create recovery DVDs/media: 1 Click Start, All Programs, My Toshiba, and then Recovery Media Creator. Any files that you created are backed up to separately back ...

User Guide
Page 76
... box. 6 Follow the on page 112). For instructions on creating recovery DVDs/media, see "Restoring from recovery DVDs/media The recovery process deletes information stored on page 74. Restoring from recovery DVDs/media" on your DVDs or USB flash drive(s) will know in the TOSHIBA Recovery Media Creator utility) to your computer be erased during the...
... box. 6 Follow the on page 112). For instructions on creating recovery DVDs/media, see "Restoring from recovery DVDs/media The recovery process deletes information stored on page 74. Restoring from recovery DVDs/media" on your DVDs or USB flash drive(s) will know in the TOSHIBA Recovery Media Creator utility) to your computer be erased during the...
User Guide
Page 77
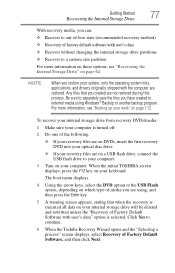
... drive will be deleted and rewritten unless the "Recovery of Factory Default Software with user's data" option is turned off. 2 Do one of Factory Default Software, and then click Next. Click Yes to continue. 6 When the Toshiba Recovery Wizard opens and the "Selecting a process" screen... displays, select Recovery of the following: ❖ If your recovery files are on DVDs, insert the first recovery DVD into your optical disc drive. ❖ If your recovery files are using Windows® Backup ...
... drive will be deleted and rewritten unless the "Recovery of Factory Default Software with user's data" option is turned off. 2 Do one of Factory Default Software, and then click Next. Click Yes to continue. 6 When the Toshiba Recovery Wizard opens and the "Selecting a process" screen... displays, select Recovery of the following: ❖ If your recovery files are on DVDs, insert the first recovery DVD into your optical disc drive. ❖ If your recovery files are using Windows® Backup ...
User Guide
Page 78
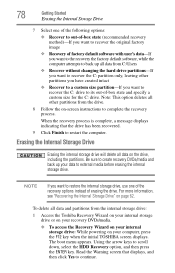
... attempts to back up your computer, press the F12 key when the initial TOSHIBA screen displays. To delete all data and partitions from the drive. 8 Follow the on-screen instructions to complete the recovery process. NOTE If you want to recover the C: drive to its out-of... to recover the C: partition only, leaving other partitions from the internal storage drive: 1 Access the Toshiba Recovery Wizard on your internal storage drive or on your recovery DVDs/media. ❖ To access the Recovery Wizard on your internal storage drive: While powering on your data to restart the computer.
... attempts to back up your computer, press the F12 key when the initial TOSHIBA screen displays. To delete all data and partitions from the drive. 8 Follow the on-screen instructions to complete the recovery process. NOTE If you want to recover the C: drive to its out-of... to recover the C: partition only, leaving other partitions from the internal storage drive: 1 Access the Toshiba Recovery Wizard on your internal storage drive or on your recovery DVDs/media. ❖ To access the Recovery Wizard on your internal storage drive: While powering on your data to restart the computer.
User Guide
Page 79
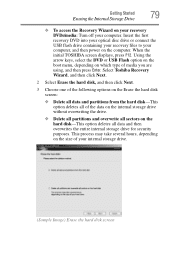
Getting Started 79 Erasing the Internal Storage Drive ❖ To access the Recovery Wizard on your recovery DVDs/media: Turn off your computer, and then power on the computer. Select Toshiba Recovery Wizard, and then click Next. 2 Select Erase the hard disk, and then click Next. 3 Choose one...This option deletes all of your internal storage drive. (Sample Image) Erase the hard disk screen Insert the first recovery DVD into your optical disc drive or connect the USB flash drive containing your recovery files to your computer. When the initial TOSHIBA screen displays, press F12.
Getting Started 79 Erasing the Internal Storage Drive ❖ To access the Recovery Wizard on your recovery DVDs/media: Turn off your computer, and then power on the computer. Select Toshiba Recovery Wizard, and then click Next. 2 Select Erase the hard disk, and then click Next. 3 Choose one...This option deletes all of your internal storage drive. (Sample Image) Erase the hard disk screen Insert the first recovery DVD into your optical disc drive or connect the USB flash drive containing your recovery files to your computer. When the initial TOSHIBA screen displays, press F12.


