User Manual
Page 31
Contents 31 Using an external keyboard 82 Using a mouse 82 Connecting a printer 82 Setting up a printer 83 Turning off the computer 84 Options for turning off the computer 84 Using the ... the computer 94 Moving the computer 95 Using a computer lock 95 Chapter 2: Learning the Basics 96 Computing tips 96 Using the keyboard 97 Character keys 98 Making your keyboard emulate a full-size keyboard 98 Ctrl, Fn, and Alt keys 99 Function keys 99 Special Windows® keys 99 Overlay keys 100 Starting a program...
Contents 31 Using an external keyboard 82 Using a mouse 82 Connecting a printer 82 Setting up a printer 83 Turning off the computer 84 Options for turning off the computer 84 Using the ... the computer 94 Moving the computer 95 Using a computer lock 95 Chapter 2: Learning the Basics 96 Computing tips 96 Using the keyboard 97 Character keys 98 Making your keyboard emulate a full-size keyboard 98 Ctrl, Fn, and Alt keys 99 Function keys 99 Special Windows® keys 99 Overlay keys 100 Starting a program...
User Manual
Page 34
... operating system can help you 167 Fixing a problem with Device Manager 168 Checking device properties 168 Memory problems 169 Power and the batteries 169 Keyboard problems 171 Display problems 171 Disk or storage drive problems 173 Error-checking 173 Optical disc drive problems 174 Sound system problems 177 Printer problems... habits 181 Data and system configuration backup in the Windows® operating system 182 If you need further assistance 186 Before you contact Toshiba 186 Contacting Toshiba 186 Other Toshiba Internet Web sites 187 Toshiba's worldwide offices 188
... operating system can help you 167 Fixing a problem with Device Manager 168 Checking device properties 168 Memory problems 169 Power and the batteries 169 Keyboard problems 171 Display problems 171 Disk or storage drive problems 173 Error-checking 173 Optical disc drive problems 174 Sound system problems 177 Printer problems... habits 181 Data and system configuration backup in the Windows® operating system 182 If you need further assistance 186 Before you contact Toshiba 186 Contacting Toshiba 186 Other Toshiba Internet Web sites 187 Toshiba's worldwide offices 188
User Manual
Page 35
Contents 35 Appendix A: Hot Keys/TOSHIBA Cards 190 Hot Key Cards 190 Using the Hot Key Cards 191 Application Cards 192 Using the Application Cards 193 Card Case 193 Hot key functions 194 Volume Mute 194 Lock (Instant security 195 Power plan 196 Sleep mode 197 Hibernation mode 198 Output (Display switch 199 Display brightness 200 Disabling or enabling wireless devices............201 Disabling or enabling the TouchPad 202 Zoom (Display resolution 203 Keyboard hot key functions 204 Appendix B: Power Cord/Cable Connectors 205 Glossary 206 Index 221
Contents 35 Appendix A: Hot Keys/TOSHIBA Cards 190 Hot Key Cards 190 Using the Hot Key Cards 191 Application Cards 192 Using the Application Cards 193 Card Case 193 Hot key functions 194 Volume Mute 194 Lock (Instant security 195 Power plan 196 Sleep mode 197 Hibernation mode 198 Output (Display switch 199 Display brightness 200 Disabling or enabling wireless devices............201 Disabling or enabling the TouchPad 202 Zoom (Display resolution 203 Keyboard hot key functions 204 Appendix B: Power Cord/Cable Connectors 205 Glossary 206 Index 221
User Manual
Page 44
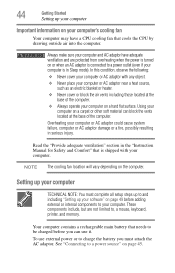
... you can block the vents located at the base of the computer. Overheating your computer on page 45. To use external power or to , a mouse, keyboard, printer, and memory. Using your computer or AC adaptor could cause system failure, computer or AC adaptor damage or a fire, possibly resulting in serious injury...
... you can block the vents located at the base of the computer. Overheating your computer on page 45. To use external power or to , a mouse, keyboard, printer, and memory. Using your computer or AC adaptor could cause system failure, computer or AC adaptor damage or a fire, possibly resulting in serious injury...
User Manual
Page 48
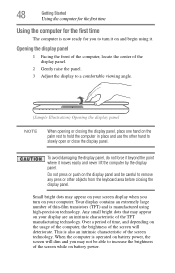
... time Using the computer for you to turn on the palm rest to hold the computer in place and use the other objects from the keyboard area before closing the display panel, place one hand on your screen display when you may appear on the usage of the computer, the brightness...
... time Using the computer for you to turn on the palm rest to hold the computer in place and use the other objects from the keyboard area before closing the display panel, place one hand on your screen display when you may appear on the usage of the computer, the brightness...
User Manual
Page 50
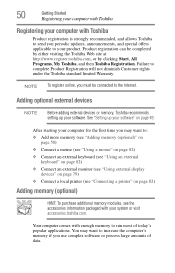
... clicking Start, All Programs, My Toshiba, and then Toshiba Registration. Product registration can be connected to your product. Failure to : ❖ Add more memory (see "Adding memory (optional)" on page 50) ❖ Connect a mouse (see "Using a mouse" on page 82) ❖ Connect an external keyboard (see "Using an external keyboard" on page 82) ❖...
... clicking Start, All Programs, My Toshiba, and then Toshiba Registration. Product registration can be connected to your product. Failure to : ❖ Add more memory (see "Adding memory (optional)" on page 50) ❖ Connect a mouse (see "Using a mouse" on page 82) ❖ Connect an external keyboard (see "Using an external keyboard" on page 82) ❖...
User Manual
Page 61
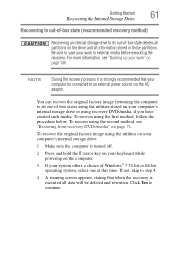
... continue. NOTE During the recovery process it is strongly recommended that when the recovery is turned off. 2 Press and hold the 0 (zero) key on your keyboard while powering on the computer. 3 If your system offers a choice of -box state deletes all partitions on the drive and all data will be connected...
... continue. NOTE During the recovery process it is strongly recommended that when the recovery is turned off. 2 Press and hold the 0 (zero) key on your keyboard while powering on the computer. 3 If your system offers a choice of -box state deletes all partitions on the drive and all data will be connected...
User Manual
Page 63
... and all information stored in those partitions. Be sure to save your work to external media before proceeding (see "Backing up your work " on the keyboard to restart the computer. Be sure to save your work to a custom size partition deletes all data will be connected to begin the recovery. Recovering...
... and all information stored in those partitions. Be sure to save your work to external media before proceeding (see "Backing up your work " on the keyboard to restart the computer. Be sure to save your work to a custom size partition deletes all data will be connected to begin the recovery. Recovering...
User Manual
Page 64
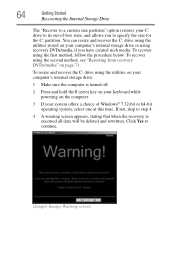
... the C: partition. Click Yes to step 4. 4 A warning screen appears, stating that when the recovery is turned off. 2 Press and hold the 0 (zero) key on your keyboard while powering on the computer. 3 If your system offers a choice of -box state, and allows you have created such media.
... the C: partition. Click Yes to step 4. 4 A warning screen appears, stating that when the recovery is turned off. 2 Press and hold the 0 (zero) key on your keyboard while powering on the computer. 3 If your system offers a choice of -box state, and allows you have created such media.
User Manual
Page 66
... restart the computer. NOTE During the internal storage drive recovery process it is turned off. 2 Press and hold the 0 (zero) key on your keyboard while powering on the keyboard to external media before executing the recovery (see "Restoring from recovery DVDs/media" on them will remain intact and any key on the...
... restart the computer. NOTE During the internal storage drive recovery process it is turned off. 2 Press and hold the 0 (zero) key on your keyboard while powering on the keyboard to external media before executing the recovery (see "Restoring from recovery DVDs/media" on them will remain intact and any key on the...
User Manual
Page 68
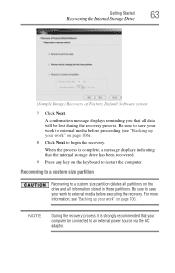
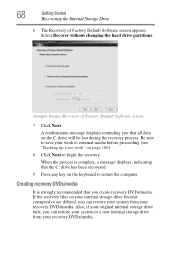
Creating recovery DVDs/media It is complete, a message displays, indicating that the C: drive has been recovered. 9 Press any key on the keyboard to begin the recovery. Select Recover without changing the hard drive partitions. (Sample Image) Recovery of Factory Default Software screen appears. 68 Getting Started Recovering ...
Creating recovery DVDs/media It is complete, a message displays, indicating that the C: drive has been recovered. 9 Press any key on the keyboard to begin the recovery. Select Recover without changing the hard drive partitions. (Sample Image) Recovery of Factory Default Software screen appears. 68 Getting Started Recovering ...
User Manual
Page 72
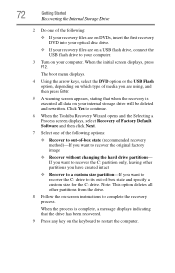
..., depending on which type of media you want to recover the C: drive to restart the computer. Click Yes to continue. 6 When the Toshiba Recovery Wizard opens and the Selecting a Process screen displays, select Recovery of Factory Default Software and then click Next. 7 Select one of the...warning screen appears, stating that when the recovery is complete, a message displays indicating that the drive has been recovered. 9 Press any key on the keyboard to its out-of-box state and specify a custom size for the C: drive. 72 Getting Started Recovering the Internal Storage Drive 2 Do one of ...
..., depending on which type of media you want to recover the C: drive to restart the computer. Click Yes to continue. 6 When the Toshiba Recovery Wizard opens and the Selecting a Process screen displays, select Recovery of Factory Default Software and then click Next. 7 Select one of the...warning screen appears, stating that when the recovery is complete, a message displays indicating that the drive has been recovered. 9 Press any key on the keyboard to its out-of-box state and specify a custom size for the C: drive. 72 Getting Started Recovering the Internal Storage Drive 2 Do one of ...
User Manual
Page 74
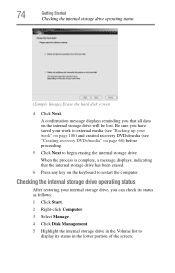
... drive operating status (Sample Image) Erase the hard disk screen 4 Click Next. When the process is complete, a message displays, indicating that all data on the keyboard to display its status as follows: 1 Click Start. 2 Right-click Computer. 3 Select Manage. 4 Click Disk Management. 5 Highlight the internal storage drive in the lower portion...
... drive operating status (Sample Image) Erase the hard disk screen 4 Click Next. When the process is complete, a message displays, indicating that all data on the keyboard to display its status as follows: 1 Click Start. 2 Right-click Computer. 3 Select Manage. 4 Click Disk Management. 5 Highlight the internal storage drive in the lower portion...
User Manual
Page 75
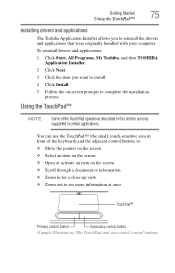
Using the TouchPad™ NOTE Some of the keyboard) and the adjacent control buttons to: ❖ Move ...The TouchPad and associated control buttons To reinstall drivers and applications: 1 Click Start, All Programs, My Toshiba, and then TOSHIBA Application Installer. 2 Click Next. 3 Click the item you to reinstall the drivers and applications that ...were originally bundled with your computer. Getting Started 75 Using the TouchPad™ Installing drivers and applications The Toshiba Application Installer allows you want to install. 4 Click Install. 5 Follow the on the screen ❖...
Using the TouchPad™ NOTE Some of the keyboard) and the adjacent control buttons to: ❖ Move ...The TouchPad and associated control buttons To reinstall drivers and applications: 1 Click Start, All Programs, My Toshiba, and then TOSHIBA Application Installer. 2 Click Next. 3 Click the item you to reinstall the drivers and applications that ...were originally bundled with your computer. Getting Started 75 Using the TouchPad™ Installing drivers and applications The Toshiba Application Installer allows you want to install. 4 Click Install. 5 Follow the on the screen ❖...
User Manual
Page 82
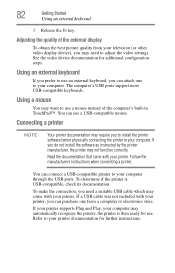
...you can purchase one to your computer. Refer to your printer documentation for further instructions. Using an external keyboard If you prefer to use an external keyboard, you need a suitable USB cable which may come with your computer may need to use a USB-compatible...instructions when connecting a printer. If your printer supports Plug and Play, your printer. The computer's USB ports support most USB-compatible keyboards. Using a mouse You may not function correctly. If you may automatically recognize the printer; Adjusting the quality of the computer's built-...
...you can purchase one to your computer. Refer to your printer documentation for further instructions. Using an external keyboard If you prefer to use an external keyboard, you need a suitable USB cable which may come with your computer may need to use a USB-compatible...instructions when connecting a printer. If your printer supports Plug and Play, your printer. The computer's USB ports support most USB-compatible keyboards. Using a mouse You may not function correctly. If you may automatically recognize the printer; Adjusting the quality of the computer's built-...
User Manual
Page 94
... button until the ON/OFF light glows white. For more information, see "Taking care of the computer. For information about taking care of the computer's keyboard, speaker, and other openings. NOTE Please handle your operating system documentation or Help and Support for your computer This section gives tips on page 142...
... button until the ON/OFF light glows white. For more information, see "Taking care of the computer. For information about taking care of the computer's keyboard, speaker, and other openings. NOTE Please handle your operating system documentation or Help and Support for your computer This section gives tips on page 142...
User Manual
Page 97
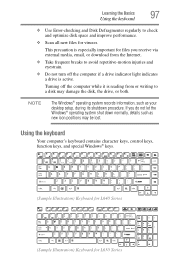
...174; operating system records information, such as new icon positions may damage the disk, the drive, or both. Learning the Basics 97 Using the keyboard ❖ Use Error-checking and Disk Defragmenter regularly to check and optimize disk space and improve performance. ❖ Scan all new files for ... not let the Windows® operating system shut down normally, details such as your desktop setup, during its shutdown procedure. Using the keyboard Your computer's keyboard contains character keys, control keys, function keys, and special Windows® keys. (Sample Illustration...
...174; operating system records information, such as new icon positions may damage the disk, the drive, or both. Learning the Basics 97 Using the keyboard ❖ Use Error-checking and Disk Defragmenter regularly to check and optimize disk space and improve performance. ❖ Scan all new files for ... not let the Windows® operating system shut down normally, details such as your desktop setup, during its shutdown procedure. Using the keyboard Your computer's keyboard contains character keys, control keys, function keys, and special Windows® keys. (Sample Illustration...
User Manual
Page 98
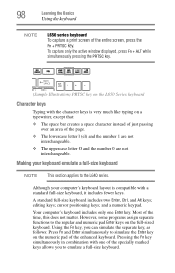
...you can simulate the separate key, as follows: Press Fn and Enter simultaneously to simulate the Enter key on the full-sized keyboard. editing keys; cursor positioning keys; However, some programs assign separate functions to the L640 series. Pressing the Fn key simultaneously ...in combination with a standard full-size keyboard, it includes fewer keys. Most of the enhanced keyboard. A standard full-size keyboard includes two Enter, Ctrl, and Alt keys; Your computer's keyboard includes only one of the entire screen, press the Fn + PRTSC...
...you can simulate the separate key, as follows: Press Fn and Enter simultaneously to simulate the Enter key on the full-sized keyboard. editing keys; cursor positioning keys; However, some programs assign separate functions to the L640 series. Pressing the Fn key simultaneously ...in combination with a standard full-size keyboard, it includes fewer keys. Most of the enhanced keyboard. A standard full-size keyboard includes two Enter, Ctrl, and Alt keys; Your computer's keyboard includes only one of the entire screen, press the Fn + PRTSC...
User Manual
Page 99
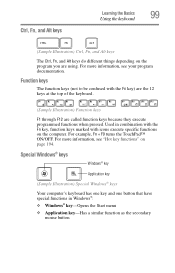
...F9 turns the TouchPad™ ON/OFF. Special Windows® keys Windows® key Application key (Sample Illustration) Special Windows® keys Your computer's keyboard has one key and one button that have special functions in combination with the Fn key, function keys marked with the Fn key) are the... mouse button For more information, see "Hot key functions" on the computer. Ctrl, Fn, and Alt keys Learning the Basics 99 Using the keyboard (Sample Illustration) Ctrl, Fn, and Alt keys The Ctrl, Fn, and Alt keys do different things depending on the program you are called ...
...F9 turns the TouchPad™ ON/OFF. Special Windows® keys Windows® key Application key (Sample Illustration) Special Windows® keys Your computer's keyboard has one key and one button that have special functions in combination with the Fn key, function keys marked with the Fn key) are the... mouse button For more information, see "Hot key functions" on the computer. Ctrl, Fn, and Alt keys Learning the Basics 99 Using the keyboard (Sample Illustration) Ctrl, Fn, and Alt keys The Ctrl, Fn, and Alt keys do different things depending on the program you are called ...
User Manual
Page 100
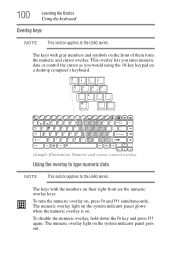
...and symbols on . To turn the numeric overlay on their right front are the numeric overlay keys. The numeric overlay light on a desktop computer's keyboard. (Sample Illustration) Numeric and cursor control overlay Using the overlay to type numeric data NOTE This section applies to the L640 series. This overlay ... control the cursor as you would using the 10-key keypad on the system indicator panel goes out. 100 Learning the Basics Using the keyboard Overlay keys NOTE This section applies to the L640 series. To disable the numeric overlay, hold down the Fn key and press F11 again...
...and symbols on . To turn the numeric overlay on their right front are the numeric overlay keys. The numeric overlay light on a desktop computer's keyboard. (Sample Illustration) Numeric and cursor control overlay Using the overlay to type numeric data NOTE This section applies to the L640 series. This overlay ... control the cursor as you would using the 10-key keypad on the system indicator panel goes out. 100 Learning the Basics Using the keyboard Overlay keys NOTE This section applies to the L640 series. To disable the numeric overlay, hold down the Fn key and press F11 again...


