User Manual
Page 29
Contents Introduction 36 This guide 38 Safety icons 39 Other icons used 39 Your computer's features and specifications 40 Other documentation 40 Service options 40 Chapter 1: Getting Started 41 Selecting a place to work 41 Setting up a work environment 41 Keeping yourself comfortable 42 Precautions 42 Important information on your computer's cooling fan 44 Setting up your computer 44 Connecting to a power source 45 Charging the main battery 47 29
Contents Introduction 36 This guide 38 Safety icons 39 Other icons used 39 Your computer's features and specifications 40 Other documentation 40 Service options 40 Chapter 1: Getting Started 41 Selecting a place to work 41 Setting up a work environment 41 Keeping yourself comfortable 42 Precautions 42 Important information on your computer's cooling fan 44 Setting up your computer 44 Connecting to a power source 45 Charging the main battery 47 29
User Manual
Page 31
... 98 Ctrl, Fn, and Alt keys 99 Function keys 99 Special Windows® keys 99 Overlay keys 100 Starting a program 101 Starting a program from the Start menu.........101 Starting a program from Windows® Explorer 102 Starting a program using the Search programs and files field 103 Saving your work 103 Printing your work 105 Backing up...
... 98 Ctrl, Fn, and Alt keys 99 Function keys 99 Special Windows® keys 99 Overlay keys 100 Starting a program 101 Starting a program from the Start menu.........101 Starting a program from Windows® Explorer 102 Starting a program using the Search programs and files field 103 Saving your work 103 Printing your work 105 Backing up...
User Manual
Page 40
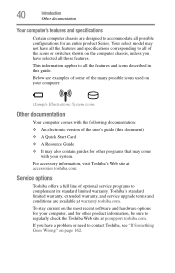
... examples of some of the many possible icons used on the computer chassis, unless you have a problem or need to contact Toshiba, see "If Something Goes Wrong" on the most recent software and hardware options for other programs that may come with the ...this guide. For accessory information, visit Toshiba's Web site at warranty.toshiba.com. 40 Introduction Other documentation Your computer's features and specifications Certain computer chassis are designed to accommodate all the features and icons described in this document) ❖ A Quick Start Card ❖ A Resource Guide &#...
... examples of some of the many possible icons used on the computer chassis, unless you have a problem or need to contact Toshiba, see "If Something Goes Wrong" on the most recent software and hardware options for other programs that may come with the ...this guide. For accessory information, visit Toshiba's Web site at warranty.toshiba.com. 40 Introduction Other documentation Your computer's features and specifications Certain computer chassis are designed to accommodate all the features and icons described in this document) ❖ A Quick Start Card ❖ A Resource Guide &#...
User Manual
Page 41
Chapter 1 Getting Started This chapter provides tips for using your computer effectively, summarizes how to connect components, and explains what to do the first time you are using, ...
Chapter 1 Getting Started This chapter provides tips for using your computer effectively, summarizes how to connect components, and explains what to do the first time you are using, ...
User Manual
Page 42
... moisture can cause electric shock or fire, resulting in damage or serious injury. Keeping yourself comfortable The Toshiba Instruction Manual for Safety and Comfort, included with the underside or surface of travel. 42 Getting Started Selecting a place to work To keep your computer in prime operating condition, protect your work environment and...
... moisture can cause electric shock or fire, resulting in damage or serious injury. Keeping yourself comfortable The Toshiba Instruction Manual for Safety and Comfort, included with the underside or surface of travel. 42 Getting Started Selecting a place to work To keep your computer in prime operating condition, protect your work environment and...
User Manual
Page 43
... files for Safety and Comfort" that generate strong magnetic fields, such as large stereo speakers. Placing a magnet too close to a disk can become hot! Getting Started 43 Selecting a place to work ❖ Avoid prolonged physical contact with your computer. Never place a heavy object on some disks is shipped with the underside...
... files for Safety and Comfort" that generate strong magnetic fields, such as large stereo speakers. Placing a magnet too close to a disk can become hot! Getting Started 43 Selecting a place to work ❖ Avoid prolonged physical contact with your computer. Never place a heavy object on some disks is shipped with the underside...
User Manual
Page 44
... the computer. To use external power or to charge the battery you can block the vents located at the base of the computer. 44 Getting Started Setting up your computer Important information on your computer's cooling fan Your computer may have adequate ventilation and are not limited to, a mouse, keyboard, printer...
... the computer. To use external power or to charge the battery you can block the vents located at the base of the computer. 44 Getting Started Setting up your computer Important information on your computer's cooling fan Your computer may have adequate ventilation and are not limited to, a mouse, keyboard, printer...
User Manual
Page 45
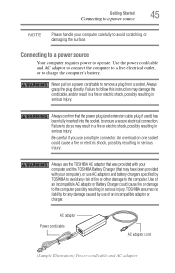
Getting Started 45 Connecting to a power source NOTE Please handle your computer), or use...and/or result in a fire or electric shock, possibly resulting in serious injury. Be careful if you use the TOSHIBA AC adaptor that was provided with your computer carefully to ensure a secure electrical connection. Use of an incompatible adaptor or... electric shock, possibly resulting in serious injury. Always confirm that may have been provided with your computer and the TOSHIBA Battery Charger (that the power plug (and extension cable plug if used) has been fully inserted into the socket...
Getting Started 45 Connecting to a power source NOTE Please handle your computer), or use...and/or result in a fire or electric shock, possibly resulting in serious injury. Be careful if you use the TOSHIBA AC adaptor that was provided with your computer carefully to ensure a secure electrical connection. Use of an incompatible adaptor or... electric shock, possibly resulting in serious injury. Always confirm that may have been provided with your computer and the TOSHIBA Battery Charger (that the power plug (and extension cable plug if used) has been fully inserted into the socket...
User Manual
Page 46
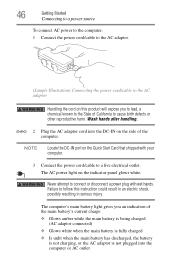
... handling. _ + 2 Plug the AC adaptor cord into the computer or AC outlet NOTE Locate the DC-IN port on the Quick Start Card that shipped with wet hands. 46 Getting Started Connecting to a power source To connect AC power to the computer: 1 Connect the power cord/cable to the AC adaptor. (Sample...
... handling. _ + 2 Plug the AC adaptor cord into the computer or AC outlet NOTE Locate the DC-IN port on the Quick Start Card that shipped with wet hands. 46 Getting Started Connecting to a power source To connect AC power to the computer: 1 Connect the power cord/cable to the AC adaptor. (Sample...
User Manual
Page 47
... the power required for information on page 124 for system operation and will be used . Your computer's Power Options utility can damage the battery. Getting Started 47 Charging the main battery ❖ Flashes amber when the main battery charge is low and it is not receiving correct input from the AC...
... the power required for information on page 124 for system operation and will be used . Your computer's Power Options utility can damage the battery. Getting Started 47 Charging the main battery ❖ Flashes amber when the main battery charge is low and it is not receiving correct input from the AC...
User Manual
Page 48
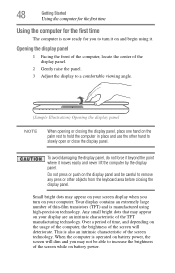
... panel NOTE When opening or closing the display panel. Any small bright dots that may appear on and begin using high-precision technology. 48 Getting Started Using the computer for the first time Using the computer for the first time The computer is now ready for you to turn on the...
... panel NOTE When opening or closing the display panel. Any small bright dots that may appear on and begin using high-precision technology. 48 Getting Started Using the computer for the first time Using the computer for the first time The computer is now ready for you to turn on the...
User Manual
Page 49
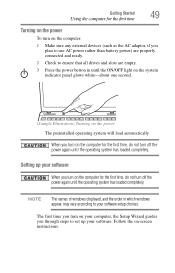
... glows white-about one second. (Sample Illustration) Turning on the power The preinstalled operating system will load automatically. Setting up your software setup choices. Getting Started 49 Using the computer for the first time Turning on the power To turn on the computer: 1 Make sure any external devices (such as the...
... glows white-about one second. (Sample Illustration) Turning on the power The preinstalled operating system will load automatically. Setting up your software setup choices. Getting Started 49 Using the computer for the first time Turning on the power To turn on the computer: 1 Make sure any external devices (such as the...
User Manual
Page 50
...'s memory if you periodic updates, announcements, and special offers applicable to complete Product Registration will not diminish Customer rights under the Toshiba standard limited Warranty. 50 Getting Started Registering your computer with Toshiba Registering your computer with enough memory to run most of data. NOTE To register online, you may want to: ❖...
...'s memory if you periodic updates, announcements, and special offers applicable to complete Product Registration will not diminish Customer rights under the Toshiba standard limited Warranty. 50 Getting Started Registering your computer with Toshiba Registering your computer with enough memory to run most of data. NOTE To register online, you may want to: ❖...
User Manual
Page 51
Getting Started 51 Adding memory (optional) NOTE Before adding external devices or memory, Toshiba recommends setting up your software. The surrounding area may also be hot. To avoid damaging the computer's screws, use a small Phillips screwdriver that is the ... this procedure. Installing a memory module with the computer's power on page 49. If you install or remove a memory module, turn off the computer using the Start menu. The computer has two memory slots-Slot A and Slot B. Slot B is in minor bodily injury. See "Setting up your software" on may be hot...
Getting Started 51 Adding memory (optional) NOTE Before adding external devices or memory, Toshiba recommends setting up your software. The surrounding area may also be hot. To avoid damaging the computer's screws, use a small Phillips screwdriver that is the ... this procedure. Installing a memory module with the computer's power on page 49. If you install or remove a memory module, turn off the computer using the Start menu. The computer has two memory slots-Slot A and Slot B. Slot B is in minor bodily injury. See "Setting up your software" on may be hot...
User Manual
Page 52
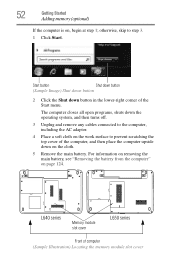
...adaptor. 4 Place a soft cloth on the cloth. 5 Remove the main battery. L640 series Memory module slot cover L650 series Front of the Start menu. 52 Getting Started Adding memory (optional) If the computer is on page 124. otherwise, skip to prevent scratching the top cover of the computer, and then place... the computer upside down button in the lower-right corner of computer (Sample Illustration) Locating the memory module slot cover Start button Shut down button (Sample Image) Shut down button 2 Click the Shut down on the work surface to step 3. 1 Click...
...adaptor. 4 Place a soft cloth on the cloth. 5 Remove the main battery. L640 series Memory module slot cover L650 series Front of the Start menu. 52 Getting Started Adding memory (optional) If the computer is on page 124. otherwise, skip to prevent scratching the top cover of the computer, and then place... the computer upside down button in the lower-right corner of computer (Sample Illustration) Locating the memory module slot cover Start button Shut down button (Sample Image) Shut down button 2 Click the Shut down on the work surface to step 3. 1 Click...
User Manual
Page 53
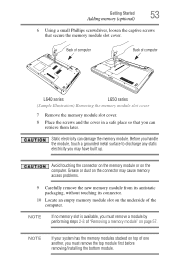
... the memory module. Grease or dust on top of one another, you must remove the top module first before removing/installing the bottom module. Getting Started 53 Adding memory (optional) 6 Using a small Phillips screwdriver, loosen the captive screws that you may cause memory access problems. 9 Carefully remove the new memory module...
... the memory module. Grease or dust on top of one another, you must remove the top module first before removing/installing the bottom module. Getting Started 53 Adding memory (optional) 6 Using a small Phillips screwdriver, loosen the captive screws that you may cause memory access problems. 9 Carefully remove the new memory module...

User Manual
Page 54
54 Getting Started Adding memory (optional) NOTE For this model, Slot A is the top slot. Slot B is the bottom slot. Position the module toward the socket, aligning the ...
54 Getting Started Adding memory (optional) NOTE For this model, Slot A is the top slot. Slot B is the bottom slot. Position the module toward the socket, aligning the ...
User Manual
Page 55
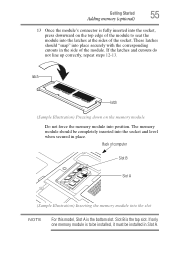
Getting Started 55 Adding memory (optional) 13 Once the module's connector is fully inserted into the socket, press downward on the memory module Do not force the ...
Getting Started 55 Adding memory (optional) 13 Once the module's connector is fully inserted into the socket, press downward on the memory module Do not force the ...
User Manual
Page 56
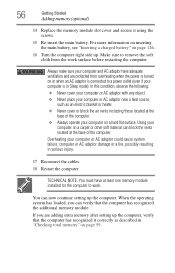
..., such as described in serious injury. 17 Reconnect the cables. 18 Restart the computer. Make sure to work surface before restarting the computer. 56 Getting Started Adding memory (optional) 14 Replace the memory module slot cover and secure it correctly as an electric blanket or heater. ❖ Never cover or block...
..., such as described in serious injury. 17 Reconnect the cables. 18 Restart the computer. Make sure to work surface before restarting the computer. 56 Getting Started Adding memory (optional) 14 Replace the memory module slot cover and secure it correctly as an electric blanket or heater. ❖ Never cover or block...
User Manual
Page 57
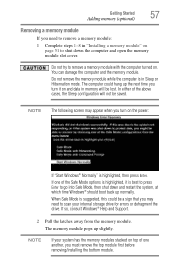
... If your internal storage drive for errors or defragment the drive. The memory module pops up the next time you turn on the power: If "Start Windows® Normally" is in "Installing a memory module" on page 51 to remove a memory module with the computer turned on and data in memory will... and the memory module. Do not try to shut down and restart the system, at which time Windows® should boot back up normally. Getting Started 57 Adding memory (optional) Removing a memory module If you need to go into Safe Mode, then shut down the computer and open the memory module...
... If your internal storage drive for errors or defragment the drive. The memory module pops up the next time you turn on the power: If "Start Windows® Normally" is in "Installing a memory module" on page 51 to remove a memory module with the computer turned on and data in memory will... and the memory module. Do not try to shut down and restart the system, at which time Windows® should boot back up normally. Getting Started 57 Adding memory (optional) Removing a memory module If you need to go into Safe Mode, then shut down the computer and open the memory module...


