User Guide
Page 39
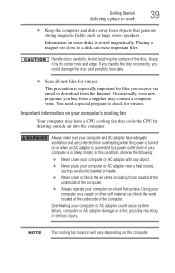
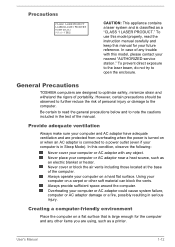
...may have adequate ventilation and are protected from overheating when the power is in serious injury. In this condition, observe the following: ❖ Never cover your computer or AC adaptor with any object. ❖ Never place your computer or AC adaptor near a heat source, such as large stereo...computer and AC adaptor have a CPU cooling fan that generate strong magnetic fields, such as an electric blanket or heater. ❖ Never cover or block the air vents including those located at the underside of the computer. ❖ Always operate your computer on your computer's cooling ...
...may have adequate ventilation and are protected from overheating when the power is in serious injury. In this condition, observe the following: ❖ Never cover your computer or AC adaptor with any object. ❖ Never place your computer or AC adaptor near a heat source, such as large stereo...computer and AC adaptor have a CPU cooling fan that generate strong magnetic fields, such as an electric blanket or heater. ❖ Never cover or block the air vents including those located at the underside of the computer. ❖ Always operate your computer on your computer's cooling ...
User Guide
Page 45
.... You will be installed in good condition. The surrounding area may be hot. You can be lost. Avoid touching the cover, the module(s), and the surrounding area before replacing it. Failure to run most of the computer. NOTE Before adding external devices or memory...memory module(s) may also be hot. You may damage the computer, the module, or both. See "Setting up your system or visit accessories.toshiba.com. To avoid damaging the computer's screws, use complex software or process large amounts of the correct size that is in minor bodily injury...
.... You will be installed in good condition. The surrounding area may be hot. You can be lost. Avoid touching the cover, the module(s), and the surrounding area before replacing it. Failure to run most of the computer. NOTE Before adding external devices or memory...memory module(s) may also be hot. You may damage the computer, the module, or both. See "Setting up your system or visit accessories.toshiba.com. To avoid damaging the computer's screws, use complex software or process large amounts of the correct size that is in minor bodily injury...
User Guide
Page 46
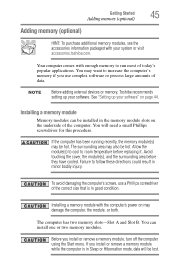
... the top slot. otherwise, skip to your Quick Start document. NOTE To locate your memory module slot cover please refer to step 3. 1 Click the Start button. Do not try to prevent scratching the top cover of the Start menu. The computer closes all open programs, shuts down button in Slot A. Start button...
... the top slot. otherwise, skip to your Quick Start document. NOTE To locate your memory module slot cover please refer to step 3. 1 Click the Start button. Do not try to prevent scratching the top cover of the Start menu. The computer closes all open programs, shuts down button in Slot A. Start button...
User Guide
Page 47
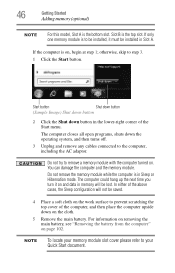
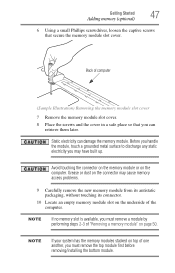
... the memory module or on the underside of computer (Sample Illustration) Removing the memory module slot cover 7 Remove the memory module slot cover. 8 Place the screws and the cover in a safe place so that secure the memory module slot cover. Back of the computer. Grease or dust on the connector may have built up.
... the memory module or on the underside of computer (Sample Illustration) Removing the memory module slot cover 7 Remove the memory module slot cover. 8 Place the screws and the cover in a safe place so that secure the memory module slot cover. Back of the computer. Grease or dust on the connector may have built up.
User Guide
Page 49
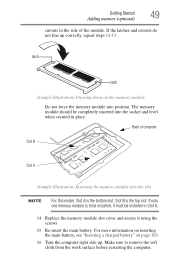
... slot. If the latches and cutouts do not line up . Getting Started 49 Adding memory (optional) cutouts in Slot A. 14 Replace the memory module slot cover and secure it must be completely inserted into the socket and level when secured in place.
... slot. If the latches and cutouts do not line up . Getting Started 49 Adding memory (optional) cutouts in Slot A. 14 Replace the memory module slot cover and secure it must be completely inserted into the socket and level when secured in place.
User Guide
Page 50
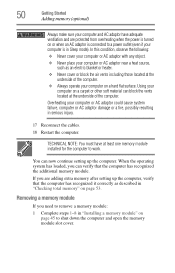
... on a carpet or other soft material can verify that the computer has recognized it correctly as an electric blanket or heater. ❖ Never cover or block the air vents including those located at the underside of the computer. 50 Getting Started Adding memory (optional) Always make sure your ... block the vents located at least one memory module installed for the computer to work. In this condition, observe the following: ❖ Never cover your computer or AC adaptor with any object. ❖ Never place your computer or AC adaptor near a heat source, such as described in...
... on a carpet or other soft material can verify that the computer has recognized it correctly as an electric blanket or heater. ❖ Never cover or block the air vents including those located at the underside of the computer. 50 Getting Started Adding memory (optional) Always make sure your ... block the vents located at least one memory module installed for the computer to work. In this condition, observe the following: ❖ Never cover your computer or AC adaptor with any object. ❖ Never place your computer or AC adaptor near a heat source, such as described in...
User Guide
Page 52
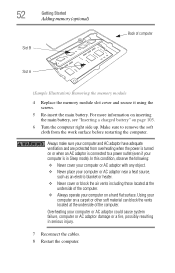
... the computer. ❖ Always operate your computer or AC adaptor near a heat source, such as an electric blanket or heater. ❖ Never cover or block the air vents including those located at the underside of computer Slot A (Sample Illustration) Removing the memory module 4 Replace the memory module... slot cover and secure it using the screws. 5 Re-insert the main battery. Make sure to a power outlet (even if your computer or AC ...
... the computer. ❖ Always operate your computer or AC adaptor near a heat source, such as an electric blanket or heater. ❖ Never cover or block the air vents including those located at the underside of computer Slot A (Sample Illustration) Removing the memory module 4 Replace the memory module... slot cover and secure it using the screws. 5 Re-insert the main battery. Make sure to a power outlet (even if your computer or AC ...
User Guide
Page 53
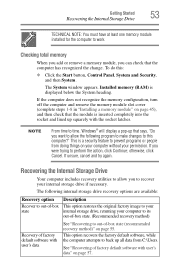
..., click Cancel. To do this computer?" If the computer does not recognize the memory configuration, turn off the computer and remove the memory module slot cover (complete steps 1-8 in "Installing a memory module" on page 57. This is a security feature to perform the action, click Continue; This option recovers the factory default...
..., click Cancel. To do this computer?" If the computer does not recognize the memory configuration, turn off the computer and remove the memory module slot cover (complete steps 1-8 in "Installing a memory module" on page 57. This is a security feature to perform the action, click Continue; This option recovers the factory default...
User Guide
Page 89
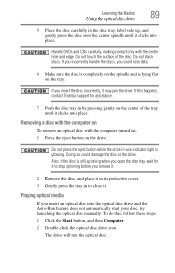
... pressing gently on the tray. Also, if the disc is still spinning when you remove it. 2 Remove the disc, and place it in its protective cover. 3 Gently press the tray in -use indicator light is lying flat on the center of the disc. Handle DVDs and CDs carefully, making contact only... discs, you insert an optical disc into place. Playing optical media If you could damage the disc or the drive. To do this happens, contact Toshiba support for it to close it. Learning the Basics 89 Using the optical disc drive 5 Place the disc carefully in the disc tray, label side...
... pressing gently on the tray. Also, if the disc is still spinning when you remove it. 2 Remove the disc, and place it in its protective cover. 3 Gently press the tray in -use indicator light is lying flat on the center of the disc. Handle DVDs and CDs carefully, making contact only... discs, you insert an optical disc into place. Playing optical media If you could damage the disc or the drive. To do this happens, contact Toshiba support for it to close it. Learning the Basics 89 Using the optical disc drive 5 Place the disc carefully in the disc tray, label side...
User Guide
Page 91
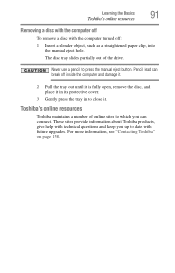
... as a straightened paper clip, into the manual eject hole. Toshiba's online resources Toshiba maintains a number of the drive. For more information, see "Contacting Toshiba" on page 158. The disc tray slides partially out of... online sites to which you up to press the manual eject button. Pencil lead can connect. Learning the Basics 91 Toshiba's online...off To remove a disc with future upgrades. These sites provide information about Toshiba products, give help with technical questions and keep you can break off ...
... as a straightened paper clip, into the manual eject hole. Toshiba's online resources Toshiba maintains a number of the drive. For more information, see "Contacting Toshiba" on page 158. The disc tray slides partially out of... online sites to which you up to press the manual eject button. Pencil lead can connect. Learning the Basics 91 Toshiba's online...off To remove a disc with future upgrades. These sites provide information about Toshiba products, give help with technical questions and keep you can break off ...
User Guide
Page 92
Toshiba's energy-saver design Your computer enters a low-power suspension mode when it many times. 92 Many of these ...-Ion) battery that you are away from an AC outlet. We recommend you leave these energy-saving features have been preset by Toshiba. You can use it for longer periods while traveling. It has a number of other features that enhance its maximum energy efficiency,...is not being used, thereby conserving energy and saving money in the process. Chapter 3 Mobile Computing This chapter covers all aspects of using your computer to operate at its energy efficiency.
Toshiba's energy-saver design Your computer enters a low-power suspension mode when it many times. 92 Many of these ...-Ion) battery that you are away from an AC outlet. We recommend you leave these energy-saving features have been preset by Toshiba. You can use it for longer periods while traveling. It has a number of other features that enhance its maximum energy efficiency,...is not being used, thereby conserving energy and saving money in the process. Chapter 3 Mobile Computing This chapter covers all aspects of using your computer to operate at its energy efficiency.
User Guide
Page 107
... cords, and compact discs. They all provide plenty of carrying cases for more information see "Hot Keys/TOSHIBA Cards" on a sunny ledge or in a place where it could get wet or covered in dust. ❖ Always travel with the computer in a carrying case. Contact your authorized... Toshiba representative for the computer. Mobile Computing Traveling tips 107 Traveling tips The environmental precautions listed in "Selecting a ...
... cords, and compact discs. They all provide plenty of carrying cases for more information see "Hot Keys/TOSHIBA Cards" on a sunny ledge or in a place where it could get wet or covered in dust. ❖ Always travel with the computer in a carrying case. Contact your authorized... Toshiba representative for the computer. Mobile Computing Traveling tips 107 Traveling tips The environmental precautions listed in "Selecting a ...
User Guide
Page 135
It covers the problems you solve many problems by yourself. If you may require help you are most likely to encounter. Others may encounter when using your network administrator or the manufacturer of this chapter. Problems that suddenly freezes all else fails, contact Toshiba. If all operations...window appears. 135 This chapter aims to help from your computer are relatively easy to identify and solve. You will find information on Toshiba's support services at the end of the software program. Chapter 6 If Something Goes Wrong Some problems you are working with a program...
It covers the problems you solve many problems by yourself. If you may require help you are most likely to encounter. Others may encounter when using your network administrator or the manufacturer of this chapter. Problems that suddenly freezes all else fails, contact Toshiba. If all operations...window appears. 135 This chapter aims to help from your computer are relatively easy to identify and solve. You will find information on Toshiba's support services at the end of the software program. Chapter 6 If Something Goes Wrong Some problems you are working with a program...
User Guide
Page 187
...track button 88 using 88 volume increase/decrease buttons 88 memory adding (optional) 45 check total memory 53 removing memory module slot cover 47 Memory card reader inserting memory media 114 removing memory media 115 using 114 memory module installation 45 inserting into socket 48 removing ... 79 N network accessing 112 connecting your computer 112 networking wireless 111 notification area 111 O ON/OFF indicator light 97 online resources Toshiba 91 optical disc Auto-Run feature 89 handling 89 inserting 88 playing optical media 89 positioning 89 recording optical media 90 removing with ...
...track button 88 using 88 volume increase/decrease buttons 88 memory adding (optional) 45 check total memory 53 removing memory module slot cover 47 Memory card reader inserting memory media 114 removing memory media 115 using 114 memory module installation 45 inserting into socket 48 removing ... 79 N network accessing 112 connecting your computer 112 networking wireless 111 notification area 111 O ON/OFF indicator light 97 online resources Toshiba 91 optical disc Auto-Run feature 89 handling 89 inserting 88 playing optical media 89 positioning 89 recording optical media 90 removing with ...
User Guide
Page 188
... 94 optimum performance 94 power plans selecting power plan options 100 power saving options 99 precautions safety 37 printer troubleshooting 148 problem solving contacting Toshiba 158 Startup options 139 program, starting 84 program, starting from Start menu 85 projector connecting 77 R real-time clock (RTC) battery... disc with computer on 89 and optical disc with computer off 91 battery from the computer 102 memory module 50 memory module slot cover 47 restore points troubleshooting 153 restoring your work 86 running computer on battery power 92 S safety computer 107 disposing of batteries 105...
... 94 optimum performance 94 power plans selecting power plan options 100 power saving options 99 precautions safety 37 printer troubleshooting 148 problem solving contacting Toshiba 158 Startup options 139 program, starting 84 program, starting from Start menu 85 projector connecting 77 R real-time clock (RTC) battery... disc with computer on 89 and optical disc with computer off 91 battery from the computer 102 memory module 50 memory module slot cover 47 restore points troubleshooting 153 restoring your work 86 running computer on battery power 92 S safety computer 107 disposing of batteries 105...

User Manual
Page 5
... digital format, alteration, transfer of copied material and distribution on a network) without notice. Any other intellectual property covered by TOSHIBA Corporation. Disclaimer This manual has been validated and reviewed for damages incurred directly or indirectly from this manual's production...., Intel Core and Centrino are trademarks of Advanced Micro Devices, Inc. User's Manual 1-1 Please comply with respect to TOSHIBA computers. TOSHIBA assumes no liability for accuracy. Copyright, Disclaimer and Trademarks Copyright © 2012 by copyright laws belongs to the author ...
... digital format, alteration, transfer of copied material and distribution on a network) without notice. Any other intellectual property covered by TOSHIBA Corporation. Disclaimer This manual has been validated and reviewed for damages incurred directly or indirectly from this manual's production...., Intel Core and Centrino are trademarks of Advanced Micro Devices, Inc. User's Manual 1-1 Please comply with respect to TOSHIBA computers. TOSHIBA assumes no liability for accuracy. Copyright, Disclaimer and Trademarks Copyright © 2012 by copyright laws belongs to the author ...

User Manual
Page 12
... the rouines from the apps directory (application code) you must retain the copyright notice, this list of the library used. Redistributions in this distribution is covered by the same copyright terms except that the following conditions are not to all code found in binary form must display the following conditions apply...
... the rouines from the apps directory (application code) you must retain the copyright notice, this list of the library used. Redistributions in this distribution is covered by the same copyright terms except that the following conditions are not to all code found in binary form must display the following conditions apply...
User Manual
Page 16
In this condition, observe the following: Never cover your computer or AC adaptor with this manual for the computer and any object. Always provide sufficient space around the computer. User's Manual 1-12 Be certain to note the cautions included in serious injury. General Precautions TOSHIBA computers are using, such as a printer. Provide adequate...
In this condition, observe the following: Never cover your computer or AC adaptor with this manual for the computer and any object. Always provide sufficient space around the computer. User's Manual 1-12 Be certain to note the cautions included in serious injury. General Precautions TOSHIBA computers are using, such as a printer. Provide adequate...
User Manual
Page 31
... you will find a list of charms: Search, Share, Start, Devices and Settings. This section provides basic information to know the Start screen User's Manual 2-2 It covers the following the recommendations in from the Start screen to access the desktop that you want to move to the Start screen by clicking the...
... you will find a list of charms: Search, Share, Start, Devices and Settings. This section provides basic information to know the Start screen User's Manual 2-2 It covers the following the recommendations in from the Start screen to access the desktop that you want to move to the Start screen by clicking the...

User Manual
Page 62
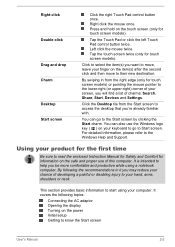
... foreign objects from entering the drive. The disc should lie below the top of its surrounding casing as this could cause misalignment. 1. Therefore, you will cover the disc tray slightly. Grasp the disc tray gently and pull until you place it lies flat. Figure 4-6 Inserting a disc 1 1. Check the surface of the...
... foreign objects from entering the drive. The disc should lie below the top of its surrounding casing as this could cause misalignment. 1. Therefore, you will cover the disc tray slightly. Grasp the disc tray gently and pull until you place it lies flat. Figure 4-6 Inserting a disc 1 1. Check the surface of the...

