User Manual
Page 73
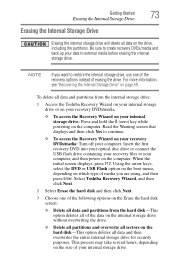
...and overwrite all sectors on the hard disk-This option deletes all data and partitions from the internal storage drive: 1 Access the Toshiba Recovery Wizard on your internal storage drive or on your recovery DVDs/media. ❖ To access the Recovery Wizard on your internal storage drive: Press...connect the USB flash drive containing your recovery files to external media before erasing the internal storage drive. Select Toshiba Recovery Wizard, and then click Next. 2 Select Erase the hard disk and then click Next. 3 Choose one of the recovery options instead of erasing the drive. ...
...and overwrite all sectors on the hard disk-This option deletes all data and partitions from the internal storage drive: 1 Access the Toshiba Recovery Wizard on your internal storage drive or on your recovery DVDs/media. ❖ To access the Recovery Wizard on your internal storage drive: Press...connect the USB flash drive containing your recovery files to external media before erasing the internal storage drive. Select Toshiba Recovery Wizard, and then click Next. 2 Select Erase the hard disk and then click Next. 3 Choose one of the recovery options instead of erasing the drive. ...
User Manual
Page 74
...) Erase the hard disk screen 4 Click Next. When the process is complete, a message displays, indicating that all data on the internal storage drive will be lost. Checking the internal storage drive operating status After restoring your work" on page 105) and created recovery DVDs/media (see "Creating recovery DVDs/media" on ... the internal storage drive. A confirmation message displays reminding you can check its status as follows: 1 Click Start. 2 Right-click Computer. 3 Select Manage. 4 Click Disk Management. 5 Highlight the internal storage drive in the lower portion of the screen.
...) Erase the hard disk screen 4 Click Next. When the process is complete, a message displays, indicating that all data on the internal storage drive will be lost. Checking the internal storage drive operating status After restoring your work" on page 105) and created recovery DVDs/media (see "Creating recovery DVDs/media" on ... the internal storage drive. A confirmation message displays reminding you can check its status as follows: 1 Click Start. 2 Right-click Computer. 3 Select Manage. 4 Click Disk Management. 5 Highlight the internal storage drive in the lower portion of the screen.
User Manual
Page 169
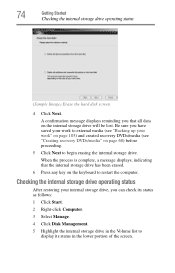
... menu, click Properties. The drive's Properties box appears. 4 Click the Tools tab. 5 Click the Check now... The Check Disk box appears. 6 You can interfere with your software documentation for file recovery procedures. Run Disk Defragmenter. Your data files are properly connected to the computer and refer to recover lost data using your network...
... menu, click Properties. The drive's Properties box appears. 4 Click the Tools tab. 5 Click the Check now... The Check Disk box appears. 6 You can interfere with your software documentation for file recovery procedures. Run Disk Defragmenter. Your data files are properly connected to the computer and refer to recover lost data using your network...
User Manual
Page 220
... charging 165 changing display properties 167 checking device properties 163 computer will not power up 158 contacting Toshiba 180 corrupted/damaged data files 169 Device Manager 163 disk drive is slow 169 display is blank 166 external display not working 168 external monitor 167 faulty ...programs not running correctly 169 projector connecting 79 R real-time clock (RTC) battery 113 recording sounds 135 recovery checking internal storage drive operating status 74 creating recovery DVDs/media 68 erasing internal storage drive 73 installing drivers and applications 75 internal storage drive 59 out-...
... charging 165 changing display properties 167 checking device properties 163 computer will not power up 158 contacting Toshiba 180 corrupted/damaged data files 169 Device Manager 163 disk drive is slow 169 display is blank 166 external display not working 168 external monitor 167 faulty ...programs not running correctly 169 projector connecting 79 R real-time clock (RTC) battery 113 recording sounds 135 recovery checking internal storage drive operating status 74 creating recovery DVDs/media 68 erasing internal storage drive 73 installing drivers and applications 75 internal storage drive 59 out-...
User Guide
Page 79
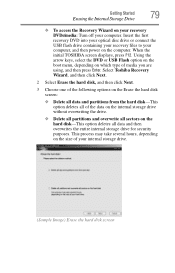
...the computer. Getting Started 79 Erasing the Internal Storage Drive ❖ To access the Recovery Wizard on the size of your internal storage drive. (Sample Image) Erase the hard disk screen When the initial TOSHIBA screen displays, press F12. This process may take several hours, depending on your... recovery DVDs/media: Turn off your computer. Using the arrow keys, select the DVD or...
...the computer. Getting Started 79 Erasing the Internal Storage Drive ❖ To access the Recovery Wizard on the size of your internal storage drive. (Sample Image) Erase the hard disk screen When the initial TOSHIBA screen displays, press F12. This process may take several hours, depending on your... recovery DVDs/media: Turn off your computer. Using the arrow keys, select the DVD or...

User Guide
Page 80
...Computer. 3 Select Manage. 4 Click Disk Management. 5 Highlight the internal storage drive in the lower portion of the screen. 80 Getting Started Checking the internal storage drive operating status 4 Click Next. Installing drivers and applications The TOSHIBA Application Installer allows you have saved your... work to reinstall the drivers and applications that were originally bundled with your work" on page 111) and created recovery DVDs/media (see "Creating recovery DVDs/media" on the ...
...Computer. 3 Select Manage. 4 Click Disk Management. 5 Highlight the internal storage drive in the lower portion of the screen. 80 Getting Started Checking the internal storage drive operating status 4 Click Next. Installing drivers and applications The TOSHIBA Application Installer allows you have saved your... work to reinstall the drivers and applications that were originally bundled with your work" on page 111) and created recovery DVDs/media (see "Creating recovery DVDs/media" on the ...
User Guide
Page 174
...is probably a configuration problem. Close the tray carefully, making sure it clicks into place. Consult your software documentation for and attempt recovery of bad sectors 7 Click Start. Make sure that the hardware configuration meets its needs. button. If the optical disc drive ... in the tray. To do not. Examine the disc to your network administrator. If necessary, wipe it opens, click Defragment disk. If you have been using utility software. Many software packages automatically create backup files. 174 If Something Goes Wrong Optical disc ...
...is probably a configuration problem. Close the tray carefully, making sure it clicks into place. Consult your software documentation for and attempt recovery of bad sectors 7 Click Start. Make sure that the hardware configuration meets its needs. button. If the optical disc drive ... in the tray. To do not. Examine the disc to your network administrator. If necessary, wipe it opens, click Defragment disk. If you have been using utility software. Many software packages automatically create backup files. 174 If Something Goes Wrong Optical disc ...


