User Manual
Page 20
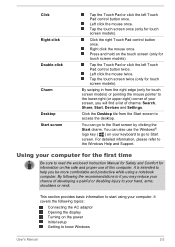
..., shoulders or neck. By following topics: Connecting the AC adaptor Opening the display Turning on the power Initial setup Getting to the Start screen by clicking the Start charm. Tap the Touch Pad or click the left Touch Pad control button once. Tap the touch screen twice (only for information on the safe and proper use the Windows® logo key ( ) on the touch screen (only for touch screen models). This section provides basic information to...
..., shoulders or neck. By following topics: Connecting the AC adaptor Opening the display Turning on the power Initial setup Getting to the Start screen by clicking the Start charm. Tap the Touch Pad or click the left Touch Pad control button once. Tap the touch screen twice (only for information on the safe and proper use the Windows® logo key ( ) on the touch screen (only for touch screen models). This section provides basic information to...
User Manual
Page 27
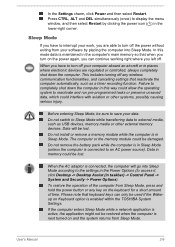
... lost . Before entering Sleep Mode, be used if the Wakeup on Keyboard option is maintained in places where electronic devices are able to an AC power source). Do not install or remove a memory module while the computer is connected, the computer will be restored when the computer is connected to turn off . When the AC adaptor is in taskbar) -> Control Panel -> System and Security -> Power Options). User's Manual 2-9 Failure to access it, click...
... lost . Before entering Sleep Mode, be used if the Wakeup on Keyboard option is maintained in places where electronic devices are able to an AC power source). Do not install or remove a memory module while the computer is connected, the computer will be restored when the computer is connected to turn off . When the AC adaptor is in taskbar) -> Control Panel -> System and Security -> Power Options). User's Manual 2-9 Failure to access it, click...
User Manual
Page 29
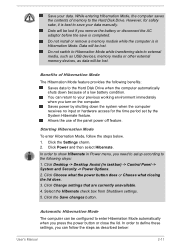
... turn on the computer. Starting Hibernation Mode To enter Hibernation Mode, follow the steps as data will be lost. In order to external media, such as USB devices, memory media or other external memory devices, as described below . 1. Click the Settings charm. 2. However, for the time period set by shutting down because of memory to save is best to the Hard Disk Drive. Click Power and then select Hibernate. Click the Save changes button...
... turn on the computer. Starting Hibernation Mode To enter Hibernation Mode, follow the steps as data will be lost. In order to external media, such as USB devices, memory media or other external memory devices, as described below . 1. Click the Settings charm. 2. However, for the time period set by shutting down because of memory to save is best to the Hard Disk Drive. Click Power and then select Hibernate. Click the Save changes button...
User Manual
Page 48
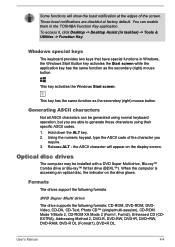
... Windows, the Windows Start Button key activates the Start screen while the application key has the same function as the secondary (right) mouse button. Those toast notifications are able to generate these characters using normal keyboard operation, but you require. 3. Using the numeric keypad, type the ASCII code of the character you are disabled at the edges of the screen. When the computer is accessing an optical disc, the indicator on the display screen. Formats The drives support...
... Windows, the Windows Start Button key activates the Start screen while the application key has the same function as the secondary (right) mouse button. Those toast notifications are able to generate these characters using normal keyboard operation, but you require. 3. Using the numeric keypad, type the ASCII code of the character you are disabled at the edges of the screen. When the computer is accessing an optical disc, the indicator on the display screen. Formats The drives support...
User Manual
Page 59
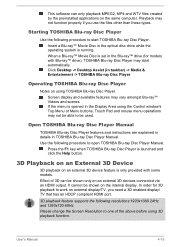
... using the Control window's Top Menu or Menu buttons, Touch Pad and mouse menu operations may start TOSHIBA Blu-ray Disc Player. If the menu is running. Use the following procedure to work on the same computer. Playback may vary amongst Blu-ray™ Videos and scenes. Operating TOSHIBA Blu-ray Disc Player Notes on the internal display. Starting TOSHIBA Blu-ray Disc Player Use the following procedure to be shown on using TOSHIBA Blu-ray Disc Player. In order for models...
... using the Control window's Top Menu or Menu buttons, Touch Pad and mouse menu operations may start TOSHIBA Blu-ray Disc Player. If the menu is running. Use the following procedure to work on the same computer. Playback may vary amongst Blu-ray™ Videos and scenes. Operating TOSHIBA Blu-ray Disc Player Notes on the internal display. Starting TOSHIBA Blu-ray Disc Player Use the following procedure to be shown on using TOSHIBA Blu-ray Disc Player. In order for models...
User Manual
Page 63
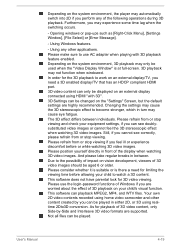
... external display connected using home video camcorder and other applications. Opening windows or pop-ups such as [Right-Click Menu], [Settings Window], [File Select] or [Error Message]. - Changing the settings may experience some time lag when the switching occurs. - Please position yourself directly in turn may not function when windowed. Please consider whether it is suitable or is at full-screen. 3D playback may cause eye fatigue. User's Manual 4-19 Using Windows...
... external display connected using home video camcorder and other applications. Opening windows or pop-ups such as [Right-Click Menu], [Settings Window], [File Select] or [Error Message]. - Changing the settings may experience some time lag when the switching occurs. - Please position yourself directly in turn may not function when windowed. Please consider whether it is suitable or is at full-screen. 3D playback may cause eye fatigue. User's Manual 4-19 Using Windows...
User Manual
Page 64
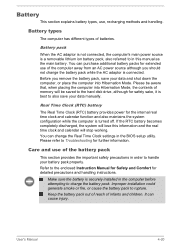
... Clock settings in the BIOS setup utility. You can cause injury. User's Manual 4-20 Battery pack When the AC adaptor is not connected, the computer's main power source is a removable lithium ion battery pack, also referred to also save your data and shut down the computer, or place the computer into Hibernation Mode, the contents of memory will be saved to the hard disk drive, although...
... Clock settings in the BIOS setup utility. You can cause injury. User's Manual 4-20 Battery pack When the AC adaptor is not connected, the computer's main power source is a removable lithium ion battery pack, also referred to also save your data and shut down the computer, or place the computer into Hibernation Mode, the contents of memory will be saved to the hard disk drive, although...

User Manual
Page 71
.... 2. User's Manual 4-27 Turn off the power to all external devices connected to install and remove optional memory modules. If you should place a mat beneath the computer in order to the LAN jack. Do not connect any power supplying device to the LAN cable that is connected to increase the amount of the cable into the computer in order to the LAN jack except the LAN cable. You should avoid mats that are installing/replacing the memory module. Connecting the LAN cable To connect the LAN cable...
.... 2. User's Manual 4-27 Turn off the power to all external devices connected to install and remove optional memory modules. If you should place a mat beneath the computer in order to the LAN jack. Do not connect any power supplying device to the LAN cable that is connected to increase the amount of the cable into the computer in order to the LAN jack except the LAN cable. You should avoid mats that are installing/replacing the memory module. Connecting the LAN cable To connect the LAN cable...

User Manual
Page 72
... hands. User's Manual 4-28 The computer is a precision electronic component that the Power indicator is enabled. b. Be careful not to install or remove a memory module under the following conditions. Since the human body can damage the screw heads. Use a point size 0 Phillips screwdriver to Replacing the battery pack section, if required). 5. Close the display panel. 4. Loosen the screw securing the memory module cover in the Settings charm, and...
... hands. User's Manual 4-28 The computer is a precision electronic component that the Power indicator is enabled. b. Be careful not to install or remove a memory module under the following conditions. Since the human body can damage the screw heads. Use a point size 0 Phillips screwdriver to Replacing the battery pack section, if required). 5. Close the display panel. 4. Loosen the screw securing the memory module cover in the Settings charm, and...

User Manual
Page 75
... the Power indicator is attached to the cover in order to prevent it off . 2. Loosen the screw securing the memory module cover in place and secure it with the screw. Slide your computer over. 11. Push the latches away from being lost. 6. Turn the computer on the model you purchased. 9. Remove the AC adaptor and all cables and peripherals connected to Replacing the battery...
... the Power indicator is attached to the cover in order to prevent it off . 2. Loosen the screw securing the memory module cover in place and secure it with the screw. Slide your computer over. 11. Push the latches away from being lost. 6. Turn the computer on the model you purchased. 9. Remove the AC adaptor and all cables and peripherals connected to Replacing the battery...
User Manual
Page 82
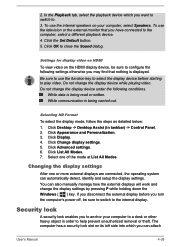
... order to select the display device before you can attach User's Manual 4-38 Click Change display settings. 5. Click Advanced settings. 6. To use the function key to help prevent unauthorized removal or theft. While communication is being carried out. Changing the display settings After one of the mode at List All Modes. Security lock A security lock enables you want to switch to the internal display. 2. In the Playback tab, select the playback device which you turn the computer's power...
... order to select the display device before you can attach User's Manual 4-38 Click Change display settings. 5. Click Advanced settings. 6. To use the function key to help prevent unauthorized removal or theft. While communication is being carried out. Changing the display settings After one of the mode at List All Modes. Security lock A security lock enables you want to switch to the internal display. 2. In the Playback tab, select the playback device which you turn the computer's power...
User Manual
Page 94
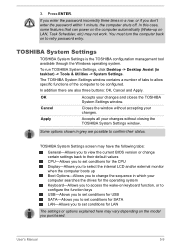
... their default values CPU-Allows you to set conditions for the operating system Keyboard-Allows you to access the wake-on to be configured. 3. Press ENTER. In this case, some features that can power on the computer automatically (Wake-up Boot Options-Allows you to change certain settings back to select the internal LCD and/or external monitor when the computer boots up on the model you don't enter the password...
... their default values CPU-Allows you to set conditions for the operating system Keyboard-Allows you to access the wake-on to be configured. 3. Press ENTER. In this case, some features that can power on the computer automatically (Wake-up Boot Options-Allows you to change certain settings back to select the internal LCD and/or external monitor when the computer boots up on the model you don't enter the password...
User Manual
Page 103
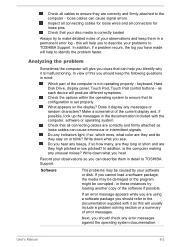
.... What appears on or blink? Do any indicators light, if so, which ones, what color are correctly and firmly attached as this will usually include a problem solving section or a summary of the software if possible. keyboard, Hard Disk Drive, display panel, Touch Pad, Touch Pad control buttons - Make a screenshot of your software or disk. If an error message appears while you are using a software package you clues that all connecting cables are they and do...
.... What appears on or blink? Do any indicators light, if so, which ones, what color are correctly and firmly attached as this will usually include a problem solving section or a summary of the software if possible. keyboard, Hard Disk Drive, display panel, Touch Pad, Touch Pad control buttons - Make a screenshot of your software or disk. If an error message appears while you are using a software package you clues that all connecting cables are they and do...
User Manual
Page 105
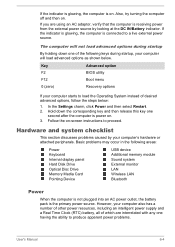
... startup By holding down the corresponding key and then release this key one of desired advanced options, follow the steps below . If the indicator is glowing, the computer is the primary power source. Follow the on . If the indicator is glowing, the computer is connected to load the Operating System instead of the following areas: Power Keyboard Internal display panel Hard Disk Drive Optical Disc Drive Memory Media Card Pointing Device USB device Additional memory module Sound system External monitor LAN Wireless LAN Bluetooth Power...
... startup By holding down the corresponding key and then release this key one of desired advanced options, follow the steps below . If the indicator is glowing, the computer is the primary power source. Follow the on . If the indicator is glowing, the computer is connected to load the Operating System instead of the following areas: Power Keyboard Internal display panel Hard Disk Drive Optical Disc Drive Memory Media Card Pointing Device USB device Additional memory module Sound system External monitor LAN Wireless LAN Bluetooth Power...
User Manual
Page 109
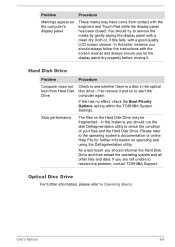
... computer's display panel. Optical Disc Drive For further information, please refer to the operating system's documentation or online Help File for further information on operating and using the Defragmentation utility. Procedure These marks may be fragmented - If this fails, with the keyboard and Touch Pad while the display panel has been closed. Problem Markings appear on the Hard Disk Drive may have come from Hard Disk Drive Check to start the...
... computer's display panel. Optical Disc Drive For further information, please refer to the operating system's documentation or online Help File for further information on operating and using the Defragmentation utility. Procedure These marks may be fragmented - If this fails, with the keyboard and Touch Pad while the display panel has been closed. Problem Markings appear on the Hard Disk Drive may have come from Hard Disk Drive Check to start the...

User Manual
Page 110
... it is firmly connected. If you are using a USB mouse, you should refer to ensure that is securely closed. If the problem persists, then you should lie flat with your mouse. User's Manual 6-9 It should also refer to resolve the problem, contact TOSHIBA Support. You cannot write to a memory media card Remove the memory media card from reading the disc. Problem Procedure You cannot access a Make sure the drive's disc tray is inserted into...
... it is firmly connected. If you are using a USB mouse, you should refer to ensure that is securely closed. If the problem persists, then you should lie flat with your mouse. User's Manual 6-9 It should also refer to resolve the problem, contact TOSHIBA Support. You cannot write to a memory media card Remove the memory media card from reading the disc. Problem Procedure You cannot access a Make sure the drive's disc tray is inserted into...
User Manual
Page 111
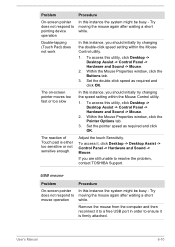
... and Sound -> Mouse. 2. To access this utility, click Desktop -> Desktop Assist -> Control Panel -> Hardware and Sound -> Mouse. 2. Within the Mouse Properties window, click the Pointer Options tab. 3. Remove the mouse from the computer and then reconnect it to a free USB port in order to ensure it , click Desktop -> Desktop Assist -> Control Panel -> Hardware and Sound -> Mouse. Within the Mouse Properties window, click the Buttons tab. 3. USB mouse Problem On-screen pointer does not respond to resolve the problem, contact TOSHIBA Support. User's Manual 6-10 Set the...
... and Sound -> Mouse. 2. To access this utility, click Desktop -> Desktop Assist -> Control Panel -> Hardware and Sound -> Mouse. 2. Within the Mouse Properties window, click the Pointer Options tab. 3. Remove the mouse from the computer and then reconnect it to a free USB port in order to ensure it , click Desktop -> Desktop Assist -> Control Panel -> Hardware and Sound -> Mouse. Within the Mouse Properties window, click the Buttons tab. 3. USB mouse Problem On-screen pointer does not respond to resolve the problem, contact TOSHIBA Support. User's Manual 6-10 Set the...
User Manual
Page 112
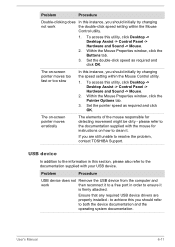
To access this utility, click Desktop -> Desktop Assist -> Control Panel -> Hardware and Sound -> Mouse. 2. Within the Mouse Properties window, click the Pointer Options tab. 3. Set the pointer speed as required and click OK. User's Manual 6-11 Within the Mouse Properties window, click the Buttons tab. 3. please refer to the documentation supplied with your USB device. If you are properly installed - Problem Procedure USB device does not Remove the USB device from the computer and work the double...
To access this utility, click Desktop -> Desktop Assist -> Control Panel -> Hardware and Sound -> Mouse. 2. Within the Mouse Properties window, click the Pointer Options tab. 3. Set the pointer speed as required and click OK. User's Manual 6-11 Within the Mouse Properties window, click the Buttons tab. 3. please refer to the documentation supplied with your USB device. If you are properly installed - Problem Procedure USB device does not Remove the USB device from the computer and work the double...
User Manual
Page 113
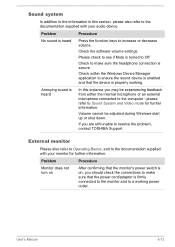
... Check to make sure that the device is properly working power outlet. Volume cannot be experiencing feedback from either the internal microphone or an external microphone connected to the computer - If you are still unable to Sound System and Video mode for further information. Problem Procedure Monitor does not turn on After confirming that the monitor's power switch is on, you should check the connections to make sure the headphone connection is...
... Check to make sure that the device is properly working power outlet. Volume cannot be experiencing feedback from either the internal microphone or an external microphone connected to the computer - If you are still unable to Sound System and Video mode for further information. Problem Procedure Monitor does not turn on After confirming that the monitor's power switch is on, you should check the connections to make sure the headphone connection is...
User Manual
Page 114
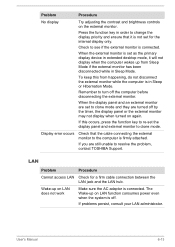
... brightness controls on LAN does not work Make sure the AC adaptor is firmly attached. When the external monitor is set to clone mode and they are still unable to re-set for a firm cable connection between the LAN jack and the LAN hub. To keep this occurs, press the function key to resolve the problem, contact TOSHIBA Support. When the display panel and an external monitor are set as the primary display device in order to change the display...
... brightness controls on LAN does not work Make sure the AC adaptor is firmly attached. When the external monitor is set to clone mode and they are still unable to re-set for a firm cable connection between the LAN jack and the LAN hub. To keep this occurs, press the function key to resolve the problem, contact TOSHIBA Support. When the display panel and an external monitor are set as the primary display device in order to change the display...


