
User Guide 1
Page 65
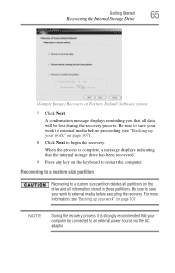
When the process is strongly recommended that the internal storage drive has been recovered. 9 Press any key on page 107. Recovering to a custom size partition Recovering to a custom size partition deletes all partitions on page 107). 8 Click Next to external media before proceeding (see "Backing up your work " on the drive and all... save your work to external media before executing the recovery. Getting Started 65 Recovering the Internal Storage Drive (Sample Image) Recovery of Factory Default Software screen 7 Click Next.
When the process is strongly recommended that the internal storage drive has been recovered. 9 Press any key on page 107. Recovering to a custom size partition Recovering to a custom size partition deletes all partitions on page 107). 8 Click Next to external media before proceeding (see "Backing up your work " on the drive and all... save your work to external media before executing the recovery. Getting Started 65 Recovering the Internal Storage Drive (Sample Image) Recovery of Factory Default Software screen 7 Click Next.

User Guide 1
Page 66
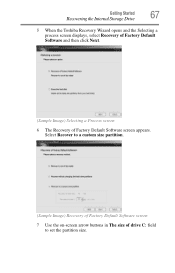
To resize and recover the C: drive using the utilities stored on page 73. Click Yes to continue. (Sample Image) Warning screen If not, skip to step 4. 4 A warning screen appears, stating that when the recovery is turned off. 2 Press and hold the 0 (zero) key on your keyboard while powering on ...1 Make sure the computer is executed all data will be deleted and rewritten. To recover using recovery DVDs/media, if you to specify the size for the C: partition. To recover using the second method, see "Restoring from recovery DVDs/media" on your computer's internal storage drive or ...
To resize and recover the C: drive using the utilities stored on page 73. Click Yes to continue. (Sample Image) Warning screen If not, skip to step 4. 4 A warning screen appears, stating that when the recovery is turned off. 2 Press and hold the 0 (zero) key on your keyboard while powering on ...1 Make sure the computer is executed all data will be deleted and rewritten. To recover using recovery DVDs/media, if you to specify the size for the C: partition. To recover using the second method, see "Restoring from recovery DVDs/media" on your computer's internal storage drive or ...
User Guide 1
Page 67
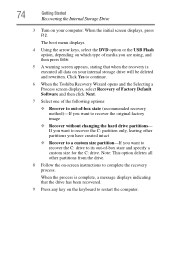
Select Recover to a custom size partition. (Sample Image) Recovery of Factory Default Software screen 7 Use the on-screen arrow buttons in The size of Factory Default Software screen appears. Getting Started 67 Recovering the Internal Storage Drive 5 When the Toshiba Recovery Wizard opens and the Selecting a process screen displays, select Recovery of Factory Default Software and then click Next. (Sample Image) Selecting a Process screen 6 The Recovery of drive C: field to set the partition size.
Select Recover to a custom size partition. (Sample Image) Recovery of Factory Default Software screen 7 Use the on-screen arrow buttons in The size of Factory Default Software screen appears. Getting Started 67 Recovering the Internal Storage Drive 5 When the Toshiba Recovery Wizard opens and the Selecting a process screen displays, select Recovery of Factory Default Software and then click Next. (Sample Image) Selecting a Process screen 6 The Recovery of drive C: field to set the partition size.
User Guide 1
Page 74
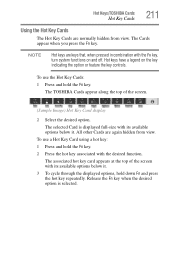
Click Yes to continue. 6 When the Toshiba Recovery Wizard opens and the Selecting a Process screen displays, select Recovery of Factory Default Software and then click Next. 7 Select one of the following options: ❖ Recover to restart the computer. 74 Getting ... displays indicating that when the recovery is executed all other partitions you have created intact ❖ Recover to a custom size partition-If you want to complete the recovery process. When the initial screen displays, press F12. The boot menu displays. 4 Using the arrow keys, select the DVD option or the USB Flash...
Click Yes to continue. 6 When the Toshiba Recovery Wizard opens and the Selecting a Process screen displays, select Recovery of Factory Default Software and then click Next. 7 Select one of the following options: ❖ Recover to restart the computer. 74 Getting ... displays indicating that when the recovery is executed all other partitions you have created intact ❖ Recover to a custom size partition-If you want to complete the recovery process. When the initial screen displays, press F12. The boot menu displays. 4 Using the arrow keys, select the DVD option or the USB Flash...

User Guide 1
Page 75
...to restore the internal storage drive, use one of the following options on the Erase the hard disk screen: ❖ Delete all data and partitions from the internal storage drive: 1 Access the Toshiba Recovery Wizard on your internal storage drive or on your recovery DVDs/media. ❖ To access the...storage drive. This process may take several hours, depending on page 61. For more information, see "Recovering the Internal Storage Drive" on the size of media you want to your computer, and then power on your recovery DVDs/media: Turn off your computer. To delete all data and ...
...to restore the internal storage drive, use one of the following options on the Erase the hard disk screen: ❖ Delete all data and partitions from the internal storage drive: 1 Access the Toshiba Recovery Wizard on your internal storage drive or on your recovery DVDs/media. ❖ To access the...storage drive. This process may take several hours, depending on page 61. For more information, see "Recovering the Internal Storage Drive" on the size of media you want to your computer, and then power on your recovery DVDs/media: Turn off your computer. To delete all data and ...

User Guide 1
Page 189
Reduce the size of the color palette to one that is capable of displaying at ...supported by clicking a blank area of the Windows® desktop. 2 Click Personalize, and then Display. 3 Adjust the screen resolution and/or color quality. 4 Click OK. Devices that do not work with the secondary control button, then clicking ...Personalize. This opens the Personalization window. Choose a theme for your desktop background, under Colors, Sounds, and Screen Saver, or change the display properties: 1 Right-click in a blank area of the desktop with your display settings ...
Reduce the size of the color palette to one that is capable of displaying at ...supported by clicking a blank area of the Windows® desktop. 2 Click Personalize, and then Display. 3 Adjust the screen resolution and/or color quality. 4 Click OK. Devices that do not work with the secondary control button, then clicking ...Personalize. This opens the Personalization window. Choose a theme for your desktop background, under Colors, Sounds, and Screen Saver, or change the display properties: 1 Right-click in a blank area of the desktop with your display settings ...
User Guide 1
Page 211
... repeatedly. Release the Fn key when the desired option is displayed full-size with the desired function. Hot keys have a legend on and off. The selected Card is selected. The TOSHIBA Cards appear along the top of the screen with the Fn key, turn system functions on the key indicating the... option or feature the key controls. Hot Keys/TOSHIBA Cards Hot Key Cards 211 Using the Hot Key Cards The ...
... repeatedly. Release the Fn key when the desired option is displayed full-size with the desired function. Hot keys have a legend on and off. The selected Card is selected. The TOSHIBA Cards appear along the top of the screen with the Fn key, turn system functions on the key indicating the... option or feature the key controls. Hot Keys/TOSHIBA Cards Hot Key Cards 211 Using the Hot Key Cards The ...

User Guide 1
Page 213
...The Application Cards are stacked under this card. To use the Card Case: 1 Click Start, All Programs, TOSHIBA, Utilities, and then Settings for the application Card to appear. 4 Click the full-size Card to choose which cards appear in the Application Card display (see "Using the Application Cards" on the far... using the Application Cards: 1 Press and hold the Fn key. Card Case The Card Case feature allows you to launch the application. The TOSHIBA Cards display at the top of the screen. (Sample Image) TOSHIBA Card display "stacked" Card 2 Click the "stacked" card on page 213).
...The Application Cards are stacked under this card. To use the Card Case: 1 Click Start, All Programs, TOSHIBA, Utilities, and then Settings for the application Card to appear. 4 Click the full-size Card to choose which cards appear in the Application Card display (see "Using the Application Cards" on the far... using the Application Cards: 1 Press and hold the Fn key. Card Case The Card Case feature allows you to launch the application. The TOSHIBA Cards display at the top of the screen. (Sample Image) TOSHIBA Card display "stacked" Card 2 Click the "stacked" card on page 213).

User Guide 1
Page 237
...peripheral - pointing device - processor - Volatile here means that is used for your finger across the TouchPad or move the pointer on -screen items, such as icons, menu items, and buttons. pixel - Generally, refers to the computer's ability to automatically configure itself automatically to... a printer or joystick, that information in a cable for "picture element." The general classes of a file include the file's type, size, and creation date. This type of memory is attached to increase the capabilities of characters entered by a device manufacturer, allows a computer ...
...peripheral - pointing device - processor - Volatile here means that is used for your finger across the TouchPad or move the pointer on -screen items, such as icons, menu items, and buttons. pixel - Generally, refers to the computer's ability to automatically configure itself automatically to... a printer or joystick, that information in a cable for "picture element." The general classes of a file include the file's type, size, and creation date. This type of memory is attached to increase the capabilities of characters entered by a device manufacturer, allows a computer ...

User Guide 1
Page 247
... not receiving or transmitting 197 no sound 194 power and batteries 186 printer 196, 197 program not responding 179 program not working properly 191 screen does not look correct/ flickers 189 Startup options 183 URL address not found 184 USB Sleep and Charge cannot use 205 USB Wakeup function ...drive 75 installing drivers and applications 77 internal storage drive 61 out-of-box state 63 restoring from recovery DVDs/ media 73 to custom size partition 65 without changing drive partitions 68 recycle bin icon 137 registering computer 51 removing an optical disc with computer on 116 battery from the...
... not receiving or transmitting 197 no sound 194 power and batteries 186 printer 196, 197 program not responding 179 program not working properly 191 screen does not look correct/ flickers 189 Startup options 183 URL address not found 184 USB Sleep and Charge cannot use 205 USB Wakeup function ...drive 75 installing drivers and applications 77 internal storage drive 61 out-of-box state 63 restoring from recovery DVDs/ media 73 to custom size partition 65 without changing drive partitions 68 recycle bin icon 137 registering computer 51 removing an optical disc with computer on 116 battery from the...

