Satellite A60/A65 Users Guide
Page 29
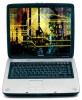
... computer's features and specifications.... 53 Turning on the power 53 Activating the power-on password 54 Using the TouchPad 55 Using TOSHIBA Touch and Launch 58 Installing additional memory (optional 62 Removing a memory module 66 Using an external keyboard 68 Connecting a mouse 68 Connecting a printer 69 Connecting a USB printer 69 Connecting a parallel printer...
... computer's features and specifications.... 53 Turning on the power 53 Activating the power-on password 54 Using the TouchPad 55 Using TOSHIBA Touch and Launch 58 Installing additional memory (optional 62 Removing a memory module 66 Using an external keyboard 68 Connecting a mouse 68 Connecting a printer 69 Connecting a USB printer 69 Connecting a parallel printer...
Satellite A60/A65 Users Guide
Page 33
... 157 Customize Your Computer 159 Security 159 Power Management 159 Toshiba Hardware Setup 161 TOSHIBA Zooming Utility 163 Application Launch Button 164 Chapter 6: If Something Goes Wrong 165 Problems that are easy to fix 165 Problems when you turn ... help you 170 Resolving a hardware conflict 171 A plan of action 171 Resolving hardware conflicts on your own .... 172 Fixing a problem with Device Manager .......... 174 Memory module problems 176 Power and the batteries 177 Keyboard problems 178 Display problems 179 Disk drive problems 182 DVD-ROM or multi-function drive problems...
... 157 Customize Your Computer 159 Security 159 Power Management 159 Toshiba Hardware Setup 161 TOSHIBA Zooming Utility 163 Application Launch Button 164 Chapter 6: If Something Goes Wrong 165 Problems that are easy to fix 165 Problems when you turn ... help you 170 Resolving a hardware conflict 171 A plan of action 171 Resolving hardware conflicts on your own .... 172 Fixing a problem with Device Manager .......... 174 Memory module problems 176 Power and the batteries 177 Keyboard problems 178 Display problems 179 Disk drive problems 182 DVD-ROM or multi-function drive problems...
Satellite A60/A65 Users Guide
Page 46
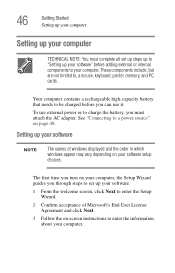
... acceptance of windows displayed and the order in which windows appear may vary depending on your software setup choices. See "Connecting to , a mouse, keyboard, printer, memory, and PC cards. Your computer contains a rechargeable high-capacity battery that needs to your computer. 46 Getting Started Setting up your computer Setting up your...
... acceptance of windows displayed and the order in which windows appear may vary depending on your software setup choices. See "Connecting to , a mouse, keyboard, printer, memory, and PC cards. Your computer contains a rechargeable high-capacity battery that needs to your computer. 46 Getting Started Setting up your computer Setting up your...

Satellite A60/A65 Users Guide
Page 47
... "Thank you may also want to: ❖ Add more memory (see "Installing additional memory (optional)" on page 46. Adding external devices NOTE Before adding external devices, Toshiba recommends setting up your computer with Toshiba icon on your computer must be completed during the initial startup... To register online, your desktop or go to the Toshiba Web site at that time, you may register with Toshiba by clicking the Register with Toshiba "Product registration is strongly recommended, and allows Toshiba to send Customer periodic updates, announcements, and special offers...
... "Thank you may also want to: ❖ Add more memory (see "Installing additional memory (optional)" on page 46. Adding external devices NOTE Before adding external devices, Toshiba recommends setting up your computer with Toshiba icon on your computer must be completed during the initial startup... To register online, your desktop or go to the Toshiba Web site at that time, you may register with Toshiba by clicking the Register with Toshiba "Product registration is strongly recommended, and allows Toshiba to send Customer periodic updates, announcements, and special offers...
Satellite A60/A65 Users Guide
Page 62
... menu. Your computer comes with your system or visit accessories.toshiba.com. Your system has one memory slot available for more information). 62 Getting Started Installing additional memory (optional) Installing additional memory (optional) HINT: To purchase additional memory modules, see the accessories information packaged with enough memory to run most of data. Before you install or...
... menu. Your computer comes with your system or visit accessories.toshiba.com. Your system has one memory slot available for more information). 62 Getting Started Installing additional memory (optional) Installing additional memory (optional) HINT: To purchase additional memory modules, see the accessories information packaged with enough memory to run most of data. Before you install or...
Satellite A60/A65 Users Guide
Page 63
... avoid damaging the computer's screws, use the computer, begin at step 1, otherwise skip to install a memory module. See "Turn Off or Shut down using Standby or Hibernation mode. 3. Do not install or remove a memory module while the DVD-ROM or multi-function drive power is on . 2. If you are adding... memory after you . The operating system turns off the computer. 2 Close the display panel and turn the...
... avoid damaging the computer's screws, use the computer, begin at step 1, otherwise skip to install a memory module. See "Turn Off or Shut down using Standby or Hibernation mode. 3. Do not install or remove a memory module while the DVD-ROM or multi-function drive power is on . 2. If you are adding... memory after you . The operating system turns off the computer. 2 Close the display panel and turn the...
Satellite A60/A65 Users Guide
Page 64
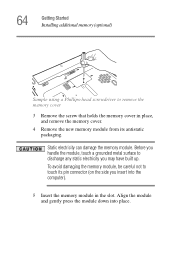
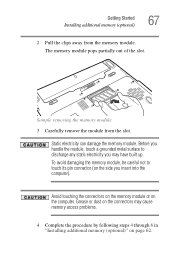
...) Sample using a Phillips-head screwdriver to remove the memory cover 3 Remove the screw that holds the memory cover in place, and remove the memory cover. 4 Remove the new memory module from its pin connector (on the side you may have built up. Align the module and gently press the module down... into the computer). 5 Insert the memory module in the slot. To avoid damaging the memory module, be careful not to discharge any static electricity you insert into place. Static electricity can damage the...
...) Sample using a Phillips-head screwdriver to remove the memory cover 3 Remove the screw that holds the memory cover in place, and remove the memory cover. 4 Remove the new memory module from its pin connector (on the side you may have built up. Align the module and gently press the module down... into the computer). 5 Insert the memory module in the slot. To avoid damaging the memory module, be careful not to discharge any static electricity you insert into place. Static electricity can damage the...
Satellite A60/A65 Users Guide
Page 65
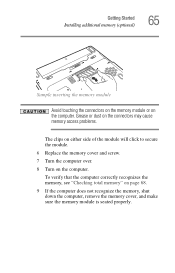
... the computer over. 8 Turn on page 68. 9 If the computer does not recognize the memory, shut down the computer, remove the memory cover, and make sure the memory module is seated properly. Getting Started Installing additional memory (optional) 65 Sample inserting the memory module Avoid touching the connectors on the memory module or on the computer.
... the computer over. 8 Turn on page 68. 9 If the computer does not recognize the memory, shut down the computer, remove the memory cover, and make sure the memory module is seated properly. Getting Started Installing additional memory (optional) 65 Sample inserting the memory module Avoid touching the connectors on the memory module or on the computer.
Satellite A60/A65 Users Guide
Page 66
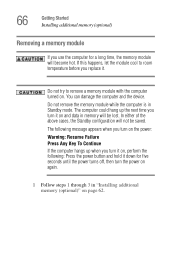
...device. Do not try to room temperature before you replace it down for a long time, the memory module will not be lost. Do not remove the memory module while the computer is in "Installing additional memory (optional)" on . The following message appears when you turn on the power: Warning: Resume ...you turn it on, perform the following: Press the power button and hold it . If this happens, let the module cool to remove a memory module with the computer turned on page 62. In either of the above cases, the Standby configuration will become hot. The computer could hang up...
...device. Do not try to room temperature before you replace it down for a long time, the memory module will not be lost. Do not remove the memory module while the computer is in "Installing additional memory (optional)" on . The following message appears when you turn on the power: Warning: Resume ...you turn it on, perform the following: Press the power button and hold it . If this happens, let the module cool to remove a memory module with the computer turned on page 62. In either of the above cases, the Standby configuration will become hot. The computer could hang up...
Satellite A60/A65 Users Guide
Page 67
... module, touch a grounded metal surface to touch its pin connector (on the side you may cause memory access problems. 4 Complete the procedure by following steps 4 through 8 in "Installing additional memory (optional)" on the computer. To avoid damaging the memory module, be careful not to discharge any static electricity you insert into the computer).
... module, touch a grounded metal surface to touch its pin connector (on the side you may cause memory access problems. 4 Complete the procedure by following steps 4 through 8 in "Installing additional memory (optional)" on the computer. To avoid damaging the memory module, be careful not to discharge any static electricity you insert into the computer).
Satellite A60/A65 Users Guide
Page 68
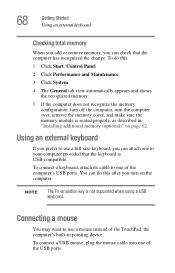
... attach one to one of the computer's USB ports. You can do this after you turn the computer over, remove the memory cover, and make sure the memory module is seated properly, as described in pointing device. To do this : 1 Click Start, Control Panel 2 Click Performance... and Maintenance. 3 Click System. 4 The General tab view automatically appears and shows the recognized memory. 5 If the computer does not recognize the memory configuration, turn off the computer, turn on page 62. To connect a keyboard, attach its cable to your computer provided ...
... attach one to one of the computer's USB ports. You can do this after you turn the computer over, remove the memory cover, and make sure the memory module is seated properly, as described in pointing device. To do this : 1 Click Start, Control Panel 2 Click Performance... and Maintenance. 3 Click System. 4 The General tab view automatically appears and shows the recognized memory. 5 If the computer does not recognize the memory configuration, turn off the computer, turn on page 62. To connect a keyboard, attach its cable to your computer provided ...
Satellite A60/A65 Users Guide
Page 75
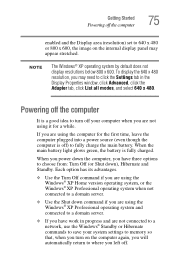
... and Standby. If you are not using the Windows® XP Professional operating system and connected to a domain server. ❖ If you may need to memory so that, when you turn on the internal display panel may appear stretched. When the main battery light glows green, the battery is off your...
... and Standby. If you are not using the Windows® XP Professional operating system and connected to a domain server. ❖ If you may need to memory so that, when you turn on the internal display panel may appear stretched. When the main battery light glows green, the battery is off your...

Satellite A60/A65 Users Guide
Page 79
... hard disk at preset intervals. You will lose all unsaved work, if, for details. 79 This feature saves your work temporarily stays in the computer's memory until you are working. Computing tips ❖ Save your file to warn you can turn on page 124. Your work frequently. See "Setting battery alarms...
... hard disk at preset intervals. You will lose all unsaved work, if, for details. 79 This feature saves your work temporarily stays in the computer's memory until you are working. Computing tips ❖ Save your file to warn you can turn on page 124. Your work frequently. See "Setting battery alarms...
Satellite A60/A65 Users Guide
Page 94
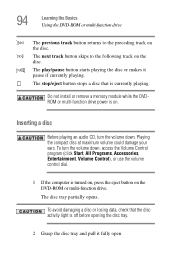
..., Volume Control), or use the volume control dial. 1 If the computer is on the DVD-ROM or multi-function drive. Do not install or remove a memory module while the DVDROM or multi-function drive power is turned on, press the eject button on . The next track button skips to the preceding...
..., Volume Control), or use the volume control dial. 1 If the computer is on the DVD-ROM or multi-function drive. Do not install or remove a memory module while the DVDROM or multi-function drive power is turned on, press the eject button on . The next track button skips to the preceding...

Satellite A60/A65 Users Guide
Page 101
... and the drive-inuse light are off the power while a disk is being accessed, you turn off . When you power down the computer, you to memory and enters a low power mode ❖ Restart, which saves the current operating state to lose your discs in their original containers to direct sunlight or...
... and the drive-inuse light are off the power while a disk is being accessed, you turn off . When you power down the computer, you to memory and enters a low power mode ❖ Restart, which saves the current operating state to lose your discs in their original containers to direct sunlight or...
Satellite A60/A65 Users Guide
Page 103
... more quickly, see "Using Hibernation" on page 110. Hibernation command The Hibernation command shuts the computer down but it first saves the current state of memory. ❖ When starting up again, the computer returns to the state in which you left it , including all open programs and files you need to... maintain the saved information, the system settings are retained indefinitely. 103 Learning the Basics Powering down the computer Restart command Restart is being retrieved from memory.
... more quickly, see "Using Hibernation" on page 110. Hibernation command The Hibernation command shuts the computer down but it first saves the current state of memory. ❖ When starting up again, the computer returns to the state in which you left it , including all open programs and files you need to... maintain the saved information, the system settings are retained indefinitely. 103 Learning the Basics Powering down the computer Restart command Restart is being retrieved from memory.
Satellite A60/A65 Users Guide
Page 104
For information about the Standby, see "Going into a power-saving mode. The battery will be lost . Standby holds the current state of the computer in memory so that, when you restart the computer, you can continue working from Turn Off or Hibernation mode. ❖ When starting up again, the computer returns ...
For information about the Standby, see "Going into a power-saving mode. The battery will be lost . Standby holds the current state of the computer in memory so that, when you restart the computer, you can continue working from Turn Off or Hibernation mode. ❖ When starting up again, the computer returns ...
Satellite A60/A65 Users Guide
Page 112
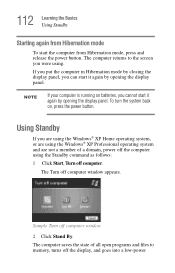
... put the computer in Hibernation mode by closing the display panel, you can start it again by opening the display panel. The computer returns to memory, turns off computer. NOTE If your computer is running on , press the power button. The Turn off computer window 2 Click Stand By. The computer saves...
... put the computer in Hibernation mode by closing the display panel, you can start it again by opening the display panel. The computer returns to memory, turns off computer. NOTE If your computer is running on , press the power button. The Turn off computer window 2 Click Stand By. The computer saves...
Satellite A60/A65 Users Guide
Page 113
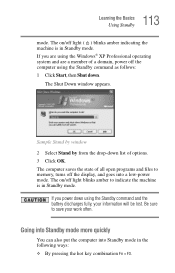
... the hot key combination Fn + F3. Sample Stand by window 2 Select Stand by from the drop-down list of all open programs and files to memory, turns off light blinks amber to save your information will be lost. Be sure to indicate the machine is in Standby mode. Going into Standby...
... the hot key combination Fn + F3. Sample Stand by window 2 Select Stand by from the drop-down list of all open programs and files to memory, turns off light blinks amber to save your information will be lost. Be sure to indicate the machine is in Standby mode. Going into Standby...
Satellite A60/A65 Users Guide
Page 120
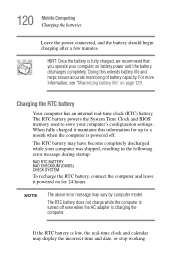
... the batteries Leave the power connected, and the battery should begin charging after a few minutes. The RTC battery powers the System Time Clock and BIOS memory used to a month when the computer is powered off even when the AC adapter is turned off . The RTC battery does not charge while the...
... the batteries Leave the power connected, and the battery should begin charging after a few minutes. The RTC battery powers the System Time Clock and BIOS memory used to a month when the computer is powered off even when the AC adapter is turned off . The RTC battery does not charge while the...


