
Toshiba User's Guide for Portege R600
Page 53
... computer, the module, or both. If you install or remove a memory module, turn off the computer using the Start menu. To avoid damaging the computer's screws, use a small Phillips screwdriver that is on may be hot. You will be installed in the lower-right corner of the computer. Avoid touching the cover, the module, and the surrounding area before replacing it. Getting Started Adding memory (optional) 53 Installing a memory module A memory module can be...
... computer, the module, or both. If you install or remove a memory module, turn off the computer using the Start menu. To avoid damaging the computer's screws, use a small Phillips screwdriver that is on may be hot. You will be installed in the lower-right corner of the computer. Avoid touching the cover, the module, and the surrounding area before replacing it. Getting Started Adding memory (optional) 53 Installing a memory module A memory module can be...

Toshiba User's Guide for Portege R600
Page 57
... you need to remove a memory module: 1 Complete steps 1-8 in "Checking total memory" on page 59. You can verify that the computer has recognized it using the screws. 15 Re-insert the main battery. Getting Started Adding memory (optional) 57 Memory slot (Sample Illustration) Inserting the memory module into the slot 14 Replace the memory module slot cover and secure it correctly as described in "Installing a memory module" on page 119. 16 Turn the computer...
... you need to remove a memory module: 1 Complete steps 1-8 in "Checking total memory" on page 59. You can verify that the computer has recognized it using the screws. 15 Re-insert the main battery. Getting Started Adding memory (optional) 57 Memory slot (Sample Illustration) Inserting the memory module into the slot 14 Replace the memory module slot cover and secure it correctly as described in "Installing a memory module" on page 119. 16 Turn the computer...

Toshiba User's Guide for Portege R600
Page 59
Getting Started Adding memory (optional) 59 3 Gently lift the memory module to work. TECHNICAL NOTE: You must have at least one memory module installed for the computer to a 30-degree angle and slide it out of computer (Sample Illustration) Removing the memory module 4 Replace the memory module slot cover and secure it using the screws. 5 Re-insert the main battery. For more information on inserting the main battery, see "Inserting a charged battery" on...
Getting Started Adding memory (optional) 59 3 Gently lift the memory module to work. TECHNICAL NOTE: You must have at least one memory module installed for the computer to a 30-degree angle and slide it out of computer (Sample Illustration) Removing the memory module 4 Replace the memory module slot cover and secure it using the screws. 5 Re-insert the main battery. For more information on inserting the main battery, see "Inserting a charged battery" on...

Toshiba User's Guide for Portege R600
Page 60
...a D: drive. ❖ Recover your hard disk drive to the factory-set default without your permission. Using the HDD Recovery, you can: ❖ Create Hard Drive Recovery DVDs using your system. 60 Getting Started Hard Drive Recovery Utilities If the computer does not recognize the memory configuration, turn off the computer and remove the memory module slot cover (complete steps 1-8 in "Installing a memory module" on page 53), and then check that you create recovery DVDs before using a writable drive. ❖ Recover your hard disk drive to the factory-set default...
...a D: drive. ❖ Recover your hard disk drive to the factory-set default without your permission. Using the HDD Recovery, you can: ❖ Create Hard Drive Recovery DVDs using your system. 60 Getting Started Hard Drive Recovery Utilities If the computer does not recognize the memory configuration, turn off the computer and remove the memory module slot cover (complete steps 1-8 in "Installing a memory module" on page 53), and then check that you create recovery DVDs before using a writable drive. ❖ Recover your hard disk drive to the factory-set default...

Toshiba User's Guide for Portege R600
Page 178
... the rated voltage is correct, and the plug fits correctly in some way such as installing a new program or adding a device. Using Startup options to fix problems If the operating system fails to your computer model. The Windows® Advanced Boot Options menu displays these problems, use the options in the Startup menu to start. ❖ The operating system responds differently from an AC adaptor that is rated for less current (amperage...
... the rated voltage is correct, and the plug fits correctly in some way such as installing a new program or adding a device. Using Startup options to fix problems If the operating system fails to your computer model. The Windows® Advanced Boot Options menu displays these problems, use the options in the Startup menu to start. ❖ The operating system responds differently from an AC adaptor that is rated for less current (amperage...

Toshiba User's Guide for Portege R600
Page 182
... about Device Manager, refer to the monitor, optional external optical drive, optional external diskette drive, and other power-using functions. If the error recurs without the memory module installed, the error is not using resources. ❖ The Driver tab, which lists resources assigned to Windows® online Help. This tab also provides options for the computer to another. TECHNICAL NOTE: You must have at least one device to work. If removing the memory module eliminates the error, the memory module...
... about Device Manager, refer to the monitor, optional external optical drive, optional external diskette drive, and other power-using functions. If the error recurs without the memory module installed, the error is not using resources. ❖ The Driver tab, which lists resources assigned to Windows® online Help. This tab also provides options for the computer to another. TECHNICAL NOTE: You must have at least one device to work. If removing the memory module eliminates the error, the memory module...

Toshiba User's Guide for Portege R600
Page 242
... 90 battery changing 117 charge indicator light 49, 111 charge not lasting 183 charging 47, 49 conserving power 114 disposal 122 low charge 113 monitoring power 49, 111 not charging 183 242 notifications 113 power plan 213 power plan hot key 116 real-time clock (RTC) 108 removing 117 BIOS Setup see TOSHIBA Hardware Setup button power 52, 61 start 126 C CD, using 100 character keys 91 charging the battery 49 checking device properties 181 click 71 communications network connection 128 set up...
... 90 battery changing 117 charge indicator light 49, 111 charge not lasting 183 charging 47, 49 conserving power 114 disposal 122 low charge 113 monitoring power 49, 111 not charging 183 242 notifications 113 power plan 213 power plan hot key 116 real-time clock (RTC) 108 removing 117 BIOS Setup see TOSHIBA Hardware Setup button power 52, 61 start 126 C CD, using 100 character keys 91 charging the battery 49 checking device properties 181 click 71 communications network connection 128 set up...

Toshiba User's Guide for Portege R600
Page 243
... files/trouble accessing a disk 187 running slow 187 diskette drive cannot insert a diskette 188 cannot read a diskette 188 connecting 75 external, connecting 75 display does not look normal/flickers 185 external monitor not working 186 screen is blank 185 display device external 72 display output settings 72 display, external adjusting 73 disposal information 27 disposing of used batteries 122 double-click 71 DVD player general problems 195 DVD, using 100 E ENERGY STAR® 36 error messages device driver conflict...
... files/trouble accessing a disk 187 running slow 187 diskette drive cannot insert a diskette 188 cannot read a diskette 188 connecting 75 external, connecting 75 display does not look normal/flickers 185 external monitor not working 186 screen is blank 185 display device external 72 display output settings 72 display, external adjusting 73 disposal information 27 disposing of used batteries 122 double-click 71 DVD player general problems 195 DVD, using 100 E ENERGY STAR® 36 error messages device driver conflict...
Toshiba User's Guide for Portege R600
Page 245
... memory module slot 55 microphone 131 monitor 72 connecting 72 not working 185 mouse installing 73 mouse utility 156 N network accessing 128 Connect to the Internet 128 networking wireless 127 Notification Area 126 O Opening the display panel 50 optical disc positioning 102 optical discs handling 102 inserting 101 removing 104 optical drive problems 188 troubleshooting 188 Index 245 using 100 optical media recording 103 other documentation 40 overlay keys 93 P password deleting a supervisor 147 disabling a user 148 setting a user 147 supervisor set up 146 types 145 passwords...
... memory module slot 55 microphone 131 monitor 72 connecting 72 not working 185 mouse installing 73 mouse utility 156 N network accessing 128 Connect to the Internet 128 networking wireless 127 Notification Area 126 O Opening the display panel 50 optical disc positioning 102 optical discs handling 102 inserting 101 removing 104 optical drive problems 188 troubleshooting 188 Index 245 using 100 optical media recording 103 other documentation 40 overlay keys 93 P password deleting a supervisor 147 disabling a user 148 setting a user 147 supervisor set up 146 types 145 passwords...
Toshiba User's Guide for Portege R600
Page 246
... 188 Device Manager 181 disk drive is slow 187 display is blank 185 ExpressCard® 190 checklist 190 error occurs 191 hot swapping fails 191 not recognized 191 slot appears dead 190 external display not working 186 external monitor 185 faulty memory 182 hardware conflict 180 high-pitched noise 190 Internet bookmarked site not found 179 Internet connection is slow 179 keyboard not responding 176 missing files/trouble accessing a disk 187 no sound...
... 188 Device Manager 181 disk drive is slow 187 display is blank 185 ExpressCard® 190 checklist 190 error occurs 191 hot swapping fails 191 not recognized 191 slot appears dead 190 external display not working 186 external monitor 185 faulty memory 182 hardware conflict 180 high-pitched noise 190 Internet bookmarked site not found 179 Internet connection is slow 179 keyboard not responding 176 missing files/trouble accessing a disk 187 no sound...

User Manual
Page 3
... special keys 5-5 Keypad overlay 5-6 Generating ASCII characters 5-7 Chapter 6 Power and Power-Up Modes Power conditions 6-1 Monitoring of power condition 6-2 Battery 6-3 TOSHIBA Password Utility 6-10 Power-up modes 6-13 Panel power on DVD Super Multi drives 4-17 TOSHIBA DVD PLAYER 4-28 Media care 4-29 Sound System 4-31 Modem 4-33 Wireless communications 4-36 LAN 4-40 Computer Handling 4-42 Using the Hard Disk Drive (HDD) Protection 4-43 Using the TOSHIBA USB Sleep and Charge Utility 4-45 Heat dispersal 4-47 Chapter 5 The Keyboard Typewriter keys 5-1 Function keys: F1...
... special keys 5-5 Keypad overlay 5-6 Generating ASCII characters 5-7 Chapter 6 Power and Power-Up Modes Power conditions 6-1 Monitoring of power condition 6-2 Battery 6-3 TOSHIBA Password Utility 6-10 Power-up modes 6-13 Panel power on DVD Super Multi drives 4-17 TOSHIBA DVD PLAYER 4-28 Media care 4-29 Sound System 4-31 Modem 4-33 Wireless communications 4-36 LAN 4-40 Computer Handling 4-42 Using the Hard Disk Drive (HDD) Protection 4-43 Using the TOSHIBA USB Sleep and Charge Utility 4-45 Heat dispersal 4-47 Chapter 5 The Keyboard Typewriter keys 5-1 Function keys: F1...

User Manual
Page 30
... on the hard disk drive, and can put a heavy load on the Windows Vista® desktop, or select the application from the Recovery hard disk drive Creating Optical Recovery Discs This section describes how to create Recovery Discs. ■ Be sure to enhance hard disk drive access speed. Getting Started Restoring the pre-installed Software Depending on the model you purchased, different ways for it to load the Windows Vista® operating system from the hard disk drive as normal...
... on the hard disk drive, and can put a heavy load on the Windows Vista® desktop, or select the application from the Recovery hard disk drive Creating Optical Recovery Discs This section describes how to create Recovery Discs. ■ Be sure to enhance hard disk drive access speed. Getting Started Restoring the pre-installed Software Depending on the model you purchased, different ways for it to load the Windows Vista® operating system from the hard disk drive as normal...
User Manual
Page 65
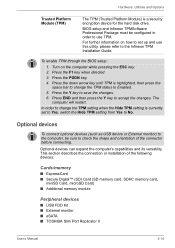
... devices ■ USB FDD Kit ■ External monitor ■ eSATA ■ TOSHIBA Slim Port Replicator II User's Manual 3-14 Optional devices To connect optional devices (such as USB device or External monitor) to the computer, be configured in order to Enabled. 5. Hardware, Utilities and Options Trusted Platform Module (TPM) The TPM (Trusted Platform Module) is currently set up and use TPM. This section describes the connection or installation of the connector before connecting. Press the PGDN key. 4. To enable TPM through the BIOS setup: 1. BIOS setup...
... devices ■ USB FDD Kit ■ External monitor ■ eSATA ■ TOSHIBA Slim Port Replicator II User's Manual 3-14 Optional devices To connect optional devices (such as USB device or External monitor) to the computer, be configured in order to Enabled. 5. Hardware, Utilities and Options Trusted Platform Module (TPM) The TPM (Trusted Platform Module) is currently set up and use TPM. This section describes the connection or installation of the connector before connecting. Press the PGDN key. 4. To enable TPM through the BIOS setup: 1. BIOS setup...
User Manual
Page 141
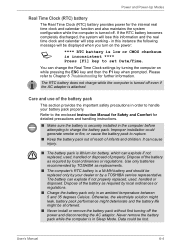
... battery can change the Real Time Clock settings by a TOSHIBA service representative. User's Manual 6-4 Data could generate smoke or fire, or cause the battery pack to handle your dealer or by turning the computer on the power: S **** RTC battery is low or CMOS checksum is inconsistent **** Press [F1] key to Chapter 8 Troubleshooting for the internal real time clock and calendar function and also maintains the system configuration...
... battery can change the Real Time Clock settings by a TOSHIBA service representative. User's Manual 6-4 Data could generate smoke or fire, or cause the battery pack to handle your dealer or by turning the computer on the power: S **** RTC battery is low or CMOS checksum is inconsistent **** Press [F1] key to Chapter 8 Troubleshooting for the internal real time clock and calendar function and also maintains the system configuration...
User Manual
Page 163
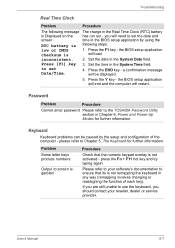
... Clock (RTC) battery is not activated - Troubleshooting Real Time Clock Problem Procedure The following steps: 1. the BIOS setup application will restart. Press [F1] key 3. Press the END key - Press the Y key - to the TOSHIBA Password Utility section in the BIOS setup application by the setup and configuration of each key). Keyboard Keyboard problems can be displayed. 5. Password Problem Procedure Cannot enter password Please refer to set the date and screen: time in Chapter 6, Power and Power-Up Modes for further...
... Clock (RTC) battery is not activated - Troubleshooting Real Time Clock Problem Procedure The following steps: 1. the BIOS setup application will restart. Press [F1] key 3. Press the END key - Press the Y key - to the TOSHIBA Password Utility section in the BIOS setup application by the setup and configuration of each key). Keyboard Keyboard problems can be displayed. 5. Password Problem Procedure Cannot enter password Please refer to set the date and screen: time in Chapter 6, Power and Power-Up Modes for further...
User Manual
Page 210
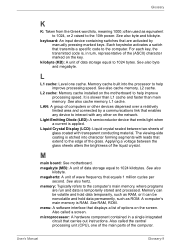
.... A computer's main memory is applied. keyboard: An input device containing switches that emits light when a current is RAM. Liquid Crystal Display (LCD): Liquid crystal sealed between the glass sheets alters the brightness of glass coated with leads that enables any device to interact with any other on the motherboard to 1024 bytes. See also hertz. Each keystroke activates a switch that carries out instructions. memory: Typically refers...
.... A computer's main memory is applied. keyboard: An input device containing switches that emits light when a current is RAM. Liquid Crystal Display (LCD): Liquid crystal sealed between the glass sheets alters the brightness of glass coated with leads that enables any device to interact with any other on the motherboard to 1024 bytes. See also hertz. Each keystroke activates a switch that carries out instructions. memory: Typically refers...

User Manual
Page 213
.... User's Manual Glossary-12 restart: Resetting a computer without turning it up. RGB: Red, green, and blue. See also CRT. Specifically refers to start it off (also called a "bootable disk", "boot disk" or a "startup disk." TFT display: A liquid crystal display (LCD) made from an array of a byte that direct and control the computer system's activities. SIO: Serial Input/Output. soft key: Key combinations that emulate keys on the IBM keyboard, change some configuration options, stop...
.... User's Manual Glossary-12 restart: Resetting a computer without turning it up. RGB: Red, green, and blue. See also CRT. Specifically refers to start it off (also called a "bootable disk", "boot disk" or a "startup disk." TFT display: A liquid crystal display (LCD) made from an array of a byte that direct and control the computer system's activities. SIO: Serial Input/Output. soft key: Key combinations that emulate keys on the IBM keyboard, change some configuration options, stop...

Maintenance Manual
Page 3
..., it could result in property damage, if the safety instruction is not observed. Preface This maintenance manual describes how to perform hardware service maintenance for the Toshiba Personal Computer PORTEGE R600 The procedures described in this manual to bring important information to your safe maintenance service. WARNING: "Warning" indicates the existence of messages are used in this manual are adhered to strictly. ‰ Be sure to...
..., it could result in property damage, if the safety instruction is not observed. Preface This maintenance manual describes how to perform hardware service maintenance for the Toshiba Personal Computer PORTEGE R600 The procedures described in this manual to bring important information to your safe maintenance service. WARNING: "Warning" indicates the existence of messages are used in this manual are adhered to strictly. ‰ Be sure to...
Maintenance Manual
Page 159
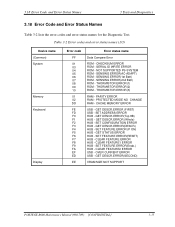
CHECKSUM ERROR ROM - THORMISTOR ERROR(2) ROM - SET FEATURE ERROR(RESET) HUB - CLEAR FEATURE2 ERROR USB - 3.18 Error Code and Error Status Names 3 Tests and Diagnostics 3.18 Error Code and Error Status Names Table 3-2 lists the error codes and error status names for the Diagnostic Test. SENSING ERROR(AC-ADAPT) ROM - THORMISTOR ERROR(1) ROM - PROTECTED MODE NO CHANGE RAM - GET DESCR.ERROR(Top 8B) HUB - SET FEATURE ERROR (P ON) HUB - CLEAR FEATURE ERROR HUB - Table 3-2 Error codes and error status names (1/3) Device name (Common) System Memory Keyboard Display Error code FF...
CHECKSUM ERROR ROM - THORMISTOR ERROR(2) ROM - SET FEATURE ERROR(RESET) HUB - CLEAR FEATURE2 ERROR USB - 3.18 Error Code and Error Status Names 3 Tests and Diagnostics 3.18 Error Code and Error Status Names Table 3-2 lists the error codes and error status names for the Diagnostic Test. SENSING ERROR(AC-ADAPT) ROM - THORMISTOR ERROR(1) ROM - PROTECTED MODE NO CHANGE RAM - GET DESCR.ERROR(Top 8B) HUB - SET FEATURE ERROR (P ON) HUB - CLEAR FEATURE ERROR HUB - Table 3-2 Error codes and error status names (1/3) Device name (Common) System Memory Keyboard Display Error code FF...

Maintenance Manual
Page 243
...computer itself. 4.6 Memory module 4 Replacement Procedures 4.6 Memory module Removing the Memory module To remove the memory module, confirm that the computer is powered off. CAUTION: When removing the memory module, make sure the computer is shut down. Loosen the screws fixing the memory cover. 2. Memory cover Screw Figure 4-5 Removing the memory cover PORTÉGÉ R600 Maintenance Manual (960-709) [CONFIDENTIAL] 4-15 Removing a memory module with the power on the connectors may cause memory access problems. Never press hard or bend the memory module. 1. Then follow...
...computer itself. 4.6 Memory module 4 Replacement Procedures 4.6 Memory module Removing the Memory module To remove the memory module, confirm that the computer is powered off. CAUTION: When removing the memory module, make sure the computer is shut down. Loosen the screws fixing the memory cover. 2. Memory cover Screw Figure 4-5 Removing the memory cover PORTÉGÉ R600 Maintenance Manual (960-709) [CONFIDENTIAL] 4-15 Removing a memory module with the power on the connectors may cause memory access problems. Never press hard or bend the memory module. 1. Then follow...


