User Guide 2
Page 5
... with the best service it is not practical, the telephone company will be a 900 number or any person to use a computer or other number for which charges exceed local or long-distance transmission charges.) or an authorized representative of Toshiba, or the Toshiba Customer Support Center within the ... service. If these changes might affect your service or the operation of your modem from its present line, please call the telephone company and let them to make any message unless such message clearly contains in advance that you disconnect the equipment until the problem ...
... with the best service it is not practical, the telephone company will be a 900 number or any person to use a computer or other number for which charges exceed local or long-distance transmission charges.) or an authorized representative of Toshiba, or the Toshiba Customer Support Center within the ... service. If these changes might affect your service or the operation of your modem from its present line, please call the telephone company and let them to make any message unless such message clearly contains in advance that you disconnect the equipment until the problem ...

User Guide 2
Page 34
... recovery method 65 Recovering without changing the internal storage drive partitions 67 Recovering to a custom size partition 70 Creating recovery DVDs/media 72 Restoring from recovery DVDs/media 75 Erasing the Internal Storage Drive 77 Checking the internal storage drive operating status 78 Installing drivers and applications 79 Using the touch pad 79 Adjusting touch pad settings 82 Disabling or enabling the touch pad 83 Using external display devices 83 Selecting video cables 84 Connecting an HDMI™-compatible television or display device 84 Connecting an external monitor...
... recovery method 65 Recovering without changing the internal storage drive partitions 67 Recovering to a custom size partition 70 Creating recovery DVDs/media 72 Restoring from recovery DVDs/media 75 Erasing the Internal Storage Drive 77 Checking the internal storage drive operating status 78 Installing drivers and applications 79 Using the touch pad 79 Adjusting touch pad settings 82 Disabling or enabling the touch pad 83 Using external display devices 83 Selecting video cables 84 Connecting an HDMI™-compatible television or display device 84 Connecting an external monitor...
User Guide 2
Page 37
... media 144 Removing memory media 145 Using the eSATA/USB combo port 146 Using the expansion port 146 Chapter 5: Utilities 147 TOSHIBA Assist 148 Connect 149 Secure 150 Protect & Fix 151 Optimize 152 TOSHIBA Application Installer 153 Setting passwords 154 Using an instant password 154 Using a supervisor password 155 Using a user password 156 TOSHIBA Face Recognition Utility 158 TOSHIBA Security Assist 159 TOSHIBA PC Diagnostic Tool Utility 161 TOSHIBA HDD Protection Utility 162 Mouse Utility 163 TOSHIBA Hardware Setup 164 TOSHBA Sleep Utility 166 Starting the TOSHIBA Sleep...
... media 144 Removing memory media 145 Using the eSATA/USB combo port 146 Using the expansion port 146 Chapter 5: Utilities 147 TOSHIBA Assist 148 Connect 149 Secure 150 Protect & Fix 151 Optimize 152 TOSHIBA Application Installer 153 Setting passwords 154 Using an instant password 154 Using a supervisor password 155 Using a user password 156 TOSHIBA Face Recognition Utility 158 TOSHIBA Security Assist 159 TOSHIBA PC Diagnostic Tool Utility 161 TOSHIBA HDD Protection Utility 162 Mouse Utility 163 TOSHIBA Hardware Setup 164 TOSHBA Sleep Utility 166 Starting the TOSHIBA Sleep...
User Guide 2
Page 55
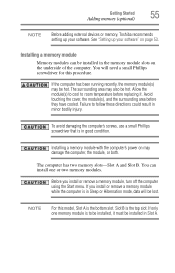
... install or remove a memory module, turn off the computer using the Start menu. Avoid touching the cover, the module(s), and the surrounding area before replacing it must be hot. Installing a memory module with the computer's power on the underside of the computer. You will be lost. Failure to room temperature before they have cooled. If only one or two memory modules. The surrounding area may also be installed in the memory module slots...
... install or remove a memory module, turn off the computer using the Start menu. Avoid touching the cover, the module(s), and the surrounding area before replacing it must be hot. Installing a memory module with the computer's power on the underside of the computer. You will be lost. Failure to room temperature before they have cooled. If only one or two memory modules. The surrounding area may also be installed in the memory module slots...
User Guide 2
Page 60
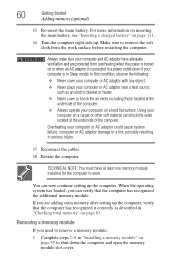
... continue setting up the computer, verify that the computer has recognized the additional memory module. If you are protected from the work . Make sure to remove the soft cloth from overheating when the power is turned on page 131. 16 Turn the computer right side up. When the operating system has loaded, you need to shut down the computer and open the memory module slot cover. Removing a memory module...
... continue setting up the computer, verify that the computer has recognized the additional memory module. If you are protected from the work . Make sure to remove the soft cloth from overheating when the power is turned on page 131. 16 Turn the computer right side up. When the operating system has loaded, you need to shut down the computer and open the memory module slot cover. Removing a memory module...
User Guide 2
Page 62
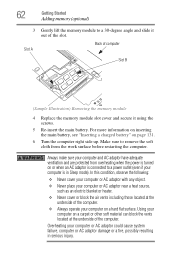
... computer Slot B (Sample Illustration) Removing the memory module 4 Replace the memory module slot cover and secure it out of the slot. Make sure to a 30-degree angle and slide it using the screws. 5 Re-insert the main battery. Using your computer on a carpet or other soft material can block the vents located at the underside of the computer. 62 Getting Started Adding memory (optional) 3 Slot A Gently lift the memory module to remove...
... computer Slot B (Sample Illustration) Removing the memory module 4 Replace the memory module slot cover and secure it out of the slot. Make sure to a 30-degree angle and slide it using the screws. 5 Re-insert the main battery. Using your computer on a carpet or other soft material can block the vents located at the underside of the computer. 62 Getting Started Adding memory (optional) 3 Slot A Gently lift the memory module to remove...
User Guide 2
Page 63
... memory configuration, turn off the computer and remove the memory module slot cover (complete steps 1-8 in "Installing a memory module" on page 55), and then check that says, "Do you want to allow you can check that the computer has recognized the change. otherwise, click Cancel. Recovering the Internal Storage Drive NOTE Your system may not have at accessories.toshiba.com. To purchase an optional external writable optical disc drive or a USB Flash drive...
... memory configuration, turn off the computer and remove the memory module slot cover (complete steps 1-8 in "Installing a memory module" on page 55), and then check that says, "Do you want to allow you can check that the computer has recognized the change. otherwise, click Cancel. Recovering the Internal Storage Drive NOTE Your system may not have at accessories.toshiba.com. To purchase an optional external writable optical disc drive or a USB Flash drive...
User Guide 2
Page 84
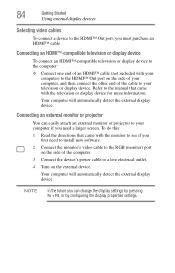
... install new software. 2 Connect the monitor's video cable to the RGB (monitor) port on the external device. NOTE In the future you can easily attach an external monitor or projector to the HDMI™ Out port, you must purchase an HDMI™ cable. To do this: 1 Read the directions that came with the television or display device for more information. 84 Getting Started Using external display devices Selecting video cables To connect a device to your television or display device. Connecting an external monitor...
... install new software. 2 Connect the monitor's video cable to the RGB (monitor) port on the external device. NOTE In the future you can easily attach an external monitor or projector to the HDMI™ Out port, you must purchase an HDMI™ cable. To do this: 1 Read the directions that came with the television or display device for more information. 84 Getting Started Using external display devices Selecting video cables To connect a device to your television or display device. Connecting an external monitor...
User Guide 2
Page 114
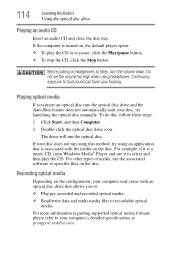
... configuration, your computer's detailed specifications at pcsupport.toshiba.com. Do not set the volume too high when using an application that allows you insert an optical disc into the optical disc drive and the Auto-Run feature does not automatically start your hearing. For more information regarding supported optical media formats please refer to listen, turn the volume down. For other types of media, use the associated software to open Windows Media...
... configuration, your computer's detailed specifications at pcsupport.toshiba.com. Do not set the volume too high when using an application that allows you insert an optical disc into the optical disc drive and the Auto-Run feature does not automatically start your hearing. For more information regarding supported optical media formats please refer to listen, turn the volume down. For other types of media, use the associated software to open Windows Media...
User Guide 2
Page 157
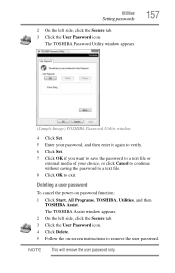
... -screen instructions to exit. The TOSHIBA Assist window appears. 2 On the left side, click the Secure tab. 3 Click the User Password icon. NOTE This will remove the user password only. Utilities Setting passwords 2 On the left side, click the Secure tab. 3 Click the User Password icon. 4 Click Delete. 5 Follow the on password function: 1 Click Start, All Programs, TOSHIBA, Utilities, and then TOSHIBA Assist. The TOSHIBA Password Utility window appears. 157 (Sample Image) TOSHIBA Password Utility window 4 Click Set. 5 Enter your password...
... -screen instructions to exit. The TOSHIBA Assist window appears. 2 On the left side, click the Secure tab. 3 Click the User Password icon. NOTE This will remove the user password only. Utilities Setting passwords 2 On the left side, click the Secure tab. 3 Click the User Password icon. 4 Click Delete. 5 Follow the on password function: 1 Click Start, All Programs, TOSHIBA, Utilities, and then TOSHIBA Assist. The TOSHIBA Password Utility window appears. 157 (Sample Image) TOSHIBA Password Utility window 4 Click Set. 5 Enter your password...
User Guide 2
Page 176
... can then choose to install the updates if you when updated software, firmware, documentation or other information is not limited to specific system conditions via pop-up messages. The collected information includes device operation time and number of actuations or status changes (e.g.: number of power button and Fn key combination uses, and AC adaptor, battery, LCD, fan, HDD, sound volume, docking and USB information), date of the total hard disk capacity (approximately 3 MB or...
... can then choose to install the updates if you when updated software, firmware, documentation or other information is not limited to specific system conditions via pop-up messages. The collected information includes device operation time and number of actuations or status changes (e.g.: number of power button and Fn key combination uses, and AC adaptor, battery, LCD, fan, HDD, sound volume, docking and USB information), date of the total hard disk capacity (approximately 3 MB or...
User Guide 2
Page 182
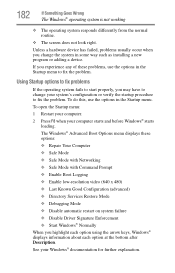
... Boot Options menu displays these problems, use the options in some way such as installing a new program or adding a device. If you experience any of these options: ❖ Repair Your Computer ❖ Safe Mode ❖ Safe Mode with Networking ❖ Safe Mode with Command Prompt ❖ Enable Boot Logging ❖ Enable low-resolution video (640 x 480) ❖ Last Known Good Configuration (advanced) ❖ Directory Services Restore Mode ❖ Debugging Mode ❖ Disable automatic restart on system failure ❖ Disable Driver Signature...
... Boot Options menu displays these problems, use the options in some way such as installing a new program or adding a device. If you experience any of these options: ❖ Repair Your Computer ❖ Safe Mode ❖ Safe Mode with Networking ❖ Safe Mode with Command Prompt ❖ Enable Boot Logging ❖ Enable low-resolution video (640 x 480) ❖ Last Known Good Configuration (advanced) ❖ Directory Services Restore Mode ❖ Debugging Mode ❖ Disable automatic restart on system failure ❖ Disable Driver Signature...
User Guide 2
Page 187
... meanings to update your keyboard driver. The screen reactivates and allows you are off the numlock light. To do this does not correct the problem, press Fn and F5 simultaneously again to return the display priority to continue working. If the numlock light or cursor control overlay light is blank. Display problems Here are using a different make sure the software you to its previous setting. If you...
... meanings to update your keyboard driver. The screen reactivates and allows you are off the numlock light. To do this does not correct the problem, press Fn and F5 simultaneously again to return the display priority to continue working. If the numlock light or cursor control overlay light is blank. Display problems Here are using a different make sure the software you to its previous setting. If you...
User Guide 2
Page 190
... it opens, click Defragment disk. Make sure the tray is dirty. Examine the disc to recover lost data using your computer for file recovery procedures. Close the tray carefully, making sure it is clean. Optical disc drive problems (Available on certain models.) You cannot access a disc in the tray. Make sure the tray that the hardware configuration meets its needs. Error-checking tests and repairs the storage drive. If the optical disc drive...
... it opens, click Defragment disk. Make sure the tray is dirty. Examine the disc to recover lost data using your computer for file recovery procedures. Close the tray carefully, making sure it is clean. Optical disc drive problems (Available on certain models.) You cannot access a disc in the tray. Make sure the tray that the hardware configuration meets its needs. Error-checking tests and repairs the storage drive. If the optical disc drive...
User Guide 2
Page 192
... you are having trouble getting one or more of devices, such as a removable hard disk, additional memory, or a pager. If your system does not have built-in this chapter may apply. Contact the manufacturer of new cards. ExpressCard® checklist ❖ Make sure the card is fed to work no longer work under System, click Device Manager. Most ExpressCard problems occur during installation and setup of the...
... you are having trouble getting one or more of devices, such as a removable hard disk, additional memory, or a pager. If your system does not have built-in this chapter may apply. Contact the manufacturer of new cards. ExpressCard® checklist ❖ Make sure the card is fed to work no longer work under System, click Device Manager. Most ExpressCard problems occur during installation and setup of the...
User Guide 2
Page 230
...)-An interface used to create a complete screen image. Interlaced monitors take two passes to transmit high quality audio and video signal via a single cable in combination with HDMI cables. internal device-See device. See also World Wide Web. L2 (level two) cache-Memory cache installed on the screen that you turn on the computer again, your work is running and have the operating system automatically recognize the change. hot swapping...
...)-An interface used to create a complete screen image. Interlaced monitors take two passes to transmit high quality audio and video signal via a single cable in combination with HDMI cables. internal device-See device. See also World Wide Web. L2 (level two) cache-Memory cache installed on the screen that you turn on the computer again, your work is running and have the operating system automatically recognize the change. hot swapping...
User Guide 2
Page 238
... a network 140 HDMI™-compatible TV or display device 84 monitor 84 power cord/cable 50 power source 50 connection set up 140 cooling fan adequate ventilation 48 customize computer settings 98 D data/entire system backup troubleshooting 200 desktop creating new icon 137 exploring the 136 icons 137 recycle bin 137 standard features 137 Windows® operating system 136 Device Manager fixing a problem 184 directing display output 85 disabling touch pad 83, 218 display troubleshooting 188 display devices external 83 display output settings...
... a network 140 HDMI™-compatible TV or display device 84 monitor 84 power cord/cable 50 power source 50 connection set up 140 cooling fan adequate ventilation 48 customize computer settings 98 D data/entire system backup troubleshooting 200 desktop creating new icon 137 exploring the 136 icons 137 recycle bin 137 standard features 137 Windows® operating system 136 Device Manager fixing a problem 184 directing display output 85 disabling touch pad 83, 218 display troubleshooting 188 display devices external 83 display output settings...

User Guide 2
Page 240
... Hibernation mode 214 keyboard overlays 220 Lock (Instant security) 211 optical disk drive 209 Output (Display switch) 215 power plan 212 Sleep mode 213 using to set a power plan 127 volume mute 210 zoom 220 zoom in 220 zoom out 220 Hot Key Cards 207 Hot key functions 209 I icon desktop 137 moving to desktop 137 recycle bin 137 safety 43 inserting ExpressCard® 143 installation memory module 55 installing a charged battery 131 battery 129 memory modules 54 mouse 86 Instruction Manual...
... Hibernation mode 214 keyboard overlays 220 Lock (Instant security) 211 optical disk drive 209 Output (Display switch) 215 power plan 212 Sleep mode 213 using to set a power plan 127 volume mute 210 zoom 220 zoom in 220 zoom out 220 Hot Key Cards 207 Hot key functions 209 I icon desktop 137 moving to desktop 137 recycle bin 137 safety 43 inserting ExpressCard® 143 installation memory module 55 installing a charged battery 131 battery 129 memory modules 54 mouse 86 Instruction Manual...
User Guide 2
Page 243
... starting again from Hibernation mode 95 Sleep mode 98 Startup menu problem solving 182 supervisor password, deleting 156 supervisor password, set up 155 system indicator lights AC power 49 drive in-use indicator 111 LEDs 50, 51, 53, 92, 95, 98, 122, 123, 142 T taskbar 139 television adjusting display 86 tips for computing 100 Toshiba online resources 116 registering computer Toshiba Web site 54 worldwide offices 205 TOSHIBA Accessibility 170 Toshiba accessories memory 54 TOSHIBA Application Installer...
... starting again from Hibernation mode 95 Sleep mode 98 Startup menu problem solving 182 supervisor password, deleting 156 supervisor password, set up 155 system indicator lights AC power 49 drive in-use indicator 111 LEDs 50, 51, 53, 92, 95, 98, 122, 123, 142 T taskbar 139 television adjusting display 86 tips for computing 100 Toshiba online resources 116 registering computer Toshiba Web site 54 worldwide offices 205 TOSHIBA Accessibility 170 Toshiba accessories memory 54 TOSHIBA Application Installer...
User Guide 2
Page 244
... 192 installing hardware/software 201 keyboard 187 keyboard will not respond 179 memory problems 185 missing files/trouble accessing a drive 189 on-screen eject button 191 optical disc drive 190 power and batteries 185 printer 194 restore points 199 screen does not look correct/ flickers 188 slow Internet connection 183 sound system 191 trouble running discs 191 trouble running programs 190 URL address not found 183 USB Sleep and Charge cannot use 202 USB Wakeup function does not work 203 Windows® operating...
... 192 installing hardware/software 201 keyboard 187 keyboard will not respond 179 memory problems 185 missing files/trouble accessing a drive 189 on-screen eject button 191 optical disc drive 190 power and batteries 185 printer 194 restore points 199 screen does not look correct/ flickers 188 slow Internet connection 183 sound system 191 trouble running discs 191 trouble running programs 190 URL address not found 183 USB Sleep and Charge cannot use 202 USB Wakeup function does not work 203 Windows® operating...


