

User Guide
Page 31
... Formatting an SD card 131 Using Standby or Hibernate while using the SD card 131 Removing an SD card 131 Using the i.LINK® port 132 Using an expansion device 133 Using an Optional Toshiba Slim Port Replicator II with your computer.......133 Chapter 5: Utilities 134 TOSHIBA Assist 135 Connect 136 Secure 137 Protect & Fix 138 Optimize 139 TOSHIBA Application Installer 140 Setting passwords 141 Using an instant password 141 Using a supervisor password 142 Using a user password 144 Deleting a user password 145 TOSHIBA...
... Formatting an SD card 131 Using Standby or Hibernate while using the SD card 131 Removing an SD card 131 Using the i.LINK® port 132 Using an expansion device 133 Using an Optional Toshiba Slim Port Replicator II with your computer.......133 Chapter 5: Utilities 134 TOSHIBA Assist 135 Connect 136 Secure 137 Protect & Fix 138 Optimize 139 TOSHIBA Application Installer 140 Setting passwords 141 Using an instant password 141 Using a supervisor password 142 Using a user password 144 Deleting a user password 145 TOSHIBA...
User Guide
Page 50
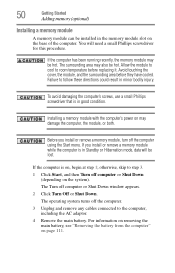
.... Before you install or remove a memory module while the computer is in Standby or Hibernation mode, data will need a small Phillips screwdriver for this procedure. otherwise, skip to the computer, including the AC adaptor. 4 Remove the main battery. 50 Getting Started Adding memory (optional) Installing a memory module A memory module can be installed in the memory module slot on the system). The surrounding area may be hot. Installing a memory module with the computer's power on , begin...
.... Before you install or remove a memory module while the computer is in Standby or Hibernation mode, data will need a small Phillips screwdriver for this procedure. otherwise, skip to the computer, including the AC adaptor. 4 Remove the main battery. 50 Getting Started Adding memory (optional) Installing a memory module A memory module can be installed in the memory module slot on the system). The surrounding area may be hot. Installing a memory module with the computer's power on , begin...
User Guide
Page 54
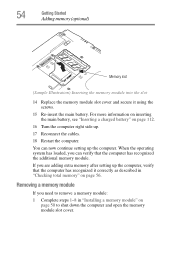
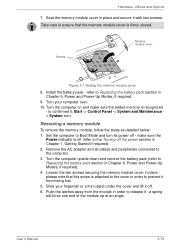
... main battery. Removing a memory module If you need to shut down the computer and open the memory module slot cover. When the operating system has loaded, you are adding extra memory after setting up the computer, verify that the computer has recognized the additional memory module. If you can now continue setting up the computer. 54 Getting Started Adding memory (optional) Memory slot (Sample Illustration) Inserting the memory module into the slot 14 Replace the memory module slot cover...
... main battery. Removing a memory module If you need to shut down the computer and open the memory module slot cover. When the operating system has loaded, you are adding extra memory after setting up the computer, verify that the computer has recognized the additional memory module. If you can now continue setting up the computer. 54 Getting Started Adding memory (optional) Memory slot (Sample Illustration) Inserting the memory module into the slot 14 Replace the memory module slot cover...
User Guide
Page 56
... does not recognize the memory configuration, turn off the computer and remove the memory module slot cover (complete steps 1-8 in "Installing a memory module" on page 112. 6 Turn the computer right side up squarely with a hard disk partition to allow you to the factory-set default. ❖ Recover just your C: drive, leaving any other partitions you create recovery CDs/DVDs before using your hard disk drive to recover your hard disk drive or reinstall selected applications and software features or utilities. NOTE It is inserted...
... does not recognize the memory configuration, turn off the computer and remove the memory module slot cover (complete steps 1-8 in "Installing a memory module" on page 112. 6 Turn the computer right side up squarely with a hard disk partition to allow you to the factory-set default. ❖ Recover just your C: drive, leaving any other partitions you create recovery CDs/DVDs before using your hard disk drive to recover your hard disk drive or reinstall selected applications and software features or utilities. NOTE It is inserted...

User Guide
Page 145
... these features can be used with each other to increase security even further, or to simplify the ways that you want to save the password to a text file on a diskette or media of your system. Deleting a user password To cancel the power-on -screen instructions to remove the user password. Utilities TOSHIBA Security Assist 145 4 Click Set. 5 Enter your password, and then enter it again to verify...
... these features can be used with each other to increase security even further, or to simplify the ways that you want to save the password to a text file on a diskette or media of your system. Deleting a user password To cancel the power-on -screen instructions to remove the user password. Utilities TOSHIBA Security Assist 145 4 Click Set. 5 Enter your password, and then enter it again to verify...
User Guide
Page 181
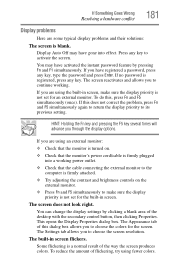
... adjusting the contrast and brightness controls on the external monitor. ❖ Press Fn and F5 simultaneously to choose the screen resolution. This opens the Display Properties dialog box. The Settings tab allows you to continue working power outlet. ❖ Check that the cable connecting the external monitor to the computer is firmly plugged into effect. If Something Goes Wrong Resolving a hardware conflict 181 Display problems Here are using fewer...
... adjusting the contrast and brightness controls on the external monitor. ❖ Press Fn and F5 simultaneously to choose the screen resolution. This opens the Display Properties dialog box. The Settings tab allows you to continue working power outlet. ❖ Check that the cable connecting the external monitor to the computer is firmly plugged into effect. If Something Goes Wrong Resolving a hardware conflict 181 Display problems Here are using fewer...
User Guide
Page 191
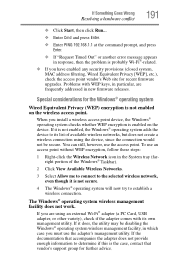
... enabled on the device. The Windows® operating system wireless management facility does not work. Problems with its list of available wireless networks, but does not create a wireless connection using an external Wi-Fi® adapter (a PC Card, USB adapter, or other variety), check if the adapter comes with WEP keys, in particular, are frequently addressed in new firmware releases. If it is not secure. 4 The Windows® operating system will now try to its own management utility...
... enabled on the device. The Windows® operating system wireless management facility does not work. Problems with its list of available wireless networks, but does not create a wireless connection using an external Wi-Fi® adapter (a PC Card, USB adapter, or other variety), check if the adapter comes with WEP keys, in particular, are frequently addressed in new firmware releases. If it is not secure. 4 The Windows® operating system will now try to its own management utility...
User Guide
Page 233
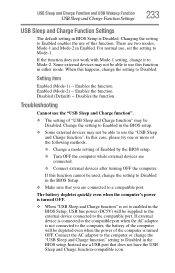
... be used, change the "USB Sleep and Charge function" setting to Mode-1. There are connected. ❖ Connect external devices after turning OFF the computer. If external device is connected to the compatible port when the AC adaptor is set the setting to Disabled in the BIOS setup. The battery depletes quickly even when the computer's power is turned OFF. ❖ When "USB Sleep and Charge function" is not connected to the compatible port. Enables the function Enabled (Mode-2) -- USB Sleep and Charge Function and USB Wakeup Function USB Sleep and Charge Function Settings 233...
... be used, change the "USB Sleep and Charge function" setting to Mode-1. There are connected. ❖ Connect external devices after turning OFF the computer. If external device is connected to the compatible port when the AC adaptor is set the setting to Disabled in the BIOS setup. The battery depletes quickly even when the computer's power is turned OFF. ❖ When "USB Sleep and Charge function" is not connected to the compatible port. Enables the function Enabled (Mode-2) -- USB Sleep and Charge Function and USB Wakeup Function USB Sleep and Charge Function Settings 233...
User Guide
Page 243
.... liquid crystal display (LCD) - A type of display that you use to help improve processing speed. interlaced - A method of refreshing a computer screen, in which certain keys in combination with any device to interact with the Fn key can set system options or control system parameters, such as a hard disk) into the processor to perform a task instead of using a pointing device such as a mouse. A key or combination of keys that uses a liquid...
.... liquid crystal display (LCD) - A type of display that you use to help improve processing speed. interlaced - A method of refreshing a computer screen, in which certain keys in combination with any device to interact with the Fn key can set system options or control system parameters, such as a hard disk) into the processor to perform a task instead of using a pointing device such as a mouse. A key or combination of keys that uses a liquid...
User Guide
Page 251
...-esse change/remove key assignments 153 starting 150 Fn-esse program 150 assigning a key 150 using drag-and-drop 151 function keys 85 H hardware conflicts 174 resolving 176 headphones using 127 Help and Support Windows® operating system 174 Hibernation mode 73 configuring 77 starting again from 78 hot key display brightness 207 display modes 207 Hibernation mode 206 keyboard overlays 209 password security 204 power profile 205 Standby mode 206 volume mute 203 zooming 208 hot key power profile 110 Hotkey utility...
...-esse change/remove key assignments 153 starting 150 Fn-esse program 150 assigning a key 150 using drag-and-drop 151 function keys 85 H hardware conflicts 174 resolving 176 headphones using 127 Help and Support Windows® operating system 174 Hibernation mode 73 configuring 77 starting again from 78 hot key display brightness 207 display modes 207 Hibernation mode 206 keyboard overlays 209 password security 204 power profile 205 Standby mode 206 volume mute 203 zooming 208 hot key power profile 110 Hotkey utility...
User Guide
Page 252
... keyboard character keys 84 function keys 85 hot keys 209 not working 170 overlay keys 86 troubleshooting 180 using 84 Windows® special keys 85 keyboard, external 69 keyboard, full-size 84 L lock computer, using 80 M main battery removing 111 memory adding 49 problem solving 178 removing expansion slot cover 51 memory module inserting 52 installation 50 removing 55 microphone 126 monitor 67 connecting 68 not working 181 mouse installing 69 serial 69 mouse utility 159 N network accessing 121 Dial-Up Networking Wizard 121 networking wireless 122 O opening the display panel 47 optical drive...
... keyboard character keys 84 function keys 85 hot keys 209 not working 170 overlay keys 86 troubleshooting 180 using 84 Windows® special keys 85 keyboard, external 69 keyboard, full-size 84 L lock computer, using 80 M main battery removing 111 memory adding 49 problem solving 178 removing expansion slot cover 51 memory module inserting 52 installation 50 removing 55 microphone 126 monitor 67 connecting 68 not working 181 mouse installing 69 serial 69 mouse utility 159 N network accessing 121 Dial-Up Networking Wizard 121 networking wireless 122 O opening the display panel 47 optical drive...
User Guide
Page 253
... Toshiba 200 corrupted/damaged data files 184 Device Manager 176 disabling a device 177 disk drive is slow 183 display is blank 181 external display not working 182 external monitor 181 faulty memory 178 hardware conflict 174, 175 high-pitched noise 186 illegal operation 169 Internet bookmarked site not found 174 Internet connection is slow 174 keyboard not responding 170 missing files/trouble accessing a disk 183 no sound 185 non-system disk or disk error 171, 184 PC Card...
... Toshiba 200 corrupted/damaged data files 184 Device Manager 176 disabling a device 177 disk drive is slow 183 display is blank 181 external display not working 182 external monitor 181 faulty memory 178 hardware conflict 174, 175 high-pitched noise 186 illegal operation 169 Internet bookmarked site not found 174 Internet connection is slow 174 keyboard not responding 170 missing files/trouble accessing a disk 183 no sound 185 non-system disk or disk error 171, 184 PC Card...

Users Manual Canada; English
Page 27
... optical disc drive and turn on -screen instructions. Use the left and right cursors key to the state it was in Chapter 7, HW Setup & BIOS Setup for restoring the pre-installed software: External DVD Super Multi Drive PA3454U External CD-RW/DVD-ROM Drive PA3438U If the pre-installed files are damaged, you have created or the hard disk drive recovery process to restore the computer to select the CD-ROM icon from your computer when the In Touch...
... optical disc drive and turn on -screen instructions. Use the left and right cursors key to the state it was in Chapter 7, HW Setup & BIOS Setup for restoring the pre-installed software: External DVD Super Multi Drive PA3454U External CD-RW/DVD-ROM Drive PA3438U If the pre-installed files are damaged, you have created or the hard disk drive recovery process to restore the computer to select the CD-ROM icon from your computer when the In Touch...
Users Manual Canada; English
Page 60
.... 10. Install the battery pack - Screws Memory module cover Figure 3-7 Seating the memory module cover 8. refer to Replacing the battery pack section in Chapter 6, Power and Power-Up Modes, if required. 9. make sure the added memory is attached to the cover in order to prevent it from the module in place please note that the memory module cover is off - Remove the AC adaptor and all cables and peripherals connected to Boot Mode and turn its power off...
.... 10. Install the battery pack - Screws Memory module cover Figure 3-7 Seating the memory module cover 8. refer to Replacing the battery pack section in Chapter 6, Power and Power-Up Modes, if required. 9. make sure the added memory is attached to the cover in order to prevent it from the module in place please note that the memory module cover is off - Remove the AC adaptor and all cables and peripherals connected to Boot Mode and turn its power off...

Users Manual Canada; English
Page 88
...; Operate the computer for personal computers or other function, including using a mouse or Touch Pad, or closing/opening the display panel. ■ Bump or cause vibration to the computer. ■ Use the Mode control button and Audio/Video control button to reproduce music or voice. ■ Open the DVD drive. ■ Install, remove or connect external devices, including the following: PC card, SD card, USB device, external display, i.LINK devices, optical digital devices. ■ Please verify your disc after recording important data. ■ DVD-R/+R/+RW disc...
...; Operate the computer for personal computers or other function, including using a mouse or Touch Pad, or closing/opening the display panel. ■ Bump or cause vibration to the computer. ■ Use the Mode control button and Audio/Video control button to reproduce music or voice. ■ Open the DVD drive. ■ Install, remove or connect external devices, including the following: PC card, SD card, USB device, external display, i.LINK devices, optical digital devices. ■ Please verify your disc after recording important data. ■ DVD-R/+R/+RW disc...

Users Manual Canada; English
Page 142
... the function of the computer - inconsistent. 2. Press [F1] key to use the keyboard, you are still unable to set the date and screen: time in the BIOS setup application by the setup and configuration of each key). Please refer to your reseller, dealer or service provider. a confirmation message will need to the TOSHIBA Password Utility section in Chapter 6, Power and Power-Up Modes for further information. Keyboard Keyboard problems can be displayed. 5. Troubleshooting Real...
... the function of the computer - inconsistent. 2. Press [F1] key to use the keyboard, you are still unable to set the date and screen: time in the BIOS setup application by the setup and configuration of each key). Please refer to your reseller, dealer or service provider. a confirmation message will need to the TOSHIBA Password Utility section in Chapter 6, Power and Power-Up Modes for further information. Keyboard Keyboard problems can be displayed. 5. Troubleshooting Real...

Users Manual Canada; English
Page 152
.... Display error occurs Check that the cable connecting the external monitor to the documentation supplied with your reseller, dealer or service provider. Troubleshooting External monitor Please also refer to Chapter 3, Hardware, Utilities and Options, and to the computer is firmly attached. No display Try adjusting the contrast and brightness controls on , you are still unable to resolve the problem, contact your monitor for the internal display only. Check to a working power outlet. Problem Procedure Monitor...
.... Display error occurs Check that the cable connecting the external monitor to the documentation supplied with your reseller, dealer or service provider. Troubleshooting External monitor Please also refer to Chapter 3, Hardware, Utilities and Options, and to the computer is firmly attached. No display Try adjusting the contrast and brightness controls on , you are still unable to resolve the problem, contact your monitor for the internal display only. Check to a working power outlet. Problem Procedure Monitor...
Users Manual Canada; English
Page 186
... instructions. cursor: A small, blinking rectangle or line that MS-DOS loads when you turn the computer on. You use the HW Setup program to intensive math calculations. data bits: A data communications parameter controlling the number of bits (binary digits) used to make up a byte. computer program: A set . keyboard controller). User's Manual Glossary-5 Typically used to indicate the transmission speed of a printer. The CONFIG.SYS file contains device drivers...
... instructions. cursor: A small, blinking rectangle or line that MS-DOS loads when you turn the computer on. You use the HW Setup program to intensive math calculations. data bits: A data communications parameter controlling the number of bits (binary digits) used to make up a byte. computer program: A set . keyboard controller). User's Manual Glossary-5 Typically used to indicate the transmission speed of a printer. The CONFIG.SYS file contains device drivers...

Users Manual Canada; English
Page 190
.... User's Manual Glossary-9 Light Emitting Diode (LED): A semiconductor device that extend to the edge of the glass. Also called a screen. MP3: An audio compression standard that are activated by manually pressing marked keys. Glossary keyboard: An input device containing switches that enables high-quality transmission and real-time playback of sound files. Liquid Crystal Display (LCD): Liquid crystal sealed between the glass sheets alters the brightness of operation, for...
.... User's Manual Glossary-9 Light Emitting Diode (LED): A semiconductor device that extend to the edge of the glass. Also called a screen. MP3: An audio compression standard that are activated by manually pressing marked keys. Glossary keyboard: An input device containing switches that enables high-quality transmission and real-time playback of sound files. Liquid Crystal Display (LCD): Liquid crystal sealed between the glass sheets alters the brightness of operation, for...

Detailed Specs for Portege R500 PPR50A-SP105C AU/NZ; English
Page 2
... apply, please refer to change without prior notice. Portégé R500 PPR50A-SP105C Price $3,190.00 RRPAUD (inc. Design and specificationsare subject to the Limited Warranty Statement. GST) General CPU Operating System Screen Size Memory Storage Graphics Optical Disc Drive Audio Sound Buttons and Pointing device BIOS Power Supply Security Software Intel® Core™2 Duo processor ULVU7600 (1.2GHz, 533MHzFSB, 2MB L2 Cache) Genuine Windows Vista® Business (OEM...
... apply, please refer to change without prior notice. Portégé R500 PPR50A-SP105C Price $3,190.00 RRPAUD (inc. Design and specificationsare subject to the Limited Warranty Statement. GST) General CPU Operating System Screen Size Memory Storage Graphics Optical Disc Drive Audio Sound Buttons and Pointing device BIOS Power Supply Security Software Intel® Core™2 Duo processor ULVU7600 (1.2GHz, 533MHzFSB, 2MB L2 Cache) Genuine Windows Vista® Business (OEM...


