
User Guide
Page 12
... ANY TECHNICAL OR TYPOGRAPHICAL ERRORS OR OMISSIONS CONTAINED HEREIN OR FOR DISCREPANCIES BETWEEN THE PRODUCT AND THE MANUAL. and/or Toshiba Corporation. CompuServe is a registered trademark of International Business Machines Corporation. Microsoft, Windows, DirectX, and DirectShow are trademarks or registered trademarks of America Online, Inc. PS/2 is a registered trademark of their respective...
... ANY TECHNICAL OR TYPOGRAPHICAL ERRORS OR OMISSIONS CONTAINED HEREIN OR FOR DISCREPANCIES BETWEEN THE PRODUCT AND THE MANUAL. and/or Toshiba Corporation. CompuServe is a registered trademark of International Business Machines Corporation. Microsoft, Windows, DirectX, and DirectShow are trademarks or registered trademarks of America Online, Inc. PS/2 is a registered trademark of their respective...
User Guide
Page 15
... 65 Using the keyboard 66 Character keys 67 Making your keyboard emulate a full-size keyboard 67 Ctrl, Fn, and Alt keys 68 Function keys 68 Windows® special keys 69 Overlay keys 69 Starting a program 71 Saving your work 72 Printing your work 73 Using diskettes 73 Inserting and removing diskettes...
... 65 Using the keyboard 66 Character keys 67 Making your keyboard emulate a full-size keyboard 67 Ctrl, Fn, and Alt keys 68 Function keys 68 Windows® special keys 69 Overlay keys 69 Starting a program 71 Saving your work 72 Printing your work 73 Using diskettes 73 Inserting and removing diskettes...

User Guide
Page 18
... 118 Personalizing your desktop 119 Customizing the taskbar 119 Bringing the world to your desktop 120 Changing desktop and browsing style 121 Personalizing individual windows 122 Customizing window toolbars 123 Displaying information about each folder....... 124 Setting up for communications 125 Determining the COM port 126 Using the Ethernet LAN Port 127...
... 118 Personalizing your desktop 119 Customizing the taskbar 119 Bringing the world to your desktop 120 Changing desktop and browsing style 121 Personalizing individual windows 122 Customizing window toolbars 123 Displaying information about each folder....... 124 Setting up for communications 125 Determining the COM port 126 Using the Ethernet LAN Port 127...
User Guide
Page 19
... again from Hibernation 144 Using Standby 144 Going into Standby mode more quickly ......... 145 Starting again from Standby 148 Chapter 7: Toshiba Utilities 149 Fn-esse 149 Starting Fn-esse 150 Assigning a key to a program or document ... 151 Viewing existing key assignments... utility 153 TOSHIBA Console 154 Customize Your Computer 155 Network 156 Security 156 TOSHIBA Controls 156 Power Management 157 Toshiba Hardware Setup 160 The Toshiba Rotation Utility 162 Tablet and Pen Settings 163 Chapter 8: Keeping Your Files Safe 166 Using passwords in the Windows® operating...
... again from Hibernation 144 Using Standby 144 Going into Standby mode more quickly ......... 145 Starting again from Standby 148 Chapter 7: Toshiba Utilities 149 Fn-esse 149 Starting Fn-esse 150 Assigning a key to a program or document ... 151 Viewing existing key assignments... utility 153 TOSHIBA Console 154 Customize Your Computer 155 Network 156 Security 156 TOSHIBA Controls 156 Power Management 157 Toshiba Hardware Setup 160 The Toshiba Rotation Utility 162 Tablet and Pen Settings 163 Chapter 8: Keeping Your Files Safe 166 Using passwords in the Windows® operating...
User Guide
Page 20
...that are easy to fix 175 Problems when you turn on the computer........... 177 The Windows® operating system is not working . 178 Using Startup options to fix problems 179 Internet problems 180 The Windows® XP operating system can help you 181 Resolving a hardware conflict 181 A ...batteries 186 Keyboard problems 188 Display problems 188 Disk drive problems 190 Problems with the DVD-ROM drive 192 Sound system problems 194 PC Card problems 194 Printer problems 197 Modem problems 198 Internet Problems 199 DVD operating problems 199 Develop good computing habits 202 If you...
...that are easy to fix 175 Problems when you turn on the computer........... 177 The Windows® operating system is not working . 178 Using Startup options to fix problems 179 Internet problems 180 The Windows® XP operating system can help you 181 Resolving a hardware conflict 181 A ...batteries 186 Keyboard problems 188 Display problems 188 Disk drive problems 190 Problems with the DVD-ROM drive 192 Sound system problems 194 PC Card problems 194 Printer problems 197 Modem problems 198 Internet Problems 199 DVD operating problems 199 Develop good computing habits 202 If you...

User Guide
Page 22
... of contents and the index to the world of powerful and portable multimedia computers! With your new Toshiba notebook computer, your computer. You can accompany you wherever you most. 22 After that your Microsoft® Windows® XP Professional operating system is already installed on your access to turn it on. This...
... of contents and the index to the world of powerful and portable multimedia computers! With your new Toshiba notebook computer, your computer. You can accompany you wherever you most. 22 After that your Microsoft® Windows® XP Professional operating system is already installed on your access to turn it on. This...
User Guide
Page 24
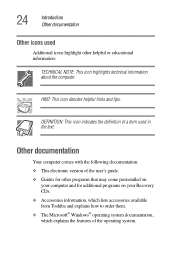
... preinstalled on your computer and for additional programs on your Recovery CDs. ❖ Accessories information, which lists accessories available from Toshiba and explains how to order them. ❖ The Microsoft® Windows® operating system documentation, which explains the features of a term used Additional icons highlight other helpful or educational information: TECHNICAL...
... preinstalled on your computer and for additional programs on your Recovery CDs. ❖ Accessories information, which lists accessories available from Toshiba and explains how to order them. ❖ The Microsoft® Windows® operating system documentation, which explains the features of a term used Additional icons highlight other helpful or educational information: TECHNICAL...
User Guide
Page 31
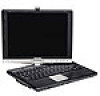
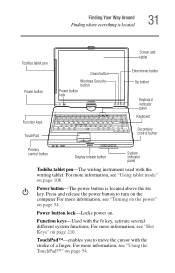
.... Press and release the power button to move the cursor with the writing tablet. Power button-The power button is located 31 Toshiba tablet pen Power button Down button Windows Security button Power button lock Function keys TouchPad Screen and tablet Enter/menu button Up button Keyboard indicator panel Keyboard Secondary control button Primary control...
.... Press and release the power button to move the cursor with the writing tablet. Power button-The power button is located 31 Toshiba tablet pen Power button Down button Windows Security button Power button lock Function keys TouchPad Screen and tablet Enter/menu button Up button Keyboard indicator panel Keyboard Secondary control button Primary control...
User Guide
Page 32
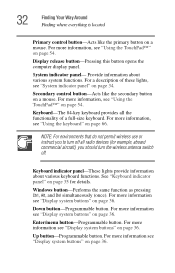
For a description of a full-size keyboard. For more information, see "System indicator panel" on page 66. See "Keyboard indicator panel" on page 36. Windows button-Performs the same function as pressing Ctrl, Alt, and Del simultaneously (once). Down button-Programmable button. For more information see "Display system buttons" on ...
For a description of a full-size keyboard. For more information, see "System indicator panel" on page 66. See "Keyboard indicator panel" on page 36. Windows button-Performs the same function as pressing Ctrl, Alt, and Del simultaneously (once). Down button-Programmable button. For more information see "Display system buttons" on ...
User Guide
Page 36
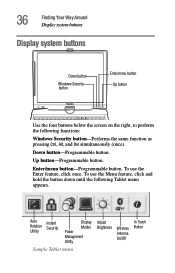
... 36 Finding Your Way Around Display system buttons Display system buttons Down button Windows Security button Enter/menu button Up button Use the four buttons below the screen on the right, to perform the following Tablet menu appears. Up button-Programmable button. To use the Menu feature, click... and hold the button down until the following functions: Windows Security button-Performs the same function as pressing Ctrl, Alt, and Del...
... 36 Finding Your Way Around Display system buttons Display system buttons Down button Windows Security button Enter/menu button Up button Use the four buttons below the screen on the right, to perform the following Tablet menu appears. Up button-Programmable button. To use the Menu feature, click... and hold the button down until the following functions: Windows Security button-Performs the same function as pressing Ctrl, Alt, and Del...
User Guide
Page 41
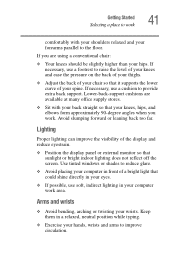
... twisting your chair so that sunlight or bright indoor lighting does not reflect off the screen. If necessary, use a cushion to the floor. Use tinted windows or shades to reduce glare. ❖ Avoid placing your computer in front of the display and reduce eyestrain. ❖ Position the display panel or external...
... twisting your chair so that sunlight or bright indoor lighting does not reflect off the screen. If necessary, use a cushion to the floor. Use tinted windows or shades to reduce glare. ❖ Avoid placing your computer in front of the display and reduce eyestrain. ❖ Position the display panel or external...
User Guide
Page 44
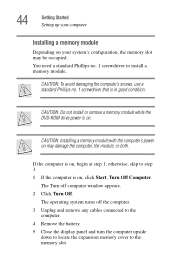
... the display panel and turn the computer upside down to locate the expansion memory cover to install a memory module. The operating system turns off computer window appears. 2 Click Turn Off. If the computer is on , begin at step 1; CAUTION: To avoid damaging the computer's screws, use a standard Phillips no . 1 screwdriver to...
... the display panel and turn the computer upside down to locate the expansion memory cover to install a memory module. The operating system turns off computer window appears. 2 Click Turn Off. If the computer is on , begin at step 1; CAUTION: To avoid damaging the computer's screws, use a standard Phillips no . 1 screwdriver to...
User Guide
Page 56
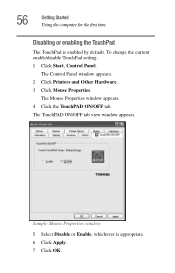
The Mouse Properties window appears. 4 Click the TouchPAD ON/OFF tab. The TouchPAD ON/OFF tab view window appears. To change the current enable/disable TouchPad setting: 1 Click Start, Control Panel. 56 Getting Started Using the computer for the first time Disabling or enabling the TouchPad The TouchPad is appropriate. 6 Click Apply. 7 Click OK. Sample Mouse Properties window 5 Select Disable or Enable, whichever is enabled by default. The Control Panel window appears. 2 Click Printers and Other Hardware. 3 Click Mouse Properties.
The Mouse Properties window appears. 4 Click the TouchPAD ON/OFF tab. The TouchPAD ON/OFF tab view window appears. To change the current enable/disable TouchPad setting: 1 Click Start, Control Panel. 56 Getting Started Using the computer for the first time Disabling or enabling the TouchPad The TouchPad is appropriate. 6 Click Apply. 7 Click OK. Sample Mouse Properties window 5 Select Disable or Enable, whichever is enabled by default. The Control Panel window appears. 2 Click Printers and Other Hardware. 3 Click Mouse Properties.
User Guide
Page 57
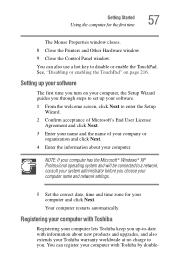
... the correct date, time and time zone for the first time 57 The Mouse Properties window closes. 8 Close the Printers and Other Hardware window. 9 Close the Control Panel window. You can register your Toshiba warranty worldwide at no charge to enter the Setup Wizard. 2 Confirm acceptance of Microsoft's...company or organization and click Next. 4 Enter the information about new products and upgrades, and also extends your computer with Toshiba Registering your computer lets Toshiba keep you up your software. 1 From the welcome screen, click Next to you through steps to set up -to...
... the correct date, time and time zone for the first time 57 The Mouse Properties window closes. 8 Close the Printers and Other Hardware window. 9 Close the Control Panel window. You can register your Toshiba warranty worldwide at no charge to enter the Setup Wizard. 2 Confirm acceptance of Microsoft's...company or organization and click Next. 4 Enter the information about new products and upgrades, and also extends your computer with Toshiba Registering your computer lets Toshiba keep you up your software. 1 From the welcome screen, click Next to you through steps to set up -to...
User Guide
Page 60
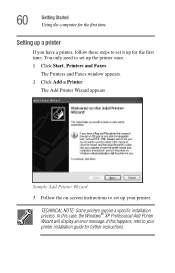
... Started Using the computer for the first time Setting up a printer If you have a printer, follow these steps to your printer. The Printers and Faxes window appears. 2 Click Add a Printer. The Add Printer Wizard appears Sample Add Printer Wizard 3 Follow the on-screen instructions to set up the printer once. 1 Click...
... Started Using the computer for the first time Setting up a printer If you have a printer, follow these steps to your printer. The Printers and Faxes window appears. 2 Click Add a Printer. The Add Printer Wizard appears Sample Add Printer Wizard 3 Follow the on-screen instructions to set up the printer once. 1 Click...
User Guide
Page 61
... settings you can customize your computer to suit your particular requirements. For more information, see "Powering down the computer if you are connected to a Windows® network server (domain server) or the Turn Off command if you are not. ❖ When the hard disk drive light on the system...If you are using it for a while. Guidelines for powering off the computer: ❖ If you have work in which you can choose. See "Toshiba Utilities" on page 96. Doing so may also wish to your operating system documentation or Help and Support for details. Getting Started Powering off the...
... settings you can customize your computer to suit your particular requirements. For more information, see "Powering down the computer if you are connected to a Windows® network server (domain server) or the Turn Off command if you are not. ❖ When the hard disk drive light on the system...If you are using it for a while. Guidelines for powering off the computer: ❖ If you have work in which you can choose. See "Toshiba Utilities" on page 96. Doing so may also wish to your operating system documentation or Help and Support for details. Getting Started Powering off the...
User Guide
Page 66
... procedure to conserve disk space and help your desktop setup, during its optimal level. 66 Learning the Basics Using the keyboard ❖ Back up your Windows® XP operating system documentation for more information on these and other removable storage media) on a regular basis. See "Powering down , details such as your... the backup copies clearly and store them in a safe place. Using the keyboard Your computer's keyboard contains character keys, control keys, function keys, and special Windows® keys, providing all the data on page 134.
... procedure to conserve disk space and help your desktop setup, during its optimal level. 66 Learning the Basics Using the keyboard ❖ Back up your Windows® XP operating system documentation for more information on these and other removable storage media) on a regular basis. See "Powering down , details such as your... the backup copies clearly and store them in a safe place. Using the keyboard Your computer's keyboard contains character keys, control keys, function keys, and special Windows® keys, providing all the data on page 134.
User Guide
Page 69
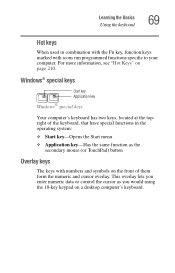
... with icons run programmed functions specific to your computer. This overlay lets you would using the 10-key keypad on page 210. Windows® special keys Start key Application key Windows® special keys Your computer's keyboard has two keys, located at the topright of the keyboard, that have special functions in...
... with icons run programmed functions specific to your computer. This overlay lets you would using the 10-key keypad on page 210. Windows® special keys Start key Application key Windows® special keys Your computer's keyboard has two keys, located at the topright of the keyboard, that have special functions in...
User Guide
Page 71
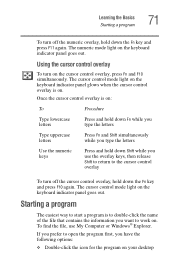
... contains the information you want to the cursor control overlay To turn off the numeric overlay, hold down Shift while you use My Computer or Windows® Explorer. Learning the Basics Starting a program 71 To turn off the cursor control overlay, hold down the Fn key and press F10 again. The...
... contains the information you want to the cursor control overlay To turn off the numeric overlay, hold down Shift while you use My Computer or Windows® Explorer. Learning the Basics Starting a program 71 To turn off the cursor control overlay, hold down the Fn key and press F10 again. The...
User Guide
Page 72
Saving your work Before you turn off the computer, save your work ❖ Use the Start menu ❖ Use Windows® Explorer to locate the program file ❖ Use the Run dialog box For more information, see Help and Support in the Start menu. Many ...
Saving your work Before you turn off the computer, save your work ❖ Use the Start menu ❖ Use Windows® Explorer to locate the program file ❖ Use the Run dialog box For more information, see Help and Support in the Start menu. Many ...


