
User Guide
Page 7
Contents 7 Chapter 3: Preview/Record Mode 22 Button Functions 22 LCD screen information 23 Video recording 25 Taking photos 26 Using Anti-Glare Function 26 Using Digital Zoom 26 Options for Menu 27 Video Mode Menu 27 ...
Contents 7 Chapter 3: Preview/Record Mode 22 Button Functions 22 LCD screen information 23 Video recording 25 Taking photos 26 Using Anti-Glare Function 26 Using Digital Zoom 26 Options for Menu 27 Video Mode Menu 27 ...

User Guide
Page 8
... Voice Recording 45 Voice recording 45 Audio Playback 47 Delete Audio File 47 Chapter 5: Playback Mode 48 Button functions 48 LCD screen information 49 Operations for Playback mode 50 Video Playback 51 Video Trim 51 Photo Playback 53 Delete File in Playback Mode 53 Chapter 6:...Viewing Files on the computer 54 Installing bundled software 54 Transferring files to a computer 55 Chapter 7: Uploading Files to the Internet 56 CAMILEO® Uploader 56 Set up account information for the web site ...........59 Chapter 8: Webcam Mode 60 Chapter 9: Troubleshooting 61 Chapter 10: Other...
... Voice Recording 45 Voice recording 45 Audio Playback 47 Delete Audio File 47 Chapter 5: Playback Mode 48 Button functions 48 LCD screen information 49 Operations for Playback mode 50 Video Playback 51 Video Trim 51 Photo Playback 53 Delete File in Playback Mode 53 Chapter 6:...Viewing Files on the computer 54 Installing bundled software 54 Transferring files to a computer 55 Chapter 7: Uploading Files to the Internet 56 CAMILEO® Uploader 56 Set up account information for the web site ...........59 Chapter 8: Webcam Mode 60 Chapter 9: Troubleshooting 61 Chapter 10: Other...
User Guide
Page 9
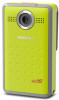
...cable (Mini HDMITM cable must be delivered smoothly. ❖ 5x digital zoom helps you to operate this product. Overview Your Toshiba camcorder comes equipped with less memory. ❖ High-quality images up to 16MP can also be purchased separately), and easily playback ... the wide screen HDTV. ❖ Electronic Image Stabilization to record smoother videos. ❖ Pause function to record multiple moments in a single file. ❖ This camcorder integrates function of 1920 x 1080p. You can record H.264 format movies. This format allows for buying the CAMILEO Clip camcorder.
...cable (Mini HDMITM cable must be delivered smoothly. ❖ 5x digital zoom helps you to operate this product. Overview Your Toshiba camcorder comes equipped with less memory. ❖ High-quality images up to 16MP can also be purchased separately), and easily playback ... the wide screen HDTV. ❖ Electronic Image Stabilization to record smoother videos. ❖ Pause function to record multiple moments in a single file. ❖ This camcorder integrates function of 1920 x 1080p. You can record H.264 format movies. This format allows for buying the CAMILEO Clip camcorder.

User Guide
Page 11
... damage that accidental splashes can cause. ❖ Always keep the lens clean and wipe the water droplets off the camcorder with a soft, dry cloth. ❖ The cover for the ports must be firmly closed. ❖ The splash-proof of the manufacturing process, and do not ...affect the recording. However, some tiny black and/or bright dots (white, red, blue or green) may appear on the LCD screen. System requirements ❖ Microsoft® Windows® XP/Windows Vista®/Windows® 7 ❖ Intel® / AMD® Dual-Core CPU or...
... damage that accidental splashes can cause. ❖ Always keep the lens clean and wipe the water droplets off the camcorder with a soft, dry cloth. ❖ The cover for the ports must be firmly closed. ❖ The splash-proof of the manufacturing process, and do not ...affect the recording. However, some tiny black and/or bright dots (white, red, blue or green) may appear on the LCD screen. System requirements ❖ Microsoft® Windows® XP/Windows Vista®/Windows® 7 ❖ Intel® / AMD® Dual-Core CPU or...

User Guide
Page 13
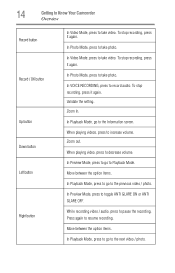
Exit Menu / Playback Mode. If no operation is made in three minutes, the camcorder will turn itself off automatically to toggle Video Mode or Photo Mode Menu ON. Press to conserve battery power. Rear view Getting to Know Your Camcorder 13 Overview Record button LCD screen Clip Menu button Power button Up button Left button Camera mode button Record/OK button Down button Right button (Sample Illustration) Rear view QUICK TOUR Power button Camera mode button Menu button Press the Power button for one second.
Exit Menu / Playback Mode. If no operation is made in three minutes, the camcorder will turn itself off automatically to toggle Video Mode or Photo Mode Menu ON. Press to conserve battery power. Rear view Getting to Know Your Camcorder 13 Overview Record button LCD screen Clip Menu button Power button Up button Left button Camera mode button Record/OK button Down button Right button (Sample Illustration) Rear view QUICK TOUR Power button Camera mode button Menu button Press the Power button for one second.
User Guide
Page 14
To stop recording, press it again. In Playback Mode, go to record audio. Press again to the Information screen. In Photo Mode, press to take video. Validate the setting. In Video Mode, press to take photo. To stop recording, press it again. Zoom in. ... option items. In Playback Mode, press to go to the previous video / photo. In Photo Mode, press to take video. 14 Getting to Know Your Camcorder Overview Record button Record / OK button Up button Down button Left button Right button In Video Mode, press to take photo. Move between the option...
To stop recording, press it again. In Playback Mode, go to record audio. Press again to the Information screen. In Photo Mode, press to take video. Validate the setting. In Video Mode, press to take photo. To stop recording, press it again. Zoom in. ... option items. In Playback Mode, press to go to the previous video / photo. In Photo Mode, press to take video. 14 Getting to Know Your Camcorder Overview Record button Record / OK button Up button Down button Left button Right button In Video Mode, press to take photo. Move between the option...
User Guide
Page 15
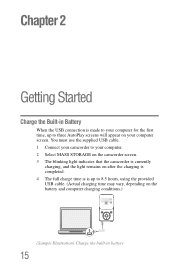
Chapter 2 Getting Started Charge the Built-in battery 15 You must use the supplied USB cable. 1 Connect your camcorder to your computer. 2 Select MASS STORAGE on the camcorder screen. 3 The blinking light indicates that the camcorder is currently charging, and the light remains on after the charging is completed. 4 The full charge time is is... conditions.) (Sample Illustration) Charge the built-in Battery When the USB connection is made to your computer for the first time, up to three AutoPlay screens will appear on your computer...
Chapter 2 Getting Started Charge the Built-in battery 15 You must use the supplied USB cable. 1 Connect your camcorder to your computer. 2 Select MASS STORAGE on the camcorder screen. 3 The blinking light indicates that the camcorder is currently charging, and the light remains on after the charging is completed. 4 The full charge time is is... conditions.) (Sample Illustration) Charge the built-in Battery When the USB connection is made to your computer for the first time, up to three AutoPlay screens will appear on your computer...

User Guide
Page 18
... mode button ( ) to the recorded video files carousel. 18 Getting Started Turning the Camcorder Off Turning the Camcorder Off ❖ To turn off the camcorder, press the Power button ( ) for smooth and stable video. Disable motion detection. The information screen will be longer than the actual recording time. You can check the recorded video...
... mode button ( ) to the recorded video files carousel. 18 Getting Started Turning the Camcorder Off Turning the Camcorder Off ❖ To turn off the camcorder, press the Power button ( ) for smooth and stable video. Disable motion detection. The information screen will be longer than the actual recording time. You can check the recorded video...

User Guide
Page 20
... 3MP 2048 x 1536 (3MP) ON Self timer OFF Activate 10-second-delayed self timer. Use under tungsten light condition. The information screen will display for lower light settings Manually sets to the recorded photo files carousel. Use under outsides light condition. OFF Disable Smile detection.... auto ISO 800 The camcorder adjusts the ISO sensitivity of the normal. Automatic adjustment. PHOTO GALLERY Go to ISO 800 for 3 seconds, then disappear. The...
... 3MP 2048 x 1536 (3MP) ON Self timer OFF Activate 10-second-delayed self timer. Use under tungsten light condition. The information screen will display for lower light settings Manually sets to the recorded photo files carousel. Use under outsides light condition. OFF Disable Smile detection.... auto ISO 800 The camcorder adjusts the ISO sensitivity of the normal. Automatic adjustment. PHOTO GALLERY Go to ISO 800 for 3 seconds, then disappear. The...
User Guide
Page 23
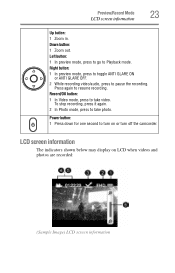
... ON or ANTI GLARE OFF. 2 While recording video/audio, press to resume recording. Record/OK button: 1 In Video mode, press to Playback mode. LCD screen information The indicators shown below may display on or turn on LCD when videos and photos are recorded: (Sample Image) LCD... screen information Left button: 1 In preview mode, press to go to take photo. Power button: 1 Press down for one second to take video. Preview/Record Mode 23 LCD screen information Up button: 1 Zoom in. To stop recording, press it again. 2 In Photo mode, press to turn off the camcorder. Down ...
... ON or ANTI GLARE OFF. 2 While recording video/audio, press to resume recording. Record/OK button: 1 In Video mode, press to Playback mode. LCD screen information The indicators shown below may display on or turn on LCD when videos and photos are recorded: (Sample Image) LCD... screen information Left button: 1 In preview mode, press to go to take photo. Power button: 1 Press down for one second to take video. Preview/Record Mode 23 LCD screen information Up button: 1 Zoom in. To stop recording, press it again. 2 In Photo mode, press to turn off the camcorder. Down ...
User Guide
Page 24
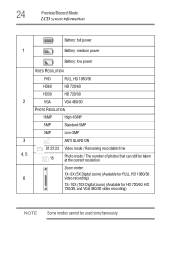
24 Preview/Record Mode LCD screen information Battery: full power 1 Battery: medium power Battery: low power VIDEO RESOLUTION FHD FULL HD 1080/30 HD60 HD 720/60 HD30 HD 720/30 2 ...
24 Preview/Record Mode LCD screen information Battery: full power 1 Battery: medium power Battery: low power VIDEO RESOLUTION FHD FULL HD 1080/30 HD60 HD 720/60 HD30 HD 720/30 2 ...
User Guide
Page 25
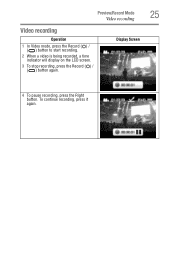
Display Screen 25 4 To pause recording, press the Right button. Preview/Record Mode Video recording Video recording Operation 1 In Video mode, press the Record ( ) / ( ) button to start recording. 2 When a video is being recorded, a time indicator will display on the LCD screen. 3 To stop recording, press the Record ( ) / ( ) button again. To continue recording, press it again.
Display Screen 25 4 To pause recording, press the Right button. Preview/Record Mode Video recording Video recording Operation 1 In Video mode, press the Record ( ) / ( ) button to start recording. 2 When a video is being recorded, a time indicator will display on the LCD screen. 3 To stop recording, press the Record ( ) / ( ) button again. To continue recording, press it again.
User Guide
Page 26
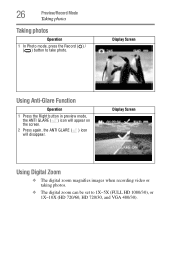
26 Preview/Record Mode Taking photos Taking photos Operation 1 In Photo mode, press the Record ( ) / ( ) button to 1X~5X (FULL HD 1080/30), or 1X~10X (HD 720/60, HD 720/30, and VGA 480/30). Display Screen Using Digital Zoom ❖ The digital zoom magnifies images when recording video or taking photos. ❖ The digital zoom can be set to take photo. Display Screen Using Anti-Glare Function Operation 1 Press the Right button in preview mode, the ANTI GLARE ( ) icon will appear on the screen. 2 Press again, the ANTI GLARE ( ) icon will disappear.
26 Preview/Record Mode Taking photos Taking photos Operation 1 In Photo mode, press the Record ( ) / ( ) button to 1X~5X (FULL HD 1080/30), or 1X~10X (HD 720/60, HD 720/30, and VGA 480/30). Display Screen Using Digital Zoom ❖ The digital zoom magnifies images when recording video or taking photos. ❖ The digital zoom can be set to take photo. Display Screen Using Anti-Glare Function Operation 1 Press the Right button in preview mode, the ANTI GLARE ( ) icon will appear on the screen. 2 Press again, the ANTI GLARE ( ) icon will disappear.

User Guide
Page 27
... • FILTER • WHITE BALANCE ❖ Please refer to Chapter 4 for the detailed information about VIDEO GALLERY. Preview/Record Mode 27 Options for Menu Display Screen 2 Press ( ) to access to the Video mode menu. 3 Use the Right/Left button to select the desired option on the carousel, and then press the...
... • FILTER • WHITE BALANCE ❖ Please refer to Chapter 4 for the detailed information about VIDEO GALLERY. Preview/Record Mode 27 Options for Menu Display Screen 2 Press ( ) to access to the Video mode menu. 3 Use the Right/Left button to select the desired option on the carousel, and then press the...

User Guide
Page 28
Display Screen 2 Press ( ) to access to the Photo mode menu. 3 Use the Right/Left button to select the desired option on the carousel, and then press the ...
Display Screen 2 Press ( ) to access to the Photo mode menu. 3 Use the Right/Left button to select the desired option on the carousel, and then press the ...
User Guide
Page 29
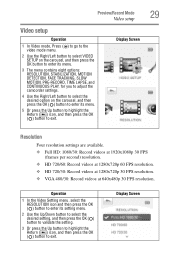
...enter its menu. 5 Or press the Up button to highlight the Return ( ) icon, and then press the OK ( ) button to exit. Display Screen 29 Resolution Four resolution settings are available. ❖ Full HD: 1080/30: Record videos at 1920x1080p 30 FPS (frames per second) resolution. ❖ HD... eight options: RESOLUTION, STABILIZATION, MOTION DETECTION, FACE TRACKING, SLOW MOTION, PRE-RECORD, TIME LAPSE, and CONTINUOUS PLAY, for you to adjust the camcorder settings. 4 Use the Right/Left button to select the desired option on the carousel, and then press the OK ( ) button to enter its...
...enter its menu. 5 Or press the Up button to highlight the Return ( ) icon, and then press the OK ( ) button to exit. Display Screen 29 Resolution Four resolution settings are available. ❖ Full HD: 1080/30: Record videos at 1920x1080p 30 FPS (frames per second) resolution. ❖ HD... eight options: RESOLUTION, STABILIZATION, MOTION DETECTION, FACE TRACKING, SLOW MOTION, PRE-RECORD, TIME LAPSE, and CONTINUOUS PLAY, for you to adjust the camcorder settings. 4 Use the Right/Left button to select the desired option on the carousel, and then press the OK ( ) button to enter its...

User Guide
Page 30
... setting. 3 Or press the Up button to highlight the Return ( ) icon, and then press the OK ( ) button to exit. 4 The camcorder will stop recording when it no longer detects movement. Operation 1 In the Video Setting menu, select the MOTION DETECTION icon and then press the OK..., and then press the OK ( ) button to record video automatically if it detects a movement, and will start to exit. Display Screen Motion detection Record video automatically when the camcorder detects a movement. 30 Preview/Record Mode Video setup Stabilization Record with an effect of reducing the...
... setting. 3 Or press the Up button to highlight the Return ( ) icon, and then press the OK ( ) button to exit. 4 The camcorder will stop recording when it no longer detects movement. Operation 1 In the Video Setting menu, select the MOTION DETECTION icon and then press the OK..., and then press the OK ( ) button to record video automatically if it detects a movement, and will start to exit. Display Screen Motion detection Record video automatically when the camcorder detects a movement. 30 Preview/Record Mode Video setup Stabilization Record with an effect of reducing the...

User Guide
Page 31
... Record mode, aim the camcorder at the face(s). The face frame(s) will be longer than the actual recording time. Display Screen NOTE ❖ The view angle may become smaller when Slow Motion is On. ❖ When Slow Motion is On, the video resolution is played, ...the playback time will appear around the face. Preview/Record Mode 31 Video setup Face tracking The camcorder can use this function for...
... Record mode, aim the camcorder at the face(s). The face frame(s) will be longer than the actual recording time. Display Screen NOTE ❖ The view angle may become smaller when Slow Motion is On. ❖ When Slow Motion is On, the video resolution is played, ...the playback time will appear around the face. Preview/Record Mode 31 Video setup Face tracking The camcorder can use this function for...

User Guide
Page 32
... validate the setting. 3 Or press the Up button to highlight the Return ( ) icon, and then press the OK ( ) button to aim the camcorder at specific intervals you set , and play them as one frame every 5 seconds. Time lapse Record still images at the subject and position it will... not miss any other setting. Display Screen NOTE ❖ Be sure to exit. Display Screen This effect is activated, it securely before the Record button is pressed. The videos are recorded few seconds more ...
... validate the setting. 3 Or press the Up button to highlight the Return ( ) icon, and then press the OK ( ) button to aim the camcorder at specific intervals you set , and play them as one frame every 5 seconds. Time lapse Record still images at the subject and position it will... not miss any other setting. Display Screen NOTE ❖ Be sure to exit. Display Screen This effect is activated, it securely before the Record button is pressed. The videos are recorded few seconds more ...
User Guide
Page 33
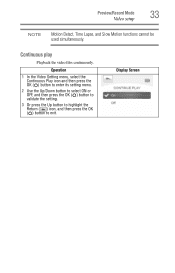
Operation 1 In the Video Setting menu, select the Continuous Play icon and then press the OK ( ) button to enter its setting menu. 2 Use the Up/Down button to select ON or OFF, and then press the OK ( ) button to validate the setting. 3 Or press the Up button to highlight the Return ( ) icon, and then press the OK ( ) button to exit. Display Screen Continuous play Playback the video files continuously. Preview/Record Mode 33 Video setup NOTE Motion Detect, Time Lapse, and Slow Motion functions cannot be used simultaneously.
Operation 1 In the Video Setting menu, select the Continuous Play icon and then press the OK ( ) button to enter its setting menu. 2 Use the Up/Down button to select ON or OFF, and then press the OK ( ) button to validate the setting. 3 Or press the Up button to highlight the Return ( ) icon, and then press the OK ( ) button to exit. Display Screen Continuous play Playback the video files continuously. Preview/Record Mode 33 Video setup NOTE Motion Detect, Time Lapse, and Slow Motion functions cannot be used simultaneously.