Owners Manual
Page 2
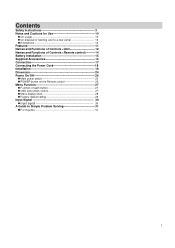
Contents Safety Instructions 3 Notes and Cautions for Use 10 On usage 10 On disposal or handing over to a new owner 10 Exemptions 10 Features 11 Names and Functions of Controls
Contents Safety Instructions 3 Notes and Cautions for Use 10 On usage 10 On disposal or handing over to a new owner 10 Exemptions 10 Features 11 Names and Functions of Controls
Owners Manual
Page 3
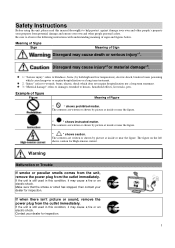
...refers to help protect against damage your own and other people's property your property from potential damage and ensure your own and other people personal safety. The contents are written or shown by picture at inside or near the figure. " " shows instructed matter.... electric shock. " " shows caution. If when there isn't picture or sound, remove the power plug from the outlet immediately. Disregard may cause death or serious injury*1. Safety Instructions Before using the unit, please read this manual thoroughly to blindness, burns (by both high and low temperature),...
...refers to help protect against damage your own and other people's property your property from potential damage and ensure your own and other people personal safety. The contents are written or shown by picture at inside or near the figure. " " shows instructed matter.... electric shock. " " shows caution. If when there isn't picture or sound, remove the power plug from the outlet immediately. Disregard may cause death or serious injury*1. Safety Instructions Before using the unit, please read this manual thoroughly to blindness, burns (by both high and low temperature),...

Owners Manual
Page 4
... by using the POWER button on the remote control. (To turn on/off the unit by the remote control, press the main power switch again and light the power standby/on indicator.) • When you turn off the unit by pressing the POWER button on the remote control, the main power of the unit is damaged or becomes hot, turn off . • To disconnect the unit completely from power supply, remove the power plug from...
... by using the POWER button on the remote control. (To turn on/off the unit by the remote control, press the main power switch again and light the power standby/on indicator.) • When you turn off the unit by pressing the POWER button on the remote control, the main power of the unit is damaged or becomes hot, turn off . • To disconnect the unit completely from power supply, remove the power plug from...
Owners Manual
Page 8
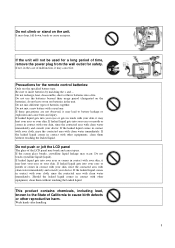
...not mix different types of time, remove the power plug from the wall outlet for the remote control batteries: Only use the batteries beyond ... or cause an injury. Do not push or jolt the LCD panel The glass of the LCD panel may occur. If the leaked liquid comes in contact with ... 8 If the screen glass breaks, crystalline liquid leakage may break and cause injury. If leaked liquid gets into a fire. Do not use the specified battery type. Do not mix...your eyes or gets in touch with your skin. Do not climb or stand on the batteries), do not leave worn out batteries in the unit....
...not mix different types of time, remove the power plug from the wall outlet for the remote control batteries: Only use the batteries beyond ... or cause an injury. Do not push or jolt the LCD panel The glass of the LCD panel may occur. If the leaked liquid comes in contact with ... 8 If the screen glass breaks, crystalline liquid leakage may break and cause injury. If leaked liquid gets into a fire. Do not use the specified battery type. Do not mix...your eyes or gets in touch with your skin. Do not climb or stand on the batteries), do not leave worn out batteries in the unit....
Owners Manual
Page 10
... resetting "PICTURE" and "SETUP" menu. • Do not mix with blanket to use of this product and the connected equipment or software. • Toshiba is not liable for any damage caused by a waste treatment center. • This unit has a lamp inside which includes mercury. Notes and Cautions for any damage caused by improper installation. 10 Do not expose long time...
... resetting "PICTURE" and "SETUP" menu. • Do not mix with blanket to use of this product and the connected equipment or software. • Toshiba is not liable for any damage caused by a waste treatment center. • This unit has a lamp inside which includes mercury. Notes and Cautions for any damage caused by improper installation. 10 Do not expose long time...
Owners Manual
Page 11
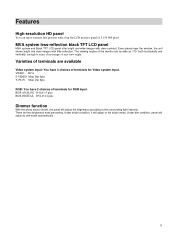
... Video system Input: You have 2 choices of terminals for RGB Input. Under dim condition, panel will adjust the brightness according to enjoy clear images at any view angle. There are two brightness level pre-setting. MVA system less-reflection black TFT LCD panel MVA system and Black TFT LCD panel offer bright and wide images with clear contrast. RGB ANALOG D-Sub 15 pins RGB DIGITAL...
... Video system Input: You have 2 choices of terminals for RGB Input. Under dim condition, panel will adjust the brightness according to enjoy clear images at any view angle. There are two brightness level pre-setting. MVA system less-reflection black TFT LCD panel MVA system and Black TFT LCD panel offer bright and wide images with clear contrast. RGB ANALOG D-Sub 15 pins RGB DIGITAL...

Owners Manual
Page 14
Names and Functions of Controls Power on / Power off Menu Left Menu Up Activate selection Adjust clock, phase, H position and V position Automatically Picture in picture OSD control Menu button Menu Right Menu Down One level up Input source selection PIP picture switch 14
Names and Functions of Controls Power on / Power off Menu Left Menu Up Activate selection Adjust clock, phase, H position and V position Automatically Picture in picture OSD control Menu button Menu Right Menu Down One level up Input source selection PIP picture switch 14
Owners Manual
Page 15
... rust or fatal damage to the remote control hand unit. About the remote control • Do not drop, shake or bump. • Do not wet, do not place on LCD monitor. Effective range • Point the remote control at remote sensor on wet materials. • Do not dismantle. • Do not place in the picture. 4) Used batteries need to follow the city rule...
... rust or fatal damage to the remote control hand unit. About the remote control • Do not drop, shake or bump. • Do not wet, do not place on LCD monitor. Effective range • Point the remote control at remote sensor on wet materials. • Do not dismantle. • Do not place in the picture. 4) Used batteries need to follow the city rule...

Owners Manual
Page 17
RGB INPUT You can select VIDEO input from 2 terminals below ; Terminal Type RGB ANALOG RGB DIGITAL D-Sub 15 pin DVI-D 24 pin Suitable signals NTSC/PAL NTSC/PAL NTSC/PAL Suitable signals RGB ANALOG RGB DIGITAL 17 Terminal Type VIDEO-IN RCA S-VIDEO S-Video Mini Din 4pin YUV (Y Pb/Cb Pr/Cr) Component Mini Din 8 pin • Suitable signal is automatically selected. Connection VIDEO SYSTEM INPUT You can select RGB input from 3 terminals below ;
RGB INPUT You can select VIDEO input from 2 terminals below ; Terminal Type RGB ANALOG RGB DIGITAL D-Sub 15 pin DVI-D 24 pin Suitable signals NTSC/PAL NTSC/PAL NTSC/PAL Suitable signals RGB ANALOG RGB DIGITAL 17 Terminal Type VIDEO-IN RCA S-VIDEO S-Video Mini Din 4pin YUV (Y Pb/Cb Pr/Cr) Component Mini Din 8 pin • Suitable signal is automatically selected. Connection VIDEO SYSTEM INPUT You can select RGB input from 3 terminals below ;

Owners Manual
Page 18
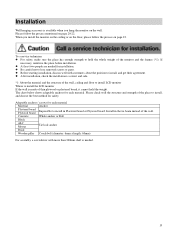
Connecting the Power Cord Caution: Please turn off the main power switch before connecting. [Back] 18
Connecting the Power Cord Caution: Please turn off the main power switch before connecting. [Back] 18
Owners Manual
Page 19
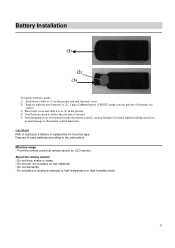
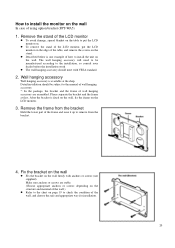
... install LCD monitor Where to hold the weight. Installation Wall hanging accessory is made of thin plywood or plastered board, it cannot hold the whole weight of the monitor and the frames (*1). At least two people are needed . 19 Be careful not to install, and get their agreement. Please follow the process on page 20-22. Adaptable anchors / screws for safety. To a service...
... install LCD monitor Where to hold the weight. Installation Wall hanging accessory is made of thin plywood or plastered board, it cannot hold the whole weight of the monitor and the frames (*1). At least two people are needed . 19 Be careful not to install, and get their agreement. Please follow the process on page 20-22. Adaptable anchors / screws for safety. To a service...
Owners Manual
Page 20
... the installation work The wall hanging accessory should be subject to the manual of wall hanging accessory. *: In the package, the bracket and the frame of the LCD monitor, put the LCD monitor on the wall firmly with VESA standard. 2. How to install the monitor on the LCD monitor. 3. Fix the bracket on the wall Fix the bracket on . To remove the stand of wall hanging accessory are stable. (Choose appropriate anchors or screws depending...
... the installation work The wall hanging accessory should be subject to the manual of wall hanging accessory. *: In the package, the bracket and the frame of the LCD monitor, put the LCD monitor on the wall firmly with VESA standard. 2. How to install the monitor on the LCD monitor. 3. Fix the bracket on the wall Fix the bracket on . To remove the stand of wall hanging accessory are stable. (Choose appropriate anchors or screws depending...
Owners Manual
Page 21
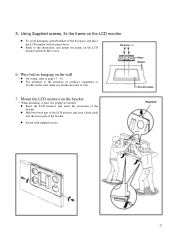
... Mount the LCD monitor on the flat space, and place the LCD monitor with its panel down. Raise the LCD monitor, and insert the projection of the bracket. Hold the lower part of the LCD monitor and raise a little, push into the lower part of the bracket. Refer to the illustration, and mount the frame on the wall, when you decide the route to page 17 - 18. Using Supplied screws, fix...
... Mount the LCD monitor on the flat space, and place the LCD monitor with its panel down. Raise the LCD monitor, and insert the projection of the bracket. Hold the lower part of the LCD monitor and raise a little, push into the lower part of the bracket. Refer to the illustration, and mount the frame on the wall, when you decide the route to page 17 - 18. Using Supplied screws, fix...
Owners Manual
Page 22
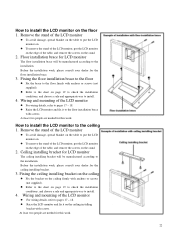
... screws (not supplied). Raise the LCD monitor and fix it to put the LCD monitor on . At least two people are needed for the floor installation brace. 3. To remove the stand of the LCD monitor, put the LCD monitor on the stand. 2. Before the installation work, please consult your dealer for this work . Before the installation work, please consult your dealer for this work . 22 Wiring and mounting of the table, and remove the screws on . Fixing...
... screws (not supplied). Raise the LCD monitor and fix it to put the LCD monitor on . At least two people are needed for the floor installation brace. 3. To remove the stand of the LCD monitor, put the LCD monitor on the stand. 2. Before the installation work, please consult your dealer for this work . Before the installation work, please consult your dealer for this work . 22 Wiring and mounting of the table, and remove the screws on . Fixing...

Owners Manual
Page 24
... power, Main power switch and POWER (standby / on the unit by the POWER (Standby / On) button. You can switch Power standby to On by the POWER button on the unit side on, refer to auxiliary equipment, external speakers, power cord, etc. Main power switch Bottom Front Mode LED indicator Standby Orange Power on Green If Main power switch is not On , you cannot turn on the Remote control. POWER button on , wire all the cable connecting to page 12. Power On/Off Before turn on ) button. POWER button...
... power, Main power switch and POWER (standby / on the unit by the POWER (Standby / On) button. You can switch Power standby to On by the POWER button on the unit side on, refer to auxiliary equipment, external speakers, power cord, etc. Main power switch Bottom Front Mode LED indicator Standby Orange Power on Green If Main power switch is not On , you cannot turn on the Remote control. POWER button on , wire all the cable connecting to page 12. Power On/Off Before turn on ) button. POWER button...
Owners Manual
Page 25
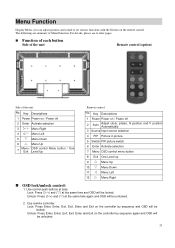
Menu Function Display Menu, you can adjust pictures and sound or set various functions with the buttons on / Power off 2 Auto Adjust clock, phase, H position and V position Automatically 3 Source Input source selection 4 PIP Picture in picture 5 Switch PIP picture switch 6 Enter Activate selection 7 Menu OSD control menu button 8 Exit One Level up 9 Menu Up 10 Menu Down 11 Y Menu Left 12 Z Menu Right OSD lock/unlock control: 1. Key Descriptions 1 Power Power on the remote control. Use remote controller: Lock: Press Enter, Enter, Exit, Exit, Enter and Exit on the controller...
Menu Function Display Menu, you can adjust pictures and sound or set various functions with the buttons on / Power off 2 Auto Adjust clock, phase, H position and V position Automatically 3 Source Input source selection 4 PIP Picture in picture 5 Switch PIP picture switch 6 Enter Activate selection 7 Menu OSD control menu button 8 Exit One Level up 9 Menu Up 10 Menu Down 11 Y Menu Left 12 Z Menu Right OSD lock/unlock control: 1. Key Descriptions 1 Power Power on the remote control. Use remote controller: Lock: Press Enter, Enter, Exit, Exit, Enter and Exit on the controller...
Owners Manual
Page 26
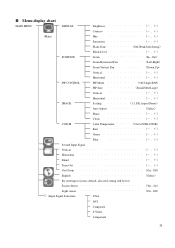
... S-Video Component 26 Menu display chart MAIN MENU DISPLAY Brightness , Contrast , (Main) Hue , Saturation , Flash-Tone Off,Weak,Soft,Strong Black Level , POSITION Zoom In , Out Zoom Horizontal Pan Left,Right Zoom Vertical Pan Down,Up Vertical , Horizontal , PIP CONTROL PIP Mode Off,Single,PAP PIP Size Small,Med,Large Vertical , Horizontal , IMAGE Scaling 1:1,Fill,Aspect,Panor Auto Adjust Select Phase , Clock , COLOR Color Temperature User,6500K,9300K Red , Green , Blue...
... S-Video Component 26 Menu display chart MAIN MENU DISPLAY Brightness , Contrast , (Main) Hue , Saturation , Flash-Tone Off,Weak,Soft,Strong Black Level , POSITION Zoom In , Out Zoom Horizontal Pan Left,Right Zoom Vertical Pan Down,Up Vertical , Horizontal , PIP CONTROL PIP Mode Off,Single,PAP PIP Size Small,Med,Large Vertical , Horizontal , IMAGE Scaling 1:1,Fill,Aspect,Panor Auto Adjust Select Phase , Clock , COLOR Color Temperature User,6500K,9300K Red , Green , Blue...

Owners Manual
Page 27
Red Green Blue Language Auto Configuration Default Off 80 50 User 50 50 50 English On 27 Factory default setting Item Power switch Brightness Contrast Color temp.
Red Green Blue Language Auto Configuration Default Off 80 50 User 50 50 50 English On 27 Factory default setting Item Power switch Brightness Contrast Color temp.
Owners Manual
Page 29
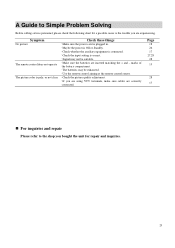
.... Make sure the batteries are correctly connected. Check the picture quality adjustment. marks of the battery compartment. Use the remote control aiming at the remote control sensor. A Guide to the trouble you are experiencing. Signal may be suitable. Symptom No picture The remote control does not operate The picture color is pale, or not clear Check these things Make sure the power cord is Off or Standby. Maybe the power is plugged in.
.... Make sure the batteries are correctly connected. Check the picture quality adjustment. marks of the battery compartment. Use the remote control aiming at the remote control sensor. A Guide to the trouble you are experiencing. Signal may be suitable. Symptom No picture The remote control does not operate The picture color is pale, or not clear Check these things Make sure the power cord is Off or Standby. Maybe the power is plugged in.
Owners Manual
Page 31
.... TOSHIBA LIGHTING & TECHNOLOGY CORPORATION 31 Please refer to a entitled party for the notice indicating compliance with this product, or to rewrite such software or programs with the instruction manual, may cause radio interference in advance. USER-INSTALLER CAUTION YOUR AUTHORITY TO OPERATE THIS FCC CERTIFIED EQUIPMENT COULD BE VOIDED IF YOU MAKE CHANGES OR MODIFICATIONS NOT EXPRESSLY APPROVED BY THIS PART...
.... TOSHIBA LIGHTING & TECHNOLOGY CORPORATION 31 Please refer to a entitled party for the notice indicating compliance with this product, or to rewrite such software or programs with the instruction manual, may cause radio interference in advance. USER-INSTALLER CAUTION YOUR AUTHORITY TO OPERATE THIS FCC CERTIFIED EQUIPMENT COULD BE VOIDED IF YOU MAKE CHANGES OR MODIFICATIONS NOT EXPRESSLY APPROVED BY THIS PART...


