
User Guide
Page 4
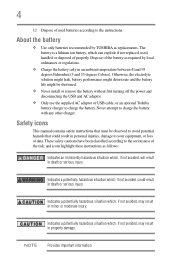
... the risk, and icons highlight these instructions as replacements. Safety icons This manual contains safety instructions that must be shortened. ❖ Never install or remove the battery without first turning off the power and disconnecting the USB and AC adaptor. ❖ Only use the supplied AC adaptor or USB cable, or an optional Toshiba battery charger to charge the battery with any other charger. Indicates a potentially hazardous situation which...
... the risk, and icons highlight these instructions as replacements. Safety icons This manual contains safety instructions that must be shortened. ❖ Never install or remove the battery without first turning off the power and disconnecting the USB and AC adaptor. ❖ Only use the supplied AC adaptor or USB cable, or an optional Toshiba battery charger to charge the battery with any other charger. Indicates a potentially hazardous situation which...
User Guide
Page 7
...Video recording 26 Photo recording 27 Using the Zoom function 27 Using the Advanced Zoom function 28 Menu options/operations 29 Video Setting options 30 Photo setting options 34 Effects 39 Deleting files 42 Chapter 4: Playback Mode 44 Button functions 44 LCD touch screen information 45 Notification icons 45 Touch function icons 46 Playback mode operations 47 Video Playback 48 Photo Playback 48 Delete a file in Playback mode 49 Chapter 5: Camcorder Settings 50 Setup Menu 50 Menu Sound 50 TV 51 Language 51 Time Settings 52 Format 52 Default Setting 53 Chapter 6: Viewing...
...Video recording 26 Photo recording 27 Using the Zoom function 27 Using the Advanced Zoom function 28 Menu options/operations 29 Video Setting options 30 Photo setting options 34 Effects 39 Deleting files 42 Chapter 4: Playback Mode 44 Button functions 44 LCD touch screen information 45 Notification icons 45 Touch function icons 46 Playback mode operations 47 Video Playback 48 Photo Playback 48 Delete a file in Playback mode 49 Chapter 5: Camcorder Settings 50 Setup Menu 50 Menu Sound 50 TV 51 Language 51 Time Settings 52 Format 52 Default Setting 53 Chapter 6: Viewing...
User Guide
Page 8
... 7: Viewing Photos and Videos on a Computer 57 Transferring photos or videos to a computer..........57 Chapter 8: Uploading Video and Photo Files to the Internet 58 CAMILEO® Uploader 58 To upload video/photo files selected manually to a Web site 60 Setting up your account information for a Web site 61 Webcam mode 62 ArcSoft MediaImpression 63 Chapter 9: Specifications 66 Operating Environment Conditions 67 Chapter 10: Troubleshooting 68 Chapter 11: Other Information 70 Toshiba Support 70...
... 7: Viewing Photos and Videos on a Computer 57 Transferring photos or videos to a computer..........57 Chapter 8: Uploading Video and Photo Files to the Internet 58 CAMILEO® Uploader 58 To upload video/photo files selected manually to a Web site 60 Setting up your account information for a Web site 61 Webcam mode 62 ArcSoft MediaImpression 63 Chapter 9: Specifications 66 Operating Environment Conditions 67 Chapter 10: Troubleshooting 68 Chapter 11: Other Information 70 Toshiba Support 70...
User Guide
Page 9
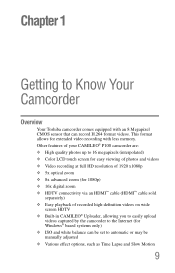
... digital zoom ❖ HDTV connectivity via an HDMI™ cable (HDMI™ cable sold separately) ❖ Easy playback of recorded high-definition videos on wide screen HDTV ❖ Built-in CAMILEO® Uploader, allowing you to easily upload videos captured by the camcorder to the Internet (for extended video recording with an 8 Megapixel CMOS sensor that can be manually adjusted ❖ Various effect options, such as Time Lapse and Slow Motion...
... digital zoom ❖ HDTV connectivity via an HDMI™ cable (HDMI™ cable sold separately) ❖ Easy playback of recorded high-definition videos on wide screen HDTV ❖ Built-in CAMILEO® Uploader, allowing you to easily upload videos captured by the camcorder to the Internet (for extended video recording with an 8 Megapixel CMOS sensor that can be manually adjusted ❖ Various effect options, such as Time Lapse and Slow Motion...
User Guide
Page 10
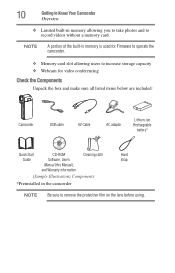
... photos and to record videos without a memory card NOTE A portion of the built-in memory is used for Firmware to operate the camcorder. ❖ Memory card slot allowing users to increase storage capacity ❖ Webcam for video conferencing Check the Components Unpack the box and make sure all listed items below are included: Camcorder USB cable AV Cable AC adaptor Lithium-ion Rechargeable battery* Quick Start CD-ROM Cleaning cloth Hand Guide Software, User's strap Manual (this Manual...
... photos and to record videos without a memory card NOTE A portion of the built-in memory is used for Firmware to operate the camcorder. ❖ Memory card slot allowing users to increase storage capacity ❖ Webcam for video conferencing Check the Components Unpack the box and make sure all listed items below are included: Camcorder USB cable AV Cable AC adaptor Lithium-ion Rechargeable battery* Quick Start CD-ROM Cleaning cloth Hand Guide Software, User's strap Manual (this Manual...
User Guide
Page 18
... an authorized Toshiba service provider has checked it for the product to cool down before attempting to charge the battery. ❖ Improper installation could generate smoke or fire, or cause the battery to rupture. Do not turn the power off and disconnect the power cable/cord plug from the product. Disposal of used batteries ❖ Always dispose of data. Put insulating tape, such as abnormal sound In such...
... an authorized Toshiba service provider has checked it for the product to cool down before attempting to charge the battery. ❖ Improper installation could generate smoke or fire, or cause the battery to rupture. Do not turn the power off and disconnect the power cable/cord plug from the product. Disposal of used batteries ❖ Always dispose of data. Put insulating tape, such as abnormal sound In such...
User Guide
Page 19
... battery falls out, while you are carrying the product, you could be shortened. ❖ Never install or remove the battery without first turning off the power and disconnecting the AC adaptor. Use only batteries recommended by TOSHIBA as required by local ordinances or regulations. NOTE Handling of the battery ❖ Never attempt to install batteries in the loss of data or damage to use...
... battery falls out, while you are carrying the product, you could be shortened. ❖ Never install or remove the battery without first turning off the power and disconnecting the AC adaptor. Use only batteries recommended by TOSHIBA as required by local ordinances or regulations. NOTE Handling of the battery ❖ Never attempt to install batteries in the loss of data or damage to use...
User Guide
Page 21
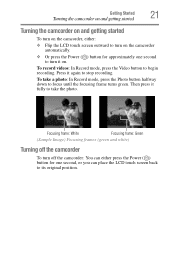
... turn off the camcorder: You can either : ❖ Flip the LCD touch screen outward to turn on the camcorder automatically. ❖ Or press the Power ( ) button for one second to turn on the camcorder, either press the Power ( ) button for approximately one second, or you can place the LCD touch screen back to its original position. To take the photo. To record videos: In Record mode, press the Video button to stop recording...
... turn off the camcorder: You can either : ❖ Flip the LCD touch screen outward to turn on the camcorder automatically. ❖ Or press the Power ( ) button for one second to turn on the camcorder, either press the Power ( ) button for approximately one second, or you can place the LCD touch screen back to its original position. To take the photo. To record videos: In Record mode, press the Video button to stop recording...
User Guide
Page 22
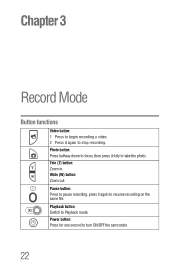
Tele (T) button: Zoom in. Pause button: Press to pause recording, press it again to stop recording. Chapter 3 Record Mode Button functions Video button: 1 Press to begin recording a video. 2 Press it again to resume recording on the same file. Playback button: Switch to turn ON/OFF the camcorder. 22 Wide (W) button: Zoom out. Power button: Press for one second to Playback mode. Photo button: Press halfway down to focus, then press it fully to take the photo.
Tele (T) button: Zoom in. Pause button: Press to pause recording, press it again to stop recording. Chapter 3 Record Mode Button functions Video button: 1 Press to begin recording a video. 2 Press it again to resume recording on the same file. Playback button: Switch to turn ON/OFF the camcorder. 22 Wide (W) button: Zoom out. Power button: Press for one second to Playback mode. Photo button: Press halfway down to focus, then press it fully to take the photo.
User Guide
Page 23
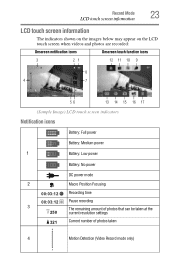
... Onscreen touch function icons 3 21 12 11 10 9 8 4 7 56 13 14 15 16 17 (Sample Image) LCD touch screen indicators Notification icons Battery: Full power Battery: Medium power 1 Battery: Low power Battery: No power DC power mode 2 Macro Position Focusing 00:03:12 Recording time 00:03:12 Pause recording 3 The remaining amount of photos that can be taken at the 250 current resolution settings 321 Current number of photos taken 4 Motion Detection (Video Record mode only)
... Onscreen touch function icons 3 21 12 11 10 9 8 4 7 56 13 14 15 16 17 (Sample Image) LCD touch screen indicators Notification icons Battery: Full power Battery: Medium power 1 Battery: Low power Battery: No power DC power mode 2 Macro Position Focusing 00:03:12 Recording time 00:03:12 Pause recording 3 The remaining amount of photos that can be taken at the 250 current resolution settings 321 Current number of photos taken 4 Motion Detection (Video Record mode only)
User Guide
Page 28
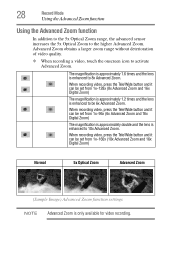
... Advanced Zoom and 16x Digital Zoom) Normal 5x Optical Zoom Advanced Zoom (Sample Image) Advanced Zoom function settings NOTE Advanced Zoom is enhanced to the higher Advanced Zoom. Advanced Zoom obtains a larger zoom range without deterioration of video quality. ❖ When recording a video, touch the onscreen icon to 10x Advanced Zoom. The magnification is approximately 1.6 times and the lens is only available for video recording. 28 Record Mode Using the Advanced Zoom function Using the Advanced Zoom function In...
... Advanced Zoom and 16x Digital Zoom) Normal 5x Optical Zoom Advanced Zoom (Sample Image) Advanced Zoom function settings NOTE Advanced Zoom is enhanced to the higher Advanced Zoom. Advanced Zoom obtains a larger zoom range without deterioration of video quality. ❖ When recording a video, touch the onscreen icon to 10x Advanced Zoom. The magnification is approximately 1.6 times and the lens is only available for video recording. 28 Record Mode Using the Advanced Zoom function Using the Advanced Zoom function In...

User Guide
Page 30
... the Video Setting menu. The Menu screen appears. 2 Touch the Video Setting icon twice to exit. Screen Screen NOTE Touch the icon once to view the description, touch twice to extend the brightness of high contrast and backlight, so objects appear brighter and clearer. The Light settings available are : Light, Resolution, Stabilization, Motion Detect, Slow Motion, Pre-Record, Time Lapse, and Continuous Play. OFF Digital Light Turns the light OFF. The Video Setting menu appears. 3 The Video Setting menu...
... the Video Setting menu. The Menu screen appears. 2 Touch the Video Setting icon twice to exit. Screen Screen NOTE Touch the icon once to view the description, touch twice to extend the brightness of high contrast and backlight, so objects appear brighter and clearer. The Light settings available are : Light, Resolution, Stabilization, Motion Detect, Slow Motion, Pre-Record, Time Lapse, and Continuous Play. OFF Digital Light Turns the light OFF. The Video Setting menu appears. 3 The Video Setting menu...

User Guide
Page 32
Screen Slow motion This option allows recording of videos with a slow motion effect. NOTE ❖ While using the Slow Motion setting, audio is not recorded and zoom is disabled. ❖ The view angle may become smaller when the Slow Motion function is activated. ❖ When the Slow Motion function is activated, the video resolution is detected. The camcorder will be longer than the actual recording time. Operation Screen 1 In the Video Setting menu, touch the Slow Motion icon twice. 2 Touch to select the desired...
Screen Slow motion This option allows recording of videos with a slow motion effect. NOTE ❖ While using the Slow Motion setting, audio is not recorded and zoom is disabled. ❖ The view angle may become smaller when the Slow Motion function is activated. ❖ When the Slow Motion function is activated, the video resolution is detected. The camcorder will be longer than the actual recording time. Operation Screen 1 In the Video Setting menu, touch the Slow Motion icon twice. 2 Touch to select the desired...

User Guide
Page 37
...). Auto Sets the ISO setting automatically according to exit. Screen When this option, you can imprint the date and time on the corner of each photo. ISO The camcorder automatically adjusts the ISO setting of speed. Use the higher setting to take a photo in the dark or in a poorly lit location, or for an subject moving at a high rate of images. Operation 1 In the Photo Setting menu, touch the Date...
...). Auto Sets the ISO setting automatically according to exit. Screen When this option, you can imprint the date and time on the corner of each photo. ISO The camcorder automatically adjusts the ISO setting of speed. Use the higher setting to take a photo in the dark or in a poorly lit location, or for an subject moving at a high rate of images. Operation 1 In the Photo Setting menu, touch the Date...
User Guide
Page 50
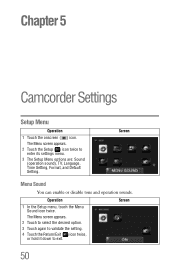
... Setup ( ) icon twice to exit. Screen Menu Sound You can enable or disable tone and operation sounds. The Menu screen appears. 2 Touch to select the desired option. 3 Touch again to validate the setting. 4 Touch the Return/Exit ( ) icon twice, or hold it down to enter its settings menu. 3 The Setup Menu options are: Sound (operation sound), TV, Language, Time Setting, Format, and Default Setting. Screen 50 Operation 1 In the Setup menu, touch the Menu Sound icon twice. Chapter 5 Camcorder Settings Setup Menu Operation...
... Setup ( ) icon twice to exit. Screen Menu Sound You can enable or disable tone and operation sounds. The Menu screen appears. 2 Touch to select the desired option. 3 Touch again to validate the setting. 4 Touch the Return/Exit ( ) icon twice, or hold it down to enter its settings menu. 3 The Setup Menu options are: Sound (operation sound), TV, Language, Time Setting, Format, and Default Setting. Screen 50 Operation 1 In the Setup menu, touch the Menu Sound icon twice. Chapter 5 Camcorder Settings Setup Menu Operation...
User Guide
Page 52
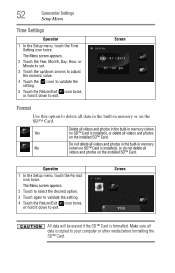
Do not delete all videos and photos in the built-in memory No (when no SD™ Card is copied to exit. Screen All data will be erased if the SD™ Card is installed), or do not delete all videos and photos in the built-in memory or on the installed SD™ Card. 52 Camcorder Settings Setup Menu Time Settings Operation 1 In the Setup menu, touch the Time Setting icon twice. The Menu screen appears. 2 Touch to select the...
Do not delete all videos and photos in the built-in memory No (when no SD™ Card is copied to exit. Screen All data will be erased if the SD™ Card is installed), or do not delete all videos and photos in the built-in memory or on the installed SD™ Card. 52 Camcorder Settings Setup Menu Time Settings Operation 1 In the Setup menu, touch the Time Setting icon twice. The Menu screen appears. 2 Touch to select the...
User Guide
Page 53
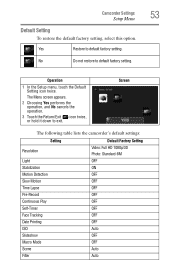
... exit. Camcorder Settings Setup Menu Default Setting To restore the default factory setting, select this option. Screen The following table lists the camcorder's default settings: Setting Resolution Light Stabilization Motion Detection Slow Motion Time Lapse Pre-Record Continuous Play Self-Timer Face Tracking Date Printing ISO Slideshow Macro Mode Scene Filter Default Factory Setting Video: Full HD 1080p/30 Photo: Standard-8M OFF ON OFF OFF OFF OFF OFF OFF OFF OFF Auto OFF OFF Auto Auto
... exit. Camcorder Settings Setup Menu Default Setting To restore the default factory setting, select this option. Screen The following table lists the camcorder's default settings: Setting Resolution Light Stabilization Motion Detection Slow Motion Time Lapse Pre-Record Continuous Play Self-Timer Face Tracking Date Printing ISO Slideshow Macro Mode Scene Filter Default Factory Setting Video: Full HD 1080p/30 Photo: Standard-8M OFF ON OFF OFF OFF OFF OFF OFF OFF OFF Auto OFF OFF Auto Auto

User Guide
Page 54
54 Camcorder Settings Setup Menu White Balance Menu Sound TV Language Volume Setting Auto ON NTSC English Level 4 Default Factory Setting
54 Camcorder Settings Setup Menu White Balance Menu Sound TV Language Volume Setting Auto ON NTSC English Level 4 Default Factory Setting
User Guide
Page 56
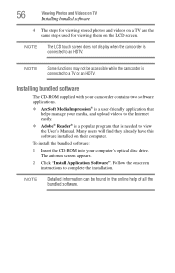
... disc drive. To install the bundled software: 1 Insert the CD-ROM into your media, and upload videos to the Internet easily. ❖ Adobe® Reader® is a popular program that is needed to complete the installation. Follow the onscreen instructions to view the User's Manual. NOTE Detailed information can be accessible while the camcorder is connected to a TV or an HDTV. NOTE The LCD touch screen does not display when...
... disc drive. To install the bundled software: 1 Insert the CD-ROM into your media, and upload videos to the Internet easily. ❖ Adobe® Reader® is a popular program that is needed to complete the installation. Follow the onscreen instructions to view the User's Manual. NOTE Detailed information can be accessible while the camcorder is connected to a TV or an HDTV. NOTE The LCD touch screen does not display when...
User Guide
Page 72
...) United States and District of Columbia may obtain warranty service by visiting the Toshiba Acclaim Web site at www.acclaim.toshiba.com or by contacting the telephone support center at 1-949-583-3305. The One (1) Year Standard Limited Warranty for Toshiba Computer Accessories can be found online at 1-888-592-0944. Customers located outside the fifty...
...) United States and District of Columbia may obtain warranty service by visiting the Toshiba Acclaim Web site at www.acclaim.toshiba.com or by contacting the telephone support center at 1-949-583-3305. The One (1) Year Standard Limited Warranty for Toshiba Computer Accessories can be found online at 1-888-592-0944. Customers located outside the fifty...


