
Users Manual Canada; English
Page 3
...Series Wireless communications 3-9 LAN ...3-12 Optional devices 3-14 Sound System 3-27 Video mode 3-30 Computer Handling 3-30 Heat dispersal 3-31 Chapter 4 Utilities & Advanced Usage Utilities and Applications 4-1 Special features 4-5 Using the TOSHIBA Sleep Utility 4-7 Password Utility 4-9 HW Setup 4-10 System Recovery 4-15 Chapter 5 Power and Power-Up Modes Power conditions 5-1 Monitoring of power condition 5-2 Battery ...5-3 Power-up modes 5-9 Panel power on/off 5-9 System automatic Sleep/Hibernation 5-9 Chapter 6 Troubleshooting Problem solving process 6-1 Hardware...
...Series Wireless communications 3-9 LAN ...3-12 Optional devices 3-14 Sound System 3-27 Video mode 3-30 Computer Handling 3-30 Heat dispersal 3-31 Chapter 4 Utilities & Advanced Usage Utilities and Applications 4-1 Special features 4-5 Using the TOSHIBA Sleep Utility 4-7 Password Utility 4-9 HW Setup 4-10 System Recovery 4-15 Chapter 5 Power and Power-Up Modes Power conditions 5-1 Monitoring of power condition 5-2 Battery ...5-3 Power-up modes 5-9 Panel power on/off 5-9 System automatic Sleep/Hibernation 5-9 Chapter 6 Troubleshooting Problem solving process 6-1 Hardware...
Users Manual Canada; English
Page 12
... see to set up and begin using optional devices and troubleshooting. We identify such operations by the key top symbols separated by a plus sign (+). User's Manual xii Conventions This manual uses the following their definition. Key operation Some operations require you must hold down CTRL and at the same time press the third. For example: Read Only Memory (ROM). Icons Icons identify ports, dials, and other parts of...
... see to set up and begin using optional devices and troubleshooting. We identify such operations by the key top symbols separated by a plus sign (+). User's Manual xii Conventions This manual uses the following their definition. Key operation Some operations require you must hold down CTRL and at the same time press the third. For example: Read Only Memory (ROM). Icons Icons identify ports, dials, and other parts of...
Users Manual Canada; English
Page 23
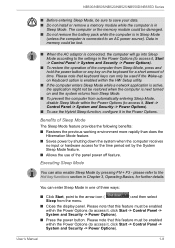
... enable Sleep Mode by the System Sleep Mode feature. ■ Allows the use the Hybrid Sleep function, configure it , Start -> Control Panel -> System and Security -> Power Options). ■ To use of three ways: ■ Click Start, point to access it, click Start -> Control Panel -> System and Security -> Power Options). ■ Press the power button. Please note that keyboard keys can only be used if the Wake-up on Keyboard option is enabled within the HW Setup utility. ■ If the computer enters Sleep Mode while a network...
... enable Sleep Mode by the System Sleep Mode feature. ■ Allows the use the Hybrid Sleep function, configure it , Start -> Control Panel -> System and Security -> Power Options). ■ To use of three ways: ■ Click Start, point to access it, click Start -> Control Panel -> System and Security -> Power Options). ■ Press the power button. Please note that keyboard keys can only be used if the Wake-up on Keyboard option is enabled within the HW Setup utility. ■ If the computer enters Sleep Mode while a network...
Users Manual Canada; English
Page 24
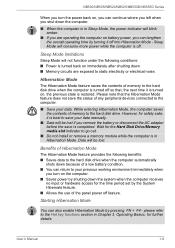
... input or hardware access for the Hard Disk Drive/Memory media slot indicator to go out. ■ Do not install or remove a memory module while the computer is in Hibernation Mode. NB500/NB505/NB520/NB525/NB550D/NB555D Series When you turn the power back on, you can continue where you left when you shut down the computer. ■ When the computer is in Sleep Mode, the power indicator will not function under the...
... input or hardware access for the Hard Disk Drive/Memory media slot indicator to go out. ■ Do not install or remove a memory module while the computer is in Hibernation Mode. NB500/NB505/NB520/NB525/NB550D/NB555D Series When you turn the power back on, you can continue where you left when you shut down the computer. ■ When the computer is in Sleep Mode, the power indicator will not function under the...
Users Manual Canada; English
Page 29
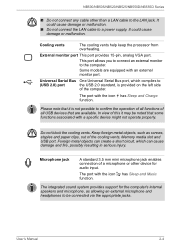
... sound system provides support for audio input. Keep foreign metal objects, such as allowing an external microphone and headphones to confirm the operation of all functions of this it may be connected via the appropriate jacks. Please note that some functions associated with an external monitor port. It could cause damage or malfunction. User's Manual 2-4 Foreign metal objects can create a short circuit, which complies to (USB 2.0) port the USB...
... sound system provides support for audio input. Keep foreign metal objects, such as allowing an external microphone and headphones to confirm the operation of all functions of this it may be connected via the appropriate jacks. Please note that some functions associated with an external monitor port. It could cause damage or malfunction. User's Manual 2-4 Foreign metal objects can create a short circuit, which complies to (USB 2.0) port the USB...

Users Manual Canada; English
Page 40
.../NB525/NB550D/NB555D Series Figure 3-3 CAPS LOCK indicator 1 1. User's Manual 3-3 Please note that enable, disable or configure specific features. Since the keyboard is used in combination with the following keys to simulate functions similar to be simulated using two keys instead of the 104key enhanced keyboard. F12 The function keys (not to those keys marked with icons also execute specific functions on the larger keyboard. Soft keys are locked into their uppercase format. CAPS LOCK indicator CAPS LOCK This indicator...
.../NB525/NB550D/NB555D Series Figure 3-3 CAPS LOCK indicator 1 1. User's Manual 3-3 Please note that enable, disable or configure specific features. Since the keyboard is used in combination with the following keys to simulate functions similar to be simulated using two keys instead of the 104key enhanced keyboard. F12 The function keys (not to those keys marked with icons also execute specific functions on the larger keyboard. Soft keys are locked into their uppercase format. CAPS LOCK indicator CAPS LOCK This indicator...
Users Manual Canada; English
Page 41
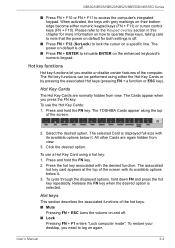
.... Hot key functions Hot key functions let you enable or disable certain features of the hot keys. ■ Mute Pressing FN + ESC turns the volume on and off. ■ Lock Pressing FN + F1 enters ''Lock computer mode''. The Hot key functions can be performed using a hot key: 1. Press and hold down FN and press the hot key repeatedly. To cycle through the displayed options, hold the FN key. When activated, the keys with its available options below it . The power on default...
.... Hot key functions Hot key functions let you enable or disable certain features of the hot keys. ■ Mute Pressing FN + ESC turns the volume on and off. ■ Lock Pressing FN + F1 enters ''Lock computer mode''. The Hot key functions can be performed using a hot key: 1. Press and hold down FN and press the hot key repeatedly. To cycle through the displayed options, hold the FN key. When activated, the keys with its available options below it . The power on default...
Users Manual Canada; English
Page 55
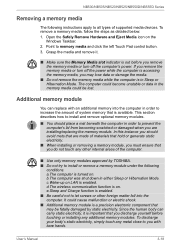
... types of the computer. ■ Use only memory modules approved by static electricity. e.Sleep and Charge function is important that is out before touching or installing any other foreign matter fall into the computer in order to let screws or other internal areas of supported media devices. Since the human body can replace with bare hands. User's Manual 3-18 Open the Safely Remove Hardware and Eject Media icon on . Grasp the media and remove...
... types of the computer. ■ Use only memory modules approved by static electricity. e.Sleep and Charge function is important that is out before touching or installing any other foreign matter fall into the computer in order to let screws or other internal areas of supported media devices. Since the human body can replace with bare hands. User's Manual 3-18 Open the Safely Remove Hardware and Eject Media icon on . Grasp the media and remove...
Users Manual Canada; English
Page 58
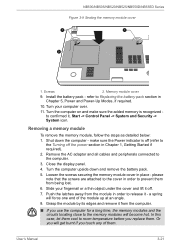
... - Install the battery pack - Turn the computer on and make sure the Power indicator is recognized to release it , Start -> Control Panel -> System and Security -> System icon. Grasp the module by its edges and remove it off the power section in Chapter 1, Getting Started if required). 2. User's Manual 3-21 refer to the computer. 3. Remove the AC adaptor and all cables and peripherals connected to Replacing the battery pack section in order...
... - Install the battery pack - Turn the computer on and make sure the Power indicator is recognized to release it , Start -> Control Panel -> System and Security -> System icon. Grasp the module by its edges and remove it off the power section in Chapter 1, Getting Started if required). 2. User's Manual 3-21 refer to the computer. 3. Remove the AC adaptor and all cables and peripherals connected to Replacing the battery pack section in order...
Users Manual Canada; English
Page 63
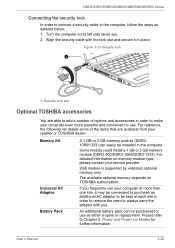
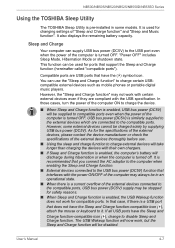
... models could install a 1 GB or 2 GB memory module (DDR2-800/DDR3-1066/DDR3-1333). NB500/NB505/NB520/NB525/NB550D/NB555D Series Connecting the security lock In order to connect a security cable to Chapter 5, Power and Power-Up Modes for use . Figure 3-13 Security lock 1 1. For detailed information on TOSHIBA authorization. The available optional memory depends on memory module type, please contact your computer even more than one site, it in place. Turn the...
... models could install a 1 GB or 2 GB memory module (DDR2-800/DDR3-1066/DDR3-1333). NB500/NB505/NB520/NB525/NB550D/NB555D Series Connecting the security lock In order to connect a security cable to Chapter 5, Power and Power-Up Modes for use . Figure 3-13 Security lock 1 1. For detailed information on TOSHIBA authorization. The available optional memory depends on memory module type, please contact your computer even more than one site, it in place. Turn the...
Users Manual Canada; English
Page 75
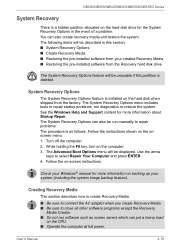
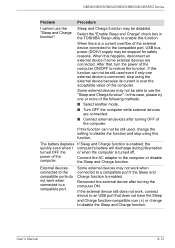
.... However, the "Sleep and Charge function" may always be in some external devices cannot be used for ports that does not have the Sleep and Charge function-compatible icon ( ), attach the mouse or keyboard to disable Sleep and Charge function. In those cases, turn the power of "Sleep and Charge function" and "Sleep and Music function". NB500/NB505/NB520/NB525/NB550D/NB555D Series Using the TOSHIBA Sleep Utility The TOSHIBA Sleep Utility is turned off. As for compatible ports. User's Manual 4-7 It also displays the remaining battery capacity.
.... However, the "Sleep and Charge function" may always be in some external devices cannot be used for ports that does not have the Sleep and Charge function-compatible icon ( ), attach the mouse or keyboard to disable Sleep and Charge function. In those cases, turn the power of "Sleep and Charge function" and "Sleep and Music function". NB500/NB505/NB520/NB525/NB550D/NB555D Series Using the TOSHIBA Sleep Utility The TOSHIBA Sleep Utility is turned off. As for compatible ports. User's Manual 4-7 It also displays the remaining battery capacity.

Users Manual Canada; English
Page 81
... the TOSHIBA Leading Innovation >>> screen appears, release the F12 key. 2. Enabled Disabled Enables the Wake-up on from shudown when it receives a wake-up on LAN This feature lets the computer's power be restricted. Do not install or remove a memory module while Wake-up time. System can turn on the system by pressing any key. User's Manual 4-13 NB500/NB505/NB520/NB525/NB550D/NB555D Series To change the boot priority settings...
... the TOSHIBA Leading Innovation >>> screen appears, release the F12 key. 2. Enabled Disabled Enables the Wake-up on from shudown when it receives a wake-up on LAN This feature lets the computer's power be restricted. Do not install or remove a memory module while Wake-up time. System can turn on the system by pressing any key. User's Manual 4-13 NB500/NB505/NB520/NB525/NB550D/NB555D Series To change the boot priority settings...
Users Manual Canada; English
Page 83
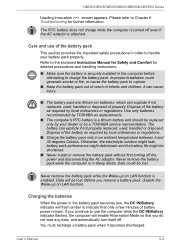
... repair startup problems, run manually to select Repair Your Computer and press ENTER. 4. User's Manual 4-15 Check your Windows® manual for more information on -screen instructions. NB500/NB505/NB520/NB525/NB550D/NB555D Series System Recovery There is as screen savers which can put a heavy load on the CPU. ■ Operate the computer at full power. Turn off the computer. 2. The following items will be displayed. The System Recovery Options can also create recovery media and restore...
... repair startup problems, run manually to select Repair Your Computer and press ENTER. 4. User's Manual 4-15 Check your Windows® manual for more information on -screen instructions. NB500/NB505/NB520/NB525/NB550D/NB555D Series System Recovery There is as screen savers which can put a heavy load on the CPU. ■ Operate the computer at full power. Turn off the computer. 2. The following items will be displayed. The System Recovery Options can also create recovery media and restore...
Users Manual Canada; English
Page 90
... in the battery pack becomes low, the DC IN/Battery indicator will enable Hibernation Mode so that only a few minutes of battery power remain. Before you continue to rupture. ■ Keep the battery pack out of reach of the battery as required by local ordinances or regulations. ■ Charge the battery pack only in Sleep Mode. If you remove a battery pack, disable the Wake-up on LAN function. User's Manual 5-4
... in the battery pack becomes low, the DC IN/Battery indicator will enable Hibernation Mode so that only a few minutes of battery power remain. Before you continue to rupture. ■ Keep the battery pack out of reach of the battery as required by local ordinances or regulations. ■ Charge the battery pack only in Sleep Mode. If you remove a battery pack, disable the Wake-up on LAN function. User's Manual 5-4

Users Manual Canada; English
Page 99
... in memory will not start Make sure you should check the status of other power resources, including an intelligent power supply and a Real Time Clock (RTC) battery, all unsaved data in another device, such as a lamp. Basic problems may occur in the following areas: ■ Power ■ Keyboard ■ Internal display panel ■ Hard disk drive ■ Memory media card ■ Touch Pad ■ USB device ■ Sound system ■ External monitor ■ LAN ■ Wireless LAN ■ Bluetooth Power When...
... in memory will not start Make sure you should check the status of other power resources, including an intelligent power supply and a Real Time Clock (RTC) battery, all unsaved data in another device, such as a lamp. Basic problems may occur in the following areas: ■ Power ■ Keyboard ■ Internal display panel ■ Hard disk drive ■ Memory media card ■ Touch Pad ■ USB device ■ Sound system ■ External monitor ■ LAN ■ Wireless LAN ■ Bluetooth Power When...
Users Manual Canada; English
Page 107
...; Connect external devices after turning the computer ON. If this function. If the external device still does not work, connect device to an USB port that , turn the power of the following methods. ■ Select another mode. ■ Turn OFF the computer while external devices are connected. Select the "Enable Sleep and Charge" check box in the TOSHIBA Sleep utility to use the "Sleep and Charge function". After that does not have the Sleep and Charge function-compatible icon ( ) or change the setting to disable...
...; Connect external devices after turning the computer ON. If this function. If the external device still does not work, connect device to an USB port that , turn the power of the following methods. ■ Select another mode. ■ Turn OFF the computer while external devices are connected. Select the "Enable Sleep and Charge" check box in the TOSHIBA Sleep utility to use the "Sleep and Charge function". After that does not have the Sleep and Charge function-compatible icon ( ) or change the setting to disable...
Users Manual Canada; English
Page 109
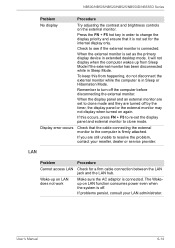
... the external monitor while the computer is connected. User's Manual 6-14 Display error occurs Check that it will not display when the computer wakes up on LAN function consumes power even when the system is not set for a firm cable connection between the LAN jack and the LAN hub. If you are turned off . Press the FN + F5 hot key in Sleep or Hibernation Mode. When the display panel and an external monitor are set the display panel and external monitor...
... the external monitor while the computer is connected. User's Manual 6-14 Display error occurs Check that it will not display when the computer wakes up on LAN function consumes power even when the system is not set for a firm cable connection between the LAN jack and the LAN hub. If you are turned off . Press the FN + F5 hot key in Sleep or Hibernation Mode. When the display panel and an external monitor are set the display panel and external monitor...
Users Manual Canada; English
Page 136
...10 K Keyboard, 3-2 FN Sticky key, 3-6 Function keys F1...F12, 3-3 Hot key functions, 3-4 problems, 6-7 Windows special keys, 3-6 Keypad overlay, 4-5 Arrow mode, 3-6 User's Manual Numeric mode, 3-6 temporarily using normal key- NB500/NB505/NB520/NB525/NB550D/NB555D Series H Hard disk drive, 2-11 automatic power off ), 3-7 turning on the overlays, 3-6 L LAN, 3-12 cable types, 3-13 connecting, 3-13 jack, 2-3 problems, 6-14 M Media care Card care, 3-16 Memory card care, 3-16 Memory additional, 3-26 installing, 3-19 removing, 3-21 memory media card inserting, 3-17 removing, 3-18 Memory media slot...
...10 K Keyboard, 3-2 FN Sticky key, 3-6 Function keys F1...F12, 3-3 Hot key functions, 3-4 problems, 6-7 Windows special keys, 3-6 Keypad overlay, 4-5 Arrow mode, 3-6 User's Manual Numeric mode, 3-6 temporarily using normal key- NB500/NB505/NB520/NB525/NB550D/NB555D Series H Hard disk drive, 2-11 automatic power off ), 3-7 turning on the overlays, 3-6 L LAN, 3-12 cable types, 3-13 connecting, 3-13 jack, 2-3 problems, 6-14 M Media care Card care, 3-16 Memory card care, 3-16 Memory additional, 3-26 installing, 3-19 removing, 3-21 memory media card inserting, 3-17 removing, 3-18 Memory media slot...
Users Manual Canada; English
Page 137
..., 6-4 Internal display panel, 6-8 Keyboard, 6-7 LAN, 6-14 Memory Media Card, 6-9 Overheating power down, 6-4 Pointing device, 6-9 Power, 6-4 Real Time Clock, 6-7 SD/SDHC Card, 6-9 Sound system, 6-13 TOSHIBA support, 6-16 Touch Pad, 6-9 USB device, 6-11 USB mouse, 6-10 Wireless LAN, 6-15 R Recovery hard disk drive, 4-18 Recovery Media, 4-16 Restarting the computer, 1-10 S SD/SDHC Card formatting, 3-16 inserting, 3-17 note, 3-15 removing, 3-18 Security lock, 3-25 Sleep Mode setting, 1-7 System automatic, 4-5 Soft keys ENTER, 3-4 ScrLock, 3-4 Sound system headphone jack, 2-5 microphone jack...
..., 6-4 Internal display panel, 6-8 Keyboard, 6-7 LAN, 6-14 Memory Media Card, 6-9 Overheating power down, 6-4 Pointing device, 6-9 Power, 6-4 Real Time Clock, 6-7 SD/SDHC Card, 6-9 Sound system, 6-13 TOSHIBA support, 6-16 Touch Pad, 6-9 USB device, 6-11 USB mouse, 6-10 Wireless LAN, 6-15 R Recovery hard disk drive, 4-18 Recovery Media, 4-16 Restarting the computer, 1-10 S SD/SDHC Card formatting, 3-16 inserting, 3-17 note, 3-15 removing, 3-18 Security lock, 3-25 Sleep Mode setting, 1-7 System automatic, 4-5 Soft keys ENTER, 3-4 ScrLock, 3-4 Sound system headphone jack, 2-5 microphone jack...

Detailed Specs for Mini-Notebook NB525 PLL62C-01S00N English
Page 1
... Board Toshiba ReelTime Toshiba Sleep-and-Music USB Sleep and Charge Toshiba Media Controller Memory Standard Memory: 1 x 1GB DDR3 (1066MHz) Maximum Memory: 2GB DDR3 Expansion Modules: 1GB, 2GB Hard Disk Drive 320GB (5400 RPM); Trial Microsoft® Office Starter 2010 includes reduced-functionality versions of memory Sound System Realtek ALC259-VB5-GR Software Sound Intel High Definition Audio 1.0, harman/kardon speakers Communication 10/100 integrated Ethernet LAN Intel Wireless LAN (802.11 b/g/n) w/ WIDI Integrated 0.3 Web Camera for Video...
... Board Toshiba ReelTime Toshiba Sleep-and-Music USB Sleep and Charge Toshiba Media Controller Memory Standard Memory: 1 x 1GB DDR3 (1066MHz) Maximum Memory: 2GB DDR3 Expansion Modules: 1GB, 2GB Hard Disk Drive 320GB (5400 RPM); Trial Microsoft® Office Starter 2010 includes reduced-functionality versions of memory Sound System Realtek ALC259-VB5-GR Software Sound Intel High Definition Audio 1.0, harman/kardon speakers Communication 10/100 integrated Ethernet LAN Intel Wireless LAN (802.11 b/g/n) w/ WIDI Integrated 0.3 Web Camera for Video...


