Printable Spec Sheet
Page 1
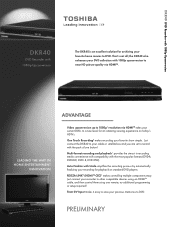
.... Auto Finalize with the push of one remote, no additional programming or setup required! Just connect your recorder to other compatible devices using an HDMITM cable, and then control them using one button! DKR40 DVD Recorder with 1080p Upconversion DKR40 DVD Recorder with 1080p upconversion to near HD picture quality via HDMITM takes your current DVDs to a new level, for an amazing viewing...
.... Auto Finalize with the push of one remote, no additional programming or setup required! Just connect your recorder to other compatible devices using an HDMITM cable, and then control them using one button! DKR40 DVD Recorder with 1080p Upconversion DKR40 DVD Recorder with 1080p upconversion to near HD picture quality via HDMITM takes your current DVDs to a new level, for an amazing viewing...
Owner's Manual - English
Page 3
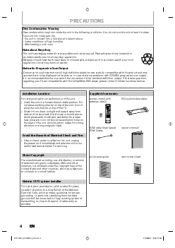
...Install the unit in a horizontal and stable position. If so, do not use , distribution, or revision of television programs, videotapes, DVDs and other countries, and may cause artifacts to Article 820-40 of the unit. Notice for a few hours until its inside the ...warm place. - Supplied Accessories remote control with your TV set compatibility with 525(480) progressive scan output, it away from devices of the unit. After heating a cold room. About Copyright The unauthorized recording, use this 525p(480p) DVD player, please contact Toshiba Customer Service. in the picture....
...Install the unit in a horizontal and stable position. If so, do not use , distribution, or revision of television programs, videotapes, DVDs and other countries, and may cause artifacts to Article 820-40 of the unit. Notice for a few hours until its inside the ...warm place. - Supplied Accessories remote control with your TV set compatibility with 525(480) progressive scan output, it away from devices of the unit. After heating a cold room. About Copyright The unauthorized recording, use this 525p(480p) DVD player, please contact Toshiba Customer Service. in the picture....

Owner's Manual - English
Page 4
...camera of cellular phone): Direct a digital camera to remote control, press and hold a button on recordable DVD discs. Dolby and the double-D symbol are trademarks or registered trademarks of HDMI Licensing LLC. DVDs created using Dolby Digital Recording will be happy to out. Cleaning the Disc ...of cellular phone). Manufactured under license under license from the center to assist you can test if the remote control sends out the infrared signal with actual recordable DVD discs. This information is working . • With a digital camera (including built-in this to ...
...camera of cellular phone): Direct a digital camera to remote control, press and hold a button on recordable DVD discs. Dolby and the double-D symbol are trademarks or registered trademarks of HDMI Licensing LLC. DVDs created using Dolby Digital Recording will be happy to out. Cleaning the Disc ...of cellular phone). Manufactured under license under license from the center to assist you can test if the remote control sends out the infrared signal with actual recordable DVD discs. This information is working . • With a digital camera (including built-in this to ...
Owner's Manual - English
Page 5
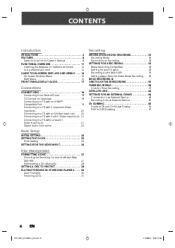
... a Remote Control ...12 GUIDE TO ON-SCREEN DISPLAYS AND MENUS ...14 On-Screen Display / Menu ...14 Main Menu...16 FRONT PANEL DISPLAY GUIDE ...17 Recording INFORMATION ON DVD RECORDING ...Recording Mode ...Restrictions on Recording ...SETTINGS FOR A RECORDING ...Make Recording Compatible ...Setting for Auto Chapter ...Recording Audio Select (XP) ...Setting Aspect Ratio for Video Mode Recording ...BASIC RECORDING & ONE-TOUCH TIMER RECORDING ...TIMER RECORDING...
... a Remote Control ...12 GUIDE TO ON-SCREEN DISPLAYS AND MENUS ...14 On-Screen Display / Menu ...14 Main Menu...16 FRONT PANEL DISPLAY GUIDE ...17 Recording INFORMATION ON DVD RECORDING ...Recording Mode ...Restrictions on Recording ...SETTINGS FOR A RECORDING ...Make Recording Compatible ...Setting for Auto Chapter ...Recording Audio Select (XP) ...Setting Aspect Ratio for Video Mode Recording ...BASIC RECORDING & ONE-TOUCH TIMER RECORDING ...TIMER RECORDING...
Owner's Manual - English
Page 10
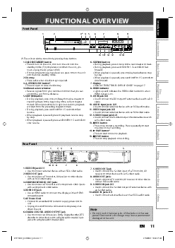
...) • Use to connect the S-video output of the jacks on page 17. 8. Infrared sensor window • Receive signals from your remote control so that you must unplug the AC power cord.) • If timer programmings have been set, press to turn on by pressing these...; Use to connect a TV monitor, AV receiver or other device with an S-video cable. 8. FUNCTIONAL OVERVIEW Front Panel 1 2 3* 4 5 6 7 8 9 1080p I/y ON/STANDBY DVD VIDEO RECORDER DKR40 OPEN/CLOSE Introduction 1080i 720p 480p Connections SKIP STOP PLAY REC L2 S-VIDEO VIDEO L R L3 DV IN 15 14* 13 12 11 10 (*) The...
...) • Use to connect the S-video output of the jacks on page 17. 8. Infrared sensor window • Receive signals from your remote control so that you must unplug the AC power cord.) • If timer programmings have been set, press to turn on by pressing these...; Use to connect a TV monitor, AV receiver or other device with an S-video cable. 8. FUNCTIONAL OVERVIEW Front Panel 1 2 3* 4 5 6 7 8 9 1080p I/y ON/STANDBY DVD VIDEO RECORDER DKR40 OPEN/CLOSE Introduction 1080i 720p 480p Connections SKIP STOP PLAY REC L2 S-VIDEO VIDEO L R L3 DV IN 15 14* 13 12 11 10 (*) The...
Owner's Manual - English
Page 11
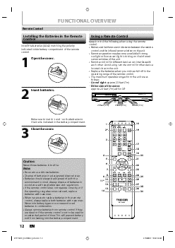
... Install the batteries (AAx2) matching the polarity indicated inside battery compartment of the remote control. Line of the center: approx. 23 feet (7m) within 30° 1080p I/y ON/STANDBY DVD VIDEO RECORDER DKR40 OPEN/CLOSE 1 2 3 Note: Open the cover. on the batteries to the marks indicated in the battery ...29 28 30 13 14 SE-R0265 12 EN 2/5/2009 10:32:38 AM E7PCBUD_DKR40KU_EN.indd 12 Insert batteries. 1080i 720p 480p DVD -RW/-R/+RW/+R RECORDING 30˚ 23feet (7m) 30˚ 23feet (7m) 23feet (7m) Make sure to replace batteries in mind. Always dispose...
... Install the batteries (AAx2) matching the polarity indicated inside battery compartment of the remote control. Line of the center: approx. 23 feet (7m) within 30° 1080p I/y ON/STANDBY DVD VIDEO RECORDER DKR40 OPEN/CLOSE 1 2 3 Note: Open the cover. on the batteries to the marks indicated in the battery ...29 28 30 13 14 SE-R0265 12 EN 2/5/2009 10:32:38 AM E7PCBUD_DKR40KU_EN.indd 12 Insert batteries. 1080i 720p 480p DVD -RW/-R/+RW/+R RECORDING 30˚ 23feet (7m) 30˚ 23feet (7m) 23feet (7m) Make sure to replace batteries in mind. Always dispose...
Owner's Manual - English
Page 23
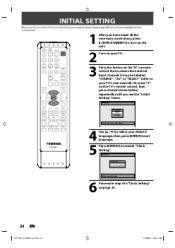
REPEAT REC MODE REC ZOOM SE-R0265 4 5 6 Use [K / L] to step 4 in "Clock Setting" on the TV's remote control that accesses the external input channel. Proceed to select your TV's user manual). SETUP DISPLAY AUDIO TOP MENU MENU/LIST ENTER CLEAR RETURN... completed all the necessary connections, press [I/y ON/STANDBY] to set language. RETURN: Exit Initial Setting. Turn on your TV. Or press "2" on the TV's remote control, then press channel down button repeatedly until you have made all the connections. INITIAL SETTING When you turn on the y unit. Initial Setting SKIP...
REPEAT REC MODE REC ZOOM SE-R0265 4 5 6 Use [K / L] to step 4 in "Clock Setting" on the TV's remote control that accesses the external input channel. Proceed to select your TV's user manual). SETUP DISPLAY AUDIO TOP MENU MENU/LIST ENTER CLEAR RETURN... completed all the necessary connections, press [I/y ON/STANDBY] to set language. RETURN: Exit Initial Setting. Turn on your TV. Or press "2" on the TV's remote control, then press channel down button repeatedly until you have made all the connections. INITIAL SETTING When you turn on the y unit. Initial Setting SKIP...

Owner's Manual - English
Page 36
...List" on the TV screen. BASIC RECORDING & ONE-TOUCH TIMER RECORDING Introduction 6 Press [REC I] to start . Press [PAUSE F]] or [REC I ] repeatedly until the desired recording time (30 minutes to 8 hours) appears on page 66.) e.g.) DVD+R/DVD-RW/-R Connections I ], recording starts immediately and continues until the ...operation may take awhile to see it on the remote control. • You cannot use the unit continuously. Press [DISPLAY] to be blank. • You cannot change the recording length during the recording pause mode. Playback Editing Note • When you...
...List" on the TV screen. BASIC RECORDING & ONE-TOUCH TIMER RECORDING Introduction 6 Press [REC I] to start . Press [PAUSE F]] or [REC I ] repeatedly until the desired recording time (30 minutes to 8 hours) appears on page 66.) e.g.) DVD+R/DVD-RW/-R Connections I ], recording starts immediately and continues until the ...operation may take awhile to see it on the remote control. • You cannot use the unit continuously. Press [DISPLAY] to be blank. • You cannot change the recording length during the recording pause mode. Playback Editing Note • When you...

Owner's Manual - English
Page 39
... E23-24 Unrecordable disc E25-28 Copy prohibited program E29 THU JAN/01 10:00AM L1/L2 L1 Some portion has not been recorded because of program overlapping. Timer Programming THU JAN/01 10:00AM Date JAN/02 Start End 1:00AM 2:00AM New Program L1/L2...to edit. Selection menu will appear. 2) Select "Yes", then press [ENTER]. • To stop the timer recording in progress 1) Press [STOP C] on the unit. TIMER RECORDING To stop the timer recording immediately, press [C STOP] on the remote control. Confirmation message will appear. 3 Use [K / L] to select "Yes", then press [ENTER]. 4-B) To ...
... E23-24 Unrecordable disc E25-28 Copy prohibited program E29 THU JAN/01 10:00AM L1/L2 L1 Some portion has not been recorded because of program overlapping. Timer Programming THU JAN/01 10:00AM Date JAN/02 Start End 1:00AM 2:00AM New Program L1/L2...to edit. Selection menu will appear. 2) Select "Yes", then press [ENTER]. • To stop the timer recording in progress 1) Press [STOP C] on the unit. TIMER RECORDING To stop the timer recording immediately, press [C STOP] on the remote control. Confirmation message will appear. 3 Use [K / L] to select "Yes", then press [ENTER]. 4-B) To ...
Owner's Manual - English
Page 45
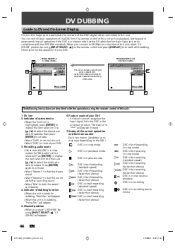
.... 5. When you wish to operate, then press [ENTER] to activate. • Select "DVD" to control this unit such as playback, fast forward or reverse and stop all operations if the DVC is compliance with after recording sound. • Select "Mix" to DV IN jack on the front of this unit... "****" will appear. 6. Switch the mode on the DVC): DVC is in stop mode, the "DV Audio" can control basic operations of the DVC from the remote control of your DVC. 3. Indicator of DVC. Press [ENTER] again to activate. • Select "Stereo1" to dub the stereo sound. • Select "...
.... 5. When you wish to operate, then press [ENTER] to activate. • Select "DVD" to control this unit such as playback, fast forward or reverse and stop all operations if the DVC is compliance with after recording sound. • Select "Mix" to DV IN jack on the front of this unit... "****" will appear. 6. Switch the mode on the DVC): DVC is in stop mode, the "DV Audio" can control basic operations of the DVC from the remote control of your DVC. 3. Indicator of DVC. Press [ENTER] again to activate. • Select "Stereo1" to dub the stereo sound. • Select "...
Owner's Manual - English
Page 46
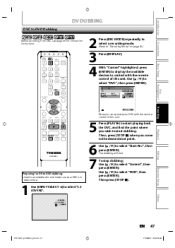
...DVC", then press [ENTER]. 1/ 1 1/ 1 -RW Control DV Audio Start Rec DVD Stereo1 VR ORG Disc Management SETUP DISPLAY AUDIO TOP MENU MENU/LIST L3 (DV-IN) AB-1234 0:12:34 ENTER CLEAR RETURN Recording XP 1:00 SKIP REV FWD SKIP Now you can operate your DVC is in video ... page 33.) Connections Press [DISPLAY]. To stop dubbing; DV DUBBING DVC to DVD Dubbing Before recording from DVC, see page 44 for DV to DVD dubbing: • Insert a recordable disc and make sure your DVC with the remote control of this unit. Basic Setup SPACE TIMER PROG. With "Control" highlighted,...
...DVC", then press [ENTER]. 1/ 1 1/ 1 -RW Control DV Audio Start Rec DVD Stereo1 VR ORG Disc Management SETUP DISPLAY AUDIO TOP MENU MENU/LIST L3 (DV-IN) AB-1234 0:12:34 ENTER CLEAR RETURN Recording XP 1:00 SKIP REV FWD SKIP Now you can operate your DVC is in video ... page 33.) Connections Press [DISPLAY]. To stop dubbing; DV DUBBING DVC to DVD Dubbing Before recording from DVC, see page 44 for DV to DVD dubbing: • Insert a recordable disc and make sure your DVC with the remote control of this unit. Basic Setup SPACE TIMER PROG. With "Control" highlighted,...

Owner's Manual - English
Page 89
...ratio to select "Yes" within 15 seconds at step 3, progressive scan remains to exit. If you with the higher definition images than 3 seconds during DVD playback. The feature provides you have a standard TV: Select "4:3 Letter Box", so that black bars appear on this feature, you have a widescreen... ON OFF GHI JKL MNO PQRS TUV SATELLITE LINK WXYZ SPACE TIMER PROG. 2) Use [{ / B] to "SETTINGS FOR THE VIDEO INPUT" on the unit or remote control within 15 seconds, then press [ENTER]. When you are playing back a disc. 1 2 3 4 5 90 Press [SETUP] and use the RCA video...
...ratio to select "Yes" within 15 seconds at step 3, progressive scan remains to exit. If you with the higher definition images than 3 seconds during DVD playback. The feature provides you have a standard TV: Select "4:3 Letter Box", so that black bars appear on this feature, you have a widescreen... ON OFF GHI JKL MNO PQRS TUV SATELLITE LINK WXYZ SPACE TIMER PROG. 2) Use [{ / B] to "SETTINGS FOR THE VIDEO INPUT" on the unit or remote control within 15 seconds, then press [ENTER]. When you are playing back a disc. 1 2 3 4 5 90 Press [SETUP] and use the RCA video...
Owner's Manual - English
Page 91
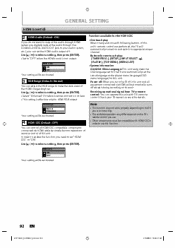
... this function. In order to enable the function you need to set the HDMI audio output off except during recording on and switch to appropriate input channel. Receiving operational signal from TV's remote control: You can operate this unit with HDMI-CEC in order to use this unit... must be activated. 4 HDMI CEC (Default : OFF) You can control all HDMI-CEC compatible components connected via HDMI will be compatible with TV's remote control. GENERAL SETTING HDMI (cont'd) 2 HDMI Audio (Default : ON) If you do not want to output the audio through HDMI (when you digitally...
... this function. In order to enable the function you need to set the HDMI audio output off except during recording on and switch to appropriate input channel. Receiving operational signal from TV's remote control: You can operate this unit with HDMI-CEC in order to use this unit... must be activated. 4 HDMI CEC (Default : OFF) You can control all HDMI-CEC compatible components connected via HDMI will be compatible with TV's remote control. GENERAL SETTING HDMI (cont'd) 2 HDMI Audio (Default : ON) If you do not want to output the audio through HDMI (when you digitally...
Owner's Manual - English
Page 93
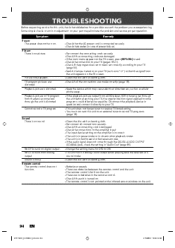
...page 90). • Switch the input selector on your TV (such as a cellular phone away. • If the playback picture output from a DVD player, VCR or tuner goes through the unit before reaching your part may eliminate the problem and restore proper operation. No DTS sound on . Symptom... TV, the copy-protection signal applied to some programs could affect picture quality. Cannot record a TV program. Sound There is no picture. No DTS sound from analog output Sound is distorted. Remote control The remote control does not function. 94 EN 2/5/2009 10:33:22 AM E7PCBUD_DKR40KU_EN.indd 94...
...page 90). • Switch the input selector on your TV (such as a cellular phone away. • If the playback picture output from a DVD player, VCR or tuner goes through the unit before reaching your part may eliminate the problem and restore proper operation. No DTS sound on . Symptom... TV, the copy-protection signal applied to some programs could affect picture quality. Cannot record a TV program. Sound There is no picture. No DTS sound from analog output Sound is distorted. Remote control The remote control does not function. 94 EN 2/5/2009 10:33:22 AM E7PCBUD_DKR40KU_EN.indd 94...


